background image

12

Before Using the Product

 Before Using the Product

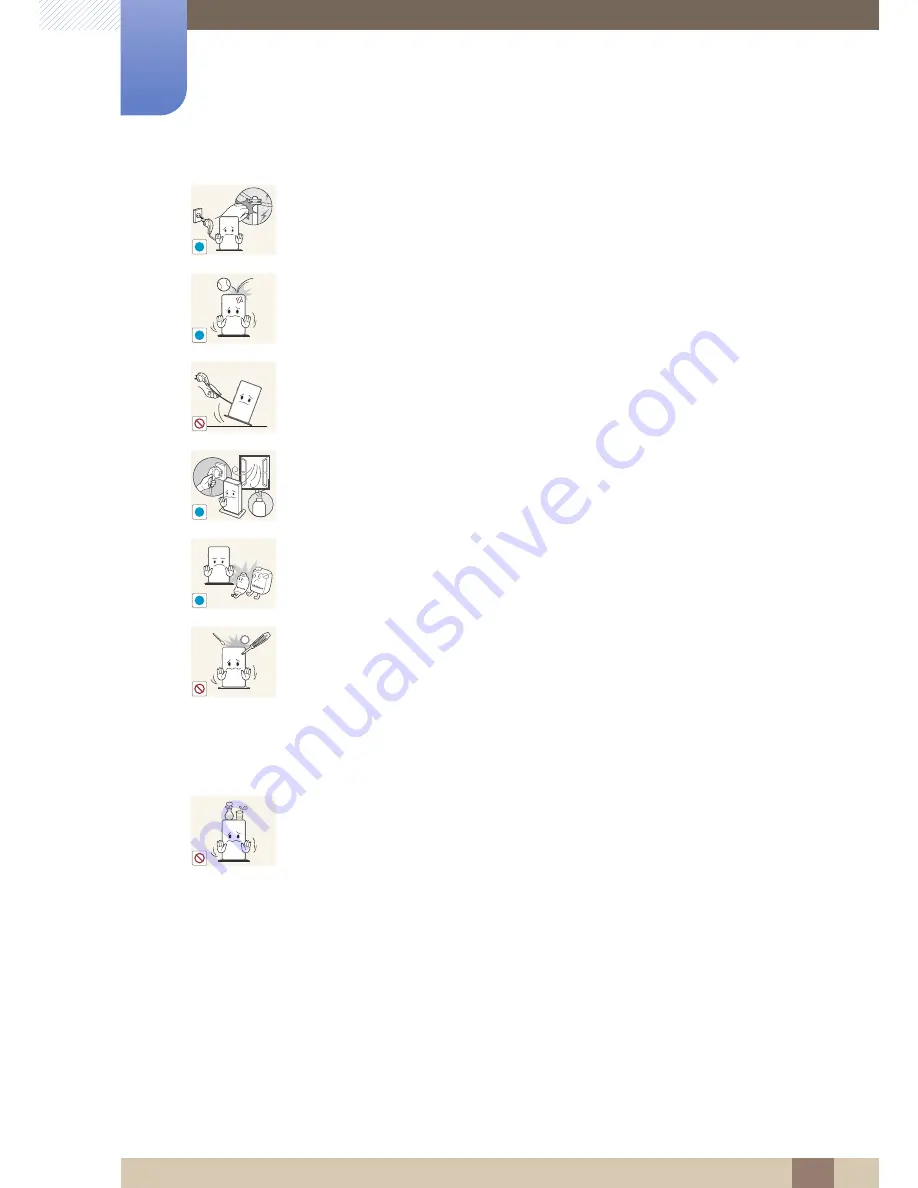
During a lightning or thunderstorm, power off the product and remove the power 

cable.

z

An electric shock or fire may result.

Do not drop objects on the product or apply impact.

z

An electric shock or fire may result.

Do not move the product holding only by the power cable or a signal cable.

z

Otherwise, the cable may be damaged and product failure, an electric shock 

or fire may result.

If a gas leakage is found, do not touch the product or power cable. Also, ventilate 

the area immediately.

z

Sparks can cause an explosion or fire.

Do not use or keep combustible spray or an inflammable substance near the 

product.

z

An explosion or fire may result.

Do not insert metallic objects such as a chopstick, coin or hair pin into the vent or 

ports of the product. Do not insert inflammable objects such as paper or a match 

into the vent or ports of the product.

z

If water or any foreign substance enters the product, be sure to power off the 

product, remove the power cable, and contact Samsung Customer Service 

Center (page 47).

z

Product failure, an electric shock or fire may result. 

Do not place objects containing liquid (vases, pots, bottles, etc) or metallic 

objects on top of the product.

z

If water or any foreign substance enters the product, be sure to power off the 

product, remove the power cable, and contact Samsung Customer Service 

Center (page 47). 

z

Product failure, an electric shock or fire may result.

!

!

!

GAS

!

100

Summary of Contents for TX-WN

Page 1: ...User Manual TX WN The color and the appearance may differ depending on the product and the specifications are subject to change without prior notice to improve the performance BN46 00302A 01 ...

Page 2: ...ARATIONS 15 Checking the Contents 15 Removing the Packaging 16 Checking the Components 18 Parts 18 Front view 20 Reverse Side 21 Installation 21 Attaching the cradle 22 Anti theft Lock USING WINDOWS EMBEDDED STANDARD 7 TX WN 23 What is Windows Embedded Standard 7 Client 24 Connection to Use Windows Embedded Standard 7 24 Before Connecting 25 Connection Using the DVI Cable 25 Connecting a Microphon...

Page 3: ...e 40 PXE 40 MagicRMS Pro Agent WIRELESS NETWORK OPTIONAL 41 Connecting to a wireless LAN using Windows 42 Successful wireless LAN connection 42 Failed wireless LAN connection 42 Failed to connect to a wireless LAN 42 Internet connection is not available 43 An AP is found but Internet access is not available TROUBLESHOOTING GUIDE 44 Requirements Before Contacting Samsung Customer Service Center 44 ...

Page 4: ...he Pay Service Cost to Customers 53 Not a product defect 53 A Product damage caused by customer s fault 53 Others 54 Correct Disposal 54 Correct Disposal of This Product Waste Electrical Electronic Equipment 54 Correct disposal of batteries in this product INDEX ...

Page 5: ...g Electronics Microsoft and Windows are registered trademarks of Microsoft Corporation VESA DPM and DDC are registered trademarks of the Video Electronics Standards Association z An administration fee may be charged if either a an engineer is called out at your request and there is no defect in the product i e where you have failed to read this user manual b you bring the unit to a repair centre a...

Page 6: ...ence only Real life situations may differ from what is shown in the images Warning A serious or fatal injury may result if instructions are not followed Caution Personal injury or damage to properties may result if instructions are not followed Activities marked by this symbol are prohibited Instructions marked by this symbol must be followed ...

Page 7: ...oduct Be sure to allow the amount of space as shown below or greater when installing the product z The exterior may differ depending on the product z This product can be installed in portrait or landscape orientation Precautions for storage For information on how to clean the inside of the product contact the service center first A service fee will be charged 10 cm 10 cm 10 cm 10 cm 10 cm 2 0 3 0 ...

Page 8: ...herwise an electric shock may result Insert the power cable all the way in so it is not loose z An unstable connection may cause a fire Ensure you connect the power cable to a grounded power socket type 1 insulated devices only z An electric shock or injury may result Do not bend or pull the power cable with force Do not weigh the power cable down with a heavy object z A damaged power cord may cau...

Page 9: ...pletely cut the power to the product z You cannot cut the power off completely using only the power button on the product Hold the plug when disconnecting the power cable from the power socket z An electric shock or fire may result DO NOT PLACE CANDLES INSECT REPELLANTS OR CIGARETTES ON TOP OF THE PRODUCT DO NOT INSTALL THE PRODUCT NEAR HEAT SOURCES z Otherwise a fire may result Avoid installing t...

Page 10: ...n electric shock or fire may result Do not expose the product to direct sunlight heat or a hot object such as a stove z Otherwise the product lifespan may be reduced or a fire may result Do not install the product within the reach of young children z The product may fall and injure children Edible oil such as soybean oil can damage or deform the product Do not install the product in a kitchen or n...

Page 11: ...he product on your own z An electric shock or fire may result z Contact Samsung Customer Service Center page 47 for repair Before moving the product turn off the power and disconnect the power cable and all other connected cables z Otherwise the power cord may be damaged and a fire or electric shock may result If the product generates a strange noise a burning smell or smoke remove the power cable...

Page 12: ...nflammable substance near the product z An explosion or fire may result Do not insert metallic objects such as a chopstick coin or hair pin into the vent or ports of the product Do not insert inflammable objects such as paper or a match into the vent or ports of the product z If water or any foreign substance enters the product be sure to power off the product remove the power cable and contact Sa...

Page 13: ...r before you use it z Otherwise a fire may result Do not let water enter the DC power adapter or get the adapter wet z An electric shock or fire may result z Avoid using the product outdoors where it can be exposed to rain or snow z Be careful not to get the DC power adapter wet when you wash the floor Do not put the DC power adapter near to any heating apparatus z Otherwise a fire may result Keep...

Page 14: ...roduct Do not place heavy objects on the product z Product failure or personal injure may result Do not increase the volume too high when using headphones earphones z Sound particularly at a higher volume could potentially affect long term hearing ...

Page 15: ...when you open the packaging with a sharp instrument 2 Remove the styrofoam from the product 3 Check the components and remove the styrofoam and plastic bag z The appearance of actual components may differ from the image shown z This image is for reference only 4 Store the box in a dry area so that it can be used when moving the product in the future ...

Page 16: ...ed the product if any item is missing z The appearance of the components and items sold separately may differ from the image shown Components Components may vary depending on the country Quick setup guide Warranty card Not available in some locations User Manual Product Power cable DC power adapter Cradle ...

Page 17: ...tions 1 1 Preparations Items sold separately The following items can be purchased at your nearest retailer LAN cable USB cable HDMI DVI cable DVI cable RS232C cable DVI RGB cable Mouse USB Keyboard MIC Headphone ...

Page 18: ...ve quality Ports Description Power on or off the product Connect to a microphone Connect to an audio output device such as headphones Connect to a USB device z Connect a device that supports USB 3 0 to the USB 3 0 port for optimal performance z Keyboard and mouse devices are required to connect to USB 2 0 z Wake up function is not supported on USB 3 0 ports 2 0 3 0 A 2 0 3 0 3 0 ...

Page 19: ...19 Preparations 1 1 Preparations Connect to a USB device Speaker Ports Description 2 0 A ...

Page 20: ...tion interface Connect to a network using the LAN cable Connect to the monitor using the DVI cable The port supports both digital and analog output To use an analog output connect a device to the port using a DVI RGB cable sold separately Connect to the monitor using the DVI cable The port only supports digital output Connect to the DC power adapter 2 0 SERIAL LAN DVI I OUT DVI D OUT DC 14V 2 0 SE...

Page 21: ...hing the cradle z The color and shape of parts may differ from what is shown Specifications are subject to change without notice to improve quality z This product can be installed in portrait or landscape orientation Vertical Type Horizontal Type 2 0 3 0 2 0 3 0 ...

Page 22: ... an anti theft locking device 1 Fix the cable of your anti theft locking device to a heavy object such as a desk 2 Put one end of the cable through the loop on the other end 3 Insert the locking device into the anti theft lock slot at the back of the product 4 Lock the locking device z An anti theft locking device can be purchased separately z Refer to the user guide provided with your anti theft ...

Page 23: ...ork between the client and server Connectable Servers z A Citrix XenDesktop Server Microsoft Windows 2000 2003 2008 Server where the Terminal Service and Citrix XenServer are installed z A VMWare View Client Server Microsoft Windows 2000 2003 2008 Server where the Terminal Service and VMWare Server are installed z A Microsoft RDP Remote Desktop Protocol Server Microsoft Windows 2000 2003 2008 Serv...

Page 24: ... on source devices may differ from device to device z Do not connect the power cable until all connections are completed Connecting the power cable during connection may damage the product z Check the types of ports at the back of the product you want to connect z The port names may vary depending on the monitor z For details on how to change the input source for your monitor refer to the monitor ...

Page 25: ...OUT on the product z The DVI I OUT port supports both digital and analog output To use an analog output connect a device to the port using a DVI RGB cable sold separately z The DVI D OUT port only supports digital output 2 2 3 Connecting a Microphone 1 Connect the microphone to on the front of the product 2 2 4 Connecting to Headphones 1 Connect the headphones to on the front of the product DVI IN...

Page 26: ...o the LAN port at the back of the product 2 2 6 Connecting USB Devices 1 Connect USB devices to 3 0 or 2 0 of the product z Connect a device that supports USB 3 0 to the USB 3 0 port for optimal performance z Wake up function is not supported on USB 3 0 ports z Keyboard and mouse devices are required to connect to USB 2 0 LAN 2 0 3 0 ...

Page 27: ...to improve quality z For details on how to connect the power cable to the monitor refer to the monitor user manual Connect the power cable to the DC power adapter Connect the DC power adapter to DC 14V on the product Connect the power cable to the power outlet and turn on the switch on the DC power adapter 2 0 SERIAL LAN DVI I OUT DVI D OUT 2 0 SERIAL LAN DVI I OUT DVI D OUT DC 14V VI I OUT DVI D ...

Page 28: ...andard User accounts for general users The audio volume icon Enhanced Write Filter status icon and system time are displayed on the Administrator Taskbar The Administrator privilege is required for adding and removing programs Log off Restart Shut down z To log off the current session shut down or restart your client use the Start menu Start Shut down The Shut Down Windows dialog box is displayed ...

Page 29: ...ternet connection When running a remote desktop on Windows 7 Professional you cannot use the operating system of your computer z Enabling Your Computer as the Host You must enable the Remote Desktop feature to control it from another computer You must be logged on as an Administrator or a member of the Administrators group to enable Remote Desktop on your computer Follow these steps 1 Open the Sys...

Page 30: ...t software on a Windowsbased client computer you are ready to start a Remote Desktop session You must first establish a virtual private network connection or remote access service connection from your client computer to your host computer To connect to another remote desktop follow the instructions below 1 Go to Start All Programs Accessories Remote Desktop Connection or double click the Remote De...

Page 31: ...information for the host computer To log in automatically enter in the user name and password Display The Remote Desktop Connection sends and receives compressed screen data If you set the resolution and color quality to the high option the speed may become slow Local Resources Specify whether to use the hard disks and ports ...

Page 32: ...rams Select an application and specify the folder where you want to run the application when a connection is established to the host PC Experience Specify the connection speed and the menu items you want to use on the remote PC connected The settings specified will be shared with the host PC ...

Page 33: ... Click Connect The Log On to Windows dialog box appears 5 In the Log On to Windows dialog box type your username password and domain if required and then click OK The Remote Desktop window will open and you will see the desktop settings files and programs that are on the host computer For more information on Remote Desktop Connections visit the Microsoft web site ...

Page 34: ...when it is not possible to write to the cache due to a lack of memory If this message is displayed you have to deactivate EWF to flush the EWF cache The user can double click the EWF icon on the tray at the bottom right of the screen to call the EWF Manager A user can also change the EWF configuration by entering EWF management commands at the command prompt This task requires the Administrator pr...

Page 35: ...to the disk using the commit command If you don t know which file is changed disable the FBWF change it and enable it again You can control the FBWF using the various options of the command at a command prompt z FBWF Configuration Current FBWF status Displays the current status of the FBWF Enabled or Disabled Boot command Displays the FBWF command that will be performed at the next boot up RAM Use...

Page 36: ...he system The client OS will not operate if space available on the system drive is not sufficient Ensure sufficient space is available on the C drive EWF can help maintain available space by preventing the C drive being written to directly z Saving Files Your client uses a fixed size of flash memory Therefore it is better to save files to the server rather than to your client Mapping a Network Dri...

Page 37: ...l necessary files to USB memory and boot up with the backed up system on the USB memory and recover the system 1 Format the USB memory device to enable the system to boot 2 Save the Windows Embedded Standard image and the Backup Recovery Utility which will be recovered later to your USB memory 3 Boot up with the USB memory 4 Recover the system using the Windows Embedded Standard image and the Back...

Page 38: ...er admin which is the password 3 Run the Recovery Mode menu by pressing the Enter key 4 If the PROMPT root xxxxx appears enter recovery to restore the system 5 If PROMPT appears after a message informing that the system is successfully restored run the reboot command to restart the system DISK is configured as follows Deleting or changing partitions may disable booting or the Standalone restore so...

Page 39: ...specific conditions To use the MagicRMS Pro Solution or MagicRMS Pro Agent and to view the user guide visit www samsunglfd com Go to Support Download Center and search for MagicRMS to download 2 4 2 Components MagicRMS Pro consists of MagicRMS Pro Server MagicRMS Pro Database MagicRMS Pro Console and PXE MagicRMS Pro manages network monitors by interacting with the MagicRMS Pro Agent MagicRMS Pro ...

Page 40: ...ge network monitors 2 4 5 MagicRMS Pro Console Manage network monitors and organize task requests using the Console 2 4 6 PXE PXE is a standard protocol that allows the Server and Client to communicate to enable the Client to boot over a network using DHCP and TFTP Booting the system over a network enables a Diskless booting where the system can be operated regardless of the operating system It al...

Page 41: ...AN access method provided by Windows 1 Click the Network connection icon on the task bar Select an AP to connect from the displayed list of available APs The Connect button appears 2 Click Connect If the network key is configured for the AP to connect enter the network key and click Connect To obtain the network key contact the network manager 3 Use the wireless network as desired AP list ...

Page 42: ...less LAN The mark in place of the wireless LAN icon on the task bar indicates that the wireless LAN is disabled or there is no AP nearby The mark can also means that the wireless LAN is disconnected 3 3 2 Internet connection is not available The mark in place of the wireless LAN icon on the task bar indicates that Internet access is not available In this case make sure the network address is corre...

Page 43: ... found but Internet access is not available This issue may occur when a higher priority is given to a wireless LAN AP with low signal strength Click an AP with higher signal strength and try again Currently connected AP signal strength is low AP that has high signal strength ...

Page 44: ...oduct cannot power on Check that the power cable is connected properly Refer to 2 2 7 Connecting the Power Sound issue There is no sound Check the connection of the audio cable or adjust the volume Check the volume The volume is too low Adjust the volume If the volume is still low after turning it up to the maximum level adjust the volume in the audio settings program ...

Page 45: ...g 2 0 lb Without cradle 210 X 47 5 X 122 mm 8 3 X 1 9 X 4 8 inches 867g 1 9 lb Cradle 91 8 X 13 X 166 3 mm 3 6 X 0 5 X 6 5 inches 40g 0 09 lb USB USB 2 0 x 4 Down stream USB 3 0 x 2 Down stream Environmental considerations Operating Temperature 50 F 104 F 10 C 40 C Humidity 10 80 non condensing Storage Temperature 4 F 113 F 20 C 45 C Humidity 5 95 non condensing Recommendation EU Only z Hereby Sam...

Page 46: ...ble USA only Dispose unwanted electronics through an approved recycler To find the nearest recycling location go to our website www samsung com recyclingdirect or call 877 278 0799 CALIFORNIA USA ONLY Applicable for networking models only This Perchlorate warning applies only to primary CR Manganese Dioxide Lithium coin cells in the product sold or distributed ONLY in California USA Perchloate Mat...

Page 47: ...http www samsung com BOLIVIA 800 10 7260 http www samsung com BRAZIL 0800 124 421 4004 0000 http www samsung com CHILE 800 SAMSUNG 726 7864 From mobile 02 482 82 00 http www samsung com COLOMBIA 01 8000112112 http www samsung com COSTA RICA 0 800 507 7267 http www samsung com latin Spanish http www samsung com latin_en English DOMINICA 1 800 751 2676 http www samsung com latin Spanish http www sam...

Page 48: ...com latin_en English PERU 0 800 777 08 http www samsung com PUERTO RICO 1 800 682 3180 http www samsung com TRINIDAD TOBAGO 1 800 SAMSUNG 726 7864 http www samsung com VENEZUELA 0 800 100 5303 http www samsung com EUROPE AUSTRIA 0810 SAMSUNG 7267864 0 07 min http www samsung com BELGIUM 02 201 24 18 http www samsung com be Dutch http www samsung com be_fr French BOSNIA 05 133 1999 http www samsung...

Page 49: ... http www samsung com LATVIA 8000 7267 http www samsung com LITHUANIA 8 800 77777 http www samsung com LUXEMBURG 261 03 710 http www samsung com MACEDONIA 023 207 777 http www samsung com MONTENEGRO 020 405 888 http www samsung com NETHERLANDS 0900 SAMSUNG 0900 7267864 0 10 Min http www samsung com NORWAY 815 56480 http www samsung com POLAND 0 801 1SAMSUNG 172 678 48 22 607 93 33 http www samsung...

Page 50: ... 8 10 800 500 55 500 GSM 7799 http www samsung com KYRGYZSTAN 00 800 500 55 500 http www samsung com MOLDOVA 0 800 614 40 http www samsung com MONGOLIA 7 800 555 55 55 http www samsung com RUSSIA 8 800 555 55 55 http www samsung com TADJIKISTAN 8 10 800 500 55 500 http www samsung com UKRAINE 0 800 502 000 http www samsung com ua Ukrainian http www samsung com ua_ru Russian UZBEKISTAN 8 10 800 500...

Page 51: ... 1 800 8 SAMSUNG 726 7864 for Globe 02 5805777 http www samsung com SINGAPORE 1800 SAMSUNG 726 7864 http www samsung com TAIWAN 0800 329 999 0266 026 066 http www samsung com THAILAND 1800 29 3232 02 689 3232 http www samsung com VIETNAM 1 800 588 889 http www samsung com MIDDlE EAST BAHRAIN 8000 4726 http www samsung com ae English http www samsung com ae_ar Arabic EGYPT 08000 726786 http www sam...

Page 52: ...64 http www samsung com BOTSWANA 0800 726 000 http www samsung com CAMEROON 7095 0077 http www samsung com COTE D IVOIRE 8000 0077 http www samsung com GHANA 0800 10077 0302 200077 http www samsung com KENYA 0800 724 000 http www samsung com NAMIBIA 8197267864 http www samsung com NIGERIA 0800 726 7864 http www samsung com SENEGAL 800 00 0077 http www samsung com SOUTH AFRICA 0860 SAMSUNG 726 7864...

Page 53: ...f customer requests software installation and setup for the product z If a service technician removes cleans dusts or foreign materials inside of the product z If customer requests an installation additionally after purchasing a product through home shopping or online A Product damage caused by customer s fault Product damage caused by customer s mishandling or wrong repair If a product damage is ...

Page 54: ...ke these items for environmentally safe recycling Business users should contact their supplier and check the terms and conditions of the purchase contract This product and its electronic accessories should not be mixed with other commercial wastes for disposal Applicable in countries with separate collection systems The marking on the battery manual or packaging indicates that the battery in this ...

Page 55: ...yright 5 Correct Disposal 54 G General 45 I Installation 21 P Parts 18 Power consumption 46 R Requirements Before Contacting Samsung Customer Service Center 44 Responsibility for the Pay Service Cost to Customers 53 S Safety Precautions 8 U Using Windows Embedded Standard 7 28 W What is Windows Embedded Standard 7 Client 23 ...

Reviews: