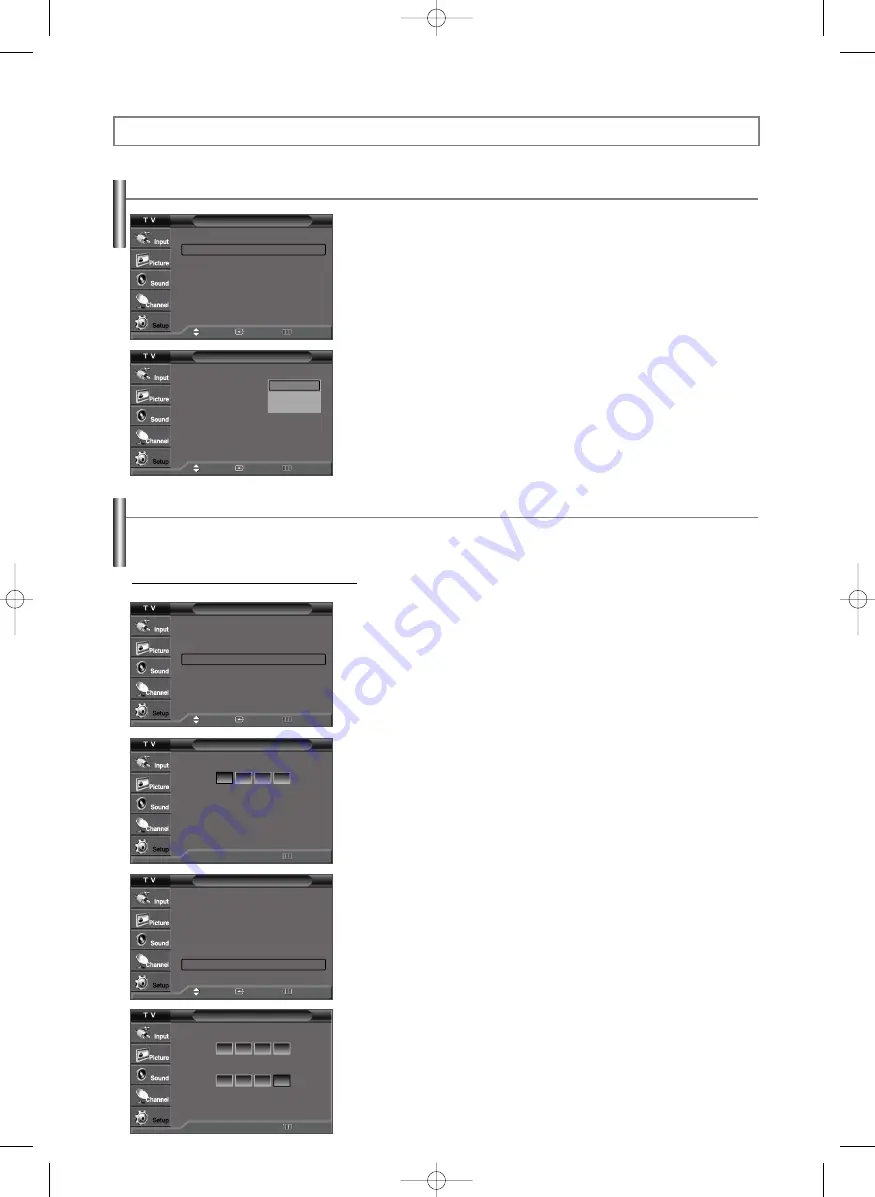
Samsung TX-R3080WH Owner'S Instructions Manual Download Page 38

English-38

Change PIN

Enter New PIN.

* * * *

Confirm New PIN.

* * *

V-Chip

V-Chip Lock

: Off

TV Parental Guidelines

MPAA Rating

Canadian English 

Canadian French 

Downloadable U.S. Rating

Change PIN

Move

Enter

Return

Return

0~9

0~9 Enter PIN

Selecting a Menu Language

1.

Press the 

MENU

button to display the menu.

Press the 

or 

button to select “Setup”, then press the 

ENTER

button.

Press the 

or 

button to select “Language”, then press the 

ENTER

button.

2.

Press the 

or 

button to select the appropriate language: “English”,

“Español” or “Français”, then press the 

ENTER

button.

Press the 

EXIT

button to exit.

Function Description

Setup

Plug & Play

Language

: English

Time

V-Chip

Caption

Menu Transparency:  Medium

Blue Screen

: Off

Function Help

: On

Move

Enter

Return

Setup

Plug & Play

Language

: English

Time
V-Chip
Caption
Menu Transparency:  Medium
Blue Screen

: Off

Function Help

: On

English

Español
Français

Move

Enter

Return

Using the V-Chip

The V-Chip feature automatically locks out programs that are deemed inappropriate for children. The user must enter a PIN (personal
ID number) before any of the V-Chip restrictions are set up or changed.

Setting Up Your Personal ID Number (PIN)

1.

Press the 

MENU

button to display the menu.

Press the 

or 

button to select “Setup”, then press the 

ENTER

button.

2.

Press the 

or 

button to select “V-Chip”, then press the 

ENTER

button.

The message “Enter PIN” will appear. Enter your 4 digit PIN number.

The default PIN number of a new TV set is “0-0-0-0”.

3.

The “V-Chip” screen will appear. 
Press the 

or 

button to select “Change PIN”, then press the 

ENTER

button. 

The Change PIN screen will appear. Choose any 4 digits for your PIN and enter
them.
As soon as the 4 digits are entered, the “Confirm new PIN” screen appears.
Re-enter the same 4 digits. When the Confirm screen disappears, your PIN has
been memorized.

Press the 

EXIT

button to exit.

If you forget the PIN, press the remote control buttons in the following sequence, which
resets the pin to 0-0-0-0 : Power Off. 

MUTE 

Power On.

Setup

Plug & Play

Language

: English

Time

V-Chip

Caption

Menu Transparency:  Medium

Blue Screen

: Off

Function Help

: On

Move

Enter

Return

V-Chip

Enter PIN.

Return

0~9

0~9 Enter PIN

Continued...

AA68-03782A-03Eng(V-Chip)  6/14/06  10:49 AM  Page 38

Summary of Contents for TX-R3080WH

Page 1: ...er s Instructions COLOR TELEVISION TX R3079WH TX R3080WH TX R3081WH TX S2782H TX S2779H TX S3082WH Register your product at www samsung com global register AA68 03782A 03Eng V Chip 6 14 06 10 48 AM Page 1 ...

Page 2: ... on non expanded standard format television video and programming should be limited to no more than 15 of the total television viewing per week Additionally viewing other stationary images and text such as stock market reports video game displays station logos web sites or computer graphics and patterns should be limited as described above for all televisions Displaying any stationary images that ...

Page 3: ...NTROL Using Automatic Picture Settings 24 Changing the Screen Size 25 Tilt 26 Setting the Film Mode 26 SOUND CONTROL Using Automatic Sound Settings 26 Customizing the Sound 27 Setting the SRS TruSurround XT 27 Automatic Volume Control 28 Choosing a Multi Channel Sound MTS track Digital 28 Choosing a Multi Channel Sound MTS track Analog 29 Setting the On Off Melody 29 CHANNEL CONTROL Selecting the ...

Page 4: ...yers Set top boxes Cable Boxes and VCRs SRS TruSurround XT SRS TruSurround XT provides a virtual Dolby surround system Accessories Please make sure the following items are included with your TV If any items are missing contact your dealer The following parts are sold separately and are available at most electronics stores Remote Control AA59 00381A AAA Batteries Owner s Instructions Safety Guide M...

Page 5: ... use the ENTER button on the remote control 2 MENU Press to see an on screen menu of your TV s features 3 VOL Press to increase or decrease the volume In the on screen menu use the VOL buttons as you would use the œ and buttons on the remote control 4 CH Press to change channels In the on screen menu use the CH buttons as you would use the and buttons on the remote control 5 Power Indicator Blinks...

Page 6: ...ital Audio component 6 HDMI IN TX S2779H TX R3079WH HDMI 1 2 IN TX S2782H TX R3080WH TX R3081WH TX S3082WH Connect to the HDMI jack of a device with an HDMI output 7 ANT 1 IN AIR ANT 2 IN CABLE Connect to an antenna air or cable TV system 1 S VIDEO IN S Video input for external devices with an S Video output 2 AV IN 2 Video and audio inputs for external devices such as a camcorder or VCR Viewing t...

Page 7: ...DD DEL Use to store and delete channels to from memory SET Sets the remote to control your TV VCR Cable DVD or Set Top Box TV DVD STB CABLE VCR Press to operate your TV DVD STB CABLE box or VCR SOURCE Press to display all of the available video sources PRE CH Tunes to the previous channel FAV CH Press to switch to your favorite channels a SLEEP Press to select a preset time interval for automatic ...

Page 8: ... adapter not supplied Use a screwdriver to tighten the screws 2 Plug the adaptor into the ANT 1 IN AIR terminal on the back of the TV If your antenna has a set of leads that look like this see Antennas with 300 Ω Flat Twin Leads below If your antenna has one lead that looks like this see Antennas with 75 Ω Round Leads If you have two antennas see Separate VHF and UHF Antennas Antennas with 300 Ω F...

Page 9: ...A B Switch Incoming cable Splitter Cable Box Incoming cable Splitter Cable Box Incoming cable Connecting to a Cable Box that Descrambles Some Channels If your cable box descrambles only some channels such as premium channels follow the instructions below You will need a two way splitter an RF A B switch and four lengths of Antenna cable These items are available at most electronics stores 1 Find a...

Page 10: ... VCR Your Samsung TV can be connected to an S Video signal from an S VHS VCR This connection delivers a better picture as compared to a standard VHS VCR 1 To begin follow steps 1 3 in the previous section to connect the antenna or cable to your VCR and your TV 2 Connect an S Video Cable between the S VIDEO OUT jack on the VCR and the AV IN2 S VIDEO jack on the TV 3 Connect Audio Cables between the...

Page 11: ...ot supplied or S Video Cable Not supplied 1 2 1 Each external input source device has a different back panel configuration When connecting an external device match the color of the connection terminal to the cable Connecting a DVD Player Set Top Box The rear panel jacks on your TV make it easy to connect a DVD player Set Top Box to your TV 1 Connect a Component Cable between the COMPONENT IN 1 Y P...

Page 12: ...The difference between HDMI and DVI is that the HDMI device is smaller in size has the HDCP High Bandwidth Digital Copy Protection coding feature installed and supports multi channel digital audio Each external input source device has a different back panel configuration When connecting an external device match the color of the connection terminal to the cable When connecting via HDMI you do not n...

Page 13: ... ENTER button then Select the language of the OSD menu is automatically displayed 2 Press the ENTER button to enter the language Press the or button to select language then press the ENTER button Select the antennas to memorize menu is automatically displayed 3 Press the or button to memorize the channels of the selected connection Press the ENTER button to select Start If the antenna is connected...

Page 14: ...essing the number buttons on the remote control 7 The message Enjoy your watching is displayed When you have finished press the ENTER button Even if the ENTER button is not pressed the message will automatically disappear after several seconds 8 Press the ENTER button Press the or button to select On or Off then the ENTER button Select the time zone where you are located menu is automatically disp...

Page 15: ...en two channels that are far apart tune to one channel then use the number button to select the second channel Then use the PRE CH button to quickly alternate between them Using the PRE CH Button to select the Previous Channel Setup Plug Play Language English Time V Chip Caption MenuTransparency Medium Blue Screen Off Function Help On Move Enter Return Menu language Channels and Time will be set S...

Page 16: ...FO button once more or wait approximately 10 seconds and it disappears automatically The display identifies the current channel and the status of certain audio video settings Air 13 Mono Picture Mode Dynamic Sound Mode Custom MTS Stereo Caption Off V Chip Off NoTime Information Viewing the Menus Input Source List TV Edit Name Move Enter Return 1 With the power on press the MENU button The main men...

Page 17: ...ager Name FineTune Signal Strength Move Enter Return Auto Program Select the antennas to memorize Air Cable Air Cable Start Start Start Memorizing the Channels Your TV can memorize and store all of the available channels for both off air air and cable channels After the available channels are memorized use the CH or CH button to scan through the channels This eliminates the need to change channels...

Page 18: ... Box Pressing the corresponding button on the remote control allows you to switch between these modes and control whichever piece of equipment you choose The remote control might not be compatible with all DVD Players VCRs Cable boxes and Set Top Boxes Setting Up the Remote control to Operate Your Cable Box 1 Turn off your cable box 2 Press the CABLE button on your TV s remote control 3 Press the ...

Page 19: ...control is in DVD mode the volume buttons still control your TV s volume Setting Up the Remote control to Operate Your Set Top Box 1 Turn off your STB 2 Press the STB button on your TV s remote control 3 Press the SET button on your TV s remote control 4 Using the number buttons on your remote control enter three digits of the STB code listed on page 21 of this manual for your brand of STB Make su...

Page 20: ... 021 056 059 007 008 018 021 026 037 062 006 036 073 074 075 076 021 006 021 024 025 034 005 019 041 075 Brand MITSUBISHI MONTGOMERY WARD MTC MULTITECH NEC OPTIMUS PANASONIC PENTAX PENTEX RESEARCH PHILCO PHILIPS PIONEER PORTLAND PROSCAN QUARTZ QUASAR RADIOSHACK REALISTIC RCA SANSUI SANYO SCOTT SEARS SHARP SHIMTOM SIGNATURE SONY SYLVANIA SYMPHONIC TANDY TASHIKA TATUNG TEAC TECHNICS TEKNIKA TMK TOSH...

Page 21: ...OP BOX Code 023 043 018 034 019 035 015016017019022045060061062065066067 068 074 069 070 069 018 024 032 027 025 069 070 071 069 069 065 046 047 048 063 064 069 056 022 015 017 020 020 059 063 069 070 Brand ALPHASTAR ANAM CHANNEL MASTER CROSSDIGITAL CHAPARRAL DIRECT TV DAEWOO DISHNETWORKSYSTEM DISHPRO DRAKE DX ANTENNA ECHOSTAR EXPRESSVU GOI GE GENERALINSTRUMENT HTS HOME CABLE HITACHI HUGHES NETWOR...

Page 22: ...SION DAEWOO DENON FARENHEIT FISHER GPX GO VIDEO GE GREENHILL HITACHI HITEKER HOYO HARMAN KARDON IRT INTEGRA JBL JVC JATON KENWOOD KISS KONKA KLH LG Goldstar LOEWE LASONIC MOBILE AUTHORITY MEMOREX MALATA MAGNAVOX MINTEK MONYKA Brand NORCENT NEXT BASE NEC NANTAUS NESA OPTOMEDIA ELECTRONICS OPTIVIEW ONKYO PHILCO PRINCETON PROSCAN PANASONIC PHILIPS ROTEL RIO RCA RAITE ROWA SAMPO SONY SHERWOOD SVA SYLV...

Page 23: ... 2 TX S2782H TX R3080WH TX R3081WH TX S3082WH input jack then press the ENTER button 3 Press the or button to select VCR DVD D VHS Cable STB HD STB Satellite STB PVR STB AV Receiver DVD Receiver Game Camcorder DVD Combo DHR Internet TV Recv Interactive TV Recv VOD STB or TV input source then press the ENTER button Press the EXIT button to exit 1 Press the MENU button to display the menu Press the ...

Page 24: ...ote control to select one of the standard picture settings 3 Press the or button to select Contrast Brightness Sharpness Color or Tint then press the ENTER button 4 Press the œ or button to decrease or increase the value of a particular item Each adjusted setting will be stored separately according to its input mode When you make changes to Contrast Brightness Sharpness Color or Tint OSD color wil...

Page 25: ...0 ColorTone Cool1 Reset Move Enter Return Screen size selection depends on the type of video input 1 Press the MENU button to display the menu Press the or button to select Picture then press the ENTER button 2 Press the or button to select Size then press the ENTER button 3 Press the or button to select the screen format you want then press the ENTER button Press the EXIT button to exit Press the...

Page 26: ...cture then press the ENTER button 2 Press the or button to select Film Mode then press the ENTER button 3 Press the or button to select Off or On then press the ENTER button Press the EXIT button to exit Picture Mode Dynamic Size 16 9 Tilt Film Mode Off Move Enter Return Picture Mode Dynamic Size 16 9 Tilt Film Mode Off Move Enter Return Using Automatic Sound Settings Your TV has automatic sound s...

Page 27: ...nnel content over two speakers TruSurround delivers a compelling virtual surround sound experience through any two speaker playback system including internal television speakers It is fully compatible with all multichannel formats 1 Press the MENU button to display the menu Press the or button to select Sound then press the ENTER button 2 Press the or button to select SRS TruSurround XT then press...

Page 28: ...system is capable of simultaneous transmission of many audio tracks for example simultaneous translations of the program into foreign languages The availability of these additional multitracks depends upon the program Preferred Language 1 Press the MENU button to display the menu Press the or button to select Sound then press the ENTER button 2 Press the or button to select Multi Track Options the...

Page 29: ... to exit Press the MTS button on the remote control repeatedly to select Mono Stereo or SAP Sound Mode Custom Equalizer SRSTruSurround XT Off Auto Volume Off Multi Track Options Melody On Move Enter Return Multi Track Options Preferred Language English Multi Track Sound Streo Move Enter Return Mono Stereo SAP 1 Press the MENU button to display the menu Press the or button to select Sound then pres...

Page 30: ...ess the ENTER button 3 Press the ENTER button to select All 4 Press the or button to select a channel to delete then press the ENTER button Press the or button to select Delete then press the ENTER button to delete the channel You can add or delete a channel to display the channels you want only To use the Channel Manager function first run Auto Program see page 17 Channel Antenna Air Auto Program...

Page 31: ...avorite channels All favorite channels will be shown on Favorite menu To select the favorite channels you have set up press the FAV CH button on the remote control You can set channels you watch frequently as favorites Channel Antenna Air Auto Program Channel Manager Name FineTune Signal Strength Move Enter Return Channel Manager All Added Favorite Default List Mode All Move Enter Return Channel M...

Page 32: ... Default List Mode All Move Enter Return Channel Antenna Air Auto Program Channel Manager Name FineTune Signal Strength Move Enter Return Channel Manager All Added Favorite Default List Mode All Move Enter Return All Added Favorite 1 Press the MENU button to display the menu Press the or button to select Channel then press the ENTER button 2 Press the or button to select Channel Manager then press...

Page 33: ...corresponding label information will also be added or deleted Fine Tuning Analog Channels Use fine tuning to manually adjust a particular channel for optimal reception 1 Press the MENU button to display the menu Press the or button to select Channel then press the ENTER button 2 Press the or button to select Fine Tune then press the ENTER button 3 Press the œ or button to adjust the fine tuning 4 ...

Page 34: ...on on the remote control to check the signal strength Using the R Surf Feature This feature allows you to set the TV to return to a particular channel after a certain amount of time For example you may be watching a channel when commercials start You can set the R Surf to 5 minutes then switch channels After 5 minutes the TV will return to the original channel To use the R Surf feature 1 While you...

Page 35: ...onth Day Year Hour Minute or am pm Set the date and time you want by pressing the or button then press the ENTER button Press the EXIT button to exit The current time will appear every time you press the INFO button You can set the month day year hour and minute directly by pressing the number buttons on the remote control Time Setting Setup Plug Play Language English Time V Chip Caption MenuTrans...

Page 36: ...ly If this occurs set the time manually Air or cable must be connected in order to set the time automatically NewFoundland Atlantic Eastern Central Mountain Pacific Alaska Hawaii Setup Plug Play Language English Time V Chip Caption MenuTransparency Medium Blue Screen Off Function Help On Move Enter Return Time Clock SleepTimer Off OnTimer Inactivated OffTimer Inactivated Clock Clock Mode Manual Cl...

Page 37: ...he ENTER button 5 Press the or button to set the hour then press the button to move to the next step Set other items using the same method as above Press the EXIT button to exit Auto Power Off When you set the timer On the TV will eventually turn off if no controls are operated for 3 hours after the TV was turned on by timer This function is only available in timer On mode and prevents overheating...

Page 38: ... The user must enter a PIN personal ID number before any of the V Chip restrictions are set up or changed Setting Up Your Personal ID Number PIN 1 Press the MENU button to display the menu Press the or button to select Setup then press the ENTER button 2 Press the or button to select V Chip then press the ENTER button The message Enter PIN will appear Enter your 4 digit PIN number The default PIN ...

Page 39: ...ating Change PIN Move Enter Return Off On How to Set up Restrictions Using the TV Parental Guidelines First set up a personal identification number PIN and enable the V Chip See previous section Parental restrictions can be set up using either of two methods The TV guidelines or the MPAA rating 1 Press the MENU button to display the menu Press the or button to select Setup then press the ENTER but...

Page 40: ...tings in TV 14 and TV MA will automatically be blocked 7 Press the EXIT button to clear all the screens Or proceed to the next section and set up additional restrictions based on the MPAA codes These categories consist of two separate groups TV Y and TV Y7 young children through age 7 and TV G through TV MA everybody else The restrictions for these two groups work independently If a household incl...

Page 41: ... While is selected press the ENTER button to block or unblock the category Press the EXIT button to exit Allow all Press to unlock all TV ratings Block all Press to lock all TV ratings The V Chip will automatically block any category that is more restrictive For example if you block the PG 13 category then R NC 17 and X will automatically be blocked also Setup Plug Play Language English Time V Chi...

Page 42: ...nadian English 1 Press the MENU button to display the menu Press the or button to select Setup then press the ENTER button 2 Press the or button to select V Chip then press the ENTER button The message Enter PIN will appear Enter your 4 digit PIN number 3 The V Chip screen will appear Press the or button to select Canadian English then press the ENTER button 4 Press the or button to select a appro...

Page 43: ...utton to select Canadian French then press the ENTER button 4 Press the or button to select a appropriate restriction Press the ENTER button to activate the restriction selected The symbol is indicated Allow all Press to unlock all TV ratings Block all Press to lock all TV ratings The V Chip will automatically block any category that is more restrictive For example if you block 8 ans category then...

Page 44: ...ivate the restriction selected The symbol is indicated Press the EXIT button to exit Allow all Press to unlock all TV ratings Block all Press to lock all TV ratings Parental restriction levels differ depending on the broadcasting station The default menu name and Downloadable US rating changes depending on the downloaded information Even if you set the On screen display to your desired language th...

Page 45: ...ue Screen Off Function Help On Move Enter Return Caption Caption Off Caption Mode Default Caption Options Default Service1 Service2 Service3 Service4 Service5 Service6 CC1 Caption Caption Off Caption Mode Default Caption Options Off On Move Enter Return Move Enter Return Caption Caption Off Caption Mode Default Caption Options Move Enter Return Caption Options Size Default Font Style Default Foreg...

Page 46: ...n to select Caption then press the ENTER button 3 Press the ENTER button to select Caption Press the or button to select On then press the ENTER button 4 Press the or button to select Caption Mode then press the ENTER button Press the or button to select the submenu CC1 CC4 or Text1 Text4 you want then press the ENTER button Press the EXIT button to exit The default is CC1 The availability of capt...

Page 47: ...Off Function Help On Move Enter Return Setup Plug Play Language English Time V Chip Caption MenuTransparency Medium Blue Screen Off Function Help On Move Enter Return Setup Plug Play Language English Time V Chip Caption MenuTransparency Medium Blue Screen Off Function Help On Move Enter Return High Medium Low Opaque Setup Plug Play Language English Time V Chip Caption MenuTransparency Medium Blue ...

Page 48: ...e the remote has batteries Check that the and ends of the batteries are inserted correctly Please check the digital signal strength and input antenna Adjust the Brightness and Contrast Adjust the Fine tuning The visual qualities of digital channels may vary depending on the original production method analog or digital If the original production method is digital High visual quality program If the ...

Page 49: ...This page is intentionally left blank AA68 03782A 03Eng V Chip 6 14 06 10 49 AM Page 49 ...

Page 50: ...This page is intentionally left blank AA68 03782A 03Eng V Chip 6 14 06 10 49 AM Page 50 ...

Page 51: ...This page is intentionally left blank AA68 03782A 03Eng V Chip 6 14 06 10 49 AM Page 51 ...

Page 52: ...864 1 800 SAMSUNG 7267864 Web Site www samsung com ca www samsung com Address Samsung Electronics Canada Inc Customer Service 55 Standish Court Mississauga Ontario L5R 4B2 Canada Samsung Electronique Canada Inc Service à la Clientèle 55 Standish Court Mississauga Ontario L5R 4B2 Canada Samsung Electronics America Inc 105 Challenger Road Ridgefield Park NJ 07660 0511 AA68 03782A 03Eng V Chip 6 14 0...

Reviews: