background image

English · 

9

0

3

V

iewing Mode Display

1. 

Press [

MENU

] button to enter the menu setting or exit the menu setting.

2. 

Move to other menu by press [

_

] or [

+

] button.

3. 

Adjust option level by [

$

] or [

%

] button.

4. 

Press [ 


] button to save and complete.


n


`

If no action more than 20sec, it will be time out back to monitor mode with save.

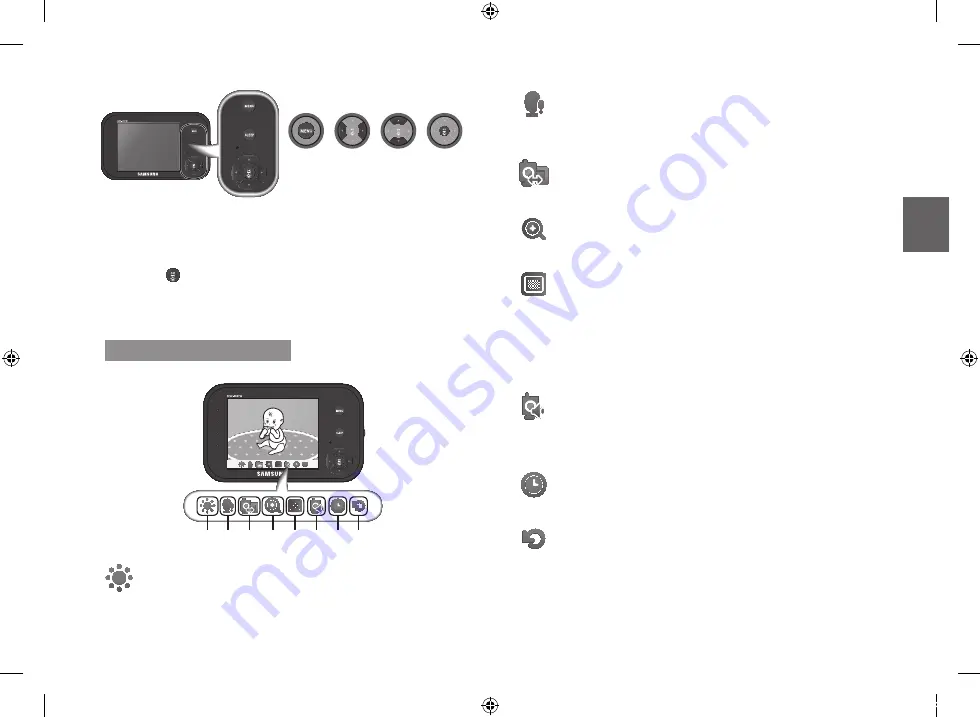
How to use the setup icon

a b

e f g h

c d

a

   Brightness

Adjusts the brightness of the image shown. If you are using multiple camera, 
you can adjust the brightness of each individual camera.

b

  Camera VOX Sensitivity

If not in “

VOX

” mode, “

OFF

” is displayed and not to be selected. 

In VOX mode, you can select “

H

” (High) or “

L

” (Low). If set to “

H

”, monitor can 

be triggered by lower audio level than “

L

” setting.

c

   Pairing

You can register a wireless camera with the monitor using the registration menu 
where you can view the video of the selected wireless camera.

d

   Zoom

Zoom in on the current image (2x).  
If you are using multiple cameras, you can set the zoom for each camera. 

e

  Select Camera to View and Scan Mode

Set which camera is being currently viewed. Each time a different camera is 
selected, the Brightness, VOX Sensitivity Level, Camera Speaker Volume, and 
Zoom settings will be saved to that specific camera.  
If “

SCAN

” mode is selected, each of the registered cameras will be viewed in 

ascending order at 10 second intervals. If one or more cameras are turned off 
or out of range, the monitor will show the “

Out of Range

” indicator for the 10 

seconds for that particular camera. 

f

  Set Camera Speaker Volume

Adjust the volume of the speaker on the camera in this menu. The volume can 
be adjusted from 1 to 5, with 5 being the loudest setting and 1 being the 
quietest. If “

MUTE

” is selected, no audio will be transmitted to the speaker when 

the [

TALK

] button is pressed. 

g

  Time Setting

Set the time shown on the monitor. Use the [

_

] or [

+

] button to select a field. 

Use the [

$

] or [

%

] button to change the numbers in the selected field. 

h

   Reset

Choose <

YES

> to reset the monitor to factory defaults. All settings including 

time and paring information will be set to the factory defaults.

Enter menu 

setting

Move to a 

menu

Adjust level

Save the 

change

SEW-3037W-ENGLISH.indd   9

2012-09-03   오전 11:37:19

Summary of Contents for Techwin SafeVIEW Babyview SEW-3037P

Page 1: ...eed further assistance contact Samsung support at 877 349 3149 To extend your one year warranty by three months be sure to go to www samsungsv com and register your product SafeVIEW User Manual English SEW 3037W ENGLISH indd 1 2012 09 03 오전 11 37 12 ...

Page 2: ... combination to avoid injury from tip over 13 Unplug this apparatus during lighting storms or when unused for long periods of time 14 Refer all servicing to qualified service personnel Servicing is required when the apparatus has been damaged in any way such as power supply cord or plug is damaged liquid has been spilled or objects have fallen into the apparatus the apparatus has been exposed to r...

Page 3: ...uct read and follow all instructions contained in this booklet and read and follow all instructions and warnings on the product NEVER use the transmitter or monitor near water including near a bathtub sink laundry tub wet basement etc This product is intended for indoor use only This product is not intended for use as a medical monitor and its use should not replace adult supervision The transmitt...

Page 4: ...cription 8 How to use the indicator 8 Menu Operation 8 How to use the setup buttons 8 How to use the setup icon 9 OVERVIEW Getting to know your Monitoring system 10 Wireless Monitor 10 Wireless Camera 12 INSTALLATION How to Install 13 Wireless Monitor 13 Wireless Camera 13 APPENDIX Specifications 14 Troubleshooting 15 SEW 3037W ENGLISH indd 4 2012 09 03 오전 11 37 12 ...

Page 5: ...owing components Wireless camera Wireless monitor User Manual Warranty Card Camera Adapter Monitor Adapter Plastic anchor 1EA Screw 1EA Check your package to confirm that you have received the complete system including all components shown above SEW 3037W ENGLISH indd 5 2012 09 03 오전 11 37 13 ...

Page 6: ... camera number to assign Up to 4 Cameras may be paired 1 Power on and turn the switch ON The power LED for the monitor should be ON 2 Press the MENU button on the monitor 3 Select by pressing _ or button 4 Select camera number by pressing the or button Press button to confirm A pairing icon comes out and search a camera which sets to pairing mode A count down clock appears at the middle of top ico...

Page 7: ...ut of Range If the camera and monitor are not paired or if the monitor is outside of transmission range with the paired camera the Out of Range message appears with warning beeps at regular intervals Two way talk Press the TALK button while talking Sound level The louder the sound around the camera the more LEDs turn on Portable monitoring Slide the belt clip upwards to use the integrated belt cli...

Page 8: ...time that is set on the monitor It only provides AM PM time format and no 24hour format f Night light Indicates the night light is on g Monitor Speaker Mute Indicates the monitor speaker is muted Once the monitor s speaker is muted no sound from the camera is produced h VOX On Indicates the Power VOX slide switch position is set at VOX mode i Battery Capacity Level Indicates remaining battery char...

Page 9: ...View and Scan Mode Set which camera is being currently viewed Each time a different camera is selected the Brightness VOX Sensitivity Level Camera Speaker Volume and Zoom settings will be saved to that specific camera If SCAN mode is selected each of the registered cameras will be viewed in ascending order at 10 second intervals If one or more cameras are turned off or out of range the monitor wil...

Page 10: ...its audio to the camera when TALK button is pressed down and held like a walkie talkie Navigation Controls OK Night light Button Use the controls to move and select while in Viewing Mode Menu Mode You can control PTZ operation Power LED Indicator turns green when powered When battery is charging this LED will in green color Navigation Controls Button Viewing Mode The following controls are used wh...

Page 11: ... monitor use the belt hanger to hold the monitor onto your belt Kick Stand Use to hold the monitor onto a table ON VOX OFF DC IN 6V DC 6V Power Input Connect the included AC power adapter to power and or charge the monitor battery when the monitor is not placed in the optional Charge cradle Volume Button Used for adjusting the volume up down Power and VOX ON OFF Slide Switch Set this switch to ON ...

Page 12: ...ra is placed IR LEDs Infrared LED s provide viewing in no low light conditions Microphone Receives sounds for the area near the camera and transmits sound from the camera to the monitor Speaker Produces the sound transmitted from the monitor Night Light Button Turns Night Light ON or OFF When the camera is powered on Night Light would be automatically turned on Camera Antenna Sends receives signal...

Page 13: ...ght Avoid installing the camera where there are thick walls or obstructions between the camera and the monitor STRANGULATION HAZARD Keep cord out of child s reach NEVER place camera or cords within 3 feet of crib or playpen Never use extension cords with AC Adapters Only use the AC Adapters provided 1 Carefully unpack the camera If you are installing cameras that did not come with the system pleas...

Page 14: ... Temperature Range 0 C 40 C Item Details Wireless Camera Operating Humidity Range 85 RH Environment Rating Indoor use only Pan Angle 300 Tilt Angle 110 Regulation Compliance FCC CE RoHS Compliance Yes for CE version only Other Special Feature Built in Microphone Speaker Weight 214g Wireless Monitor Display Type Size Color TFT 3 5 Resolution Pixel 320X240 RGB Viewing Angle H 80 degree V 100 degree ...

Page 15: ...bstructions between the monitor and camera 3 Adjust the monitor antenna to vertical position No sounds even with both units turned on 1 Make sure that the power adapter is connected to the camera 2 The battery on the monitor may be dead be sure to charge it using the adapter included 3 The monitor may be out of range of the camera be sure to check if the Range LED in on continuously Your SafeView ...

Page 16: ...ot be mixed with other commercial wastes for disposal Correct disposal of batteries in this product Applicable in the European Union and other European countries with separate battery return systems This marking on the battery manual or packaging indicates that the batteries in this product should not be disposed of with other household waste at the end of their working life Where marked the chemi...

Page 17: ...This template is used to install the camera on the wall TEMPLATE CAMERA FRONT Screw holes for the Camera installation SEW 3037W ENGLISH indd 17 2012 09 03 오전 11 37 21 ...

Page 18: ...AX 82 31 8018 3745 SAMSUNG TECHWIN AMERICA Inc 100 Challenger Rd Suite 700 Ridgefield Park NJ 07660 Toll Free 1 877 349 3149 www samsungsv com SAMSUNG TECHWIN EUROPE LTD Samsung House 1000 Hillswood Drive Hillswood Business Park Chertsey Surrey UNITED KINGDOM KT16 OPS TEL 44 1932 45 5300 FAX 44 1932 45 5325 SEW 3037W ENGLISH indd 18 2012 09 03 오전 11 37 21 ...

Page 19: ...SEW 3037W SafeVIEW Manuel d utilisation Français SEW 3037W FRENCH indd 1 2012 09 03 오전 11 30 10 ...

Page 20: ...l Si vous utilisez un chariot déplacez le chariot transportant l appareil avec précaution afin d éviter les blessures que pourrait entraîner un basculement accidentel 13 Débranchez cet appareil en cas d orage ou de non utilisation prolongée 14 Veuillez faire appel au personnel qualifié pour tous travaux de maintenance Les travaux de maintenance sont nécessaires si l appareil a été endommagé de que...

Page 21: ...e ce produit lisez et respectez les instructions contenues dans ce livret et lisez et respectez les instructions et avertissements mentionnés sur le produit N utilisez JAMAIS l émetteur ou le moniteur proche de l eau d une baignoire d un évier d un bac de lessive d un sol humide etc Ce produit est conçu pour être utilisé en intérieur uniquement Ce produit n est pas destiné à être utilisé comme un ...

Page 22: ...tilisation du voyant 8 Fonctionnement du menu 8 Utilisation des boutons de configuration 8 Utilisation des icônes de configuration 9 PRÉSENTATION Apprendre à utiliser votre système de surveillance 10 Moniteur sans fil 10 Caméra sans fil 12 INSTALLATION Comment installer 13 Moniteur sans fil 13 Caméra sans fil 13 ANNEXE Spécifications 14 Dépannage 15 SEW 3037W FRENCH indd 4 2012 09 03 오전 11 30 11 ...

Page 23: ...anuel d utilisation Bon de garantie Adaptateur de la caméra Adaptateur du moniteur Chevilles en plastique 1EA et Vis 1EA Vérifiez le contenu de votre colis afin de confirmer que vous avez reçu le pack complet y compris tous les composants mentionnés ci dessus SEW 3037W FRENCH indd 5 2012 09 03 오전 11 30 12 ...

Page 24: ... de caméra à affecter Vous pouvez ajouter jusqu à 4 caméras 1 Mettez sous tension en réglant l interrupteur d alimentation sur ON Les LED d alimentation du moniteur doivent être allumées 2 Appuyez sur le bouton MENU du moniteur 3 Sélectionnez en appuyant sur le bouton _ ou 4 Sélectionnez le numéro de caméra en appuyant sur le bouton ou Appuyez sur le bouton pour confirmer Une icône de jumelage app...

Page 25: ...as jumelés ou si le moniteur est hors de portée de transmission avec la caméra jumelée le message Out of Range apparaît avec des signaux sonores d avertissement à intervalle régulier Communication à deux voies Appuyez sur le bouton TALK tout en parlant Niveau de son Plus le son est fort autour de la caméra plus les LED s allument Surveillance portable Faites glisser vers le haut l attache de ceint...

Page 26: ...PM et non en format 24 heures f Veilleuse Indique si la veilleuse est allumée g Enceinte du moniteur en silencieux Permet d indiquer que l enceinte du moniteur est en mode silencieux Une fois que l enceinte du moniteur est en mode silencieux aucun son n est produit depuis la caméra h VOX activée Permet d indiquer que l inverseur Alimentation VOX est réglé sur le mode VOX i Niveau de capacité de la...

Page 27: ...a caméra Mode de balayage Permet de spécifier quelle caméra est actuellement affichée Chaque fois qu une caméra différente est sélectionnée la Luminosité le Niveau de sensibilité de la VOX le Volume des enceintes de la caméra et les Réglages du zoom sont sauvegardés sur cette caméra spécifique Si le mode SCAN est sélectionné chaque caméra enregistrée sera affichée en ordre croissant par intervalle...

Page 28: ...t actionné et maintenu enfoncé comme pour un talkie walkie Commandes de navigation Bouton de la veilleuse OK Utilisez ces commandes pour opérer des déplacements et des sélections lorsque l appareil est en mode Affichage ou Menu Vous pouvez contrôler l opération PTZ LED de l alimentation Le voyant devient vert lors de la mise sous tension Lorsque la batterie est en cours de chargement cette LED dev...

Page 29: ...ransportez le moniteur utilisez l attache pour suspendre le moniteur à votre ceinture Support Permet de maintenir le moniteur sur une table ON VOX OFF DC IN 6V Entrée d alimentation 6V CC Mettez l adaptateur secteur CA sous tension et ou chargez la batterie du moniteur Lorsque le moniteur n est pas place dans le support de chargement en option Bouton de volume Permet d augmenter de réduire le volu...

Page 30: ...e où est placée la caméra LED infrarouge Les LED infrarouges permettent de voir dans des conditions de faible d absence d éclairage Microphone Permet de recevoir du son dans la zone près de la caméra et de transmettre du son de la caméra au moniteur Enceinte Produit le son transmis depuis le moniteur Bouton de la veilleuse Permet d allumer ou d éteindre la veilleuse Lorsque la caméra est sous tens...

Page 31: ...contenant des murs épais ou des obstacles entre la caméra et le moniteur DANGER D ÉTRANGLEMENT Conservez le cordon hors de portée des enfants Ne placez JAMAIS la caméra ou les cordons à moins d 1 mètre de distance du berceau de l enfant ou de son parc N utilisez jamais de rallonge avec les adaptateurs CA Utilisez uniquement les adaptateurs CA fournis 1 Déballez soigneusement la caméra Si vous inst...

Page 32: ...0 C Élément Détails Caméra sans fil Plage de taux d humidité Taux d humidité 85 Cote environnementale Utilisation en intérieur exclusivement Angle panoramique 300 Angle d inclinaison 110 Conformité réglementaire FCC CE Conformité à la directive RoHS Oui pour la version CE uniquement Autre fonction spécifique Microphone Enceinte intégré e Poids 214 g Moniteur sans fil Type Taille d affichage Couleu...

Page 33: ...etirez tout obstacle entre le moniteur et la caméra 3 Réglez l antenne du moniteur en position verticale Aucun son même avec les deux unités allumées 1 Assurez vous que l adaptateur secteur est connecté à la caméra 2 La batterie du moniteur est peut être déchargée assurez vous de charger la batterie à l aide de l adaptateur fourni 3 Le moniteur est peut être hors de portée de la caméra veuillez vé...

Page 34: ...mination des batteries de ce produit Applicable aux pays de l Union européenne et aux autres pays européens dans lesquels des systèmes de collecte sélective sont mis en place Le symbole sur la batterie le manuel ou l emballage indique que les batteries de ce produit ne doivent pas être éliminées en fin de vie avec les autres déchets ménagers L indication éventuelle des symboles chimiques Hg Cd ou ...

Page 35: ...Ce gabarit sert à installer la caméra sur le mur GABARIT FAÇADE DE LA CAMÉRA Trous des vis pour l installation de la caméra SEW 3037W FRENCH indd 17 2012 09 03 오전 11 30 23 ...

Page 36: ... FAX 82 31 8018 3745 SAMSUNG TECHWIN AMERICA Inc 100 Challenger Rd Suite 700 Ridgefield Park NJ 07660 Toll Free 1 877 349 3149 www samsungsv com SAMSUNG TECHWIN EUROPE LTD Samsung House 1000 Hillswood Drive Hillswood Business Park Chertsey Surrey UNITED KINGDOM KT16 OPS TEL 44 1932 45 5300 FAX 44 1932 45 5325 SEW 3037W FRENCH indd 18 2012 09 03 오전 11 30 23 ...

Page 37: ...SEW 3037W SafeVIEW Benutzerhandbuch Deutsch SEW 3037W GERMAN indd 1 2012 09 03 오전 11 42 13 ...

Page 38: ... Transportwagens bewegen Sie das Gerät nur mit äußerster Vorsicht um Verletzungen durch Umkippen zu vermeiden 13 Trennen Sie das Gerät bei Gewitter oder längerer Abwesenheit vom Stromnetz 14 Überlassen Sie alle Wartungsarbeiten qualifiziertem Kundendienstpersonal Wartungsarbeiten sind erforderlich wenn das Gerät in irgendeiner Weise beschädigt wurde wie zum Beispiel ein beschädigtes Netzkabel oder...

Page 39: ...ungen auf dem Gerät lesen und befolgen Den Sender oder den Monitor NIEMALS in der Nähe von Wasser wie z B Badewannen Waschbecken Waschzubern usw verwenden Dieses Gerät ist ausschließlich für den Einsatz in Räumen bestimmt Dieses Gerät ist nicht für den Einsatz als medizinische Überwachung gedacht und seine Verwendung darf die persönliche Aufsicht durch die Eltern nicht ersetzen Der Sender erkennt ...

Page 40: ...bung der Symbolleiste 8 Bedeutung der Symbole 8 Bedienen des Menüs 8 Bedienen der Setup Schaltflächen 8 Beschreibung der Setup Symbole 9 ÜBERSICHT Übersicht über das Überwachungssystem 10 Funk Monitor 10 Funk Kamera 12 INSTALLATION Installationsanleitung 13 Funk Monitor 13 Funk Kamera 13 ANHANG Technische Daten 14 Problembehebung 15 SEW 3037W GERMAN indd 4 2012 09 03 오전 11 42 13 ...

Page 41: ...nten Funk Kamera Funk Monitor Benutzerhandbuch Garantiekarte Kamera Netzteil Monitor Netzteil Kunststoffdübel 1 Stck Schrauben 1 Stck Überprüfen Sie ob alle oben aufgeführten Komponenten des Systems und sämtliches Zubehör im Lieferumfang enthalten sind SEW 3037W GERMAN indd 5 2012 09 03 오전 11 42 14 ...

Page 42: ... Der Benutzer kann die zuzuweisende Kameranummer wählen Es können Verbindungen zu bis zu vier Kameras aufgebaut werden 1 Schalten Sie die Geräte ein Die Netzspannungs LED des Monitors muss leuchten 2 Die MENU Taste auf dem Monitor drücken 3 Wählen Sie mithilfe der oder _ Taste aus 4 Wählen Sie mithilfe der oder Taste die Kameranummer aus Bestätigen Sie mit der Taste Es erscheint das Symbol für die...

Page 43: ...einzuschalten Außer Reichweite Wenn keine Verbindung zwischen dem Monitor und der Kamera besteht oder sich der Monitor außerhalb der Übertragungsreichweite der Kamera befindet Out of Range Meldung angezeigt und es ertönen in regelmäßigen Abständen Warntöne Sprechen Beim Sprechen die TALK Taste drücken Geräuschpegel Je lauter die Geräusche in der Nähe der Kamera sind desto mehr LEDs leuchten auf Mo...

Page 44: ...Zeigt an dass das Nachtlicht eingeschaltet ist g Monitor Lautsprecher Stumm Zeigt an dass der Monitorlautsprecher ausgeschaltet ist Wenn der Monitorlautsprecher ausgeschaltet ist ist kein Ton von der Kamera zu hören h VOX Ein Zeigt an dass der Netzspannung VOX Schiebeschalter in den VOX Modus eingestellt ist i Batterie Ladezustand Zeigt die noch zur Verfügung stehende Batterieladung an Anzeige von...

Page 45: ...können Sie den Zoom für jede Kamera einzeln einstellen e Kamera Auswahl Scan Modus Stellt die zu betrachtende Kamera ein Jedes Mal wenn eine andere Kamera gewählt wird werden die Einstellungen für Helligkeit VOX Empfindlichkeit Kameralautstärke und Zoom für die gewählte Kamera gespeichert Wenn der SCAN Modus gewählt wird werden die Videobilder der registrierten Kameras in absteigender Reihenfolge ...

Page 46: ...mpfängt Signale aus oder zu der Kamera 3 5 LCD Bildschirm Zeigt Video von der Kamera an Geräuschpegel LEDs Blinkt wenn ein Geräusch erkannt wird MENU Taste Drücken Sie diese Taste um vom Modus der Videobildanzeige in den Modus für die Menübedienung zu wechseln Im Menü Modus werden durch Drücken dieser Taste die Einstellungen gespeichert und in den Überwachungsmodus zurückgeschaltet SLEEP Taste Die...

Page 47: ...rtelclips am Gürtel befestigen Stützfuß Verwenden Sie den Stützfuß um den Monitor auf einem Tisch aufzustellen ON VOX OFF DC IN 6V DC 6V Stromanschluss Schließen Sie das mitgelieferte Netzteil an um das Gerät mit Strom zu versorgen oder um die Batterie des Monitors zu laden Wenn der Monitor nicht an das optionale Lade Dock angeschlossen wird Lautstärke Taste Dient zur Einstellung der Lautstärke Ne...

Page 48: ...a IR LEDs Mithilfe der Infrarot LEDs ist es möglich auch bei Dunkelheit oder schwachen Lichtverhältnissen die Kamera zu betreiben Mikrofon Empfängt Geräusche aus der Nähe der Kamera und überträgt diese Geräusche von der Kamera an den Monitor Lautsprecher Gibt die vom Monitor übertragenen Töne wieder Nachtlicht Taste Schaltet das Nachtlicht ein oder aus Wenn die Kamera eingeschaltet ist wird Nachtl...

Page 49: ...en sich dicke Wände oder Hindernisse zwischen der Kamera und dem Monitor befinden STRANGULIERUNGSGEFAHR Außerhalb der Reichweite von Kindern aufbewahren NIEMALS die Kamera oder Kabel näher als 1 m vom Kinderbett oder dem Laufgitter platzieren Niemals Verlängerungskabel zusammen mit dem Netzteil verwenden Nur die mitgelieferten Netzteile verwenden 1 Packen Sie die Kamera vorsichtig aus Wenn Sie ein...

Page 50: ...ulässiger Luftfeuchtigkeitsbereich 85 rel Luftfeuchtigkeit Betriebsumgebung Nur für die Verwendung in Innenräumen Schwenkwinkel 300 Neigungswinkel 110 Erfüllte Richtlinien FCC CE RoHS Richtlinie Ja nur für CE Version Andere Sonderfunktionen Integriertes Mikrofon Lautsprecher Gewicht 214 g Funk Monitor Anzeige Typ Größe Farbe TFT 3 5 Resolution Pixel 320 x 240 RGB Sichtwinkel H 80 Grad V 100 Grad A...

Page 51: ...n Sie die Hindernisse zwischen Monitor und Kamera 3 Stellen Sie die Antenne des Monitors in die vertikale Position Keine Geräusche auch bei beiden eingeschalteten Geräten 1 Stellen Sie sicher dass das Netzteil an die Kamera angeschlossen ist 2 Die Batterie im Monitor kann leer sein Laden Sie die Batterie mithilfe des mitgelieferten Netzteils auf 3 Der Monitor kann sich außerhalb der Kamerareichwei...

Page 52: ...erden Korrekte Entsorgung der Batterien dieses Produkts In den Ländern der Europäischen Union und anderen europäischen Ländern mit einem separaten Altbatterie Rücknahmesystem Die Kennzeichnung auf der Batterie bzw auf der dazugehörigen Dokumentation oder Verpackung gibt an dass die Batterie zu diesem Produkt nach seiner Lebensdauer nicht zusammen mit dem normalen Haushaltsmüll entsorgt werden darf...

Page 53: ...Diese Schablone wird verwendet um die Kamera an die Wand zu installieren SCHABLONE KAMERA FRONT Schraublöcher für die Montage der Kamera SEW 3037W GERMAN indd 17 2012 09 03 오전 11 42 20 ...

Page 54: ... FAX 82 31 8018 3745 SAMSUNG TECHWIN AMERICA Inc 100 Challenger Rd Suite 700 Ridgefield Park NJ 07660 Toll Free 1 877 349 3149 www samsungsv com SAMSUNG TECHWIN EUROPE LTD Samsung House 1000 Hillswood Drive Hillswood Business Park Chertsey Surrey UNITED KINGDOM KT16 OPS TEL 44 1932 45 5300 FAX 44 1932 45 5325 SEW 3037W GERMAN indd 18 2012 09 03 오전 11 42 20 ...

Reviews: