background image

39

English

Other Information

Other Information

Attaching a Wall Mount/Desktop Stand

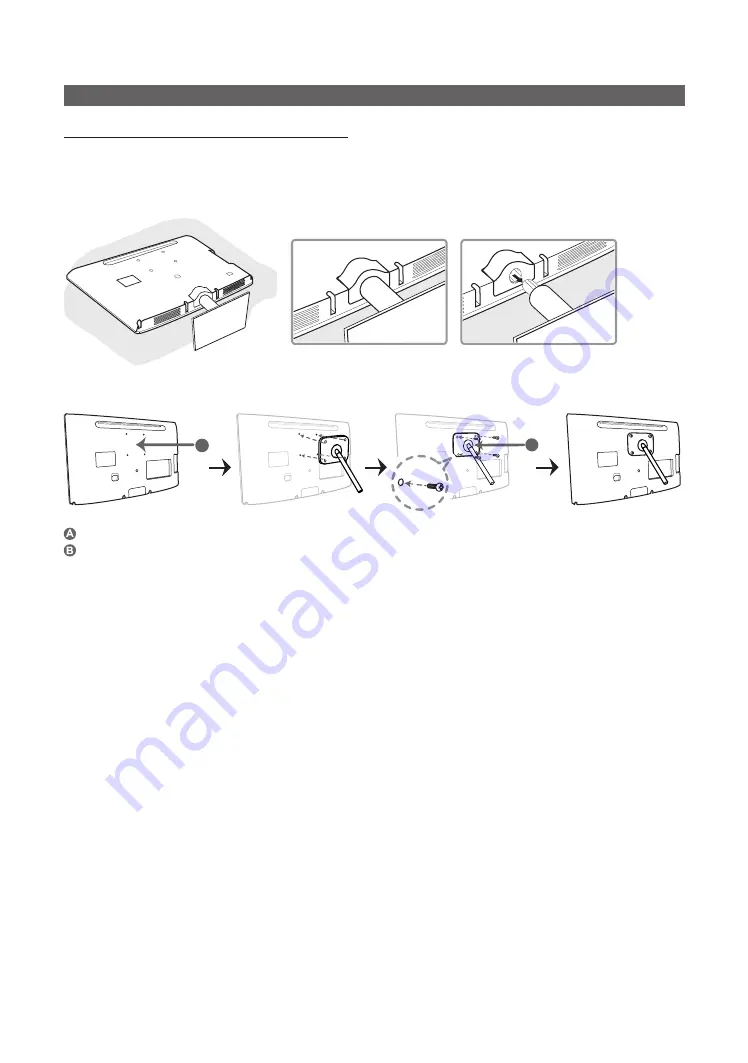
Preparing before installing Wall-Mount/Desktop Stand

1. 

Turn the product off and unplug the power cord from the wall outlet.

2. 

Place a soft cloth or cushion on a flat surface to protect the panel and place the product face down.

3. 

Pull the stand in the direction of the arrow as shown in the figure to separate it.

Attaching a Wall Mount/Desktop Stand

B

A

 Wall/Desktop Stand Mount
 Wall mount kit/desktop stand (not supplied)

4. 

Align wall mount/desktop stand to the Monitor/TV and firmly fix the wall mount/desktop stand by fastening the screw.

5. 

Align the groove of the part of the product that is to be connected to the stand with the groove in the stand (desk-top 
stand, wall mount stand or another stand) and firmly fix the stand by fastening the screw.


NOTE


x

If you use screws that are longer than the standard specifications, the inside of the product may be damaged.


x

For wall mounts that are not compatible with the standard VESA specifications, the length of the screw may differ 
depending on the corresponding specifications.


x

Avoid using screws that are incompatible with the standard VESA specifications and avoid assembling them using 
excessive force. This may result in damage to the product or injury due to the product falling. Samsung shall not be 
held liable for any damage or injury.


x

Samsung shall not be held liable for any damage to the product or injury caused by using a wall mount/desktop stand 
that is not compatible with the specifications or due to an installation not performed by an authorized installation 
engineer.


x

Use the wall mount according to the international specifications.

Summary of Contents for TC550

Page 1: ...his Samsung product To receive more complete service please register your product at www samsung com register Model _____________ Serial No _____________ TC350 If you have any questions please call us...

Page 2: ...rs On LED models that offer picture sizing features use these controls to view different formats as a full screen picture Be careful in the selection of television formats you use for viewing and the...

Page 3: ...t Source 21 y y Channel Menu 21 Seeing Channels 21 Using Favorite Channels 22 Memorizing Channels 22 Editing Channels 22 Other Features 22 y y Picture Menu 24 Changing the Preset Picture Mode 24 Adjus...

Page 4: ...d maintenance has been included with this product Power Related The following images are for your reference and may differ depending on models and countries Warning Avoid using a damaged power cord or...

Page 5: ...the power button on the product Installation Related Warning Avoid placing burning candles mosquitorepellentor cigarettes on the product y Otherwise it may result in fire Ask an installation engineer...

Page 6: ...let the product drop while moving it y This may result in a problem with the product or injury Do not place the product face down on the floor y This may damage the panel of the product When installi...

Page 7: ...agent when cleaning the product This may result in the exterior being deformed or the print being removed If you can t get the product clean with just the supplied cloth use a soft damp cloth with a...

Page 8: ...y result in electric shock or fire Avoid moving the product by pulling the power cord or antenna cable y y Otherwise it may result in electric shock fire or a problem with the product due to damage to...

Page 9: ...as leaving your home unplug the power cord from the wall outlet y Otherwise it may cause dust accumulation and result in fire caused by overheating or short circuit or result in an electric shock Set...

Page 10: ...ry in a location that children or infants cannot reach y y If children have had the battery in their mouths consult your doctor immediately When replacing the batteries insert them with right polarity...

Page 11: ...odel Check that there is no accessory hidden behind packing materials when you open the box y y Remote Control AA59 00821A Batteries AAA x 2 y y Warranty Card Safety Guide Quick Setup Guide y y User M...

Page 12: ...Displays an on screen menu the OSD on screen display of your TV s features y Adjusts the volume In the OSD use the y buttons as you would use the and buttons on the remote control z Changes the channe...

Page 13: ...g the function by moving the controller to the up down left right directions be sure not to press the controller If you press it first you cannot operate it to move the up down left right directions S...

Page 14: ...y the same station For example to select channel 54 3 press 54 then press and 3 Displays the main on screen menu Quickly select frequently used functions View the Media Play Returns to the previous me...

Page 15: ...ion Support 2 u d Select an icon or option with the u or d button 3 ENTERE Press ENTERE to access the sub menu 4 u d Select the desired submenu with the u or d button 5 l r Adjust the value of an item...

Page 16: ...Selecting search options for auto tuning Press the or button then press the ENTERE button Select Air Cable or Auto If you selected Cable you ll go to the cable system screen Use the u or d button to s...

Page 17: ...x Be sure to purchase a certified HDMI cable Otherwise the picture may not display or a connection error may occur x x For better picture and audio quality connect to a digital device using an HDMI ca...

Page 18: ...tip ring sleeve TRS type Connecting to a PC Using an HDMI Cable or an HDMI to DVI Cable or a D sub Cable Connection Your PC may not support an HDMI connection AUDIO OUT PC OUT HDMI OUT DVI OUT AUDIO...

Page 19: ...ency Hz Pixel Clock MHz Sync Polarity H V Mode Resolution IBM 720 x 400 70Hz 31 469 70 087 28 322 VESA DMT 640 x 480 60Hz 31 469 59 940 25 175 MAC 640 x 480 67Hz 35 000 66 667 30 240 VESA DMT 640 x 48...

Page 20: ...75 000 108 000 MAC 1152 x 870 75Hz 68 681 75 062 100 000 VESA DMT 1280 x 720 60Hz 45 000 60 000 74 250 VESA DMT 1280 x 800 60Hz 49 702 59 810 83 500 VESA DMT 1280 x 1024 60Hz 63 981 60 020 108 000 VE...

Page 21: ...nected an AV device to the HDMI IN 1 DVI port with an HDMI to DVI cable select DVI under Edit Name to enter a device name Information You can see detailed information about the selected external devic...

Page 22: ...NOTE x x When selecting the Cable TV system STD HRC and IRC identify various types of cable TV systems Contact your local cable company to identify the type of cable system that exists in your particu...

Page 23: ...in the Programmed menu x x When a digital channel is selected press the button to view the digital program Select All Select all the channels in the channel list Deselect All Deselect all the selecte...

Page 24: ...osition Mode 1 10 Determines the amount of adjustment Numbers closer to 10 are best for lower viewing positions When Samsung MagicAngle is set to Lean back mode or Standing Mode Gamma is not available...

Page 25: ...on by reducing screen brightness when the picture on the screen is in motion Picture Options MENUm Picture Picture Options ENTERE Select an option using the up and down arrow keys and then press ENTER...

Page 26: ...duct Maintain the correct posture when using this product y y Straighten your back y y Keep a distance of 45 50 cm 15 19 inches from your eyes to the screen Look down at the screen and face the screen...

Page 27: ...nce through a pair of speakers using HRTF Head Related Transfer Function technology Preferred Language digital channels only Digital TV broadcasts are capable of simultaneous transmission of many audi...

Page 28: ...ailable when the Clock Mode is set to Auto Using the Sleep Timer MENUm Setup Time Sleep Timer ENTERE Sleep Timer t Automatically shuts off the TV after a preset period of time 30 60 90 120 150 and 180...

Page 29: ...TV 14 Viewers 14 and over TV MA Mature audience ALL Lock all TV ratings FV Fantasy violence V Violence S Sexual situation L Adult Language D Sexually Suggestive Dialog The Program Rating Lock will aut...

Page 30: ...tc and TV ratings For example DH MH H etc may differ depending on the broadcasting station Change PIN The Change PIN screen will appear Choose any 4 digits for your PIN and enter it in Enter New PIN R...

Page 31: ...hen connecting to a game console such as PlayStation or Xbox you can enjoy a more realistic gaming experience by selecting the game mode NOTE x x Precautions and limitations for game mode To disconnec...

Page 32: ...Please check your connections If the problem persists refer to the external device s user manual Signal Strength Digital channels only An HD channel s reception quality is either perfect or the chann...

Page 33: ...t Media Play USB then press the ENTERE button USB Drive TV Side Panel Using the Media Play Menu 1 Press the MENU button Press the or button to select Application and then press the ENTERE button 2 Sel...

Page 34: ...sequential jpeg format x x Do not disconnect the USB device while it is loading x x MSC supports MP3 and JPEG files and the PTP device supports JPEG files only x x MTP Media Transfer Protocol is not...

Page 35: ...nformation is unknown play time and progress bar are not displayed E Pause L Jump T Tools R Return The displayed image may differ depending on the model Supported Subtitle Formats External Name Extens...

Page 36: ...ps 3gp 3GP MPEG4 SP ASP 1920x1080 6 30 30Mbps MP3 H 264 1920x1080 6 30 30Mbps flv swf flash formats H 264 1920x1080 6 30 30Mbps MP3 Sorenson H 263 1920x1080 6 30 30Mbps Other Restrictions NOTE y y Vid...

Page 37: ...Show Detailed Information Device Information 2 Press the u or d button to select Start Slide Show then press the ENTERE button During the slide show files are displayed in order from the currently sho...

Page 38: ...select background music when watching a slide show c Zoom You can zoom into images in full screen mode c Rotate You can rotate images in full screen mode c Information You can see detailed informatio...

Page 39: ...d wall mount stand or another stand and firmly fix the stand by fastening the screw NOTE x x If you use screws that are longer than the standard specifications the inside of the product may be damaged...

Page 40: ...n the manufacturer Refer to the manual provided with the Kensington Lock for additional information on proper use The Kensington Lock is not supplied by Samsung Please find a K icon on the rear of the...

Page 41: ...ture distortion This is not a TV problem Mobile phones used close to the TV within 3 3ft may cause noise in picture on analog and digital TV Color is wrong or missing If you re using Component connect...

Page 42: ...ents may cause picture distortion especially with fast moving pictures such as sports and action movies A low signal can cause picture distortion This is not a TV problem Others Purple green rolling h...

Page 43: ...l uses a panel consisting of sub pixels which require sophisticated technology to produce However there may be a few bright or dark pixels on the screen These pixels will have no impact on the perform...

Page 44: ...8 027 477 5 319 713 5 333 201 5 638 452 5 771 295 5 970 152 5 912 976 7 200 236 7 492 907 8 050 434 7 720 240 7 031 474 7 907 736 and 7 764 802 DTS the Symbol and DTS and the Symbol together are regis...

Page 45: ...x 13 4 x 1 6 inches 567 8 x 341 3 x 41 8 mm With Stand 22 3 x 17 2 x 7 8 inches 567 8 x 438 4 x 200 mm 22 3 x 17 2 x 7 8 inches 567 8 x 438 4 x 200 mm Weight Without Stand 8 5 lbs 3 9 kg 8 5 lbs 3 9...

Page 46: ...Electronics Canada Inc Customer Service 55 Standish Court Mississauga Ontario L5R 4B2 Canada U S A 1 800 SAMSUNG 726 7864 www samsung com Samsung Electronics America Inc 85 Challenger Road Ridgefield...

Reviews: