background image

9.

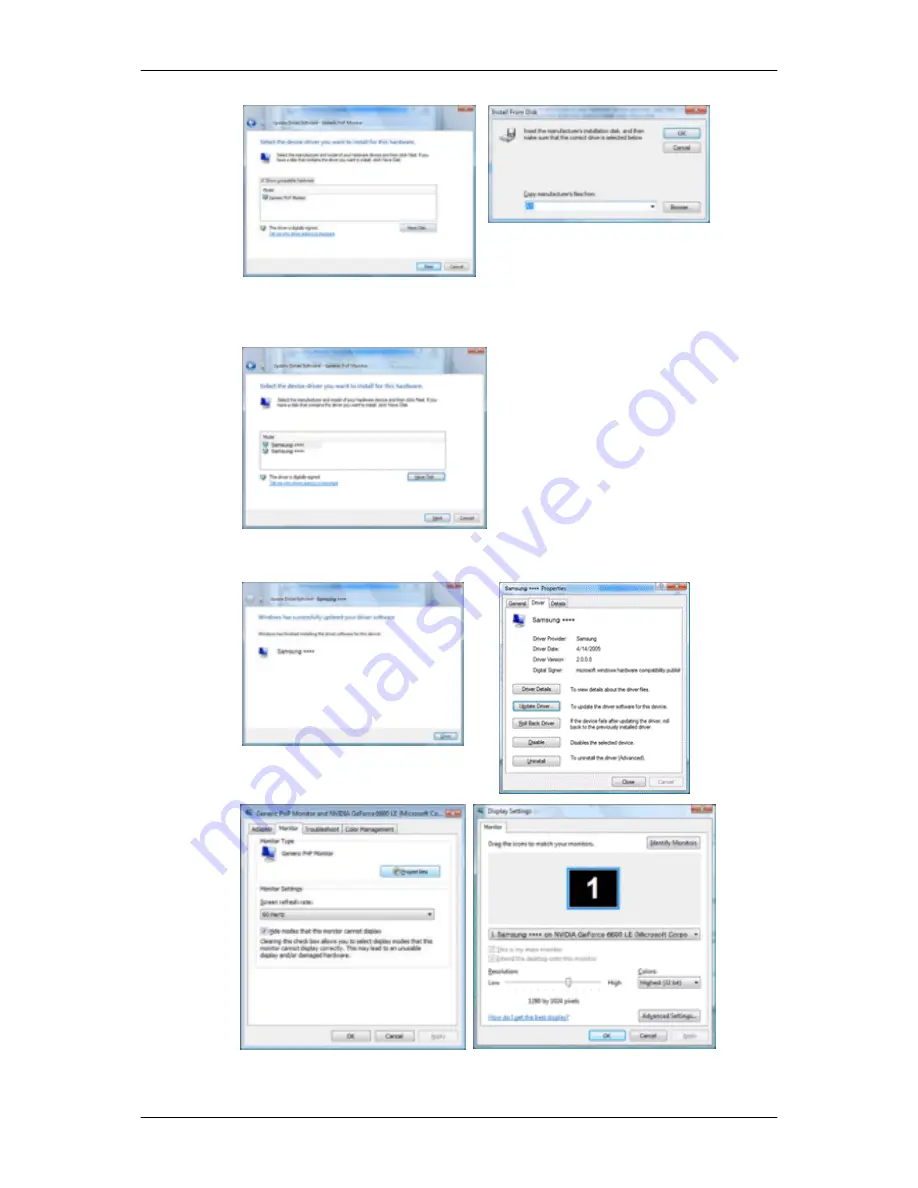
Select the model that matches your monitor from the list of monitor models on the screen, and
click "Next".


10. Click "Close" 

 "Close" 

 "OK" 

 "OK" on the following screens displayed in sequence.

Microsoft

®

 Windows

®

 XP Operating System

Using the Software

Summary of Contents for SyncMaster T200M

Page 1: ...SyncMaster T200M T220M LCD Monitor User Manual ...

Page 2: ...ot touch Ground to prevent an electric shock Power When not used for extended period of time set your computer to DPM If using screen saver set it to active screen mode The images here are for reference only and are not applicable in all cases or countries Shortcut to Anti Afterimage Instructions Do not use a damaged power cord or plug or a damaged or loose power outlet Otherwise this may result i...

Page 3: ...e the provided power cord of another product Otherwise this may result in fire or electric shock Installation Be sure to contact an authorized Service Center when installing your monitor in a location with heavy dust high or low temperatures high humidity and exposed to chemical substances and where it operates for 24 hours such as at airports train stations etc Failure to do so may cause serious ...

Page 4: ...jury Make sure to install the specified wall mount Install your product in a well ventilated location Ensure that there is a clearance of more than 10 cm from the wall Otherwise it may result in fire due to an increase in the internal tem perature Bend the outdoor antenna cable downwards at the location where it goes in so that rainwater does not flow in If rainwater enters the product it may resu...

Page 5: ...with a dry cloth Do not use chemicals such as wax benzene alcohol thinner mos quito repellant lubricant or cleaner These may change the appear ance of the product surface and peel off the indication labels on the product Since the product housing is easily scratched make sure to use the specified cloth only Use the specified cloth adding only a little water As the product may be scratched if there...

Page 6: ... and left while only holding the power cord or signal cables Otherwise it may fall and result in electric shock damage to the product or fire due to damage to the cable Make sure that the ventilating opening is not blocked by a table or curtain Otherwise it may result in fire due to an increase in the internal tem perature Do not place any containers containing water vases flowerpots med icines as...

Page 7: ... injury and or damage the product If you use the product in a location exposed to vibrations it may damage the product and result in fire When moving the product turn the power off and disconnect the power plug antenna cable and all the cables connected to the product Otherwise it may result in electric shock or fire Ensure that children do not hang onto the product or climb up onto the product Th...

Page 8: ...cycling The customer can return used or rechargeable batteries to a nearby public recycling center or to a store selling the same type of the battery or rechargeable battery Do not turn the product upside down or move it while holding only the stand Otherwise it may fall and result in personal injury and or damage to the product Do not place the product in a location exposed to direct sunlight or ...

Page 9: ... injury and or damage to the product Good Postures When Using the Monitor When using the product use it in the correct position Keep your back straight while looking at the product The distance between your eyes and the screen should be between 45 to 50 cm Look at the screen from a slightly higher location than the height of the screen When using the product use it in the correct position Adjust t...

Page 10: ...with your monitor If any items are missing contact your dealer Contact a local dealer to buy optional items Unpacking Without stand With stand Monitor Monitor Manuals Quick Setup Guide Warranty Card Not available in all loca tions User s Guide Cables D Sub Cable Power Cord Stereo Cable ...

Page 11: ...th Cable holding ring Stand Body Stand Base Note Cleaning Cloth is only provided for highly polished black products as a product feature Sold separately DVI Cable HDMI Cable Headphones Digital audio optic output ca ble TV Antenna Cable Coaxial Cable Component PR PB Y Cable Audio cable Introduction ...

Page 12: ...lick here to see an animation clip MENU Use this button to open the on screen menu and to exit from the on screen menu or to close the screen adjustment menu VOL Moves from one menu item to another horizontally or adjusts selected menu val ues Adjusts the audio volume CH Moves from one menu item to another vertically or adjusts selected menu values In TV mode selects TV channels Power button Use t...

Page 13: ...te See PowerSaver described in the manual for further information regarding power saving functions For energy conservation turn your monitor OFF when it is not needed or when leaving it unattended for long periods Speaker Rear Note The configuration at the back of the product may vary from product to product POWER POWER Connect the power cord for your monitor to the POWER port on the back of the p...

Page 14: ...UT OPTICAL Connect the DIGITAL AUDIO OUT OPTI CAL terminal of your product to the digital sound output or standard sound output terminal of the DVD home theater or amplifier using a digital audio optical output cable DVI D DVI D Connect the DVI cable to the DVI D port on the back of your product HDMI IN HDMI IN Connect the HDMI IN terminal at the back of your monitor to the HDMI terminal of your d...

Page 15: ...ANT IN port on the rear side of the prod uct Make sure to use a TV antenna cable sold separately as the antenna cable S Video Video R AUDIO L S Video Video Input devices such as DVD VCR or Camcorder are connected to the VIDEO or S VIDEO termi nal of the monitor using the Video or S Video cable R AUDIO L Connect the port of the DVD VCR DVD DTV Set Top Box to the R AUDIO L port of the mon itor Conne...

Page 16: ... to be purchased separately Note The location of the Kensington Lock may be dif ferent depending on its model Using the Anti Theft Kensington Lock 1 Insert the locking device into the Kensington slot on the Monitor and turn it in the locking direction 2 Connect the Kensington Lock cable 3 Fix the Kensington Lock to a desk or a heavy stationary object Note See Connecting Cables for further informat...

Page 17: ...o change the channel 4 button The button operates only for DTV It is used to select MMS multi channel for a DTV 5 VOL Adjusts the audio volume 6 TOOLS Not Available 7 Down Up Left Right buttons Moves from one menu item to another horizontally vertically or adjusts selected menu values 8 INFO Current picture information is displayed on the upper left corner of the screen 9 COLOR BUTTONS Not Availab...

Page 18: ...vices that are connected to the monitor at the time 14 PRE CH This button is used to return to the immediately previous channel 15 CH In TV mode selects TV channels 16 MUTE Pauses mutes the audio output temporarily This is displayed on the lower left corner of the screen The audio resumes if MUTE or VOL is pressed in the Mute mode 17 RETURN Returns to the previous menu 18 ENTER Activates a highlig...

Page 19: ...r monitor PC Using the DVI Digital connector on the video card Connect the DVI Cable to the DVI D Port on the back of your Monitor DVI D Connect the HDMI PC DVI D AUDIO IN port on the rear side of the monitor to the sound card of the PC Note You may enjoy clear and quality sound from the computer sound card using the monitor speakers You don t need to install any separate speakers for your compute...

Page 20: ...to Other devices Note This monitor allows the user to connect it to such input devices as a DVD player a VCR or cam corder or a DTV or TV without disconnecting the PC The configuration at the back of the monitor may vary from product to product The DVI to HDMI cable digital audio optic output cable and RCA to stereo for PC cable are all sold separately Contact a Service Center to purchase any prod...

Page 21: ...essional for installation if possible To connect the RF cable to the antenna input terminal Keep the copper wire portion of the RF cable straight 2 Turn on the monitor 3 Select TV using the TV 4 Select a desired TV channel Note Is weak signal causing poor reception Purchase and install a signal amplifier for better reception Connecting DVD DTV Set Top Box Note Connect to the DVD DTV Set Top Box in...

Page 22: ...ed in red or blue For single family houses install an UHF antenna to receive digital broadcasting Connecting HDMI Note You can connect digital output devices to your monitor You can enjoy better screen and sound quality 1 Connecting Using a HDMI Cable Input devices such as digital DVD are connected to the HDMI IN terminal of the monitor using the HDMI cable When all the connections are completed c...

Page 23: ...minal 4 Select HDMI using the SOURCE button Note If you just connect using the DVI to HDMI cable without connecting to the sound source you cannot hear sound Connecting the audio output terminal of a digital device to the R AUDIO L of COMPONENT IN of the monitor using an audio cable will not give you sound Make sure to connect to the HDMI PC DVI D AUDIO IN terminal of the monitor Connecting and Us...

Page 24: ...ecting AV Devices Note The monitor has AV connection terminals to connect AV input devices like DVDs VCRs or Cam corders You may enjoy AV signals as long as the monitor is turned on 1 Input devices such as DVD VCR or Camcorder are connected to the VIDEO or S VIDEO terminal of the monitor using the Video or S Video cable 2 Connect the port of the DVD VCR DVD DTV Set Top Box to the R AUDIO L port of...

Page 25: ...Connect your headphones to the Headphone connection terminal Using the Stand Monitor Assembly Monitor and Bottom Tilt angle Note You can tilt the monitor upwards at an angle of 1 to 21 Connections ...

Page 26: ...rating system you have Prepare a blank disk and download the driver program file at the Internet web site shown here Internet web site http www samsung com Worldwide Installing the Monitor Driver Automatic 1 Insert CD into the CD ROM drive 2 Click Windows 3 Choose your monitor model in the model list then click the OK button 4 If you can see following message window then click the Continue Anyway ...

Page 27: ...ert your Manual CD into your CD ROM drive 2 Click Start and Control Panel Then double click on Appearance and Personalization 3 Click Personalization and then Display Settings 4 Click Advanced Settings 5 Click Properties in the Monitor tab If the Properties button is deactivated it means the configuration for your monitor is completed The monitor can be used as is If the message Windows needs is d...

Page 28: ...posted on Samsung Monitor homepage 6 Click Update Driver in the Driver tab 7 Check the Browse my computer for driver software checkbox and click Let me pick from a list of device drivers on my computer 8 Click Have Disk and select the folder for example D Drive where the driver setup file is located and click OK Using the Software ...

Page 29: ...l that matches your monitor from the list of monitor models on the screen and click Next 10 Click Close Close OK OK on the following screens displayed in sequence Microsoft Windows XP Operating System Using the Software ...

Page 30: ... Click Display icon and choose the Settings tab then click Advanced 4 Click the Properties button on the Monitor tab and select Driver tab 5 Click Update Driver and select Install from a list or then click Next button 6 Select Don t search I will then click Next and then click Have disk Using the Software ...

Page 31: ...lowing message window then click the Continue Anyway button Then click OK button Note This monitor driver is under certifying MS logo and this installation doesn t damage your system The certified driver will be posted on Samsung Monitor homepage http www samsung com 9 Click the Close button then click OK button continually Using the Software ...

Page 32: ...on is active click the Properties button then follow next steps continually 5 Click Driver and then click on Update Driver then click on the Next button 6 Choose Display a list of the known drivers for this device so that I can choose a specific driver then click Next and then click Have disk 7 Click the Browse button then choose A D Driver 8 Click the Open button then click OK button 9 Choose you...

Page 33: ...r clicking Test If the screen is not normal change to a different mode lower mode of resolution colors or frequency Note If there is no Mode at All Display Modes select the level of resolution and vertical frequency by referring to the Preset Timing Modes in the user guide Linux Operating System To execute X Window you need to make the X86Config file which is a type of system setting file 1 Press ...

Page 34: ...fer to Help F1 in the software program How to install the Natural Color software Insert the CD included with the Samsung monitor into the CD ROM Drive Then the initial screen of the program Natural Color will be executed Click Natural Color on the initial screen to install the Natural Color software To install the program manually insert the CD included with the Samsung monitor into the CD ROM Dri...

Page 35: ... the Multiscreen executable icon appears on your desktop Double click the icon to start the program Multiscreen execution icon may not appear depending on specification of computer system or monitor If that happens press F5 Key Installation Problems The installation of MultiScreen can be affected by such factors as the video card motherboard and the network environment System Requirements OS Windo...

Page 36: ...Select Setting Control Panel on the Start menu and then double click Add Delete a program Select Multiscreen from the list and then click the Add Delete button Using the Software ...

Page 37: ...ding on the contents of the image you are watching Currently five different modes are available Entertain Internet Text Dynamic Contrast and Custom Each mode has its own pre configured brightness value Entertain High Brightness For watching motion pictures such as a DVD or VCD Internet For working with a mixture of images such as texts and graphics Text For documents or works involving heavy text ...

Page 38: ...le in MagicBright mode of Dynamic Contrast You can use the on screen menus to change the contrast and brightness according to personal prefer ence Contrast Adjust the Contrast Brightness Adjust the Brightness Sharpness Adjust the Sharpness MENU MENU EXIT Auto Adjustment The values of Fine Coarse and Position are adjusted automatically By changing the resolution in the control panel auto function i...

Page 39: ...image area You may relocate it to the center using the horizontal control menu Fine Removes noise such as horizontal stripes If the noise persists even after Fine tuning repeat it after adjusting the frequency clock speed MENU MENU EXIT Position Adjusts the screen location horizontally and vertically MENU MENU EXIT Adjusting the LCD Display ...

Page 40: ...meters are replaced with the factory default values MENU MENU EXIT Picture Options Color Tone The tone of the color can be changed Available in PC DVI mode only Cool Normal Warm Custom MENU MENU EXIT Adjusting the LCD Display ...

Page 41: ... R G B Adjusts the individual R G B color controls MENU MENU EXIT Size You can switch the Size Wide 4 3 MENU MENU EXIT Reset Adjusting the LCD Display ...

Page 42: ...Dynamic Standard and Movie that are preset at the factory You can activate either Dynamic Standard or Movie Dynamic Selects the picture for high definition in a bright room Standard Selects the picture for optimum display in a normal environment Movie Selects the picture for viewing movies in a dark room MENU MENU EXIT Contrast Brightness Sharpness Color Adjusting the LCD Display ...

Page 43: ...st the Contrast Brightness Adjust the Brightness Sharpness Adjust the Sharpness Color Adjust the Colour MENU MENU EXIT Tint Adds a natural tone to the display It is activated when the signal is NTSC MENU MENU EXIT Color Tone The tone of the color can be changed Cool2 Cool1 Normal Warm1 Warm2 Adjusting the LCD Display ...

Page 44: ...wide picture in the vertical direction to fit the screen size Select by pressing the or button Use the or button to move the picture up and down After selecting use the or button to magnify or reduce the picture size in the vertical direction 4 3 Sets the picture to 4 3 normal mode Just Scan Use the function to see the original image where its part being cut off minimized with HDMI 720p 1080i 1080...

Page 45: ...ing that may appear on the screen Off Turns the screen noise reduction function off Low Reduces screen noise at a low level Medium Reduces screen noise at a medium level High Reduces screen noise at a high level Auto Automatically recognizes and reduces screen noise MENU MENU EXIT Backlight Adjust the screen brightness by adjusting the LCD backlight MENU MENU EXIT Adjusting the LCD Display ...

Page 46: ...ilable Modes PC DVI TV AV S Video Component HDMI Note The default setting may be different depending on the selected Input Mode input signal source selected in External Input List and the selected resolution Mode The Monitor has a built in high fidelity stereo amplifier Standard Adjusting the LCD Display ...

Page 47: ...ostly dialogue i e news Custom Choose Custom if you want to adjust the settings according to personal preference MENU MENU EXIT Equalizer You can adjust the left and right sound balance and the low or high volume as required MENU MENU EXIT MTS Multi Track Sound Mono Choose for channels that are broadcasting in mono or if you are having difficulty receiving a stereo signal Adjusting the LCD Display...

Page 48: ...lly a foreign language trans lation Available in TV Mode Only MENU MENU EXIT Auto Volume Reduces the differences in volume level among broadcasters Off On MENU MENU EXIT TV Speaker If you set this menu On sound output from the speakers is muted in case of using the home theater Off On MENU MENU EXIT Adjusting the LCD Display ...

Page 49: ...urce selected in External Input List and the selected resolution Air Cable The channel system can be set in several different ways STD HRC IRC and Air identify various types of cable TV systems Contact your local cable company to identify the type of cable system that exists in your particular area Air STD HRC IRC MENU MENU EXIT Adjusting the LCD Display ...

Page 50: ...s In rare cases Auto program may miss a few channels due to weak signals and the channels may not be added to the channel memory MENU MENU EXIT Channel Manager Channel List You can add or delete a channel so only channels you want are displayed is active when Child Lock is selected to On MENU MENU EXIT Child Lock Adjusting the LCD Display ...

Page 51: ...certain broadcast or video programs The Child Lock feature can be selected only from the remote MENU MENU EXIT Fine Tune Due to weak signals or an incorrect antenna configuration some of the channels may not be tuned correctly MENU MENU EXIT Adjusting the LCD Display ...

Page 52: ...gnal reception with color unsatisfactory select the Color System Mode to PAL M PAL N or NTSC Auto PAL M PAL N NTSC MENU MENU EXIT Setup Available Modes PC DVI TV AV S Video Component HDMI Note The default setting may be different depending on the selected Input Mode input signal source selected in External Input List and the selected resolution Adjusting the LCD Display ...

Page 53: ...e in retail environments If the unit is accidentally set to Shop mode and you want to return to Home Standard Press the Volume button on the TV When the volume OSD is displayed press and hold the MENU button on the TV for 5 seconds MENU Language You can choose one of 4 languages The language chosen affects only the language of the OSD MENU MENU EXIT Adjusting the LCD Display ...

Page 54: ... Clock Set You can set the current time MENU MENU EXIT Sleep Timer Use to set the Monitor to be turned off automatically in certain minutes Off 30 60 90 120 150 180 MENU MENU EXIT Adjusting the LCD Display ...

Page 55: ... the product Three different On Off Timer Settings can be made MENU MENU EXIT Caption Enables or disables the Caption feature and sets the appearance of closed caption text Caption Off On Mode Caption The speech is displayed in subtitles at the bottom of the screen in black Text Only subtitles are displayed on the screen Channel 1 2 Field 1 2 MENU MENU EXIT Adjusting the LCD Display ...

Page 56: ...nue viewing the poor picture you must set the Blue screen mode to Off Off On MENU MENU EXIT Melody A melody sound can be set to come on when the monitor is powered On or Off Off Turns off the melody function Low Sets the melody volume to low Medium Sets the melody volume to medium High Sets the melody volume to high MENU MENU EXIT Adjusting the LCD Display ...

Page 57: ...power or when the LED dazzles your eyes Off LED will not come on In Standby Turns the LED on in standby mode In Watching TV Turns the LED on while watching TV Always LED is always on MENU MENU EXIT Light Level Use to adjust the light level i e the brightness of the light MENU MENU EXIT Adjusting the LCD Display ...

Page 58: ... high energy saving mode MENU MENU EXIT HDMI Black Level When a DVD or set top box is connected to your TV via HDMI it may cause a degradation in the screen quality such as an increase in the black level a low contrast or discoloration etc depending on the external device connected In this case adjust the screen quality of your TV by configuring the HDMI Black Level This function is active only wh...

Page 59: ...with color unsatisfactory select the Color System Mode to PAL M PAL N or NTSC Available in AV S Video Mode Only Auto PAL M PAL N NTSC MENU MENU EXIT Input Available Modes PC DVI TV AV S Video Component HDMI Note The default setting may be different depending on the selected Input Mode input signal source selected in External Input List and the selected resolution Adjusting the LCD Display ...

Page 60: ...ect button on the remote control is SOURCE button PC DVI TV AV S Video Component HDMI MENU Edit Name Name the input device connected to the input jacks to make your input source selection easier VCR DVD D VHS Cable STB HD STB Satellite STB AV Receiver DVD Receiver Game Camcorder DVD Combo DHR PC MENU MENU EXIT Adjusting the LCD Display ...

Page 61: ...rocedure check your video controller and computer system your monitor is functioning properly Not Optimum Mode If there is something wrong with the input signal a message appears on the screen or the screen goes blank although the power indicator LED is still on The message may indicate that the monitor is out of scan range or that you need to check the signal cable Note Refer to Specifications Pr...

Page 62: ...dapter video driver and the monitor driver 4 Check if the scanning ratio of the video screen is set at 56 Hz 75 Hz Do not exceed 60 Hz when using the maximum resolution 5 If you have problems in installing the adapter video driver boot the computer in Safe Mode remove the Display Adapter at the Control Panel System Device Administrator and then reboot the computer to reinstall the adapter video dr...

Page 63: ...mum Mode message A Check the maximum resolution and the frequency of the video adapter A Compare these values with the data in the Preset Timing Modes Chart Q Picture rolls vertically A Check if the signal cable is securely connected Connect it again securely Refer to Connecting the monitor Q Image is not clear Picture is blurred A Run Frequency Coarse and Fine tuning A Turn on again after removin...

Page 64: ...he Connecting the monitor A Check the volume level Refer to the Volume Q The sound level is too low A Check the volume level Refer to the Volume A If the volume is still too low after turning the control to its maximum check the volume control on the computer sound card or software program 4 Problems related to Remote Control Note Problems related to the remote control and their solutions are list...

Page 65: ... on the case Do not let any water enter the monitor Q What are the benefits of digital broadcasting A Digital TV broadcasting generates less noise and provides clearer visuals and sound than analog TV broadcasting does As services develop you can also enjoy various information services because various kinds of data besides video and audio can be sent A For example while watching a sports game you ...

Page 66: ...broadcasting Q Can I use my present antenna to receive digital broadcasting A As for existing analog TV digital TV is designed so that digital broadcasting signals are received via both indoor and outdoor antennas A If signal reception is very good in your environment you can watch digital broadcasts with your existing indoor antenna If not it is better to install an outdoor UHF antenna Q How do I...

Page 67: ...Terminated RGB Analog DVI Digital Visual Interface 0 7 Vp p 5 Separate H V sync Composite TTL level V high 2 0 V V low 0 8 V Maximum Pixel Clock 146 250 MHz Power Supply AC 100 240 V 10 60 50 Hz 3 Hz Signal Cable 15pin to 15pin D sub cable Detachable DVI D to DVI D connector Detachable Dimensions W x H x D Weight 486 0 x 350 0 x 86 0 mm 19 1 X 13 8 X 3 4 inch Without Stand 5 5 kg 12 1 Ibs 486 0 x ...

Page 68: ...ies with the Electromagnetic Compatibility Directives for residential use and can be used in all areas including common residential areas Class B equipment emits less electromagnetic waves than Class A equipment PowerSaver This monitor has a built in power management system called PowerSaver This system saves energy by switching your monitor to low power mode when it has not been used for a certai...

Page 69: ...88 50 000 VESA 800 x 600 46 875 75 000 49 500 VESA 1024 x 768 48 363 60 004 65 000 VESA 1024 x 768 56 476 70 069 75 000 VESA 1024 x 768 60 023 75 029 78 750 VESA 1152 x 864 67 500 75 000 108 000 VESA 1280 x 960 60 000 60 000 108 000 VESA 1280 x 1024 63 981 60 020 108 000 VESA 1280 x 1024 79 976 75 025 135 000 VESA 1680 x 1050 65 290 59 954 146 250 Horizontal Frequency The time to scan one line con...

Page 70: ...chable Dimensions W x H x D Weight 520 0 x 370 0 x 86 5 mm 20 5 X 14 6 X 3 4 inch Without Stand 5 7 kg 12 6 Ibs 520 0 x 441 5 x 215 0 mm 20 5 X 17 4 X 8 5 inch With Stand 6 2 kg 13 7 Ibs Environmental considerations Operating Temperature 50 F 104 F 10 C 40 C Humidity 10 80 non condensing Storage Temperature 4 F 113 F 20 C 45 C Humidity 5 95 non condensing Plug and Play Capability This monitor can ...

Page 71: ...nergy conservation turn your monitor OFF when it is not needed or when leaving it unattended for long periods The PowerSaver system operates with a VESA DPM compliant video card installed in your computer Use the software utility installed on your computer to set up this feature State Normal Operation Power saving mode Power off Power button EPA ENERGY 2000 Power Indicator On Blinking Off Power Co...

Page 72: ...5 000 108 000 VESA 1280 x 960 60 000 60 000 108 000 VESA 1280 x 1024 63 981 60 020 108 000 VESA 1280 x 1024 79 976 75 025 135 000 VESA 1680 x 1050 65 290 59 954 146 250 Horizontal Frequency The time to scan one line connecting the right edge to the left edge of the screen horizontally is called the Horizontal Cycle and the inverse number of the Horizontal Cycle is called the Horizontal Frequency U...

Page 73: ... as window termination button is pressed If there s still noise after the automatic adjustment use the Fine Coarse adjustment func tion When viewing a fixed screen for an extended period of time a residual image or blur riness may appear Change the mode to energy save or set a screensaver to move the picture when you need to be away from the monitor for an extended period of time Do not display a ...

Page 74: ...power off when using a stationary pattern Turn the power off for 4 hours after 20 hours in use Turn the power off for 2 hours after 12 hours in use Use a Screen saver if possible Screen saver in one color or a moving image is recommended Set the Monitor to power off with the PC Display Properties Power Scheme Suggestions for specific applications Ex Airports Transit Stations Stock Markets Banks an...

Page 75: ...using it Image retention may not occur when a LCD panel is operated under normal conditions Normal conditions are defined as continuously changing video patterns When the LCD panel is operated for a long time with a fixed pattern over 12 hours there may be slight difference in voltage between electrodes that work the liquid crystal LC in a pixel The voltage difference between electrodes increases ...

Page 76: ...Our LCD Monitor satisfies ISO13406 2 Pixel fault Class II Information ...

Page 77: ...http www samsung com latin GUATEMALA 1 800 299 0013 http www samsung com latin HONDURAS 800 7919267 http www samsung com latin JAMAICA 1 800 234 7267 http www samsung com latin NICARAGUA 00 1800 5077267 http www samsung com latin PANAMA 800 7267 http www samsung com latin PUERTO RICO 1 800 682 3180 http www samsung com latin REP DOMINICA 1 800 751 2676 http www samsung com latin TRINIDAD TO BAGO 1...

Page 78: ...G 7267864 CHF 0 08 Min http www samsung com ch U K 0845 SAMSUNG 7267864 http www samsung com uk CIS ESTONIA 800 7267 http www samsung ee LATVIA 8000 7267 http www samsung com lv LITHUANIA 8 800 77777 http www samsung lt KAZAKHSTAN 8 10 800 500 55 500 http www samsung com kz_ru KYRGYZSTAN 00 800 500 55 500 RUSSIA 8 800 555 55 55 http www samsung ru TADJIKISTAN 8 10 800 500 55 500 UKRAINE 8 800 502 ...

Page 79: ... horizontal sync signals into one composite signal and transmitting it to the monitor The monitor displays the color signals by separating the composite signal into original color signals Dot Pitch The image on a monitor is composed of red green and blue dots The closer the dots the higher the resolution The distance be tween two dots of the same color is called the Dot Pitch Unit mm Vertical Freq...

Page 80: ...p to the cable network CATV CATV refers to the broadcasting service offered at hotels schools and other buildings through their own broadcasting sys tem apart from VHF or UHF broadcasting by terrestrial broad casters The CATV programs may include movies entertainment and educational programs Different from cable TV CATV can be viewed only within the area in which the CATV service is offered VHF UH...

Page 81: ...ition Multi media Interface This is an interface that connects both quality video signals and digital audio signals with a cable without any compression HD High Definition In HD 1080 line 2x density beaming 1080i is used HD provides a five times clearer screen quality than the existing analog method and has a wide 16 9 aspect ratio SD Standard Definition In SD 480 line double beaming 480i is used ...

Page 82: ...STAR guidelines for energy efficiency All other product names mentioned herein may be the trade marks or registered trademarks of their respective owners Appendix ...

Reviews: