Samsung SyncMaster 900NF User Manual Download Page 18

When prompted by the operating system for the monitor driver, insert the CD-ROM 
included with this monitor. Driver installation is slightly different from one operating 
system to another. Follow the directions as appropriate for the operating system you 
have.

Prepare a blank disk and download the driver program file at the Internet web site shown 
here.

z

Internet web site : 

http://www.samsung-monitor.com/

 (Europe)

http://www.samsung

usa

.com/

monitor/

 (USA)

http://www.sec.co.kr/

monitor/

 (Korea)

http://www.samsungmonitor.com.cn/

 (China)

Microsoft

®

 Windows

®

 XP Operating System

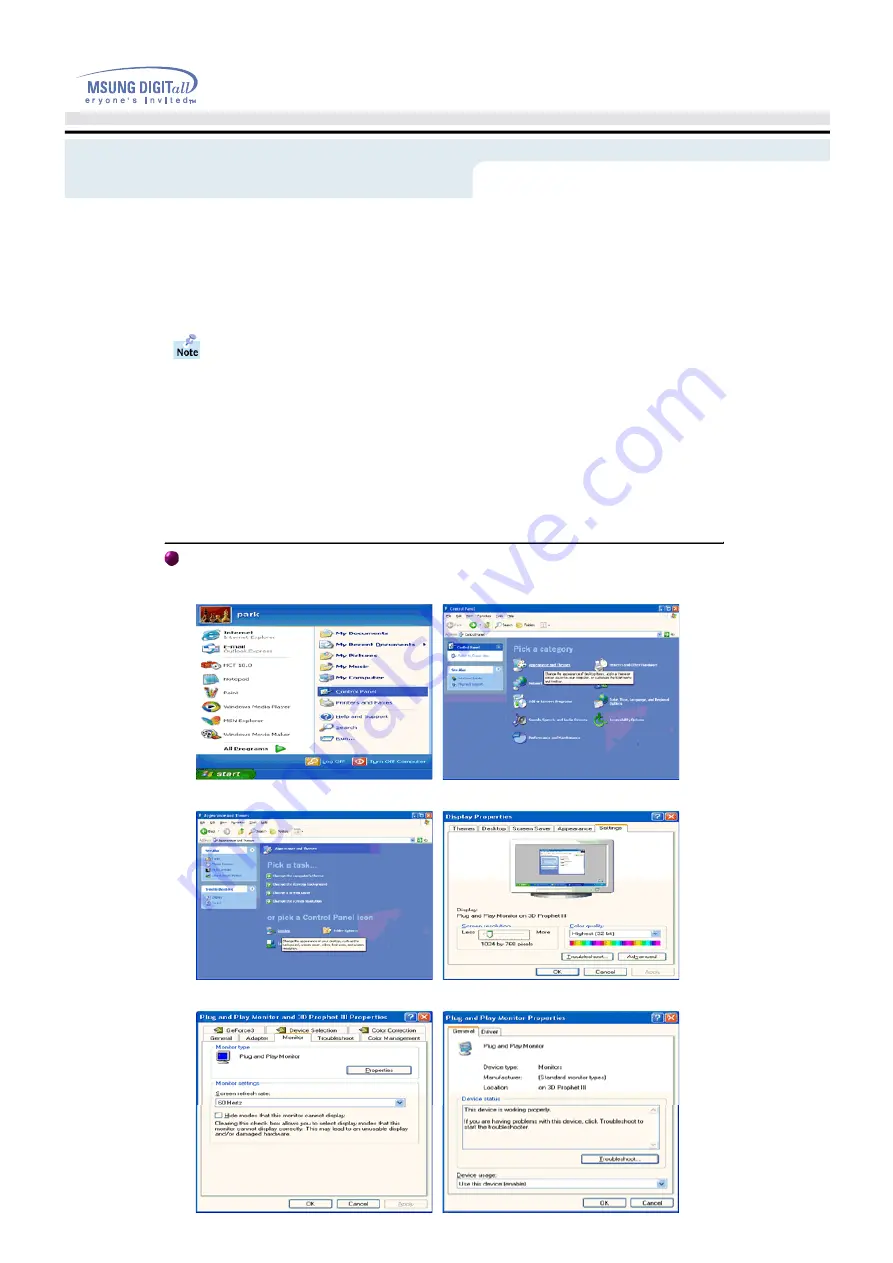
1. Insert CD into the CD-ROM driver. 
2. Click "

Start

" —> "

Control Panel

" then click the "

Appearance and Themes

" Icon. 


3. Click "

Display

" icon and choose the "

Settings

" tab then click "

Advanced..

".


4. Click the "

Properties

" button on the "

Monitor

" tab and select "

Driver

" tab. 

Setup

Summary of Contents for SyncMaster 900NF

Page 1: ...SyncMaster 959NF 900NF ...

Page 2: ...t Power Q A Installation Self Test Feature Check Cleaning Other Introduction Specifications Unpacking General Specifications Front Preset Display Modes Rear PowerSaver Bottom Setup Information Connecting Your Monitor Service Installing the Monitor Driver Terms Automatic Regulatory Manual Natural Color Base Installation MouScreen S W Authority ...

Page 3: ...this symbol could result in bodily harm or damage to equip ment Notational Warning Caution Notation Conventions Prohibited Important to read and understand at all times Do not disassemble Disconnect the plug from the outlet Do not touch Grounding to prevent an electric shock ...

Page 4: ...scent substance on the inside of the CDT Do not use a damaged or loose plug This may cause an electric shock or fire Do not pull the plug out by the wire nor touch the plug with wet hands This may cause an electric shock or fire Use only a properly grounded plug and recepticle An improper ground may cause electric shock or equipment damage Do not excessively bend the plug and wire nor place heavy ...

Page 5: ...ct the plug from the outlet during storms or lightening or if it is not used for a long period of time Failure to do so may cause an electric shock or fire Do not connect too many extension cords or plugs to an outlet This may cause a fire Power ...

Page 6: ...ation with low humidity and a mini mum of dust An electric shock or fire could result inside the monitor Do not drop the monitor when moving it This may cause damage to the product or human body Place the monitor on a flat and stable surface The monitor can cause injury by falling Set down the monitor carefully It could be damaged or broken Installation ...

Page 7: ...or face down The CDT surface may be damaged Do not use the monitor without the monitor stand It could break down or cause a fire due to bad ventilation If the monitor must be used without the supplied stand take steps to insure proper ventilation Installation ...

Page 8: ...fire Do not set a glass of water chemicals or any small metal objects on the monitor This may cause damage electric shock or a fire If a foreign substance gets into the monitor disconnect the plug and then contact a service center Clean When cleaning the monitor case or the surface of the CDT wipe with a slightly moistened soft fabric Do not clean Flat monitor with water Use a water diluted mild d...

Page 9: ... any unusual sounds or smells coming from it unplug it immediately and contact an authorized dealer or service This may cause an electric shock or a fire Do not place any heavy objects on the monitor This may cause an electric shock or a fire For each hour of looking at the monitor you should let your eyes rest for 5 minutes This will reduce eye fatigue Do not use or store inflammable substances n...

Page 10: ... cable Do not move the monitor right or left by pulling only the wire or the signal cable This may cause a breakdown electric shock or a fire due to damage to the cable Never insert anything metallic into the monitor openings This may cause an electric shock fire or injury Keep the monitor away from any magnetic substances This may cause discoloring or distortion of the image Other ...

Page 11: ... attached Please make sure the following items are included with your monitor If any items are missing contact your dealer Power Cord Stand Signal Cable Option Quick Setup Guide Warranty Card Not available in all locations User s Guide and Driver Installation CD USB Cable USB Hub Option ...

Page 12: ...items in the menu 4 Menu button Use this button to open the OSD and activate a highlighted menu item 5 Power indicator This light glows green during normal operation and blinks green once as the monitor saves your adjustments 6 Power button Use this button to turn the monitor on and off Note See PowerSaver described in the manual for further information regarding power saving functions For energy ...

Page 13: ...he monitor 2 Signal port Connect the signal cable to the video port on your computer video board video card or graphics card 3 BNC Connectors Option Connect the signal cable to the BNC signal port on the back of your monitor 4 USB Connector Connect the USB cable to the USB port on the back of your monitor Note See Connecting Your Monitor for further information regarding cable connections Rear ...

Page 14: ...e signal cable to the video port on your computer video board video card or graphics card 2 Power Port Connect the power cord for your monitor to the power port on the back of the monitor 3 Tilt Swivel Base You can separate the base from the monitor Bottom ...

Page 15: ...d 3 If you are using a Macintosh computer connect the cable to a Macintosh adapter and set the pins on your adapter Adapter not included A PC compatible computer does not need an adapter 4 Connect the signal cable to the BNC signal port on the back of your monitor computer 5 Connect the USB cable to the USB port on the back of your monitor computer 6 Turn on your computer and monitor If your monit...

Page 16: ...and download the driver program file at the Internet web site shown here z Internet web site http www samsung monitor com Worldwide http www samsungusa com monitor USA http www sec co kr monitor Korea http www samsungmonitor com cn China Windows ME 98 95 1 Insert CD into the CD ROM driver 2 Click Windows ME 98 95 Driver 3 Choose your monitor model in the model list then click the OK button 4 Click...

Page 17: ...e Install button in the Warning window 5 If you can see following Message window then click the Continue Anyway button Then click OK button This monitor driver is under certifying MS logo and this installation don t damage your system The certified driver will be posted on Samsung Monitor Homepage http www samsung monitor com 6 Monitor driver installation is completed ...

Page 18: ...r program file at the Internet web site shown here z Internet web site http www samsung monitor com Europe http www samsungusa com monitor USA http www sec co kr monitor Korea http www samsungmonitor com cn China Microsoft Windows XP Operating System 1 Insert CD into the CD ROM driver 2 Click Start Control Panel then click the Appearance and Themes Icon 3 Click Display icon and choose the Settings...

Page 19: ...Don t search I will then click Next and then click Have disk 7 Click the Browse button then choose A D Driver and choose your monitor model in the model list and click the Next button 8 If you can see following Message window then click the Continue Anyway button Then click OK button Setup ...

Page 20: ... tab and then click Advanced 4 Choose Monitor 5 Click Driver and then click on Update Driver then click on the Next button 6 Choose Display a list of the known drivers for this device so that I can choose a specific driver then click Next and then click Have disk 7 Click the Browse button then choose A D Driver 8 Click the Open button then click OK button 9 Choose your monitor model and click the ...

Page 21: ...ect Show all devices then choose the monitor that corresponds to the one you connected to your computer and click OK 10 Continue choosing Close button and O K button until you close the Display Properties dialogue box Microsoft Windows 95 Operating System First determine the Windows 95 version installed on your computer by right clicking the My Computer icon on PC and selecting Properties The vers...

Page 22: ...y referring to the Preset Display Modes in the user guide Linux Operating System To execute X Window you need to make the X86Config file which is a type of system setting file 1 Press Enter at the first and the second screen after executing the X86Config file 2 The third screen is for setting your mouse 3 Set a mouse for your computer 4 The next screen is for selecting a keyboard 5 Set a Keyboard ...

Page 23: ...User s Manual 21 Setup With the built in pedestal you can tilt and or swivel the monitor for the most comfortable viewing angle Note The base is detachable Base Installation Tilt Swivel Base ...

Page 24: ...e down on a flat work surface 2 Align the tabs on the base with the corresponding slots on the bottom of the monitor 3 Press the base onto the monitor until the tabs are fully engaged in the slots 4 Push the base toward the front of the monitor until the release latch clicks into the locked position Do not bend the snap ...

Page 25: ...e The base will align with the monitor slots in only one position Base Installation Attaching and Removing the Bose 5 Squeeze and pull up on the release latch on the base 6 Push the base toward the back of the monitor and lift up to remove the base ...

Page 26: ...o conferencing systems or photos by emphasizing a certain area on the screen 2 Exit button Use this button to Exit the active menu or the OSD 3 Adjust buttons These buttons allow you to highlight and adjust items in the menu 4 Menu button Use this button to open the OSD and activate a highlighted menu item ...

Page 27: ...ecrease the brightness 3 Push the button to increase the contrast or the button to decrease the contrast 1 Push and hold in the Menu button for 10 seconds or more to Lock the OSD In this case even if you click the Menu button the control screen will not be printed 2 Push and hold in the Menu button for 10 seconds or more to UnLock the OSD Menu How to adjust Brightness Contrast OSD lock unlock ...

Page 28: ...the horizontal position of the monitor s viewing area Follow these instructions to change the size of the monitor s entire display 1 Push the Menu button 2 Push the button or button until the Position Size screen is displayed push the button or button to select Size 3 Push the Menu button to open the Size adjustment screen 4 Use the and buttons to change the vertical size of the monitor s viewing ...

Page 29: ...rease the screen viewing area Use the button to enlarge the screen viewing area Adjust the parallelogram setting when the display is leaning left or right adjust the rotation setting when the entire display is tilted left or right 1 Push the Menu button 2 Push the button or button until the Geometry screen is displayed 3 Push the Menu button to open the Parallel Rotation adjustment screen 4 Use th...

Page 30: ...on to open the Pincushion Trapezoid adjustment screen 4 Use the button or button to adjust the pincushion setting Use the button or button to adjust the trapezoid setting Adjust the pinbalance setting when the sides of the display are bowed towards the left or right 1 Push the Menu button 2 Push the button or button until the Geometry screen is displayed Push the button or button to select Pinbala...

Page 31: ...ner adjustment screen 4 Use the or buttons to adjust the SidePin Corner correction Adjust the Pinbalance Corner correction when the sides of the display are bowed in or bowed out adjust the side pinbalance corner correction when the top or bottom of the display is too large or small 1 Push the Menu button 2 Push the button or button until the Geometry screen is displayed Push the button or button ...

Page 32: ...e or button to select R ed G reen or B lue then use the and buttons until you reach the desired color Color temperature is a measure of the warmth of the image colors The available range is between 5000 to 9300K Follow these steps to change the color temperature and adjust individual R G B color control Note Recall does not reset the color settings 1 Push the Menu button 2 Push the button or butto...

Page 33: ...h the Menu button to open the Color3 adjustment screen 4 Adjust the color temperature as close to the desired temperature as possible using only the and buttons To fine tune the color hue use the or button to select R ed G reen or B lue then use the and buttons until you reach the desired color Adjust the color purity of the picture 1 Push the Menu button 2 Push the button or button until the Scre...

Page 34: ...on to open the Clear Moire adjustment screen 4 Use the button or button to adjust horizontal moire use the button or button to adjust vertical moire Adjust the linearity setting when the display image is compressed at the left right or top bottom 1 Push the Menu button 2 Push the button or button until the Screen OSD is displayed Push the button or button to select Linearity 3 Push the Menu button...

Page 35: ...areas of the screen Use the button or button to adjust the center area of the screen Convergence affects picture clarity Adjust the horizontal or vertical convergence to properly align the color dots that make up the image 1 Push the Menu button 2 Push the button or button until the Screen OSD is displayed Push the button or button to select Convergence 3 Push the Menu button to open the Convergen...

Page 36: ...sing screen will appear After a few seconds the degauss main menu will return Use the recall feature to reset these monitor settings to their original levels Position Size Pincushion Trapezoid Parallelogram Pinbalance Rotation Clear Moire Note If you have selected Yes all settings listed above will be reset All other settings will remain the same 1 Push the Menu button 2 Push the button or button ...

Page 37: ...is menu to set your monitor to the correct type of synchronization Select Separate if the computer is sending a separate synchronization signal Select Sync on Green if the computer expects the monitor to synchronize with the green signal it sends Refer to your computer or video card user s manual to determine the correct setting 1 Push the Menu button 2 Push the button or button until the Advanced...

Page 38: ...or button to select D SUB BNC 3 Push the Menu button to open the D SUB BNC selection screen 4 Use the button or button to select D SUB or BNC You can see the frequency user control mode used by the user the polarity of the operational signals the default frequency default mode set when you buy the monitor and the resolution level Note These screens do not allow any changes to the settings they are...

Page 39: ...o place the menu in the position you prefer The menu will automatically turn off if no adjustments are made for a certain time period You can set the amount of time the menu will wait before it turns off 1 Push the Menu button 2 Push the button or button until the Menu screen is displayed Push the button or button to select Menu Duration 3 Push the Menu button to open the Menu Duration selection s...

Page 40: ...y not appear in some areas The language chosen affects only the language of the OSD It has no effect on any software running on the computer 1 Push the Menu button 2 Push the button or button until the Menu screen is displayed Push the button or button to select Languages 3 Push the Menu button to open the Languages selection screen 4 Use the button or button to select the language you would like ...

Page 41: ...n 3 Push the button or button to cancel execute or enlarge the entire screen This function is to move the Highlight Zone horizontally or vertically 1 Push the Highlight button 2 Push the button or button to select the Screen Position Adjustment and then push the Menu button 3 Push the button or button to move the position of the Highlight Zone horizontally and use the push the button or button to ...

Page 42: ...ush the button or button to move the size of the Highlight Zone horizontally and use the push the button or button to move it vertically This function is to use the Contrast of the Highlight Zone 1 Push the Highlight button 2 Push the button or button to select the Contrast Adjustment and then push the Menu button 3 Push the button or button to adjust the Contrast of the Highlight Zone Menu How to...

Page 43: ...the button or button to select a color from R G or B Push the button or button to adjust the R G or B color of the Highlight Zone This function is to enlarge or reduce the Highlight Zone 1 Push the Highlight button 2 Push the button or button to select theEnlargement and Reduction Adjustment and then push the Menu button 3 Push the button or button to enlarge or reduce the Highlight Zone Menu How ...

Page 44: ...t the sharpness of the Highlight Zone 1 Push the Highlight button 2 Push the button or button to select the Sharpness Adjustment and then push the Menu button 3 Push the button or button to adjust the sharpness of the Highlight Zone Menu How to adjust Sharpness ...

Page 45: ...wing depending on the image and colors on the screen As the contrast value approaches 0 the picture becomes too dark to see clearly Therefore this value should be 25 or higher 3 3 3 3 Color Temperature This setting adjusts the color temperature also known as warmth in a range from 9300K bluish hue to 5000K reddish hue 4 Color Control This setting adjusts the picture color tone by controlling each ...

Page 46: ... cursor movement 2 Fine Tuning When the mouse pointer is correctly placed over the Position icon the icon color will change Then click the left mouse button The fine tuning sub menu appears in the bottom left corner of the screen When the mouse cursor is correctly placed over any of the fine tuning arrows the arrow color changes as it does when an icon is selected Click the left mouse button to ac...

Page 47: ...d To decrease the Width drag inward To increase the Height drag upward on the grid where the icons are located To decrease the Height drag downward 2 Fine Tuning When the mouse pointer is correctly placed over the Size icon the icon color changes Then click the left mouse button The fine tuning sub menu appears in the bottom left corner of the screen When the mouse cursor is correctly placed over ...

Page 48: ...rrow 2 Fine Tuning When the mouse pointer is correctly placed over the Rotation icon the icon color changes Then click the left mouse button The fine tuning sub menu appears in the left bottom corner of the screen When the mouse cursor is correctly placed over either of the left or right arrows the arrow color changes as it does when an icon is selected Then click the left mouse button to achieve ...

Page 49: ... the right the image area becomes concave 2 Fine Tuning When the mouse pointer is correctly placed over the Pincushion icon the icon color changes Then click the left mouse button and the Pincushion fine tuning sub menu appears in the bottom left corner of the screen When the mouse cursor is correctly placed over any of the Pincushion fine tuning arrows the arrow color changes as it does when an i...

Page 50: ...ight the image area becomes tilts to the right 2 Fine Tuning When the mouse pointer is correctly placed over the Pin Balance icon the icon color changes Then click the left mouse button and the Pin Balance fine tuning sub menu appears in the left bottom corner of the screen When the mouse cursor is correctly placed over either of the left or right arrows the arrow color changes as it does when an ...

Page 51: ...right the upper image area widens and the bottom part narrows 2 Fine Tuning When the mouse pointer is correctly placed over the Trapezoid icon the icon color changes Then click the left mouse button and the Trapezoid fine tuning sub menu appears in the left bottom corner of the screen When the mouse cursor is correctly placed over either of the left or right arrows the arrow color changes as it do...

Page 52: ...ge area tilts to the left 2 Fine Tuning When the mouse pointer is correctly placed over the Parallelogram icon the icon color changes Then click the left mouse button to pop up the Parallelogram fine tuning sub menu in the left bottom corner of the screen When the mouse cursor is correctly placed over either of the left or right arrows the arrow color changes as it does when the icon is selected T...

Page 53: ...u functions in the Highlight Zone only when the Highlight Zone is turned on You cannot select menu functions when this setting is off 2 Highlight Zone on As soon as you click the On checkbox the Highlight Zone turns on while the checkbox appears checked selected 3 Highlight Zone off As soon as you click the Off checkbox the checkbox will be unchecked and the High light Zone turns off Highlight Zon...

Page 54: ...irrespective of whether the Highlight Zone is in On or Off mode When the Highlight Zone is in Full mode it enlarges to the entire screen area and is locked by the Picture icon because Position Size adjustment is no longer required 2 Deactivating Full Highlight Zone When you click the Full checkbox again in the Full mode the Highlight Zone returns to the previous menu If you wish to turn it off you...

Page 55: ...tal Size Width adjustment icon is located on the left and right sides and the Vertical Size Height adjustment icon is located on the top and bottom of the screen Drag outward along the grid where the icons are located to increase the Highlight Zone s Width Drag inward to decrease Width Drag upward along the grid where the icons are located to increase the Highlight Zone s Height Drag downward to d...

Page 56: ...sired When the mouse pointer is correctly placed over the arrow the pointer turns into a finger icon Then click the left mouse button and drag the icon as desired 1 Contrast This setting adjusts the contrast of the Highlight Zone from 100 to 100 to achieve the user s desired contrast 2 Color This setting adjusts the color of the Highlight Zone by Red Green or Blue separately This ensures that anim...

Page 57: ...w is dragged to the right 2 Fine Tuning When the mouse pointer is correctly placed over the Moire icon the icon color changes Then click the left mouse button and its fine tuning sub menu appears in the bottom left corner of the screen When the mouse cursor is correctly placed over either of the left or right arrows the arrow color changes as it does when an icon is selected Then click your left m...

Page 58: ... If the mouse is dragged to the left for both the icons the corner side pins shrink inward If the mouse is dragged to the right they expand outward 2 Fine Tuning When the mouse pointer is correctly placed over the Corner Side Pin icon the icon color changes Then click the left mouse button and the Corner Side Pin fine tuning sub menu appears in the bottom left corner of the screen When the mouse c...

Page 59: ...ons if the mouse is dragged to the left the corner side pins are curved to the left If the mouse is dragged to the right they are curved to the right 2 Fine Tuning When the mouse pointer is correctly placed over the Corner Pin Balance icon the icon color changes Then click the left mouse button and its fine tuning sub menu appears in the bottom left corner of the screen When the mouse cursor is co...

Page 60: ...lace and click the mouse pointer on the Degauss icon that is located in the center of the screen The picture image may become fuzzy for three to five seconds with the monitor making a ticking sound when the icon is selected Any fuzzy screen blotches are removed while the magnetic field affecting the screen is degaussed More More More More ...

Page 61: ... nature does not require being reset 2 Save This setting saves all the adjustments made in the current session since the program was started 3 OK This closes the monitor setting saves the current adjustments and exits the program 4 Cancel This returns the monitor settings to their original state before the current adjustments are saved and exits the program Others Others Others Others ...

Page 62: ...licable mode the safe mode for Windows 95 98 ME XP 2000 and then change the frequency of the video card Refer to the Preset Note If the initial screen the login screen does not appear contact a service center or your dealer Can you see Sync Out of Range 68 7kHz 168Hz PP on the screen You can see this message when the signal from the video card exceeds the maximum resolution and frequency that the ...

Page 63: ... screen displaying only one color as if looking at the screen through a cellophane paper Check the signal cable connection Make sure the video card is fully inserted in it s slot Have the screen colors become strange after running a program or due to a crash between applications Reboot the computer Has the video card been set properly Set the video card by referring to the video card manual The sc...

Page 64: ...ere are only 16 colors shown on the screen The screen colors have changed after changing the video card Have the Windows colors been set properly For Windows 95 98 ME XP 2000 Set the colors properly at the Control Panel Display Settings For Windows 3 1 Adjust the colors of the screen using the VGA utility provided by the video card Has the video card been set properly Set the video card by referri...

Page 65: ...de remove the Display Adapter at the Control Panel System Device Administrator and then reboot the computer to reinstall the adapter video driver The Highlight feature is designed for movig image and so please use it in the moving image screen 1 To protect CDT against the screen brightness the Highlight Zone function persists for three hours and then automatically stops So please reset it to conti...

Page 66: ...for details How can I set the Power Saving function Windows 95 98 ME XP 2000 Set the function at BIOS SETUP of the computer or the screen saver Refer to Windows Computer Manual Windows 3 1 Set the function using the VGA Utility provided by the video card The monitor makes a sound when it is turned on This is normal as some sound may be generated when the metal case and the electromagnet which are ...

Page 67: ...e being adjusted Make sure you close the MouScreen program before changing the vertical frequency or resolution Do not run the MouScreen program together with OSD Otherwise the program may not work properly as data stored in the monitor may be different from those in the program If you close and rerun the program it will work properly because it reads the modified data while reloading The Highligh...

Page 68: ...Position Size Tabs do not respond Check if the Highlight Zone Full Screen function has been used but not yet released If Full Screen is on those three functions will not operate Note If this problem persists reinstall the program If it still persists contact the Service Center ...

Page 69: ...following screen appears Failure of any of the boxes to appear indicates a problem with your monitor This box also appears during normal operation if the video cable becomes disconnected or damaged 4 Turn off your monitor and reconnect the video cable then turn on both your computer and the monitor If your monitor screen remains blank after using the previous procedure check your video controller ...

Page 70: ... the monitor 3 Degauss the monitor if any devices were removed from the area A monitor recreates visual signals received from the PC Therefore if there is trouble with the PC or the video card this can cause the monitor to become blank have poor coloring noise Sync Out of Range etc In this case first check the source of the problem and then contact a service center or your dealer Judging the monit...

Page 71: ...black matrix Anti doming invar shadow mask Multi layer coated with anti static Maximum Flicker Free Resolution 1600x1200 87Hz Flicker Free Display Active Display Horizontal 352 3 mm Vertical 264 3 mm Synchronization Horizontal 30 110 kHz Vertical 50 160 Hz Input Signal Definition Video Signal RGB Analog 0 7 Vpp positive at 75 ohms Sync Signal Separate H V sync Composite TTL level positive or negat...

Page 72: ...nmental considerations Operating Temperature 32 F 104 F 0 C 40 C Humidity 10 80 non condensing Storage Temperature 4 F 113 F 20 C 45 C Humidity 5 95 non condensing Plug and Play Capability This monitor can be installed on any Plug Play compatible system Interaction of the monitor and computer systems will provide the best operating conditions and monitor settings In most cases monitor installation...

Page 73: ...black matrix Anti doming invar shadow mask Multi layer coated with anti static Maximum Flicker Free Resolution 1600x1200 87Hz Flicker Free Display Active Display Horizontal 352 3 mm Vertical 264 3 mm Synchronization Horizontal 30 110 kHz Vertical 50 160 Hz Input Signal Definition Video Signal RGB Analog 0 7 Vpp positive at 75 ohms Sync Signal Separate H V sync Composite TTL level positive or negat...

Page 74: ...nmental considerations Operating Temperature 32 F 104 F 0 C 40 C Humidity 10 80 non condensing Storage Temperature 4 F 113 F 20 C 45 C Humidity 5 95 non condensing Plug and Play Capability This monitor can be installed on any Plug Play compatible system Interaction of the monitor and computer systems will provide the best operating conditions and monitor settings In most cases monitor installation...

Page 75: ...87 28 322 VESA 640 x 480 43 269 85 008 36 000 VESA 800 x 600 53 674 85 061 56 250 VESA 1024 x 768 68 677 84 997 94 500 VESA 1280 x 1024 79 976 75 025 135 00 VESA 1280 x 1024 91 146 85 024 157 50 VESA 1600 x 1200 106 250 85 000 229 50 Horizontal Frequency The time to scan one line connecting the right edge to the left edge of the screen horizontally is called Horizontal Cycle and the inverse number...

Page 76: ...hen leaving it unattended for long periods The PowerSaver system operates with a VESA DPMS compliant video card installed in your computer Use a software utility installed on your computer to set up this feature PowerSaver State Normal Operation Power off Mode EPA ENERGY 2000 Power Indicator Green Green Blinking Power Consumption 110W Nominal 120W Maximum Less than 3W This monitor is EPA ENERGY ST...

Page 77: ...pean Service Center National Service Stafford Park 12 Telford Shropshire TF3 3BJ Tel 0870 242 0303 Fax 01952 292 033 http samsungservice co uk THAILAND HAI SAMSUNG SERVICE CENTER MPA COMPLEX BUILDING 1st 2nd Floor 175 SOI SUEKSA VIDHAYA SATHON SOI 12 SILOM ROAD SILOM BANGRAK BANGKOK 10500 TEL 0 2635 2567 FAX 0 2635 2556 SOUTH AFRICA Samsung Electronics 5 Libertas Road Somerset Office Park Bryansto...

Page 78: ...erlace method is used for the majority of monitors to ensure a clear image The Interlace method is the same as that used in TVs Plug Play This is a function that provides the best quality screen for the user by allowing the computer and the monitor to exchange information automatically This monitor follows the international standard VESA DDC for the Plug Play function Resolution The number of hori...

Page 79: ...experienced radio television technician for additional suggestions You may find thebooklet called How to Identify and Resolve Radio TV Interference Problems helpful This booklet was prepared by the Federal Communications Commission It is available from the U S Government Printing Office Washington DC 20402 Stock Number 004 000 00345 4 Warning User must use shielded signal interface cables to maint...

Page 80: ...AC MPR II recommendations for reduced electric and magnetic fields European Notice Europe only Products with the CE Marking comply with both the EMC Directive 89 336 EEC 92 31 EEC 93 68 EEC and the Low Voltage Directive 73 23 EEC issued by the Commission of the European Community Compliance with these directives implies conformity to the following European Norms EN55022 1998 Radio Frequency Interf...

Page 81: ...etc it is vital to conserve energy Electronic equipment in offices consumes an enormous amount of energy since it is often routinely left running continuously What does labelling involve This product meets the requirements for the TCO 95 scheme which provides for international environmental labelling of monitors The labelling scheme was developed as a joint effort by the TCO The Swedish Confederat...

Page 82: ...and bromine Lead Lead can be found in picture tubes display screens solders and capacitors Lead damages the nervous system and in higher doses causes lead poisoning TCO 95 requirement Permits the inclusion of lead since no replacement has yet been developed Cadmium Cadmium is present in rechargeable batteries and in the colour generating layers of certain computer displays Cadmium damages the nerv...

Page 83: ...ture Since it is not so far possible to satisfactorily recycle the majority of electronics equipment most of these potentially damaging substances sooner or later enter nature There are also other characteristics of a computer such as energy consumption levels that are important from the viewpoints of both the work internal and natural external environments Since all methods of electricity generat...

Page 84: ...ervous system and is toxic in high doses The relevant TCO 99 requirement states that batteries the colour generating layers of display screens and the electrical or electronics components must not contain any cadmium Mercury Mercury is sometimes found in batteries relays and switches It damages the nervous system and is toxic in high doses The relevant TCO 99 requirement states that batteries may ...

Page 85: ...ore information refer to Help F1 in the software program How to install the Natural Color software Insert the CD included with the Samsung monitor into the CD ROM Drive Then the initial screen of the program installation will be executed Click Natural Color on the initial screen to install the Natural Color software To install the program manually insert the CD included with the Samsung monitor in...

Page 86: ...a Samsung monitor that is equipped with a USB port Before Running MouScreen V2 First check to ensure the USB port of the monitor is connected to your computer by a root or hub USB port If not connected properly the MouScreen program will not run displaying the following message If the above message is displayed and the monitor is properly connected to the computer this means that the operating sys...

Page 87: ...r may be different from those in the program If you close and rerun the program it will work properly because it reads the modified data Conflict with OSD In principle the OSD on screen display does not work when this program runs on the system As the program shares internal data with the OSD it will not work properly Close the MouScreen program before running the OSD User s Manual Information Mou...

Page 88: ...ce or use of this material Samsung is the registered trademark of Samsung Electronics Co Ltd Microsoft Windows and Windows NT are registered trademarks of Microsoft Corporation VESA DPMS and DDC are registered trademarks of Video Electronics Standard Association the ENERGY STAR name and logo are registered trademarks of the U S Environmental Protection Agency EPA As an ENERGY STAR Partner Samsung ...

Reviews: