background image

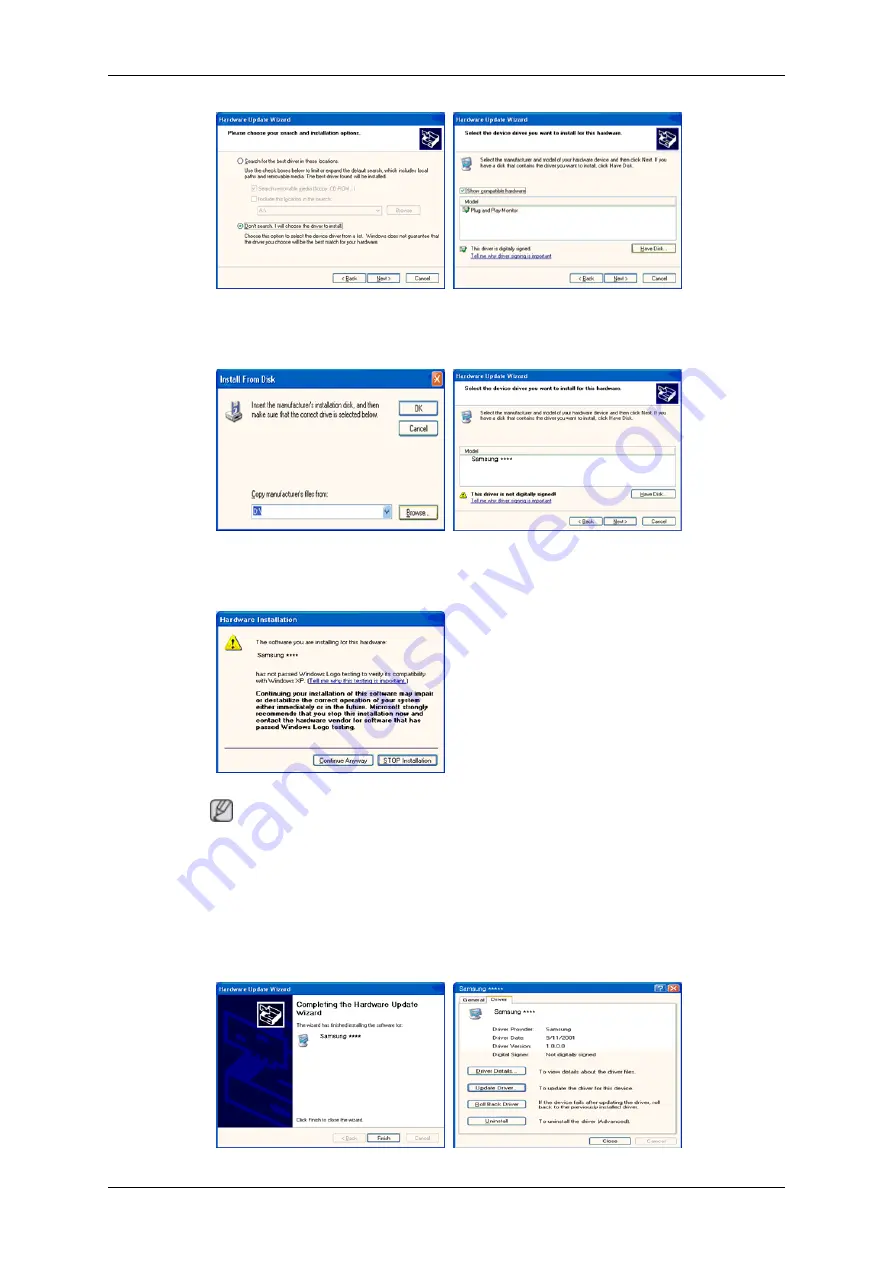
7. Click the "Browse" button then choose A:(D:\Driver) and choose your monitor model in the model

list and click the "Next" button.

8. If you can see following message window, then click the "Continue Anyway" button. Then click

"OK" button.


 Note

This monitor driver is under certifying MS logo, and this installation doesn't damage your system.

The certified driver will be posted on Samsung Monitor homepage.

http://www.samsung.com/

9. Click the "Close" button then click "OK" button continually.

Using the Software

22

Summary of Contents for SyncMaster 2443NW

Page 1: ...SyncMaster 2443NW 2443NWX LCD Monitor User Manual ...

Page 2: ...t touch Ground to prevent an electric shock Power When not used for extended period of time set your computer to DPM If using screen saver set it to active screen mode The images here are for reference only and are not applicable in all cases or countries Shortcut to Anti Afterimage Instructions Do not use a damaged power cord or plug or a damaged or loose power outlet Otherwise this may result in...

Page 3: ... the provided power cord of another product Otherwise this may result in fire or electric shock Installation Be sure to contact an authorized Service Center when installing your monitor in a location with heavy dust high or low temperatures high humidity and exposed to chemical substances and where it operates for 24 hours such as at airports train stations etc Failure to do so may cause serious d...

Page 4: ... cause personal injury Make sure to install the specified wall mount Install your product in a well ventilated location Ensure that there is a clearance of more than 10 cm from the wall Otherwise it may result in fire due to an increase in the internal tem perature Ensure that the packaging vinyl is kept away from children Otherwise it may result in serious harm suffocation if children play with i...

Page 5: ...ecified cloth adding only a little water As the product may be scratched if there is any foreign material on the cloth make sure to shake it thoroughly before using it When cleaning the product do not spray water directly onto the main body of the product Ensure that water does not enter the product and that it is not wet Otherwise this may result in electric shock fire or a malfunction Others The...

Page 6: ... perature Do not place any containers containing water vases flowerpots med icines as well as any metal on the product If water or a foreign material enters the product disconnect the power cord and contact a Service Center This may result in a product malfunction electric shock or fire Do not use or keep combustible spray or flammable material near the product Otherwise this may result in an expl...

Page 7: ...sonal injury or death If you do not use the product for a long period of time disconnect the power cord from the power outlet Otherwise this may result in overheating or fire due to dust and may result in fire due to electric shock or leakage Do not place any heavy items or toys or confectionery such as cookies etc that may attract the attention of children and to the product Your children may han...

Page 8: ...e it may fall and result in personal injury Since the front part of the product is heavy install the product on a level and stable surface Do not put any heavy objects on the product This may result in personal injury and or damage to the product Good Postures When Using the Monitor When using the product use it in the correct position Keep your back straight while looking at the product The dista...

Page 9: ...our monitor If any items are missing contact your dealer Contact a local dealer to buy optional items Unpacking Type 1 Monitor Simple stand Type 2 Monitor USB Simple stand Note MagicRotation program can not be provided as Simple Stand does not support Pivot function Type3 Monitor HAS stand 8 ...

Page 10: ...ard Not available in all loca tions User s Guide Cables D Sub Cable Power Cord Others Cleaning Cloth Cable holding ring Simple stand Sold separately USB Cable Note Cleaning Cloth is only provided for highly polished black products as a product feature Introduction 9 ...

Page 11: ...mes Make sure to adjust the resolution of your PC before reaching the maximum count Note The resolution displayed on the screen is the optimal resolution for this product Adjust your PC resolution so that it is the same as the optimal resolution for this product Front MENU button MENU Opens the on screen menu and exits from the menu Also use to exit the OSD menu or return to the previous menu Cust...

Page 12: ...enu item AUTO button Use this button for auto adjustment Click here to see an animation clip Power button Use this button for turning the product on and off Power Indicator This light is lit when operating normally and blinks once when your adjustments are saved Note See PowerSaver described in the manual for further information regarding power saving functions For energy conservation turn your mo...

Page 13: ...place The locking device has to be purchased separately For using a locking device contact where you purchase it DOWN USB downstream port Connect the DOWN port of the USB monitor and a USB device with the USB cable UP USB upstrem port Connect the UP port of the monitor and the USB port of the computer with the USB cable Note See Connecting Cables for further information regarding cable connections...

Page 14: ... Connect the monitor to the Macintosh computer using the D sub connection cable Note If the monitor and the computer are connected you can turn them on and use them Connecting USB Option Note You can use a USB device such as a mouse keyboard Memory Stick or external hard disk drive by connecting them to the DOWN port of the monitor without connecting them to the PC The USB port of the monitor supp...

Page 15: ...nal device connecting to the PC You can connect and use a keyboard and mouse You can play a file from a media device Examples of media devices MP3 digital camera etc You can run move copy or delete the files on the storage device Examples of storage devices external memory memory card memory reader HDD type MP3 player etc You can use other USB devices that can be connected to a computer Note When ...

Page 16: ...andard and it may cause a malfunction of the device If the device malfunctions even if it is connected to the computer contact the service center of the device computer Using the Stand Monitor Assembly Simple Stand Monitor and Bottom HAS Stand A Stand Stopper Attaching a Base This monitor accepts a 100 mm x 100 mm VESA compliant mounting interface pad Connections 15 ...

Page 17: ...r depending on their specifications Do not use screws that do not comply with the VESA standard screw specifica tions Do not fasten the screws too tightly as this may damage the product or cause the product to fall leading to personal injury Samsung is not liable for these kinds of accidents Samsung is not liable for product damage or personal injury when a non VESA or non specified wall mount is ...

Page 18: ...ating system you have Prepare a blank disk and download the driver program file at the Internet web site shown here Internet web site http www samsung com Worldwide Installing the Monitor Driver Automatic 1 Insert CD into the CD ROM drive 2 Click Windows 3 Choose your monitor model in the model list then click the OK button 4 If you can see following message window then click the Continue Anyway b...

Page 19: ...rt your Manual CD into your CD ROM drive 2 Click Start and Control Panel Then double click on Appearance and Personalization 3 Click Personalization and then Display Settings 4 Click Advanced Settings 5 Click Properties in the Monitor tab If the Properties button is deactivated it means the configuration for your monitor is completed The monitor can be used as is If the message Windows needs is di...

Page 20: ...osted on Samsung Monitor homepage 6 Click Update Driver in the Driver tab 7 Check the Browse my computer for driver software checkbox and click Let me pick from a list of device drivers on my computer 8 Click Have Disk and select the folder for example D Drive where the driver setup file is located and click OK Using the Software 19 ...

Page 21: ...that matches your monitor from the list of monitor models on the screen and click Next 10 Click Close Close OK OK on the following screens displayed in sequence Microsoft Windows XP Operating System Using the Software 20 ...

Page 22: ...Click Display icon and choose the Settings tab then click Advanced 4 Click the Properties button on the Monitor tab and select Driver tab 5 Click Update Driver and select Install from a list or then click Next button 6 Select Don t search I will then click Next and then click Have disk Using the Software 21 ...

Page 23: ...owing message window then click the Continue Anyway button Then click OK button Note This monitor driver is under certifying MS logo and this installation doesn t damage your system The certified driver will be posted on Samsung Monitor homepage http www samsung com 9 Click the Close button then click OK button continually Using the Software 22 ...

Page 24: ... is active click the Properties button then follow next steps continually 5 Click Driver and then click on Update Driver then click on the Next button 6 Choose Display a list of the known drivers for this device so that I can choose a specific driver then click Next and then click Have disk 7 Click the Browse button then choose A D Driver 8 Click the Open button then click OK button 9 Choose your ...

Page 25: ...clicking Test If the screen is not normal change to a different mode lower mode of resolution colors or frequency Note If there is no Mode at All Display Modes select the level of resolution and vertical frequency by referring to the Preset Timing Modes in the user guide Linux Operating System To execute X Window you need to make the X86Config file which is a type of system setting file 1 Press En...

Page 26: ...fer to Help F1 in the software program How to install the Natural Color software Insert the CD included with the Samsung monitor into the CD ROM Drive Then the initial screen of the program Natural Color will be executed Click Natural Color on the initial screen to install the Natural Color software To install the program manually insert the CD included with the Samsung monitor into the CD ROM Dri...

Page 27: ...allation Status window appears 9 Click Finish 10 When the installation is complete the MagicTune executable icon appears on your desktop Double click the icon to start the program MagicTune execution icon may not appear depending on specification of computer sys tem or monitor If that happens press F5 Key Installation Problems The installation of MagicTune can be affected by such factors as the vi...

Page 28: ...the Change Remove button to remove the program 5 Click Yes to begin the uninstall process 6 Wait until the Uninstall Complete dialog box appears Note Visit the MagicTune website for technical support for MagicTune FAQs questions and answers and software upgrades MagicRotation Installation 1 Insert the installation CD into the CD ROM drive 2 Click the MagicRotation installation file Note If the pop...

Page 29: ...he vendor 2 If some applications like Windows Media Player Real Player etc are not displaying movie files properly in 90 180 and 270 orientations then do the following Close the application Select the Orientation 90 180 270 you want to view the application Relaunch the application In most cases this should fix the problem 3 User Applications using OpenGL and DirectDraw 3D drawing will not function...

Page 30: ...s Control Panel Perform the following steps remove MagicRotation 1 Go to Task Tray Start Settings and select Control Panel in the menu If the program runs on Windows XP go to Control Panel in the Start menu 2 Click the Add or Remove Programs icon in Control Panel 3 In the Add or Remove Programs screen scroll down to find MagicRotation Click on it to highlight it 4 Click the Change Remove button to...

Page 31: ...f the popup window to install the software for the main screen is not displayed proceed with the installation using the MultiScreen executable file on the CD 3 When the Installation Shield Wizard window appears click Next 4 Select I agree to the terms of the license agreement to accept the terms of use Using the Software 30 ...

Page 32: ...ffected by such factors as the video card motherboard and the network environment System Requirements OS Windows 2000 Windows XP Home Edition Windows XP Professional Windows Vista It is recommended using MultiScreen in Windows 2000 or later Hardware 32 MB Memory above 60 MB Hard disk space above Uninstall The Multiscreen program can be removed only by using the Add or Remove Programs option of the...

Page 33: ... monitor to self adjust to the incoming Analog signal The values of Fine Coarse and Position are adjusted automatically If auto adjustment does not work properly press AUTO button again to adjust picture with more accuracy If you change resolution in the control panel auto function will be executed automatically OSD Lock Unlock When pressing the AUTO button after locking the OSD 32 ...

Page 34: ...rrent states of settings or prevent others from adjusting the current settings Lock Hold down the MENU button for more than five 5 seconds to activate the OSD adjustment lock function Unlock Hold down the MENU button for more than five 5 seconds to deactivate the OSD adjustment lock function Adjusting the Monitor 33 ...

Page 35: ...tomize key assignment for the Custom button according to your preferences To view the operating screen displayed when pressing the button after configuring the cus tomized key for a function click the name of each function Image Size MagicBright MagicColor Color Effect Note You can configure the customized key for a required function via Setup Customized Key Adjusting the Monitor 34 ...

Page 36: ...gic Bright Color MagicCol or Color Tone Color Con trol Color Effect Gamma Image Coarse Fine Sharpness H Position V Position OSD Language H Position V Position Transpar ency Display Time Setup Reset Customized Key Image Size Informa tion Picture Brightness Not available in MagicBright mode of Dynamic Contrast Adjusting the Monitor 35 ...

Page 37: ...personal preference MENU MENU Contrast Not available in MagicBright mode of Dynamic Contrast You can use the on screen menus to change the contrast according to personal preference Not available in MagicColor mode of Full and Intelligent MENU MENU Adjusting the Monitor 36 ...

Page 38: ... by simply pressing Customized Key control button Custom Although the values are carefully chosen by our engineers the pre configured values may not be comfortable to your eyes depending on your taste If this is the case adjust the brightness and contrast by using the OSD menu Text For documents or works involving heavy text Internet For working with a mixture of images such as texts and graphics ...

Page 39: ... developed to improve digital image and to display natural color more clearly without disturbing image quality Off Returns to the original mode Demo The screen before applying MagicColor appears on the right and the screen after applying MagicColor appears on the left Full Displays not only vivid natural color but also more realistic natural skin color with clearness Intelligent Displays vivid nat...

Page 40: ...can be selected Cool Makes whites bluish Normal Keeps whites white Warm Makes whites reddish Custom Select this mode when you want to adjust the image according to your preferences Not available in MagicColor mode of Full and Intelligent MENU MENU Adjusting the Monitor 39 ...

Page 41: ... Blue color balance Not available in MagicColor mode of Full and Intelligent MENU MENU Color Effect You can change the overall mood by changing the screen colors Not available in MagicColor mode of Full and Intelligent Adjusting the Monitor 40 ...

Page 42: ...splayed Green This applies the green color effect to a black and white screen Aqua This applies the aqua color effect to a black and white screen Sepia This applies the Sepia color effect to a black and white screen MENU MENU Gamma Gamma correction changes the luminance of the colors with intermediate luminance Mode 1 Mode 2 Mode 3 MENU MENU Adjusting the Monitor 41 ...

Page 43: ...ge Coarse Removes noise such as vertical stripes Coarse adjustment may move the screen image area You may relocate it to the center using the horizontal control menu MENU MENU Fine Adjusting the Monitor 42 ...

Page 44: ...s If the noise persists even after Fine tuning repeat it after adjusting the frequency clock speed MENU MENU Sharpness Changes the clearance of image Not available in MagicColor mode of Full and Intelligent MENU MENU Adjusting the Monitor 43 ...

Page 45: ...H Position Changes the horizontal position of the monitor s entire display MENU MENU V Position Changes the vertical position of the monitor s entire display MENU MENU Adjusting the Monitor 44 ...

Page 46: ...SD Language You can choose one of nine languages Note The language chosen affects only the language of the OSD It has no effect on any software running on the computer MENU MENU Adjusting the Monitor 45 ...

Page 47: ...u can change the horizontal position where the OSD menu appears on your monitor MENU MENU V Position You can change the vertical position where the OSD menu appears on your monitor MENU MENU Adjusting the Monitor 46 ...

Page 48: ...background of the OSD Off On MENU MENU Display Time The menu will be automatically turned off if no adjustments are made for a certain time period You can set the amount of time the menu will wait before it is turned off Adjusting the Monitor 47 ...

Page 49: ... 5 sec 10 sec 20 sec 200 sec MENU MENU Setup Reset Reverts the product settings to factory defaults No Yes MENU MENU Adjusting the Monitor 48 ...

Page 50: ...d Key You can specify a function which will be activated when the Customized Key is pressed MENU MENU Image Size You can change the size of the screen displayed on your monitor Auto Wide Adjusting the Monitor 49 ...

Page 51: ...the screen aspect ratio of the input signals Note Signals not available in the standard mode table are not supported If the wide screen which is the optimal resolution for the monitor is set on your PC this function is not performed MENU MENU Information Shows a video source display mode on the OSD screen MENU MENU Adjusting the Monitor 50 ...

Page 52: ...and computer system your monitor is functioning properly Warning Messages If there is something wrong with the input signal a message appears on the screen or the screen goes blank although the power indicator LED is still on The message may indicate that the monitor is out of scan range or that you need to check the signal cable Environment The location and the position of the monitor may influen...

Page 53: ...able Check the signal cable connection Q If the power is on reboot the computer to see the initial screen the login screen which can be seen A If the initial screen the login screen appears boot the computer in the applicable mode the safe mode for Windows ME XP 2000 and then change the frequency of the video card Refer to the Preset Timing Modes If the initial screen the login screen does not app...

Page 54: ...slot Q Have the screen colors become strange after running a program or due to a crash between ap plications A Reboot the computer Q Has the video card been set properly A Set the video card by referring to the video card manual The screen suddenly has become unbalanced Q Have you changed the video card or the driver A Adjust screen image position and size using the OSD Q Have you adjusted the res...

Page 55: ...on properly Q MagicTune feature is found only on PC VGA with Window OS that supports Plug and Play A To check whether your PC is available for MagicTune feature follow the steps below When Windows is XP Control Panel Performance and Maintenance System Hardware Device Manager Monitors After deleting Plug and Play monitor find Plug and Play monitor by searching new Hardware A MagicTune is an additio...

Page 56: ...evice Administrator and then reboot the computer to reinstall the adapter video driver Note If problems repeatedly occur contact an authorized service center Q A Q How can I change the frequency A The frequency can be changed by reconfiguring the video card A Note that video card support can vary depending on the version of the driver used Refer to the computer or the video card manual for details...

Page 57: ... soft cloth using either a cleaning solution or plain water Do not leave any detergent or scratches on the case Do not let any water enter the monitor Note Before calling for assistance check the information in this section to see if you can remedy any prob lems yourself If you do need assistance please call the phone number on the Information section or contact your dealer Troubleshooting 56 ...

Page 58: ...g 0 7 Vp p 5 Separate H V sync Composite TTL level V high 2 0 V V low 0 8 V Maximum Pixel Clock 164MHz Power Supply AC 100 240 V 10 50 60 Hz 3 Hz Signal Cable 15pin to 15pin D sub cable Detachable Dimensions W x H x D Weight Simple Stand 556 2 x 360 8 x 72 9 mm 21 9 x 14 2 x 2 9 inch Without Stand 556 2 x 447 4 x 227 5 mm 21 9 x 17 6 x 9 0inch With Stand 5 6 kg 12 3 lbs Dimensions W x H x D Weight...

Page 59: ...6 912 000 Note Design and specifications are subject to change without prior notice Class B Equipment Information Communication equipment for residential use This product complies with the Electromagnetic Compatibility Directives for residential use and can be used in all areas including common residential areas Class B equipment emits less electromagnetic waves than Class A equipment PowerSaver T...

Page 60: ... x 870 68 681 75 062 100 000 VESA 640 x 480 37 861 72 809 31 500 VESA 640 x 480 37 500 75 000 31 500 VESA 800 x 600 35 156 56 250 36 000 VESA 800 x 600 37 879 60 317 40 000 VESA 800 x 600 48 077 72 188 50 000 VESA 800 x 600 46 875 75 000 49 500 VESA 1024 x 768 48 363 60 004 65 000 VESA 1024 x 768 56 476 70 069 75 000 VESA 1024 x 768 60 023 75 029 78 750 VESA 1152 x 864 67 500 75 000 108 000 VESA 1...

Page 61: ...ate H V sync Composite SOG TTL level V high 2 0 V V low 0 8 V Maximum Pixel Clock 164MHz Power Supply AC 100 240 V 10 50 60 Hz 3 Hz Signal Cable 15pin to 15pin D sub cable Detachable Dimensions W x H x D Weight Simple Stand 556 2 x 360 8 x 72 9 mm 21 9 x 14 2 x 2 9 inch Without Stand 556 2 x 447 4 x 227 5 mm 21 9 x 17 6 x 9 0 inch With Stand 5 6 kg 12 3 lbs Dimensions W x H x D Weight HAS Stand 55...

Page 62: ... 912 000 Note Design and specifications are subject to change without prior notice Class B Equipment Information Communication equipment for residential use This product complies with the Electromagnetic Compatibility Directives for residential use and can be used in all areas including common residential areas Class B equipment emits less electromagnetic waves than Class A equipment PowerSaver Th...

Page 63: ... x 870 68 681 75 062 100 000 VESA 640 x 480 37 861 72 809 31 500 VESA 640 x 480 37 500 75 000 31 500 VESA 800 x 600 35 156 56 250 36 000 VESA 800 x 600 37 879 60 317 40 000 VESA 800 x 600 48 077 72 188 50 000 VESA 800 x 600 46 875 75 000 49 500 VESA 1024 x 768 48 363 60 004 65 000 VESA 1024 x 768 56 476 70 069 75 000 VESA 1024 x 768 60 023 75 029 78 750 VESA 1152 x 864 67 500 75 000 108 000 VESA 1...

Page 64: ...cture by performing the Auto Adjustment function in display screen that is appeared as window termination button is pressed If there s still noise after the automatic adjustment use the Fine Coarse adjustment func tion When viewing a fixed screen for an extended period of time a residual image or blur riness may appear Change the mode to energy save or set a screensaver to move the picture when yo...

Page 65: ... Ex Airports Transit Stations Stock Markets Banks and Controlling Systems We recom mend that you follow set up of your display system program as below Display Information together with Logo or Moving image cycle Ex Cycle Display Information for 1 hour followed by a Display Logo or moving image for 1 minute Change the Color Information periodically Use 2 different colors Ex Rotate the Color Informa...

Page 66: ...itions are defined as continuously changing video patterns When the LCD panel is operated for a long time with a fixed pattern over 12 hours there may be slight difference in voltage between electrodes that work the liquid crystal LC in a pixel The voltage difference between electrodes increases with time forcing the liquid crystal to lean When this occurs the previous image may be seen when the p...

Page 67: ...Our LCD Monitor satisfies ISO13406 2 Pixel fault Class II Information 66 ...

Page 68: ...om latin http www samsung com latin http www samsung com latin http www samsung com latin http www samsung com latin http www samsung com latin http www samsung com latin http www samsung com latin http www samsung com latin ECUADOR 1 800 10 7267 EL SALVADOR 800 6225 GUATEMALA 1 800 299 0013 HONDURAS 800 7919267 JAMAICA 1 800 234 7267 NICARAGUA 00 1800 5077267 PANAMA 800 7267 PUERTO RICO 1 800 682...

Page 69: ...amsung com uk CIS ESTONIA 800 7267 http www samsung ee LATVIA 8000 7267 http www samsung com lv LITHUANIA 8 800 77777 http www samsung lt KAZAKHSTAN 8 10 800 500 55 500 http www samsung com kz_ru KYRGYZSTAN 00 800 500 55 500 RUSSIA 8 800 555 55 55 http www samsung ru TADJIKISTAN 8 10 800 500 55 500 UKRAINE 8 800 502 0000 http www samsung ua UZBEKISTAN 8 10 800 500 55 500 http www samsung com kz_ru...

Page 70: ...ace method while show ing odd lines and then even lines in turn is called the Interlace method The Non Interlace method is used for the majority of monitors to ensure a clear image The Interlace method is the same as that used in TVs Plug Play This is a function that provides the best quality screen for the user by allowing the computer and the monitor to exchange informa tion automatically This m...

Page 71: ...uld not be mixed with other commercial wastes for disposal Authority Information in this document is subject to change without notice 2008 Samsung Electronics Co Ltd All rights reserved Reproduction in any manner whatsoever without the written permission of Samsung Electronics Co Ltd is strictly forbidden Samsung Electronics Co Ltd shall not be liable for errors contained herein or for incidental ...

Reviews: