background image


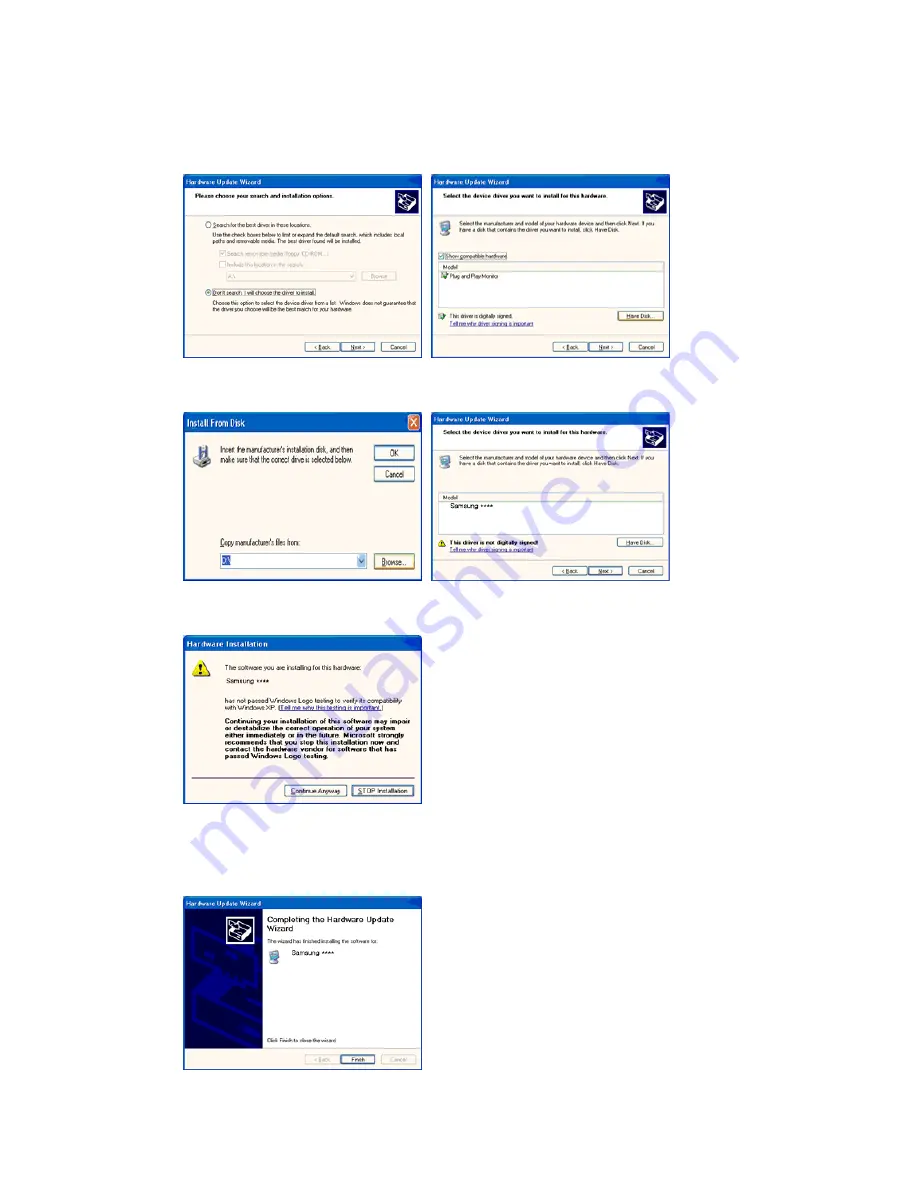
7. Click the "

Browse

" button then choose A:(D:\Driver) and choose your monitor model in the model list 

and click the "

Next

" button.  


8. If you can see following message window, then click the "

Continue Anyway

" button. Then click "

OK

button. 


This monitor driver is under certified MS logo,and this installation doesn't damage your system.The 
certified driver will be posted on Samsung Monitor Homepage.  

http://www.samsung.com/ 
 

9. Click the "

Close

" button then click "

OK

" button continually. 


Summary of Contents for SyncMaster 225MD

Page 1: ...SyncMaster 225MD Install Driver SyncMaster 225MD ...

Page 2: ...nderstand at all times Do not disassemble Disconnect the plug from the outlet Do not touch Ground to prevent an electric shock Power When not used for extended period of time set your computer to DPM If using a screen saver set it to active screen mode The images here are for reference only and are not applicable in all cases or countries SyncMaster 225MD ...

Page 3: ...hem which could cause damage z This may cause electric shock or fire Do not connect too many extension cords or plugs to one outlet z This may cause fire Do not disconnect the power cord while using the monitor z A surge may be caused by the separation and may damage the monitor Do not use the power cord when the connector or plug is dusty z If the connector or plug of the power cord is dusty clea...

Page 4: ... in a showcase or shelf so that the end of the base does not protrude from the showcase or shelf z Dropping the product may cause damage to the product or the person carrying it Do not place the product on the floor z Take care as someone specifically children may trip over it Do not place the product on an unstable or small surface area z Place the product on an even and stable surface as the pro...

Page 5: ...n the internal temperature of the product resulting in a shortened component life and degraded performance To prevent rainwater from running along the outdoor antenna cable and into the house ensure that the outdoor portion of the cable is hanging below the point of entry z If the product is exposed to rainwater it may cause electric shock or fire When using an outdoor antenna ensure that there is...

Page 6: ...e power cord before cleaning the product z Otherwise this may cause electric shock or fire Unplug the power cord from the power outlet and wipe the product using a soft dry cloth z Do not use any chemicals such as wax benzene alcohol thinners insecticide air freshener lubricant or detergent Contact the SAMSUNG customer care center or Customer Center for interior cleaning once a year z Keep the pro...

Page 7: ... plug from the outlet during storms or lightning or if it is not used for a long period of time z Failure to do so may cause electric shock or fire Do not try to move the monitor by pulling only the wire or the signal cable z This may cause a breakdown electric shock or fire due to damage to the cable Do not move the monitor right or left by pulling only the wire or the signal cable z This may cau...

Page 8: ... An inappropriate resolution may cause undesirable picture quality 22 inch Wide 55 cm 1680 X 1050 Keep the volume at a comfortable level when using the headphones z Excessively loud volume level may damage hearing Viewing the monitor continuously at a too close angle may result in damage to your eyesight To ease eye strain take at least a five minute break after every hour of using the monitor Do ...

Page 9: ...and may cause fire injury or contamination damage Use only specified standard batteries Do not use new and used batteries together z This may cause a battery to break or leak and may cause fire injury or contamination damage The batteries and rechargeable batteries are not ordinary refuse and must be returned for recycling purposes The customer is responsible for returning the used or rechargeable...

Page 10: ...d light on the screen Try to maintain your arms perpendicular to your armpits z Keep your arms level with the back of your hands z Keep the angle of the elbow perpendicular z Keep the angle of the knees at more than 90 degree Do not let your feet fall up from the floor Adjust the arm position so that it is below the heart ...

Page 11: ...gh resolution video and audio content without any compression loss You can easily connect your devices using a single cable and control them in an integrated manner Premium Design This product features a simple clean premium design Shiny glossy materials The black and shiny material suggests an elegant and classy mood High Sensitive Touch Button The Power and Adjustment buttons both utilize a high...

Page 12: ...th Stand Manual Quick Setup Guide Warranty Card Not available in all locations User s Guide Monitor Driver Cable D Sub Cable Stereo Cable Power Cord Other Remote Control Batteries AAA X 2 Cleaning Cloth Sold separately ...

Page 13: ...O Cable Earphones Headphones SCART Cable DVI Cable DVI to HDMI cable HDMI Cable RCA to stereo for PC cable Digital audio optical output cable This is an accessory that can be added depending on the model Front 1 TV DTV 2 PIP 3 4 5 MENU 6 7 Remote Control Sensor 8 Power button 9 Power indicator 10 Speaker ...

Page 14: ...he button to change the input signal source Changing the source is allowed only in external devices that are connected to the monitor at the time To switch Screen modes PC DVI Ext AV S Video Component HDMI Click here to see an animation clip 7 Remote Control Sensor Aim the remote control towards this spot on the monitor 8 Power button Turns the monitor On Off 9 Power indicator This will enable you...

Page 15: ...to the PC port on the back of your monitor 2 DVI D Connect the DVI cable to the DVI D port on the back of your monitor 3 HDMI PC DVI D AUDIO IN Connect the HDMI PC DVI D AUDIO IN terminal at the back of your monitor to your computer s sound card 3 COMPONENT IN 1 R AUDIO L Connect the port of the DVD VCR DVD DTV Set Top Box to the R AUDIO L port of the monitor 2 PR PB Y Connect the VIDEO OUT port o...

Page 16: ... cable 2 DIGITAL AUDIO OUT OPTICAL Connect the DIGITAL AUDIO OUT OPTICAL terminal of your monitor to the digital sound output or standard sound output terminal of the DVD home theater or amplifier using a digital audio optical output cable 6 EXT RGB SERVICE 1 EXT RGB Connect the EXT RGB port of the monitor to the DVD Player using a SCART jack As for EXT RGB port of the monitor it makes TV or Video...

Page 17: ...and displays it The Application Info inserting is about the CI CARD You can install the CAM anytime whether the TV is ON or OFF 10 S VIDEO VIDEO R AUDIO L 1 S VIDEO VIDEO Input devices such as DVD VCR or Camcorder are connected to the VIDEO or S VIDEO terminal of the monitor using the Video or S Video cable 2 R AUDIO L Connect the port of the DVD VCR DVD DTV Set Top Box to the R AUDIO L port of th...

Page 18: ...E 15 D MENU 16 P 17 EXIT 18 INFO 19 TTX MIX 20 COLOR BUTTONS 21 P MODE M B MagicBright 22 S MODE 23 AUTO 24 P SIZE 25 DUAL I II 26 SUBTITLE 27 SOURCE 28 PIP 1 POWER Turns the monitor On Off 2 Number button Selects TV channels in the TV mode Used to change channels when PIP is selected and the PIP SOURCE is set to TV 3 One Two Digit channel selection Use to select a channel numbered ten or over Pre...

Page 19: ...g the SOURCE button You can only watch TV using the TV or DTV button 13 PRE CH This button is used to return to the immediately previous channel 14 GUIDE Electronic Program Guide EPG display 15 D MENU DTV menu display 16 P In TV mode selects TV channels 17 EXIT Exits from the menu screen 18 INFO Current picture information is displayed on the upper left corner of the screen 19 TTX MIX TV channels ...

Page 20: ...ess the button again to circle through available preconfigured modes Standard Music Movie Speech Custom 23 AUTO Available In PC mode Only Adjusts the screen display automatically 24 P SIZE Press to change the screen size PC DVI mode Wide 4 3 TV DTV Ext AV S Video mode Auto Wide Wide 16 9 Zoom1 Zoom2 4 3 Component HDMI mode Wide 16 9 Zoom1 Zoom2 4 3 25 DUAL I II STEREO MONO DUAL l DUAL ll and MONO ...

Page 21: ... 1 Using the D sub Analog connector on the video card Connect the signal cable to the PC port on the back of your monitor PC 2 2 Using the DVI Digital connector on the video card Connect the DVI cable to the DVI D port on the back of your monitor DVI D 3 Connect the HDMI PC DVI D AUDIO IN port on the rear side of the monitor to the sound card of the PC 4 Turn on both your computer and the monitor ...

Page 22: ... the back of the monitor may vary from product to product The DVI to HDMI cable digital audio optic output cable and RCA to stereo for PC cable are all sold separately Contact a Service Center to purchase any products sold separately 1 Connecting AV Devices The monitor has AV connection terminals to connect AV input devices like DVDs VCRs or Camcorders You may enjoy AV signals as long as the monit...

Page 23: ...or the Source automatically changes to Ext 3 Connecting TV You may view television programs on the monitor if it is connected to an antenna or CATV cable without installing any separate TV reception hardware or software on your computer 1 Connect the CATV cable or TV antenna cable to the ANT IN port on the rear side of the monitor Make sure to use a TV antenna cable sold separately as the antenna ...

Page 24: ...ent simply by hooking up the Component with the monitor as long as the power is on 1 Connect the the AUDIO OUT port of DVD DTV Set Top Box to the R AUDIO L port of the monitor 2 Connect the VIDEO OUT port of the DVD DTV Set Top Box to the PR PB Y input ports using a component cable PR PB Y 3 Select Component using the SOURCE 5 Connecting HDMI You cannot connect a PC to the HDMI IN terminal 1 Input...

Page 25: ...d audio output terminals of the digital output device and connect the opposite jack to the HDMI PC DVI D AUDIO IN terminal of the monitor 3 Then start the DVD with a DVD disc inserted 4 Select HDMI using the SOURCE button 7 Connecting and Using an Amplifier You can connect the digital sound input optical or standard sound input terminal of your amplifier to your monitor using the correct cable 1 C...

Page 26: ...vided by their manufacturers 8 Connecting COMMON INTERFACE You can install the CAM anytime whether the TV is ON or OFF Purchase the CI CAM module by visiting your nearest dealer or by phone 1 Insert the CI CARD into the CAM in the direction of the arrow until it fits 2 Insert the CAM with the CI CARD installed into the common interface slot Insert the CAM in the direction of the arrow right up to ...

Page 27: ...mm X 100 mm VESA compliant mounting interface pad A Monitor B Mounting interface pad Sold separately 1 Turn off your monitor and unplug its power cord 2 Lay the LCD monitor face down on a flat surface with a cushion beneath it to protect the screen 3 Turn the fixing screws handle on the stand counterclockwise to loosen it and then separate it from the stand 4 Align the Mounting Interface Pad with ...

Page 28: ...e z Contact the nearest Samsung Service Center for more information Samsung Electronics will not be responsible for damages caused by using a base other than those specified z Please use Wall Mount according to the International standards Installing the monitor driver Automatic When prompted by the operating system for the monitor driver insert the CD ROM included with this monitor Driver installa...

Page 29: ... installation is slightly different from one operating system to another Follow the directions appropriate for the operating system you have Prepare a blank disk and download the driver program file at the Internet web site shown below z Internet web site http www samsung com Worldwide http www samsung com monitor U S A http www sec co kr monitor Korea http www samsungmonitor com cn China Microsof...

Page 30: ...splayed as shown in the figure below click Continue This monitor driver is under certifying MS logo and this installation doesn t damage your system The certified driver will be posted on Samsung Monitor homepage http www samsung com 6 Click Update Driver in the Driver tab 7 Check the Browse my computer for driver software checkbox and click Let me pick from a list of device drivers on my computer...

Page 31: ...lect the model that matches your monitor from the list of monitor models on the screen and click Next 10 Click Close Close OK OK on the following screens displayed in sequence Microsoft Windows XP Operating System 1 Insert CD into the CD ROM driver 2 Click Start Control Panel then click the Appearance and Themes Icon ...

Page 32: ...s tab then click Advanced 4 Click the Properties button on the Monitor tab and select Driver tab 5 Click Update Driver and select Install from a list or then click Next button 6 Select Don t search I will then click Next and then click Have disk ...

Page 33: ...u can see following message window then click the Continue Anyway button Then click OK button This monitor driver is under certified MS logo and this installation doesn t damage your system The certified driver will be posted on Samsung Monitor Homepage http www samsung com 9 Click the Close button then click OK button continually ...

Page 34: ...n is active click the Properties button then follow next steps continually Microsoft Windows Millennium Operating System 1 Click Start Setting Control Panel 2 Double click Display icon 3 Select the Settings tab and click Advanced Properties button 4 Select the Monitor tab 5 Click the Change button in the Monitor Type area 6 Choose Specify the location of the driver 7 Choose Display a list of all t...

Page 35: ...een is for selecting a keyboard 5 Set a Keyboard for your computer 6 The next screen is for setting your monitor 7 First of all set a horizontal frequency for your monitor You can enter the frequency directly 8 Set a vertical frequency for your monitor You can enter the frequency directly 9 Enter the model name of your monitor This information will not affect the actual execution of X Window 10 Yo...

Page 36: ...rnal Input List and the selected resolution OSD Description Play Stop Source List Use to select PC TV or other external input SOURCEs connected to the Monitor Use to select the screen of your choice The direct button on the remote control is the SOURCE button You can switch between TV and DTV modes by pressing the TV DTV button 1 PC 2 DVI 3 TV 4 Ext 5 AV 6 S Video SyncMaster 225MD ...

Page 37: ...nput SOURCE for the PIP The direct button on the remote control is SOURCE button PC DVI TV Ext AV S Video Component 3 Size Change the Size of the PIP window If you select in Size Position and Transparency will not be activated 4 Position Change the Position of the PIP window 5 Transparency Adjust the Transparency of PIP windows High Medium Low Opaque PIP Source Size Position Transparency Edit Name...

Page 38: ...1 Entertain High Brightness For watching motion pictures such as a DVD or VCD 2 Internet Medium Brightness For working with a mixture of images such as the text with graphics added 3 Text Normal Brightness For documentations or works involving heavy text 4 Custom Although the values are carefully chosen by our engineers the pre configured values may not be comfortable to your eyes depending on you...

Page 39: ...If the noise persists even after Fine tuning repeat it after adjusting the frequency clock speed 3 Position Adjusts the screen location horizontally and vertically 1 Coarse 2 Fine 3 Position Auto Adjustment The values of Fine Coarse Position are adjusted automatically By changing the resolution in the control panel auto function is performed The direct button on the remote control is the AUTO butt...

Page 40: ...ness according to personal preference 1 Contrast Adjusts the contrast 2 Brightness Adjusts the brightness 3 Sharpness Adjusts the picture sharpness 4 Colour Adjusts the picture colour Colour Tone The tone of the colour can be changed 1 Cool2 2 Cool1 3 Normal 4 Warm1 5 Warm2 Size You can switch the Size The direct button on the remote control is P SIZE button z TV DTV Ext AV S Video mode Auto Wide ...

Page 41: ... experience This function supports the resolution only up to 480i 576i when the input mode is Component or HDMI Off On Sound Available Mode PC DVI TV DTV Ext AV S Video Component HDMI The default setting may be different depending on the selected Input Mode input signal SOURCE selected in External Input List and the selected resolution OSD Description Play Stop Mode The Monitor has a built in high...

Page 42: ...eble Emphasize high frequency audio 3 Balance Allows you to adjust the sound balance between the left and right speakers You can hear the sound even when the sound value is set to 0 Auto Volume Reduces the differences in volume level among broadcasters Off On Internal Mute If you set this menu On sound output from the speakers is muted in case of using the home theater Off On SRS TruSurround XT Yo...

Page 43: ...vailable on your television in your area and store all the channels found automatically Manual Store You can scan the frequency ranges available on your television in your area and store all the channels found manually 1 Programme Inputting the appropriate program number on the screen 2 Colour System Adjusts repeatedly until the colour is of the best quality Auto PAL SECAM NTSC4 43 3 Sound System ...

Page 44: ...is poor However if incoming signals are interfering with each other turn off LNA as it may malfunction Off On Setup Available Mode PC DVI TV DTV Ext AV S Video Component HDMI The default setting may be different depending on the selected Input Mode input signal SOURCE selected in External Input List and the selected resolution OSD Description Play Stop Language You can choose one of 8 languages No...

Page 45: ...dation in the screen quality such as an increase in the black level a low contrast or discoloration etc depending on the external device connected In this case adjust the screen quality of your TV by configuring the HDMI black level This function is active only when the an external device DVD player STB etc is connected to the TV via HDMI RGB Signal Available in HDMI Mode Only Normal Low Reset Pic...

Page 46: ... navigate around the on screen menu system and adjust the various settings available refer to the following illustration Press the D MENU button Guide Now Next Guide Full Guide Scheduled List Default Guide Now Next Full Guide Channel Auto Store Manual Store Edit Favourite Channels Channel List Setup Menu Transparency High Medium Low Opaque Parental Lock Enter PIN Subtitle Off On Subtitle Mode Norm...

Page 47: ...t Channel then press the ENTER button 3 Press the or button to select Manual Store then press the ENTER button 4 Press the or button to select Manual Store Press the RED button on the remote control Channel Channel 5 to 69 in sequence are displayed depending on the country Frequency The frequency available in the Channel group is displayed Bandwidth The available bandwidths are 7 and 8 MHz 5 When ...

Page 48: ...utton to select Edit Favourite Channels then press the ENTER button 4 Select the required channel using the or button 5 Press the green button The space for entering the number is a blank 6 Enter the new channel number Press ENTER button to store or RETURN button to cancel Press the button to delete an entered digit If you enter a number already assigned to another channel the number is assigned t...

Page 49: ...the yellow button to toggle between your favourite channels and all channels Your favourite channels are only displayed if they were previously set in the Editing Your Favourite Channels menu 6 Press the red or green button to display the previous or next channel List page 7 Press the or button to select a channel to be tuned Press the ENTER button The channel number name and an icon are displayed...

Page 50: ...hannel additional information about the current programme may be displayed 1 While viewing a programme press the INFO button The programme information is displayed 2 To exit from banner information press the INFO button ...

Page 51: ...ress the ENTER button You can also display the guide menu simply by ressing the GUIDE button 4 To Then Watch a programme in the EPG list Select a programme by pressing the button Press the ENTER button If the next Programme is selected it is scheduled with the clock icon displayed If the ENTER button is pressed again the scheduling is canceled with the clock icon gone View programme information Se...

Page 52: ...adjust with the or button You can also set hour and minute by pressing the number buttons on the remote control Channel Set the channel Time Set the time Date Set Year Month and Day Frequency Set the frequency Once Daily or Weekly 6 After setting the schedule Press the red button 7 Press the EXIT button to exit Save Save the adjusted schedule Cancel Cancel the adjusted schedule Add Programme Add a...

Page 53: ... display information about the highlighted programme 8 When the Edit Favourite Channels list has not been set up The favourites list is empty Would you like to choose your favourites now message is displayed Select Yes The Edit Favourite Channels menu is displayed If you select No all channels will remain unchanged 9 Press the EXIT button to exit All Channels is the list of channels that have been...

Page 54: ... ENTER button 3 Press the or button to select Parental Lock then press the ENTER button 4 The Enter PIN is displayed 5 Enter your current 4 digit PIN code by using the numeric buttons 0 9 The options available in the Parental Lock group are displayed with the Parental Rating selected The default PIN code for a new TV set is 0000 If you enter an invalid PIN code the Invalid PIN code Please try agai...

Page 55: ...In this case use the internal mute function 1 Press the D MENU button to display the DTV menu 2 Press the or button to select Setup then press the ENTER button 3 Press the or button to select Audio Format then press the ENTER button 4 Press the or button to select PCM or Dolby Digital Press the ENTER button 5 Press the EXIT button to exit The Audio Format appears according to the broadcasting sign...

Page 56: ...xit Checking the Signal Information You can get information about the signal status 1 Press the D MENU button to display the DTV menu 2 Press the or button to select Setup then press the ENTER button 3 Press the or button to select System then press the ENTER button 4 Press the or button to select Signal Information then press the ENTER button 5 Press the EXIT button to exit If the signal status i...

Page 57: ... MENU button to display the DTV menu 2 Press the or button to select Setup then press the ENTER button 3 Press the or button to select System then press the ENTER button 4 Press the or button to select Common Interface then press the ENTER button 5 Press the ENTER button to display the information for your application 6 Press the EXIT button to exit The Application Info inserting is about the CI C...

Page 58: ...ry default values The Reset operation deletes all channel information and user preferences returningall values to their default factory state 1 Press the D MENU button to display the DTV menu 2 Press the or button to select Setup then press the ENTER button 3 Press the or button to select System then press the ENTER button 4 Press the or button to select Reset then press the ENTER button 5 The Ent...

Page 59: ...users can select one of the languages English German Italian Swedish French Welsh Gaelic Irish Danish Finnish Norwegian Spanish Czech and Greek The language selected here is the default when the user selects a channel Press the or button to select required menu Primary Subtitle Language Secondary Subtitle Language Primary Audio Language Secondary Audio Language Primary Teletext Language or Seconda...

Page 60: ...own below Check Signal Cable appears on a black background when the monitor is in its normal working condition though it does not sense any video signal While in the Self Test mode the LED power indicator remains green and the figure moves around on the screen 4 Turn off your monitor and reconnect the video cable then turn on both your computer and the monitor If your monitor screen remains blank ...

Page 61: ...oft cloth cotton flannel smoothly z Do not use benzene thinner or other flammable substances or a wet cloth z We recommend a Samsung cleansing agent is used to prevent damage to the screen z Never use acetone benzene or thinner They may cause flaws or deformation of the screen surface z The user will be required to pay costs and related expenses for repair of damages caused by him her 5 Symptoms a...

Page 62: ...t the power cord is firmly connected and the LCD monitor is on Refer to the Connecting the Monitor Check Signal Cable message z Ensure that the signal cable is firmly connected to the PC or video SOURCEs Refer to the Connecting the Monitor z Ensure that the PC or video SOURCEs are turned on Not Optimum Mode message z Check the maximum resolution and the frequency of the video adapter z Compare the...

Page 63: ...k the volume level Refer to the Volume z If the volume is still too low after turning the control to its maximum check the volume control on the computer sound card or software program Sound is too high pitched or too low pitched z Adjust the Treble and Bass to appropriate level 4 Problems related to Remote Control Problems related to the remote control and their solutions are listed Problems Item...

Page 64: ...r to Windows Computer Manual z Windows ME 2000 Set the resolution in the Control Panel Display Screen Saver Set the function in the BIOS SETUP of the computer Refer to Windows Computer Manual How can I clean the outer case LCD Panel Disconnect the power cord and then clean the monitor with a soft cloth using either a cleaning solution or plain water Do not leave any detergent or scratches on the c...

Page 65: ...50 60 Hz Maximum resolution 1680 x 1050 60 Hz Input Signal Terminated RGB Analog TTL level V high 2 0V V low 0 8V 0 7 Vp p 5 Maximum Pixel Clock 135 MHz Power Supply AC 100 240 V 10 50 60 Hz Signal Cable 15pin to 15pin D sub cable Detachable DVI D to DVI D connector Detachable Sold separately Signal connectors 15pin 3 row D sub connector 24pin 3 row DVI D connector 19pin Type A HDMI Conntector Com...

Page 66: ...nge without prior notice Class B Equipment Information Communication equipment for residential use This product complies with the Electromagnetic Compatibility Directives for residential use and can be used in all areas including common residential areas Class B equipment emits less electromagnetic waves than Class A equipment PowerSaver This monitor has a built in power management system called P...

Page 67: ... 600 46 875 75 000 49 500 VESA 1024 x 768 48 363 60 004 65 000 VESA 1024 x 768 56 476 70 069 75 000 VESA 1024 x 768 60 023 75 029 78 750 VESA 1152 x 864 67 500 75 000 108 000 VESA 1280 x 960 60 000 60 000 108 000 VESA 1280 x 1024 63 981 60 020 108 000 VESA 1280 x 1024 79 976 75 025 135 000 VESA 1680 x 1050 64 674 59 883 119 000 Horizontal Frequency The time to scan one line connecting the right ed...

Page 68: ...Source Supported Systems AV CVBS NTSC 3 58 NTSC 4 43 PAL 60 PAL SECAM S VIDEO NTSC 3 58 NTSC 4 43 PAL 60 PAL SECAM EXT NTSC 3 58 NTSC 4 43 PAL 60 PAL SECAM RGB TV Analog PAL B G D K I SECAM L L D K DTV DVB T ...

Page 69: ...tp www samsung com cl COLOMBIA 01 8000112112 http www samsung com co COSTA RICA 0 800 507 7267 http www samsung com latin ECUADOR 1 800 10 7267 http www samsung com latin EL SALVADOR 800 6225 http www samsung com latin GUATEMALA 1 800 299 0013 http www samsung com latin JAMAICA 1 800 234 7267 http www samsung com latin PANAMA 800 7267 http www samsung com latin PUERTO RICO 1 800 682 3180 http www ...

Page 70: ...N 0771 400 200 http www samsung com se SWITZERLAND 0800 7267864 http www samsung com ch U K 0870 SAMSUNG 7267864 http www samsung com uk CIS ESTONIA 800 7267 http www samsung ee LATVIA 800 7267 http www samsung com lv LITHUANIA 8 800 77777 http www samsung lt KAZAKHSTAN 8 800 080 1188 http www samsung kz RUSSIA 8 800 200 0400 http www samsung ru UKRAINE 8 800 502 0000 http www samsung com ur UZBEK...

Page 71: ...itself 60 times per second this is regarded as 60 Hz Horizontal Frequency The time to scan one line connecting the right edge to the left edge of the screen horizontally is called the Horizontal Cycle The inverse number of the Horizontal Cycle is called Horizontal Frequency Unit kHz Interlace and Non Interlace Methods Showing the horizontal lines of the screen from the top to the bottom sequential...

Page 72: ...input from such external video devices as VCRs camcorders and DVD players separate from a TV broadcast DVD A type of digital disk technology that takes up only the benefits of CD and LD to implement a high resolution quality which enables the user to enjoy clearer images DTV Broadcasting Digital TV Broadcasting An enhanced broadcasting technology to process digital video signals using a set top bo...

Page 73: ...vanced semiconductor technology with a precision of 1ppm one millionth and above is used for this product But the pixels of RED GREEN BLUE and WHITE color seem to be bright sometimes or some of black pixels could be seen This is not from bad quality and you can use it without any problems For example the number of TFT LCD sub pixels contained in this product are 5 292 000 3 When cleaning the monit...

Page 74: ...rights reserved Reproduction in any manner whatsoever without the written permission of Samsung Electronics Co Ltd is strictly forbidden Samsung Electronics Co Ltd shall not be liable for errors contained herein or for incidental or consequential damages in connection with the furnishing performance or use of this material Samsung is the registered trademark of Samsung Electronics Co Ltd Microsoft...

Page 75: ...e Mode Ex z Turn the power off when using a stationary pattern z Use a Screen saver if possible z Set the Monitor to power off with the PC Display Properties Power Scheme Turn the power off for 4 hours after 20 hours in use Turn the power off for 2 hours after 12 hours in use Screen saver in one color or a moving image is recommended Suggestions for specific applications Ex Airports Transit Statio...

Page 76: ...patterns When the LCD panel is operated for a long time with a fixed pattern over 12 hours there may be slight difference in voltage between electrodes that work the liquid crystal LC in a pixel The voltage difference between electrodes increases with time forcing the liquid crystal to lean When this occurs the previous image may be seen when the pattern is changed To prevent this the accumulated ...

Page 77: ...nment or human health from uncontrolled waste disposal please separate this from other types of wastes and recycle it responsibly to promote the sustainable reuse of material resources Household users should contact either the retailer where they purchased this product or their local government office for details of where and how they can take this item for environmentally safe recycling Business ...

Reviews: