background image


English     4


Setting up Your Monitor


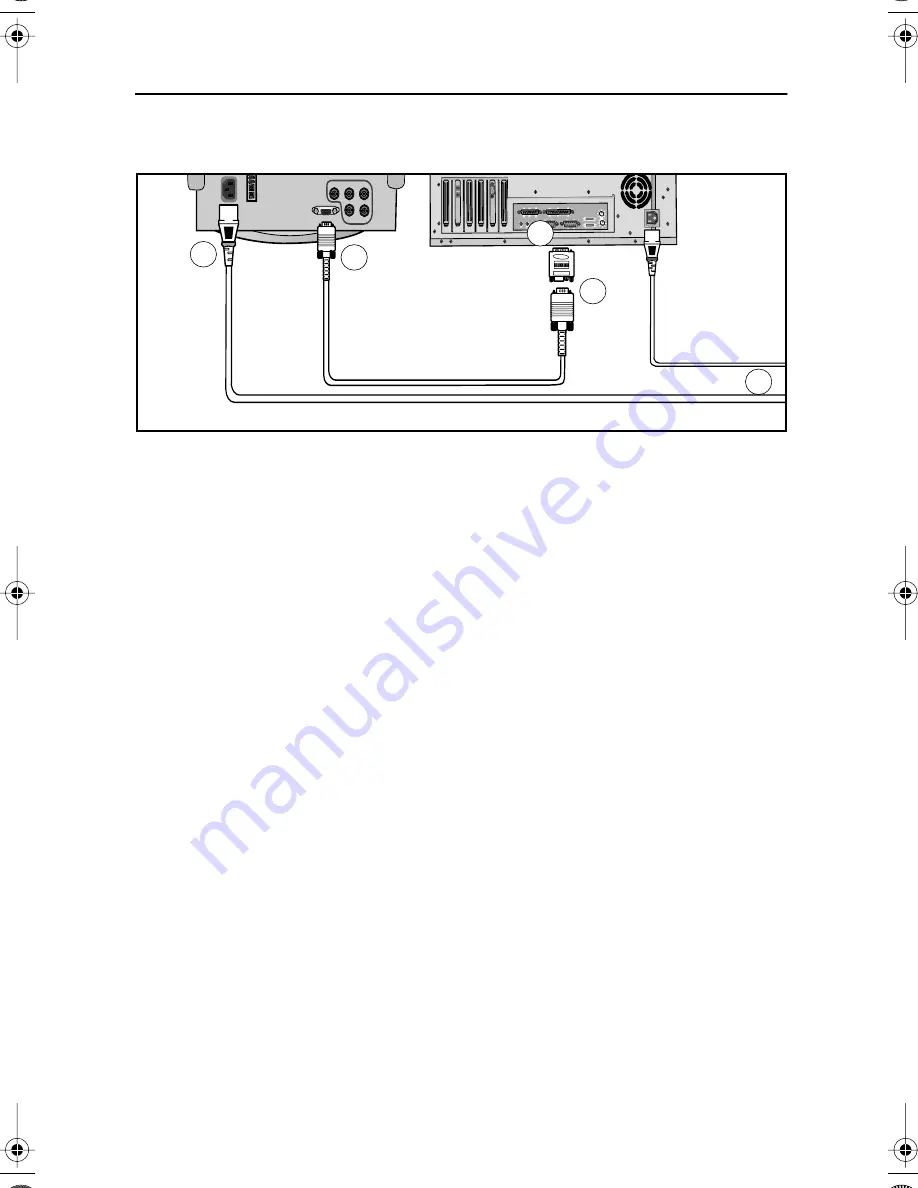
Connecting Your Monitor


Figure 1.  Cable connections


1


Turn off your computer and unplug its power cord.


2


Connect the signal cable to the D-SUB or BNC signal port on the back of your monitor.


3


If you are using an IBM-compatible computer, skip to step 5. If you are using a 
Macintosh computer, connect the other end of the signal cable to a Macintosh 
adapter. (Adapter not included) 


4


Follow the instructions included with your adapter to set the pins on your adapter, if 
necessary.


5


Connect the signal cable (with an adapter, if necessary) to the video port on the back 
of your computer. This port might be directly attached to your computer, or it might be 
part of a video adapter, video card, or graphics card.


6


Connect the power cord for your monitor to the power port on the back of the monitor.


7


Plug the power cords of your computer and your monitor into a nearby outlet.


8


Turn on your computer and monitor. If your monitor displays an image, installation is 
complete.

R

V

H/V

6

2

5

3

7


12NF(E)body.fm  Page 4  Tuesday, October 17, 2000  5:25 PM

Summary of Contents for SyncMaster 1200NF

Page 1: ...SyncMaster 1200NF Color Monitor Owner s Instructions ...

Page 2: ...erial The Samsung logo and SyncMaster are registered trademarks of Samsung Electronics Co Ltd Microsoft Windows and Windows NT are registered trademarks of Microsoft Corporation VESA DPMS and DDC are registered trademarks of Video Electronics Standard Association the ENERGY STAR name and logo are registered trademarks of the U S Environmental Protection Agency EPA As an ENERGY STAR Partner Samsung...

Page 3: ...rmation 9 Menu Features 10 Position 10 Size 10 Zoom 11 Recall 11 Pincushion Trapezoid 12 Parallel Rotation 12 Pinbalance Linearity 13 Side Pin Corner 13 PinBalance Corner 14 Recall 14 Color 15 Recall 15 Clear Moiré 16 Focus 16 Purity 17 Convergence 17 Sharpness 18 Recall 18 Degauss 19 Reset 19 Sync Input Type 20 Video Input Level 20 D SUB BNC 21 USB 21 Menu Position 22 Menu Duration 22 Languages 2...

Page 4: ...t your monitor in a location with low humidity and a minimum of dust 8 Do not expose the monitor to rain or use it near water In kitchens near swimming pools etc If the monitor accidentally gets wet unplug it and contact an authorized dealer immediately You can clean the monitor with a damp cloth when necessary but be sure to unplug the monitor first 9 Place the monitor on a solid surface and trea...

Page 5: ...he following items are included with your monitor If any items are missing contact your dealer Manual Monitor and Stand Signal Cable Warranty Card Not available in all locations V V V V R BNC Cable Option Install driver Power Cord USB Cable USB Diskette ...

Page 6: ...uded 4 Follow the instructions included with your adapter to set the pins on your adapter if necessary 5 Connect the signal cable with an adapter if necessary to the video port on the back of your computer This port might be directly attached to your computer or it might be part of a video adapter video card or graphics card 6 Connect the power cord for your monitor to the power port on the back o...

Page 7: ...prompted by the operating system for the monitor driver insert the Driver diskette included with this monitor Driver installation is slightly different from one operating system to another Follow the directions as appropriate for the operating system you have Windows 98 1 Windows 98 will auto detect your new monitor and start the Add New Hardware Wizard if the drivers are not already installed Cli...

Page 8: ... 950B 1 Click on START SETTINGS CONTROL PANEL DISPLAY ADVANCED PROPERTIES MONITOR tab HAVE DISK 2 Type the diskette letter in the box and click OK Self Test Feature Check STFC Your monitor provides a self test feature that allows you to check whether your monitor is functioning properly If your monitor and computer are properly connected but the monitor screen remains dark and the power indicator ...

Page 9: ...monitor If your monitor screen remains blank after using the previous procedure check your video controller and computer system your monitor is functioning properly Getting Help If your monitor does not display an image check your cable connections and refer to Troubleshooting on page 25 Warm up Time All monitors need time to become thermally stable the first time you turn them on each day Therefo...

Page 10: ...XIT button Use this button to Exit the active menu or the OSD 3 buttons These buttons allow you to highlight and adjust items in the menu These buttons are also direct access buttons for the contrast and brightness feature All menus automatically save your adjustments 3 seconds after you stop adjusting the setting 4 MENU button Use this button to open the OSD and activate a highlighted menu item 5...

Page 11: ...conds elapse Direct Access Feature The feature described on this page and the next page can be accessed quickly at the touch of one button When you finish making adjustments to a feature push the EXIT button to turn off the menu or allow the OSD to time out and disappear automatically Information The Information on this screen shows available horizontal and vertical frequencies and display resolut...

Page 12: ...n adjustment screen 4 Use the and buttons to change the vertical position of the monitor s viewing area use the and buttons to change the horizontal position of the monitor s viewing area Size Follow these instructions to change the size of the monitor s entire display 1 With the menu off push the button Push the button or button until the Position Size screen is displayed 2 Push the button or but...

Page 13: ...he button to enlarge the screen viewing area Recall Use the recall feature to reset these monitor settings to their original level Position Size and Zoom only 1 With the menu off push the button Push the button or button until the Position Size screen is displayed 2 Push the button or button to select Recall 3 Push the button to open the Recall adjustment screen 4 Use the button or button to adjus...

Page 14: ...elogram setting when the display is leaning left or right adjust the Rotation setting when the entire display is tilted left or right 1 With the menu off push the button Push the button or button until the Geometry screen is displayed 2 Push the button or button to select Parallel Rotation 3 Push the button to open the Parallel Rotation adjustment screen 4 Use the button or button to adjust the Pa...

Page 15: ... correction when the sides of the display are bowed in or bowed out adjust the side pin corner correction when the top or bottom of the display is too large or small 1 With the menu off push the button Push the button or button until the Geometry screen is displayed 2 Push the button or button to select Side Pin Corner 3 Push the button to open the Side Pin Corner adjustment screen 4 Use the butto...

Page 16: ...ust the Pinbalance Corner correction Recall Use the recall feature to reset the Geometry settings to their original level 1 With the menu off push the button Push the button or button until the Geometry screen is displayed 2 Push the button or button to select Recall 3 Push the button to open the Recall adjustment screen 4 Use the button or button to adjust the Recall setting RGB Pincushion Trapez...

Page 17: ...emperature as close to the desired temperature as possible using only the and buttons To fine tune the color hue use the or button to select R ed G reen or B lue then use the and buttons until you reach the desired color Note Recall does not reset the color settings Recall Use the recall feature to reset the color settings to their original level 1 With the menu off push the button Push the button...

Page 18: ...t vertical moiré Focus Use the focus control when the image displayed on the screen is not sharp in all areas 1 With the menu off push the button Push the button or button until the Screen OSD is displayed 2 Push the button or button to select Focus 3 Push the button to open the Focus adjustment screen 4 Use the button or button to adjust the focus along the left and right areas of the screen Use ...

Page 19: ... color dots that make up the image 1 With the menu off push the button Push the button or button until the Screen OSD is displayed 2 Push the button or button to select Convergence 3 Push the button to open the convergence adjustment screen 4 Push the button or button to select static top or bottom 5 Use the button or button to adjust the horizontal convergence use the button or button to adjust t...

Page 20: ... Screen settings to their original level 1 With the menu off push the button Push the button or button until the screen is displayed 2 Push the button or button to select Recall 3 Push the button to open the Recall adjustment screen 4 Use the button or button to adjust the recall setting RGB F Screen Clear Moire Focus Purity Convergence Sharpness Recall Access Function Sharpness Normal Text Previo...

Page 21: ...on Size Pincushion Trapezoid Parallelogram Pinbalance Rotation and Clear Moiré 1 With the menu off push the button Push the button or button until the Advanced screen is displayed 2 Push the button or button to select Reset 3 Push the button to open the recall selection screen 4 Push the button to select YES If you don t want to reset the monitor use the button to select NO NOTE If you have select...

Page 22: ...screen 4 Use the button or button to select Separate or Sync on Green Video Input Level Some video cards use video signals higher than 1 0 V which causes the display to be very bright For those video cards use this feature to select the 1 0 V Level 1 With the menu off push the button Push the button or button until the Advanced screen is displayed 2 Push the button or button to select Video Input ...

Page 23: ...s and the screen will blank then display the image from the new signal source Other computer A cable must be connected to both inputs to use this function USB Use this menu to choose between the up stream ports A or B 1 With the menu off push the button Push the button or button until the Advanced screen is displayed 2 Push the button or button to select USB 3 Push the button to open the USB selec...

Page 24: ...y turn off if no adjustments are made for a certain time period You can set the amount of time the menu will wait before it turns off 1 With the menu off push the button Push the button or button until the Menu screen is displayed 2 Push the button or button to select Menu Duration 3 Push the button to open the menu duration selection screen 4 Use the or buttons to select 3 7 10 20 or 50 seconds 1...

Page 25: ... the button or button to select Languages 3 Push the button to open the language selection screen 4 Use the button or button to select the language you would like to use You can choose one of nine languages English Korean Russian Swedish Portuguese Italian French Spanish or German AutoSize With the menu off push the button Push the button to adjust the size automatically and the button to cancel R...

Page 26: ...g modes NOTE This monitor automatically returns to normal operation when horizontal and vertical sync return This occurs when you move the computer s mouse or press a key on the keyboard This monitor is EPA ENERGY STAR compliant and NUTEK compliant when used with a computer equipped with VESA DPMS functionality For energy conservation turn your monitor OFF when it is not needed or when leaving it ...

Page 27: ... the computer and the monitor Sync Out of Range appears Check the maximum resolution and the frequency on the video port of your computer Compare these values with the data in the Display Modes Timing chart on page 28 The image is too light or too dark Adjust the Brightness or Contrast settings The image is too large or too small Adjust the Size settings The colors are distorted with dark or shado...

Page 28: ...ze selection Input Signal Terminated Video signal Analog video 0 7 Vpp positive at 75 W Separate sync TTL Level positive or negative Composite sync TTL Level positive or negative Sync on green Composite sync 0 3 Vpp negative Video 0 7 Vpp positive Maximum Pixel Clock 340 MHz Power Supply AC 100 240 V 10 60 Hz 50 Hz 3 Hz Power Consump tion 160 W Maximum Dimensions Weight W x D x H Unit 500 x 476 x ...

Page 29: ...n GND R GND G GND B Reserved GND Sync Self Raster GND DDC Data H Sync V Sync DDC Clock Red Green Blue GND DDC Return GND R GND G GND B Reserved GND Sync Self Raster GND DDC Data H Sync Not Used DDC Clock Red Green Sync Blue GND DDC Return GND R GND G GND B Reserved GND Sync Self Raster GND DDC Data Not Used Not Used DDC Clock GND R Red H V Sync Sense 0 Green GND G Sense 1 Reserved Blue Sense 2 GND...

Page 30: ... Comp Sync H Sync V NC NC V Sync Table 6 Preset timing modes Display Mode Horizontal Frequency kHz Vertical Frequency Hz Pixel Clock MHz Sync Polarity H V IBM VGA2 720 x 400 31 469 70 087 28 322 IBM VGA3 640 x 480 31 469 59 940 25 175 VESA 800 x 600 53 674 85 061 56 250 VESA 1024 x 768 68 677 84 997 94 500 VESA 1152 x 864 67 500 75 000 108 00 VESA 1280 x 1024 91 146 85 024 157 500 VESA 1600 x 1200...

Page 31: ...uration 22 Menu position 22 N No Connection Check Signal Cable 25 P Paralle 12 Pinbalance 13 Pinbalance Corner 14 Pincushion 12 Position 10 Position Size 10 Power button 8 Power indicator 8 Power off Mode 24 Power saving modes 24 Preset timing modes 28 Purity 17 R Recall 18 Reset 19 Rotation 12 S Screen 16 Shasrpness 18 Side Pin Corner 13 Size 10 Sync input type 20 T Trapezoid 12 Troubleshooting 2...

Page 32: ...stomaintain FCCcompliancefortheproduct Declaration of conformity for products Marked with FCC Logo ThisdevicecomplieswithPart15oftheFCCRules Operationissubjecttothefollowingtwoconditions 1 thisdevicemaynotcauseharmfulinterference and 2 this devicemustacceptanyinterferencereceived including interferencethatmaycauseundesiredoperation Thepartyresponsibleforproductcompliance SAMSUNGELECTRONICSCO LTD A...

Page 33: ...0 UK Samsung Electronics UK Ltd Samsung House 225 Hook Rise South Surbiton Surrey KT6 7LD Tel 0181 391 0168 Fax 0181 397 9949 European Service Center National Service Stafford Park 12 Telford Shropshire TF3 3BJ Tel 01952 292 262 Fax 01952 292 033 THAILAND Samsung Service Center 729 729 1 JSP Tower Rachadapisek RD Bangpongpang Yannawa Bangkok 10120 Tel 662 2954508 14 Fax 662 2954267 SOUTH AFRICA Sa...

Reviews: