


Alignment and Adjustment
Samsung Electronics
5-3
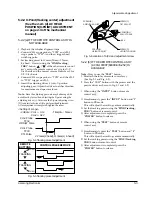
5-2-2 X-Point(Tracking center) adjustment
(See the 2-2-1 (d) AC HEAD
POSITION(X-POINT) ADJUSTMENT
on page 2-3 of the mechanical
manual)
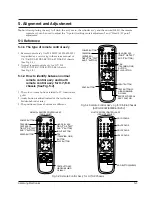
5-2-2 (a) IF THE REMOTE CONTROL ASS’Y IS
NOT AVAILABLE
1. Playback the colorbar alignment tape.
2. Connect CH-1 scope probe to ÒTP02Ó and CH-2
scope probe to ÒTP03Ó. And then, trigger head
switching pulse.
3. Set tracking preset to 11msec (2head : 2.7msec,
4, 6head : 11msec) using the Ò
FINE(Tracking,
TRK)
Ó button / of the other remote control
assÕy except the remote control assÕy jig for X-5/
X-6 chassis and the normal remote control assÕy for
X-7/X-8 chassis.
4. Connect CH-1 scope probe to ÒTP02Ó and the CH-2
to ÒTP03Ó trigger on CH-1.
5. Insert the adjusting driver (+) into X-position
adjusting gear. Adjust the driver in either direction
for maximum envelope waveform.
Note :
Since the adjusting gear unit may be damaged, do
not adjust by force when adjusting the X-point using the
adjusting driver (+). After turn the X-point adjusting screw
(D) counterclockwise a little, perform the adjustment.
After adjustment is completed, tighten the screw.
5-2-2 (b) IF THE REMOTE CONTROL ASS’Y
(AC93-10039Y/69099-633-252) IS
AVAILABLE
Note :
How to use the Ò
TEST
Ó button.
1. Disattach the inlay of remote control assÕy.
(See Fig. 5-1 and Fig. 5-2)
2. Press the ÒTESTÓ button with the pincers and the
precise driver as shown in Fig. 5-1 and 5-2)
1. When using the Ò
INPUT
Ó button of remote
control assÕy;
1) Simultaneously press the Ò
INPUT
Ó button and Ò
1
Ó
button in PB mode.
This will adjust the tracking center automatically.
2) Set the tracking preset using the Ò
FINE
(
Tracking,
TRK
)Ó button of remote control.
3) After adjustment is completed, press the
Ò
POWER
Ó button to release.
2. When using the Ò
TEST
Ó button of remote
control assÕy ;
1) Simultaneously press the Ò
TEST
Ó button and Ò
5
Ó
button in PB mode.
This will adjust the tracking center automatically.
2) Set the tracking preset using the Ò
FINE
(
Tracking
,
TRK
) button of remote control.
3) After adjustment is completed, press the
Ò
POWER
Ó button to release.
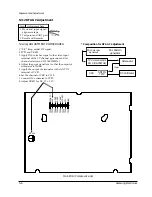
<Setting of scope>
- Volt/div. : CH-1 = 0.1V - Time/div. : 5msec
CH-2 = 0.2V
CH-2 Probe
TP02
H’D S/W Pulse
CH-1 Probe
TP03
CTL Pulse
Fig. 5-4 Tracking preset adjustment
REMOTE
BUTTONS
TRACKING
TRACKING
CONTROL PULSE REMOVE
PUSH
PUSH
Fig. 5-5 Tracking preset adjustment
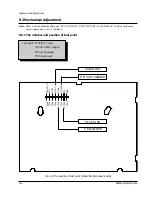
SCREW(C)
TILT ADJUST
X-POSITION
ADJUST GEAR
HOLE
SCREW(A)
HEIGHT ADJUST
SCREW(B)
AZIMUTH ADJUST
SCREW(D)
X-POINT LOCKING
Fig. 5-6 Location of A/C Head adjustment screw
2.7msec(2 head), 11msec(4, 6 head)
Summary of Contents for SV-A130B
Page 7: ...Reference Information 2 4 Samsung Electronics 2 2 IC BLOCK 2 2 1 IC601 HD6473977 ...
Page 8: ...Reference Information Samsung Electronics 2 5 2 2 2 IC301 SS11501M SS11511M ...
Page 9: ...Reference Information 2 6 Samsung Electronics 2 2 3 IC302 LA7416 ...
Page 10: ...Reference Information Samsung Electronics 2 7 2 2 4 IC303 SS23377M SS23378M ...
Page 11: ...Reference Information 2 8 Samsung Electronics 2 2 5 IC501 TA1264 ...
Page 12: ...Reference Information Samsung Electronics 2 9 2 2 6 IC502 LA7256 ...
Page 13: ...Reference Information 2 10 Samsung Electronics MEMO ...
Page 23: ...Disassembly and Reassembly 4 8 Samsung Electronics MEMO ...
Page 31: ...Alignment and Adjustment 5 8 Samsung Electronics MEMO ...
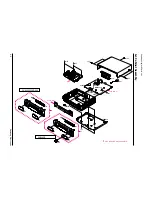
Page 41: ...Exploded View and Parts List 6 10 Samsung Electronics MEMO ...
Page 59: ...Electrical Parts List 7 18 Samsung Electronics MEMO ...
Page 61: ...Block Diagrams 8 2 Samsung Electronics 8 1 Overall Block Diagram ...
Page 62: ...Block Diagrams Samsung Electronics 8 3 8 2 System Control ...
Page 63: ...Block Diagrams 8 4 Samsung Electronics 8 3 Video ...
Page 64: ...Block Diagrams Samsung Electronics 8 5 8 4 Hi Fi Audio ...
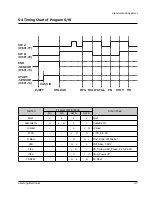
Page 65: ...Block Diagrams 8 6 Samsung Electronics 8 5 Function Timer ...
Page 66: ...Samsung Electronics 10 1 10 Wiring Diagram ...
Page 69: ......
Page 70: ......
Page 71: ......
Page 72: ......
Page 73: ......
Page 74: ......
Page 75: ......
Page 76: ......
Page 77: ......
Page 78: ......


