


GB
25
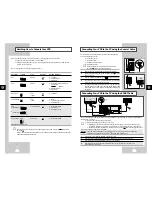
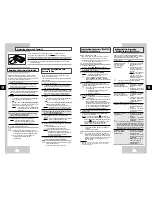
Connecting an RCA Audio/Video Input Cable
★
(SV-665GX/SV-661GX Only)
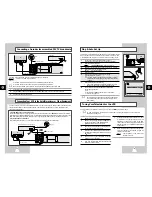
Using the Assemble Edit Function
Recording from Another VCR or Camcorder
You can connect other audio/video equipment to your
VCR using audio/video cables if the appropriate
outputs are available on the equipment chosen.
Examples:
◆
You wish to copy a video cassette with the help
of a second VCR.
◆
You wish to play back and/or copy pictures
taken with a camcorder.
☛
◆
Make sure that both the television and the
VCR are switched off before connecting
the cables.
1 Connect one end of the RCA audio/video cable into
the VIDEO socket on the front of the VCR.
2 Plug the other end of the audio/video cable into the
appropriate output connector on the other system
(VCR or camcorder).
3 Connect one end of the RCA audio cable into the
AUDIO sockets on the front of the VCR.
➢
Take care to respect the colour coding of the
left and right channels.
4 Plug the other end of the audio cable into the
appropriate output connectors on the other system
(VCR, camcorder or Hi-Fi sound system).
You can copy a cassette to your VCR from another
video source, such as another VCR or a camcorder.
☛
It is an infringement of copyright laws to copy
prerecorded cassettes or to re-record them in
any form without the permission of the
owners of the corresponding copyright.
1 Connect the VCR, from which the cassette is to be
copied, to the appropriate SCART audio and video
input connectors on the rear of your VCR.
.
You can also use an RCA audio and video cable to
connect the AUX input on the front of your VCR.
★
(SV-665GX/SV-661GX only)
2 Insert a blank cassette in your VCR.
3 Insert the pre-recorded cassette in the other video
source (VCR or camcorder).
4 Press the INPUT button to select the appropriate
input on your VCR:
◆
AV1 or AV2 for the SCART input
◆
AUX for the RCA input
★
(SV-665GX/ SV-661GX
only)
This function allows you to start a new recording at a
specific position on the cassette while maintaining a
very smooth scene change.
1 Insert the cassette to be edited in your VCR.
2 Press the
❿
ll button to start playback.
3 When you reach the position from which you wish to
start the new recording, press the
❿
ll button.
4 Press the F.ADV ( ) button again as often as
necessary to advance frame by frame, until the
exact recording position is located.
5 While the VCR is in still mode, hold the REC button
down for a while to activate the Assemble Edit
function.
Result: Record symbol flashes in the display.
6 Select the source from which you wish to record by
pressing:
◆
The PROG/TRK (
or
❷
) / PROG (
or
❷
)
buttons for television channels
◆
The INPUT button for the AV1, AV2 or AUX
★
(SV-665GX/SV-661GX only) input sources
7 Press the
❿
ll button to start recording.
8 When you have finished recording, press
■
.
F.ADV
5 Start playing back the cassette to be copied.
6 Hold REC down for a while to start recording on your
VCR.
7 When you have finished recording, press
■
on both
VCRs.
➢
If you wish to view the cassette being
copied:
◆
Your VCR must be connected as usual to
the television (see page 10 for further
details)
GB
24
Auto Repeat Play
ShowView EXTEND
★
(SV-665GX/
SV-465GX/SV-265GX Only)
Using the Tape Counter
Interval Repeat Play
You can set interval repeat play to repeat the
cassette several times for special interval.
1 Press MENU on the remote control.
Result: The programming menu is displayed.
2 Press the corresponding
,
❷
or
➛
,
❿
buttons to
select the
EASY OPERATION
option.
3 Press the OK button to select this option.
Result: The
EASY OPERATIONN
menu is displayed.
4 Press the corresponding
or
❷
buttons, until the
NO. OF INTERVAL REPEAT
option is selected.
5 To...
Press
❿
, until...
Interval repeat play
5, 10, 15 is displayed.
(choose repeat time 5 times,
10 times, 15 times)
Cancel interval
OFF
is displayed.
repeat play
6 On completion, press MENU twice to exit the menu.
7 To select interval during playback, press the
INPUT/REPEAT button at the desired start point.
Result: “
INTERVAL REPEAT SETTING
” is
displayed.Press the INPUT/REPEAT button
one more time at the desired end point.
Result: The tape is automatically rewound to the start
point. “
INTERVAL REPEAT
” is displayed.
The tape counter:
◆
Indicates the elapsed time in the play and record
modes (hours, minutes and seconds)
◆
Is reset when a cassette is inserted in the VCR
◆
Allows you to find the beginning of a sequence easily
☛
If the remaining time is to be calculated correctly,
you must indicate the type of cassette being used.
1 Insert a cassette in your VCR.
2 To set the tape counter to zero at the beginning of a
sequence:
◆
Press DISP./
or DISPLAY twice to display the
counter
◆
Press CLR/RST when you want to set the tape
counter to zero
3 When you are ready,
◆
Start playback or Recording.
◆
Press the
■
button.
◆
To fast-froward or rewind to the sequence at
which the counter was set to zero, press
➛➛
or
❿❿
.
➢
Some VCR information, such as the counter, can
be displayed on the television screen (unless you
have deactivated the OSD mode; refer to page 16).
Press DISP./
or DISPLAY:
◆
Once to display the current function,
programme number, recording speed, date,
time and counter
◆
Twice to display the counter only
◆
Three times to display the time remaining
on the cassette
◆
Four times to clear the display
You can set repeat play to repeat the tape
continuously from beginning to end.
1 Press MENU on the remote control.
Result: The programming menu is displayed.
2 Press the corresponding
,
❷
or
➛
,
❿
buttons to
select the
EASY OPERATION
option.
3 Press the OK button to select this option.
Result: The
EASY OPERATION
menu is displayed.
4 Press the corresponding
or
❷
buttons, until the
REPEAT PLAY
option is selected.
5 To...
Press
➛
or
❿
, until...
Repeat play
ON
is displayed.
Do not wish to repeat play
OFF
is displayed.
6 On completion, press MENU twice to exit the menu.
To prevent delays or over-runs the VCR has a
function called ShowView EXTEND allowing you to
extend the recording time by up to 60 minutes.
➢
Only use if PDC is not available or set to
OFF.
1 Press the MENU button on the remote control.
2 Press the corresponding
,
❷
or
➛
,
❿
buttons to
select the
EASY OPERATION
option.
3 Press the OK button to select this option.
Result: The
EASY OPERATION
menu is displayed.
4 Press the corresponding
or
❷
buttons, until the
SHOWVIEW EXTEND
option is selected.
5 Press
➛
or
❿
buttons to set the ShowView EXTEND
time by increments of 10 minutes.
6 To turn off, press
➛
or
❿
buttons repeatedly until
OFF
shows.