


28
SPEED DOME CAMERA ACCESSORIES
29
SPEED DOME CAMERA ACCESSORIES
Safety
Cable
Alignment
Direction
Guides
Alignment
Direction
Guides
Alignment
Directions
OPEN
CLOSE
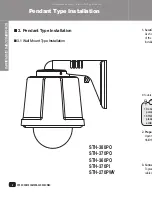
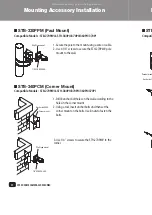
STH-370PE
STH-370PE
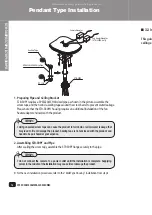
8. Setting Up Camera DIP Switches
DIP switches for communication and ID protocols are located on the bottom of the
camera. For the switch settings, refer to the appendix of this manual.
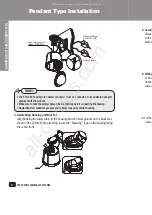
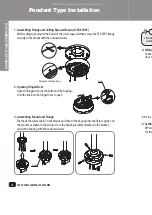
10. Assembling Dome Cover
Once the camera is successfully attached, secure the
mount with the transparent dome cover.
9. Attaching Camera
Carefully attach the camera to the mount following the alignment guide marks as shown
in the picture. First hook the camera's safety cable on the mount, and then attach the
camera. The safety cable is coiled inside the install base. As shown in the leftward picture,
pull out the safety cable from the install base and then hook it to the mount.
✽
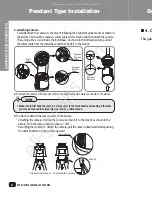
To attach the camera to the mount, refer to the alignment guide marks as shown in the picture.
•Makesuretofirsthookthecamera'ssafetycabletothemountbeforeproceeding.Otherwise
youmaybeexposedtoseriousinjurycausedbyafallencamera.
Notes
•Becarefultonotscratchthetransparentcover
during the assembly. Scratched dome covers
maydecreasethegraphicsqualityandoverall
performance of the camera.
Notes
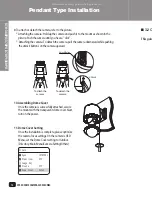
✽
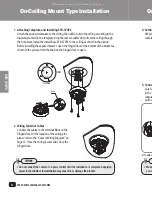
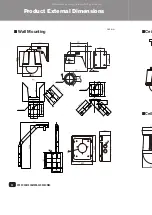
To attach or detach the camera, refer to the picture.
* Attaching the camera: Hold up the camera and push it to the mount as shown in the
picture. Push the camera until you hear a “click”.
* Detaching the camera: To detach the camera, pull the camera downward while pushing
the unlock buttons on the camera upward.
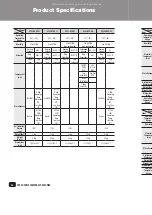
7. Arranging Camera Cables and Closing Hinged Door
Connect the cables to the terminal block on the hinged
door.
For the location of the wiring pins, please refer to the
“Camera Wiring Diagram” on Page 12.
Once the wiring is successful, close the hinged door.
Protocol(SW2)
ID(SW1)
To attach the
camera
To detach the
camera
UNLOCK
Unlock Button
Indoor Flush Mount Type Installation
Indoor Flush Mount Type Installation
All manuals and user guides at all-guides.com


