background image

Using the Computer   29

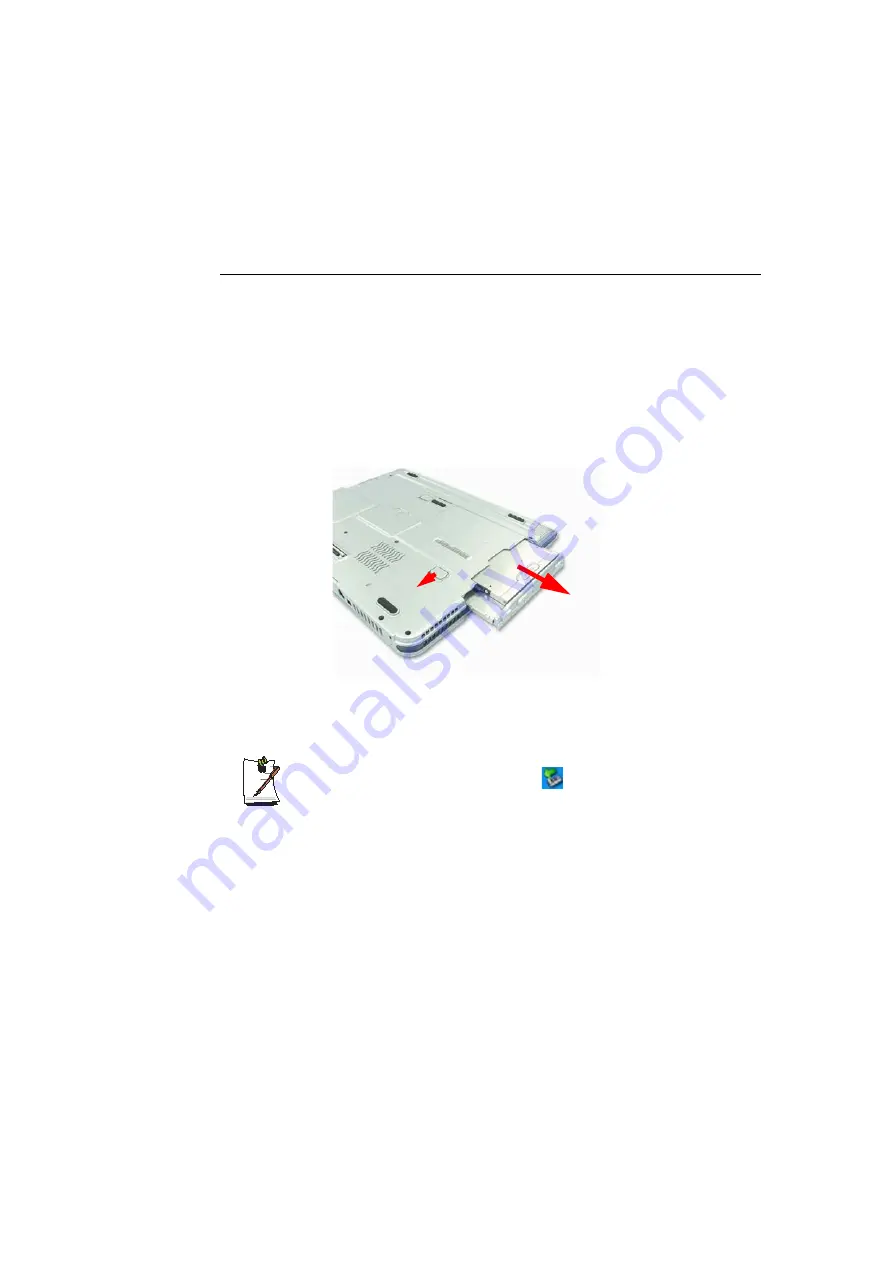
Using the Multi-Bay 

Multi-Bay provides space for CD drive installations. You can replace the CD drive 
with various other types of drives.
The procedures to replace the drive installed in the Multi-Bay with other drives are 
described below.

1.

Turn off the computer.

2.

While holding the Multi-Bay latch to the UNLOCK position, remove the installed 
drive.

3.

Insert a new drive into the Multi-Bay completely, and make sure that the latch is 
in the LOCK position.

To replace the drive without turning off the computer

a. Click the 

Safely Remove Hardware

 (

) icon on the taskbar.

b. When the 'Safely Remove Drive' message appears, click the message.
c. Remove the CD drive, and install a new drive.

Summary of Contents for SP30

Page 1: ...ft Corporation Product names mentioned herein are for identification purposes only and may be trademarks and or registered trademarks of their respective companies Macrovision Statement If your computer has a DVD drive and an analog TV Out port the following paragraph applies This product incorporates copyright protection technology that is protected by method claims of certain U S patents and oth...

Page 2: ...be operated only with the type of power source indicated on the rating label x Ensure that the electrical outlet you are using to power your equipment is easily accessible in case of fire or short circuit x If your computer has a voltage selector switch make sure that the switch is in the proper position for your area x Openings in the computer case are provided for ventilation Do not block or cov...

Page 3: ...cleaning the system x Unplug the system from the wall outlet and refer servicing to qualified personnel if The power cord or plug is damaged Liquid has been spilled into the system The system does not operate properly when the operating instructions are followed The system was dropped or the casing is damaged The system performance changes Replacement Parts and Accessories Use only replacement par...

Page 4: ...equirements for use in the country where you purchased your equipment Power cord sets for use in other countries must meet the requirements of the country where you use the computer For more information on power cord set requirements contact your authorized dealer reseller or service provider General Requirements The requirements listed below are applicable to all countries x The length of the pow...

Page 5: ...this time Because the wireless devices which may be embedded into your notebook emit less energy than is allowed in radio frequency safety standards and recommendations manufacturer believes these devices are safe for use Regardless of the power levels care should be taken to minimize human contact during normal operation As a general guideline a separation of 20 cm 8 inches between the wireless d...

Page 6: ...ur system is equipped with a wireless device when traveling between countries with your system check with the local Radio Approval authorities prior to any move or trip for any restrictions on the use of a wireless device in the destination country If your system came equipped with an internal embedded wireless device do not operate the wireless device unless all covers and shields are in place an...

Page 7: ...e the receiving antenna x Increase the separation between the equipment and receiver x Connect the equipment into an outlet on a circuit different from that to which the receiver is connected x Consult the dealer or an experienced radio TV technician for help If necessary the user should consult the dealer or an experienced radio television technician for additional suggestions The user may find t...

Page 8: ... cm2 may be exceeded at distances close to the antenna installed Therefore the user must maintain a minimum distance of 20cm from the antenna at all times This device can not be colocated with another transmitter and transmitting antenna FCC Part 68 This equipment compiles with part of the FCC rules On the back of this equipment is a label that contains among other information the FCC registration...

Page 9: ... that you disconnect the equipment until the problem is resolved The user must use the accessories and cables supplied by the manufacturer to get optimum performance from the product No repairs may be done by the customer This equipment cannot be used on public coin phone service provided by the telephone company Connection to party line service is subject to state tariffs The Telephone Consumer P...

Page 10: ...n of 20 cm 8 inches between the wireless device and the body for use of a wireless device near the body this does not include extremities is typical This device should be used more than 20 cm 8 inches from the body when wireless devices are on The power output of the wireless device or devices which may be embedded in your notebook is well below the RF exposure limits as set by Industry Canada Thi...

Page 11: ...rtified equipment should be made by an authorized Canadian maintenance facility designated by the supplier Any repairs or alterations made by the user to this equipment or equipment malfunctions may give the telecommunications company cause to request the user to disconnect the equipment Users should make sure for their own protection that the electrical ground connections of the power utility tel...

Page 12: ... fitted with a 2 4 GHz band embedded wireless device European Radio Approval Information for products fitted with EU approved radio devices This Product is a Notebook computer low power Radio LAN type devices radio frequency RF wireless communication devices operating in the 2 4 GHz band may be present embedded in your notebook system which is intended for home or office use This section is only a...

Page 13: ... for pan European approval for connection to the analogue Public Switched Telephone Networks PSTNs of TE excluding TE supporting voice telephony services in which network addressing if provided is by means of Dual Tone Multi Frequency DTMF signaling Although this equipment can use either loop disconnect pulse or DTMF tone signaling only the performance of the DTMF signaling is subject to regulator...

Page 14: ... step information they apply to Warning Indicates the possibility of personal injury Caution Warns you of possible damage to equipment or data Note Informs you of special circumstances Technical Information Informs you of special requirements or limitations for use of item s Keyboard Conventions Keys that you need to press to perform certain functions are displayed in the manual in brackets For ex...

Page 15: ... or shown in a small figure such as the Start Button shown on the right Table 1 Touchpad Click Conventions Windows Conventions Almost all Windows programs will display the name function of a button or icon if you place the touchpad pointer on the item you want information about Software User Documentation Your computer is shipped from the factory with several software programs installed The softwa...

Page 16: ...l For more information on using the fingerprint sensor refer to the manual supplied with the device LCD Button Touchpad Button Touchpad p12 Keyboard p8 Hot Keys p15 LCD Panel Status Indicators LED p17 Power Button Status Indicators LED p17 Scroll Button LCD Panel Microphone Fingerprint Sensor Optional ...

Page 17: ...lti bay devices in the multi bay of the system Refer to Using the Multi Bay p 29 Left View Fan Vent Multi Bay Hard Disk Compartment Memory Card Slot p31 Headphone Jack Microphone Jack Security Lock Port PCMCIA Slot p30 Infrared Port LAN Port p35 Modem port p34 ...

Page 18: ...om View DC In Port Parallel Port Serial Port TV Out Port S VHS 1394 Port 4 pin USB Ports 2 0 Monitor Port PS 2 Port Battery Latch Battery p70 Port Replicator Connector Memory Compartment Speaker Speaker Multi Bay Latch Hard Disk Screw ...

Page 19: ...rt the battery and connect the AC adapter according to the Installation Guide 2 Press LCD button on the front of the system and open the LCD panel 3 Press the power button To turn off the computer 1 Click the start button on the taskbar 2 Click Turn Off Computer 3 Click Turn Off ...

Page 20: ...g box appears click Shut Down Turn Off to turn off the computer Your unsaved work may be lost damaged If Ctrl Alt Delete keys do not operate either press the power button for more than 4 seconds to turn off the computer Your unsaved work may be lost damaged When you turn on the computer next time it will perform a disk checking process ...

Page 21: ...es x Full sized Alphanumeric typewriter keys are arranged like a standard typewriter keyboard and are used for text entry The Windows keys on either side of the spacebar open Windows menus and perform other special functions x Function keys when pressed together with the Fn key enable special functions x Cursor and Screen control keys move the cursor They may perform other functions depending on y...

Page 22: ...c function Press Fn Num Lock to turn on the embedded numeric keypad The numeric functions of the keypad are enabled and the Num Lock LED turns on See Reading the Status Indicators on page 17 for the location of the Num Lock LED While the numeric functions are enabled you can temporarily return a key to its normal function by pressing the key and the Fn key For example to type the letter m press Fn...

Page 23: ...d off F6 Mute Turns the audio output on and off F10 Low noise The system operates in low noise mode Note In low noise mode the operational speed of a program will be slowed down because the CPU operating at half speed and the system may overheat if used continuously in this mode because the fan is rotating only at half speed F11 Num Lock Number Lock Enables the numeric keypad p9 F12 Scroll Scroll ...

Page 24: ...s a function key combination the system sound may be temporarily muted Brightness Up Makes the LCD screen brighter Brightness Down Makes the LCD screen dimmer Volume Down Decreases the audio volume Volume Up Increases the audio volume ...

Page 25: ...is image is called a pointer and is usually displayed in arrow shape or I shape The touchpad on your computer allows you to move the pointer on the LCD screen just like a mouse that is used with a desktop computer The touchpad buttons allow you to take actions with the pointer such as selecting an item or executing a command Touchpad Buttons Touchpad Scroll Button ...

Page 26: ...ad once with your finger Double Click Launch a program or open a file Place the pointer over an object then quickly press left touchpad button twice Or place the pointer over an object then quickly tap the touchpad twice with your finger Right Click Display a short cut menu Place the pointer over an object then press right touchpad button once Drag Move an object or select an area or multiple obje...

Page 27: ...ed tool because it may damage your touchpad Scroll Display upper lower left right part of the content within a window Applicable to certain programs only Press the scroll button Or place your finger on the right edge or bottom edge of the touchpad and move vertically or horizontally Action Function Process ...

Page 28: ...rk for 5 seconds For wireless LAN Bluetooth installed models Internet Button Launches Internet Explorer E Mail Button Launches Outlook Express User 1 Button You can launch a frequently used program by pressing the button By default Windows Calculator is configured to be launched when you press this button User 2 Button or WLAN Bluetooth On Off Button By default Windows Explorer is configured to be...

Page 29: ...ick the Key Define Utility icon on the taskbar 2 Click Browser in the User 1 item In the models with wireless LAN Bluetooth installed you cannot change the configuration of the User 2 button 3 Select the desired program in Open dialog box and click Open Example Paint 4 Click OK on Key Settings dialog box to save the changes ...

Page 30: ...t is set to scroll the screen up and down while the cursor position does not change in some applications Battery Turned green when the battery is fully charged or when the battery is not installed Turns amber when the battery is being charged Blinks when the battery is not properly installed Power Turned green when the computer is turned on Blinks when the computer is in Standby mode or low noise ...

Page 31: ...Brightness Level 14 when operating on battery power Brightness Level 10 To save the battery charge When your computer is operating on battery power adjusting the LCD brightness level to dimmer diminishes the battery power consumption Bad pixels in the LCD The limits of the LCD manufacturing technology allow a maximum of 10 abnormal or bad pixels which do not affect system performance This system m...

Page 32: ...me level is displayed on the upper part of the screen for a few seconds To adjust using volume control program Click the Volume icon on the taskbar and move the Volume slider to a desired level For advanced volume control options double click the Volume icon and adjust the volume level in the volume control program ...

Page 33: ...e and a taskbar at the bottom Start Button Opens the Start menu Taskbar Displays programs that are currently running Frequently used icons can be placed here Recycle Bin Deleted files or folders are sent here Language Bar Switches text input language Start Button Taskbar Shortcut Icons Start Menu Recycle Bin Language Bar System Tray with Clock ...

Page 34: ...t by clicking Search My Computer Displays the contents of the hard disk the CD ROM drive the network drive and floppy disks It can also be used to search and open files and folders Control Panel Enables users to configure settings on the computer Help and Support Provides on line help information on Windows and troubleshooting Search Enables users to search for information in files or the Internet...

Page 35: ...ich files and folders are saved in and read from What is a folder A folder is used to group and manage files systematically and may include files in sub folders It is similar to a bookshelf What is a file A file is a document or various kinds of material that is generated as a result of program operation It is also called data To view the entire structure of the drive Click the Folder icon in the ...

Page 36: ...eshooting information regarding computer use Click Start Help and Support Windows XP Tour You can tour elementary functions provided by Windows XP Click Start Tour Windows XP Or click Start All Programs Accessories Tour Windows XP Click on the topics to find out about important functions of Windows XP ...

Page 37: ...the tray in gently until it clicks To eject a CD 1 Stop any process that accesses the CD drive and ensure the CD access LED is turned off 2 Press the eject button on the CD drive CD ROM drive Reads a CD CD RW drive Reads and writes a CD DVD ROM drive Reads a CD DVD CD RW DVD ROM Combo drive Reads a CD DVD and writes a CD DVD Multi Drive Reads CD DVD and writes data to CD DVD Supports DVD R DVD RW ...

Page 38: ...rgency Eject Hole To eject a CD when the CD drive is not working or the computer is turned off unfold a paper clip and insert the unfolded end of the clip into the emergency eject hole and press until the CD tray opens To clean a CD or DVD title Clean the disc with a soft clean cloth by wiping from the center outwards To play a DVD You have to install the DVD software provided on a separate CD to ...

Page 39: ...follow these steps 1 Insert a video CD into the CD drive 2 When the CD drive window appears double click the MPEGAV folder 3 Double click the dat file 4 When the Caution dialog box appears click Open With 5 Select Select the program from a list and click OK 6 Select the Windows Media Player and click OK The video starts playing Above procedure applies only to the video CDs that have a dat file as ...

Page 40: ...e supplied manual You cannot write to a CD that already has data in it 1 Insert a blank CD into the CD drive 2 On the CD Drive dialog box select Open Writable CD Folder and click OK The CD drive window appears 3 Click Start My Computer 4 In My Computer window select files and folders to copy then drag and drop them onto the CD drive window My Computer window 5 Click Write these files to CD CD driv...

Page 41: ...D drive window opens automatically For more information on writing CDs Click Start Help and Support Type CD copy in the search field and click the Search icon For more information on creating an audio CD Run the Windows Media Player program click the Help Help Topics Click Using Windows Media Player Using CDs Creating your own CDs To create your own CD To write data to a DVD Use the CD DVD writer ...

Page 42: ...scribed below 1 Turn off the computer 2 While holding the Multi Bay latch to the UNLOCK position remove the installed drive 3 Insert a new drive into the Multi Bay completely and make sure that the latch is in the LOCK position To replace the drive without turning off the computer a Click the Safely Remove Hardware icon on the taskbar b When the Safely Remove Drive message appears click the messag...

Page 43: ...ard into the PCMCIA card slot on the side of the computer 2 Windows automatically installs the necessary driver for the card If there is no available driver found by Windows you have to install the driver using a disk supplied with the card To remove a PCMCIA card 1 Double click Safely Removes Hardware icon on the taskbar 2 On the Safely Remove Hardware dialog box select the appropriate PCMCIA car...

Page 44: ... camera Restriction in Using Memory Stick Your computer supports a maximum Memory Stick size of 128 MB Please check the amount of memory of Memory Stick in advance when you purchase a Memory Stick The MagicGate Memory Stick has a storage function and a security function This computer does not support the security function only the storage function To insert and use a memory card 1 Insert the card ...

Page 45: ...card caused by the inherent problem of the Windows operating system To format a memory card You can use a memory card after the format operation The procedures to format a memory card are described below Since format operation deletes all data in the memory card please make sure that there is no important data in the memory card before formatting To protect the data in the memory card Set the writ...

Page 46: ... format the memory card in the digital device If you format the memory card in the computer you may have to format the memory card in other digital device again to use the memory card in the digital device To format a Memory Stick in Windows 2000 Me or 98SE install the Memory Stick Formatter software included in the system software CD ...

Page 47: ... an internet service provider ISP for instructions on how to connect to and disconnect from the Internet 1 Connect a telephone line to the computer s modem port 2 Connect to the Internet according to the instructions provided by your ISP If the Internet connection is not disconnected properly additional telephone charges may be imposed ...

Reviews: