


English - 19
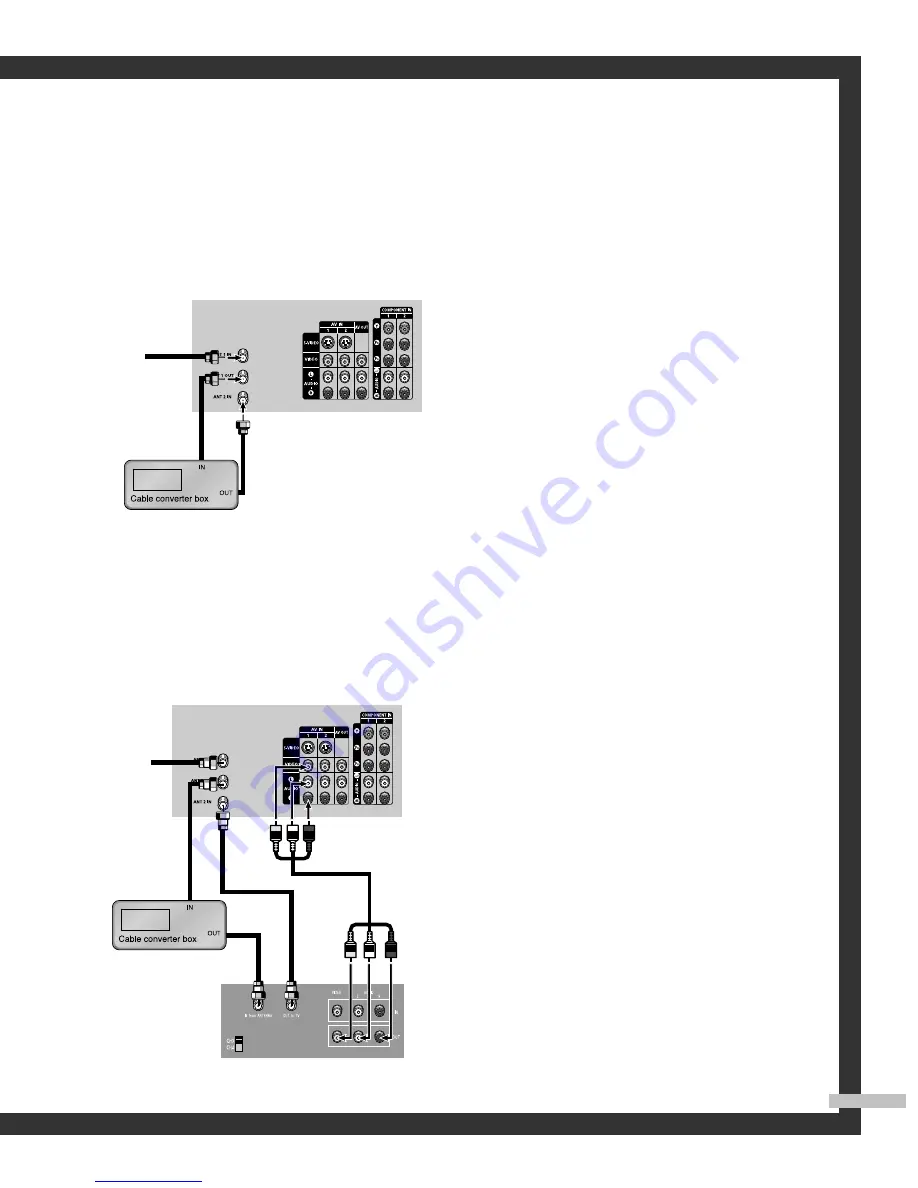
Connecting a Cable Converter Box
This connection allows you to watch cable and premium channels. You should keep your TV
selected to “ANT 1 IN” so that you can use the TV features. When viewing premium channels,
select “ANT 2 IN” and tune the TV to channel 3 or 4 (whichever channel is vacant in your area),
then use the converter box to change channels. You will need two coaxial cables.
NOTES
•
When you use a converter box with
your TV, there may be features that you
can not program using the remote
control, such as programming your
favorite channels and blocking
channels.
•
The output from “ANT 1 OUT” is
available when select “Ant.2” in the
“Antenna“ channel menu.
Connecting a Cable Converter Box and a VCR
This connection allows you to watch and record basic and premium cable channels, as well as
watch videotapes. You should keep your TV selected to “ANT 1 IN” so that you can use the TV’s
features. When viewing premium channels or recording with the VCR, select “ANT 2 IN”
(whichever channel is vacant in your area), then use the converter box to change channels.
Caution: If you want to record one channel
while watching another channel, a splitter
(not included) must be added between the
cable and “ANT 1 IN”. One output of the
splitter goes to “ANT 1 OUT” and the
second output is connected to IN on the
cable converter box.
If you have a mono VCR, connect L/Mono
to VCR Audio OUT using only one audio
cable.
If you have a S-VHS VCR, use the S-video
connections and remove the video cable.
Do not connect the video cable and the
S-video cable to video1 simultaneously.
When you use a converter box with your
TV there may be features that you can not
program using the remote control, such as
programming your favorite channels and
blocking channels.
From
Cable
TV Rear Panel
From
Cable
Stereo VCR
2_BP68-00433A-00(14~23) 5/31/05 11:34 AM Page 19
Downloaded from
www.Manualslib.com
manuals search engine
Summary of Contents for SP-46L3HR
Page 4: ...SAMSUNG Downloaded from www Manualslib com manuals search engine...
Page 5: ...Your New Wide TV Downloaded from www Manualslib com manuals search engine...
Page 14: ...SAMSUNG Downloaded from www Manualslib com manuals search engine...
Page 15: ...Connections Downloaded from www Manualslib com manuals search engine...
Page 24: ...SAMSUNG Downloaded from www Manualslib com manuals search engine...
Page 25: ...Operation Downloaded from www Manualslib com manuals search engine...
Page 44: ...SAMSUNG Downloaded from www Manualslib com manuals search engine...
Page 45: ...Special Features Downloaded from www Manualslib com manuals search engine...
Page 75: ...PC Display Downloaded from www Manualslib com manuals search engine...
Page 84: ...SAMSUNG Downloaded from www Manualslib com manuals search engine...
Page 85: ...Appendix Downloaded from www Manualslib com manuals search engine...
Page 88: ...BP68 00433A 00 Downloaded from www Manualslib com manuals search engine...


