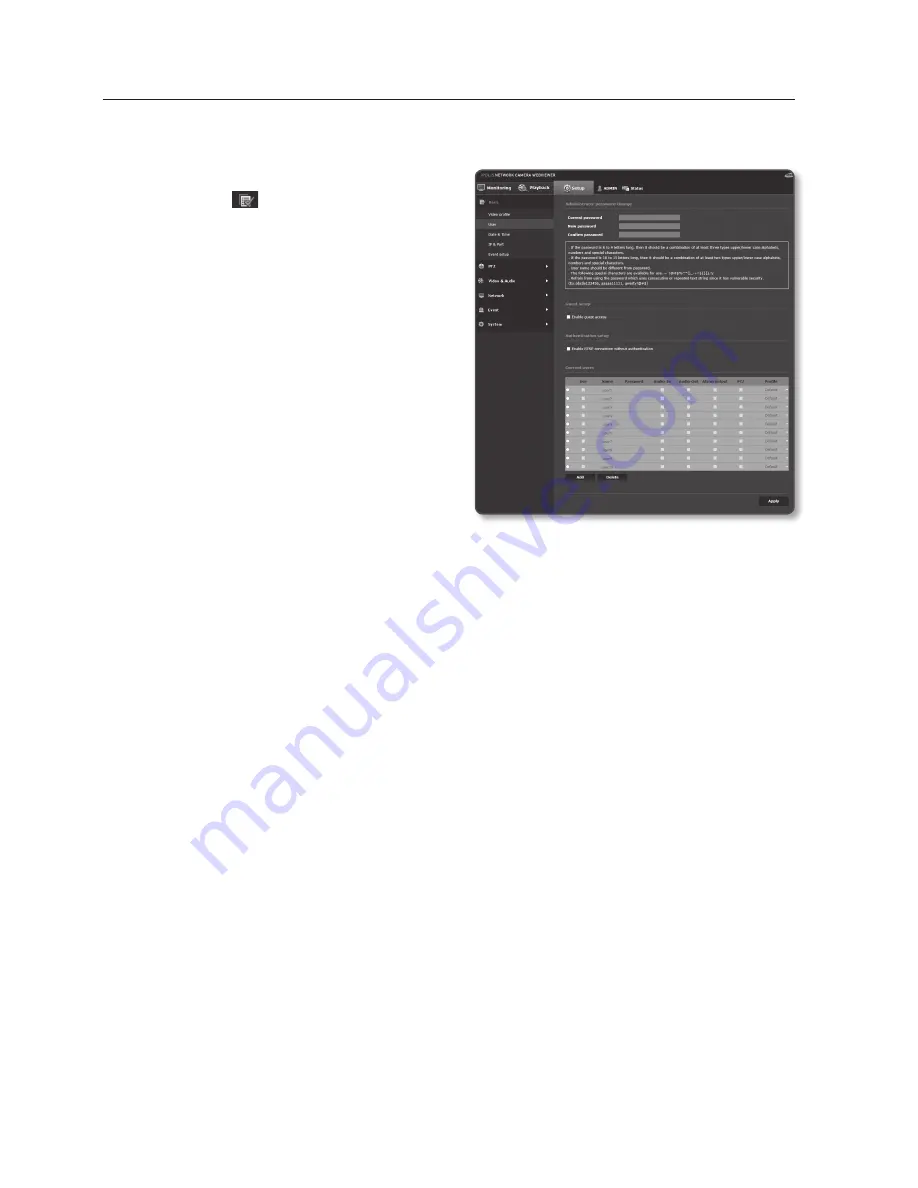
background image

user

1. 

From the Setup menu, select the 

<

Basic (   )

> tab.

2. 

Click <

user

>.

3. 

Provide the necessary user information.


Administrator password change :  

Change the password for the 

administrator.


J


`

For the security purposes, you are 

recommended to use a combination 

of numbers, alphabets uppercase and 

lowercase and special characters for 

your password. 


`

It is recommended to change your 

password once every three months.


`

The password length and limits are shown as follows.


-

A combination of at least three types of upper case, lower case, numeric, and special 

characters: 8 to 9 characters.


-

A combination of at least two types of upper case, lower case, numeric, and special 

characters: 10 to 15 characters.


-

Should be different from the ID.


-

For higher security, you are not recommended to repeat the same characters or 

consecutive keyboard inputs for your passwords.


-

Special characters that are allowed. : ~`!@#$%^*()_-+=|{}[].?/


-

When you access the camera web page for the first time or access it after the initialization, 

you will be moved to the admin password setting menu.


-

In this menu, you need to login again with the new password before using the camera web 

page menus.

setup screen

74_

 setup screen

Summary of Contents for SNP-6321

Page 1: ...NETWORK CAMERA User Manual SNP 6321 SNP 6321H ...

Page 2: ... verify the integrity and correctness of the contents in this document but no formal guarantee shall be provided Use of this document and the subsequent results shall be entirely on the user s own responsibility Samsung Techwin reserves the right to change the contents of this document without prior notice Design and specifications are subject to change without prior notice The initial administrat...

Page 3: ...on or pinched particularly at plugs convenience receptacles and the point where they exit from the apparatus 11 Only use attachments accessories specified by the manufacturer 12 Use only with the cart stand tripod bracket or table specified by the manufacturer or sold with the apparatus When a cart is used use caution when moving the cart apparatus combination to avoid injury from tip over 13 Unpl...

Page 4: ...AUTION CAUTION RISK OF ELECTRIC SHOCK DO NOT OPEN CAUTION TO REDUCE THE RISK OF ELECTRIC SHOCK DO NOT REMOVE COVER OR BACK NO USER SERVICEABLE PARTS INSIDE REFER SERVICING TO QUALIFIED SERVICE PERSONNEL EXPLANATION OF GRAPHICAL SYMBOLS The lightning flash with arrowhead symbol within an equilateral triangle is intended to alert the user to the presence of dangerous voltage within the product s enc...

Page 5: ...ons are for use by qualified service personnel only To reduce the risk of electric shock do not perform any servicing other than that contained in the operating instructions unless you are qualified to do so The CVBS out terminal of the product is provided for easier installation and is not recommended for monitoring purposes Please use the input power with just one camera and other devices must n...

Page 6: ... any ventilation openings y y Do not place heavy items on the product y y Do not expose the camera to radioactivity User s Manual is a guidance book for how to use the products The meaning of the symbols are shown below y y Reference In case of providing information for helping of product s usages y y Notice If there s any possibility to occur any damages for the goods and human caused by not foll...

Page 7: ...ng a SD Memory Card 39 Memory Card Information Not Included network connection and setup 40 40 Connecting the Camera Directly to Local Area Networking 41 Connecting the Camera Directly to a DHCP Based DSL Cable Modem 42 Connecting the Camera Directly to a PPPoE Modem 43 Connecting the Camera to a Broadband Router with the PPPoE Cable Modem 44 Buttons used in IP Installer 45 Static IP Setup 49 Dyna...

Page 8: ...ge guide 132 System Setup 138 Viewing profile information appendix 139 139 DIP Switch Setting 141 Camera Wiring 142 Specification 147 Product Overview 149 Troubleshooting 151 Open Source Announcement web viewer 52 52 Connecting to the Camera 53 Password setting 54 Login 55 Installing STW WebViewer Plugin 57 Using the Live Screen 62 Playing the recorded video ...

Page 9: ...n SD card or NAS or sends the signal to the alarm output terminal Tampering Detection Detects tempering attempts on video monitoring Motion Detection Detects motion from the camera s video input Intelligent Video Analysis Analyzes video to detect logical events of specified conditions from the camera s video input Face Detection Detects faces from the camera s video input Audio Detection Detects s...

Page 10: ...s 8 is supported only in the Desktop mode Neither a beta test version unlike the version released in the company website nor the developer version will be supported It is recommended to connect to IPv6 in Windows 7 The camera does not support Internet Explorer Compatability View settings For Mac OS X only the Safari browser is supported Video Memory 256MB or higher J J If the driver of the video g...

Page 11: ...0 UHS or higher NAS recommended specs Recommended capacity 200GB or higher is recommended Simultaneous access One unit of NAS can accept a maximum of sixteen camera accesses For this camera you are recommended to use a NAS with the following manufacturer s specs Recommended products Available sizes Netgear NAS A maximum of 16 cameras can access simultaneously Synology NAS A maximum of 16 cameras c...

Page 12: ...iption Model Name Camera 1 SNP 6321 or SNP 6321H Instruction book Installer S W CD 1 Quick Guide Optional 1 Warranty card Optional 1 Cable for the testing monitor 1 Used to test the camera connection to a portable display device Installation base 1 If installing it indoors or in a ceiling housing SNP 6321 Tapping Screw 4 Used for installation on the ceiling ...

Page 13: ... 1 Use when installing the camera at highly humid place Hexagon screw 3 Used for attaching the installation base to the camera SNP 6321H L Wrench 1 Used for fixing the installation base after attaching it to the camera Installation base 1 Bracket for mounting outdoors Waterproofing accessory 1 Install and use where there is high humidity ...

Page 14: ...mechanism from the direct sunlight or external impact b Dome Cover Dome cover for the lens and unit protection c Reset Button Pressing and holding this button for about 5 seconds will reset all camera settings to the factory default d SD Memory Card Compartment Compartment for the SD memory card Inside a b d c ...

Page 15: ...io Output Port Used to connect the audio output cable d Video Out Port Analog video output port for installation Inner View of Installation Base SW1 1 1 2 3 2 3 4 ON UART RS 422 ON ON ON NO Termination RS 485 OFF OFF OFF Termination Termination Switch No 4 Not used Pin ON OFF AUDIO OUT AUDIO IN D D TXD TXD GND GND 1 COM 1 NO 1 NC IN1 IN2 GND IN3 IN4 2 COM 2 NO 2 NC AC FG AC e f d b a c g h ...

Page 16: ...nnect the alarm I O cable f Communications Setup Switch Set communication protocol RS 486 422 and indicate whether to terminate g Network Connections You can use a PoE or an Ethernet cable to connect this terminal to the network h Power Port Used to connect the power ...

Page 17: ...Item Description a Main unit Protects the internal PTZ mechanism from the direct sunlight rain or external impact b Dome Cover Dome cover for the lens and unit protection c Safety Cable The cable prevents the product from dropping during installation c a b ...

Page 18: ...view Inside Item Description a Reset Button Pressing and holding this button for about 5 seconds will reset all camera settings to the factory default b SD Memory Card Compartment Compartment for the SD memory card b a ...

Page 19: ...ons b Audio Input Port Used to connect the audio input cable c Audio Output Port Used to connect the audio output cable d Video Out Port Analog video output port for installation Inner View of Installation Base AUDIO OUT AUDIO IN D D TXD TXD GND GND 1 COM 1 NO 1 NC IN1 IN2 GND IN3 IN4 2 COM 2 NO 2 NC AC FG AC e f d b a c g h ...

Page 20: ...nnect the alarm I O cable f Communications Setup Switch Set communication protocol RS 486 422 and indicate whether to terminate g Network Connections You can use a PoE or an Ethernet cable to connect this terminal to the network h Power Port Used to connect the power ...

Page 21: ...larm output terminal is 30V DC 2A 125V AC 0 5A and 250V AC 0 25A When connecting alarm input and output cables be sure to connect one cable to each terminal respectively To connect products over the camera s capacity please use an additional relay device If power and GND cables are connected inappropriately to the NC NO or COM port a fire or breakdown of equipment may occur AUDIO OUT AUDIO IN D D ...

Page 22: ... PoE and AC 24V If connected to a switch device that provides PoE power you don t need to apply a power source of AC 24V supply Make sure the PoE device suffices PoE IEEE 802 3at specifications If your device is connected to the switch with the standard of PoE IEEE 802 3af then go to the switch setup menu to deactivate PoE For further information on switch device refer to the manufacturer s manual...

Page 23: ... than 20 Less than 30 Less than 30 Less than 30 As shown in the table above you may encounter a voltage sag depending on the wire length If you use an excessively long wire for camera connection the camera may not work properly Camera Operating Voltage AC 24V 10 Voltage drop measurements on the chart above may vary depending on the type and manufacture of the copper cable Ethernet Connection Conne...

Page 24: ...rned off when connecting them J J This product is a network camera that transfers video over a network the video output terminal is used to set the imaging range of the camera at installation Using the terminal for monitoring purposes may cause problems such as degradation in video quality It is not suitable for 24 hour monitoring using professional CRT monitors or TFT LCD portable monitors Use th...

Page 25: ...h the bracket or housing Available Bracket Models Model Item SNP 6321 SNP 6321H SHP 3701H Outdoor Housing Yes SHP 3701F Ceiling mount Housing SBP 300HM3 Hanging Mount SBP 300WM1 Wall Mount Yes SBP 300WM SBP 300CM Ceiling Mount SBP 300LM Parapet Mount SBP 300KM Corner Mount SBP 300PM Pole Mount M M See Optional Accessories for Installation for the appearance of each bracket unbundled page 33 ...

Page 26: ... a 86mm hole in the ceiling and arrange the wires through the hole 2 Install installation base as shown 3 Before installing the exposed bracket open the hinged door at the bottom of the bracket as shown in the picture Hold the knob on the hinged door to open it J J In the case of installing the camera at highly humid place install it on the ceiling after attaching the enclosed insulation sheet on ...

Page 27: ...Camera Safety Cable and Attaching Camera 1 First as shown in the left hand picture pull out the safety cable from the base and then hook it to the mount The safety cable is coiled inside the base To attach the camera to the mount refer to the alignment guide marks as shown in the picture 2 Carefully attach the camera to the mount following the alignment guide marks as shown in the picture J J Make...

Page 28: ...not be rotated anymore as shown in the figure After rotation fasten the screws assembled to the install base Detaching the Camera Unfasten the screws as shown in the figure push in the hook and rotate it counterclockwise The screws are not completely disassembled When the hook does not rotate any more pull down the camera unit and separate it To Attach the Camera To Detach the Camera ...

Page 29: ...are provided for outdoor installations where exposed to a moisture condition through the PIPE or MOUNT install the HOUSING using the BUSHING to prevent moisture entering Apply grease of proper dose on the BUSHING before assembling and run cables through each hole of the bushings Use PINS to stop up empty holes having no cable running Assemble the BUSHING to the top side of HOUSING s inside as show...

Page 30: ...30_ installation connection 3 Connect the camera safety wire to the installation base 4 Assemble Camera and Installation Base Assemble the installation base and camera by matching the installation direction guides Safety Cable ...

Page 31: ...te the mounted camera unit clockwise so that the reference indicators of top and bottom are as shown in the image on the right 6 Secure Camera and Installation Base As shown in the picture below secure the installation base and camera using 3 hexagon screws ...

Page 32: ...utdoor housing through the external cable 2 Wrap the screw part of the housing with a sufficient amount of Teflon tape for assembly 3 When separating the dome cover and fastening it to the housing frame make sure that the gasket is not loosened to separate from the dome cover 4 Install the wall mount adapter for waterproofing and apply the silicon sealant between and around the wall and wall mount...

Page 33: ...ome cover 3 Install the ceiling mount adapter for waterproofing and apply the silicon sealant between and around the wall and ceiling mount for sealing J J Take particular caution to ensure that there is proper sealing if the installed side is not flat Optional Accessories for Installation For your easier installation you can purchase appropriate optional accessories available 1 If installing the ...

Page 34: ...n 34_ installation connection Wall mount SBP 300WM 2 If installing the camera on the ceiling Ceiling Mount SBP 300CM 3 If installing the wall mount SBP 300WM SBP 300WM1 on an at least 80mm long cylinder Pole Mount SBP 300PM ...

Page 35: ...nnection 4 If installing the wall mount SBP 300WM SBP 300WM1 on a corner of the wall Corner Mount SBP 300KM 5 If installing on a building rooftop Parapet Mount SBP 300LM 6 If installing SNP 6321 outdoors Outdoor Housing SHP 3701H ...

Page 36: ..._ installation connection 7 If installing SNP 6321 on a ceiling as built in component Flush Mount Indoor Housing for PTZ Dome Camera SHP 3701F 8 If installing SNP 6321 in the wall mount or ceiling mount Hanging Mount SBP 300HM3 ...

Page 37: ... J J Disconnect the power cable from the camera before inserting the SD memory card Inserting a SD Memory Card 1 Turn dome cover counterclockwise to open SNP 6321 Using the screw driver loosen 3 screws by turning them counterclockwise and separate the dome cover SNP 6321H ...

Page 38: ...ress down on the exposed end of the memory card as shown in the diagram to eject the memory card from the slot J J Pressing too hard on the SD memory card can cause the card to shoot out uncontrollably from the slot when released To turn off the camera or remove the SD memory card set the card to Off in Storage menu and press the Apply button page 111 If you turn off the camera or remove the SD me...

Page 39: ...nufacturers SD SDHC SDXC Memory Card Sandisk Transcend Memory cards of 4GB 64GB is recommended for using with this camera Playback performance can be affected depending on the speed of memory card so use the high speed memory card For the framerate below 30 fps it is recommended to use the specification memory card of Class 6 or higher For the framerate over 31 fps it is recommended to use the spe...

Page 40: ...perly set or a firewall is set In this case to resolve the problem contact your network administrator In the IP installer you can use the initial password 4321 to set IP Address Subnet Mask Gateway HTTP Port Device Port IP type After changing the network interface for better security access the web viewer and change the password By factory default the IP address will be assigned from the DHCP serv...

Page 41: ... browser to connect to the web viewer 4 Move to Setup page 5 Move to Network DDNS and configure the DDNS settings 6 Move to Basic IP Port and set the IP type to DHCP 7 Connect the camera which was removed from your PC directly to the modem 8 Restart the camera M M For registering the DDNS settings refer to Registering with DDNS page 102 For configuring the DDNS settings refer to DDNS page 101 Refe...

Page 42: ...the web viewer 4 Move to Setup page 5 Move to Network DDNS and configure the DDNS settings 6 Move to Basic IP Port Setup Page set the IP type to PPPoE and enter the network service s ID and password 7 Connect the camera which was removed from your PC directly to the modem 8 Restart the camera M M For registering the DDNS settings refer to Registering with DDNS page 102 For configuring the DDNS set...

Page 43: ...e following IP address ex1 If the address LAN IP of the Broadband Router is 192 168 1 1 IP address 192 168 1 100 Subnet Mask 255 255 255 0 Default Gateway 192 168 1 1 ex2 If the address LAN IP of the Broadband Router is 192 168 0 1 IP address 192 168 0 100 Subnet Mask 255 255 255 0 Default Gateway 192 168 0 1 ex3 If the address LAN IP of the Broadband Router is 192 168 xxx 1 IP address 192 168 xxx...

Page 44: ... either Static Dynamic or PPPoE for the current network connection status d MAC Ethernet Address Ethernet address for the connected camera Click the column to sort the list by Ethernet address However search will be stopped if clicked during the search e IP Address IP address Click the column to sort the list by IP address However search will be stopped if clicked during the search f Protocol Netw...

Page 45: ... Exit Exits the IP Installer program M M For the IP installer use only the installer version provided in the installation CD or use the latest one if available You can download the latest version from the Samsung web site www samsungcctv com Static IP Setup Manual Network Setup Run IP Installer_v2 XX exe to display the camera search list At the initial startup both Auto Set and Manual Set will be ...

Page 46: ...etwork administrator 4 In the Port pane provide necessary information HTTP Port Used to access the camera using the Internet browser defaulted to 80 Device Port Used to control the video signal transfer defaulted to 4520 5 Enter the password Enter the password of admin account which was used to access the camera J J For the security purposes you are recommended to use a combination of numbers alph...

Page 47: ...pplicable router For more information about port forwarding of the broadband router refer to Port Range Forward Port Mapping Setup Page 50 If the Broadband Router has more than one camera connected Configure the IP related settings and the Port related settings distinctly with each other ex Category Camera 1 Camera 2 IP related settings IP Address Subnet Mask Gateway 192 168 1 100 255 255 255 0 19...

Page 48: ... camera on the camera s label Both the Auto Set and Manual Set buttons will be activated 2 Click Auto Set The Auto Setting dialog appears The IP Address Subnet Mask and Gateway will be set automatically 3 Enter the password Enter the password of admin account which was used to access the camera J J For the security purposes you are recommended to use a combination of numbers alphabets uppercase an...

Page 49: ...necting the camera directly to modem using the DHCP protocols If IPs are assigned by the internal DHCP server via the LAN Checking the Dynamic IP 1 Run the IP Installer on the user s local computer Cameras allocated with Dynamic IP address are shown in the list 2 Select a camera from the search result 3 Click the Manual Set button and check the camera s Dynamic IP address If you uncheck DHCP you c...

Page 50: ...e user guide of that Broadband Router 2 Select TCP and UDP Port for each connected camera to the Broadband Router Each port number for the Broadband Router should match that specified in Setup Basic IP Port from the camera s web viewer menu 3 When done click Save Settings Your settings will be saved M M Above sample instructions are based on the CISCO s Broadband Router The settings may differ dep...

Page 51: ... the Internet Since using the IP Installer on a remote computer that is not in the Broadband Router s network cluster is not allowed users can access cameras within a Broadband Router s network by using the camera s DDNS URL 1 Before you can access a camera in the Broadband Router network you should have set the port range forward for the Broadband Router 2 From the remote PC launch the Internet b...

Page 52: ...ttp 2001 230 abcd ffff 0000 0000 ffff 1111 the Login dialog should appear If the HTTP port is other than 80 1 Launch the Internet browser 2 Type the IP address and HTTP port number of the camera in the address bar ex IP address 192 168 1 100 HTTP Port number 8080 http 192 168 1 100 8080 the Login dialog should appear Using URL 1 Launch the Internet browser 2 Type the DDNS URL of the camera in the ...

Page 53: ...oviding Product ID that had been used for DDNS registration J J You can use a DDNS connection only if you are connected to the external network Password setting When you access the product for the first time you must register the login password When the Password change window appears enter the new password J J For a new password with 8 to 9 digits you must use at least 3 of the following uppercase...

Page 54: ...k OK If you have logged in successfully you will the Live Viewer screen J J When you access the camera web viewer pay special attention to the security by checking whether the image data is encrypted M M If you check the Remember my credentials option when your input is done in future you will be logged in automatically without being prompted to enter the login information You will experience the ...

Page 55: ...egin installation J J If the plug in installation file download status is suspended at 99 in the Internet Explorer browser retry it after selecting Release SmartScreen filter in Tool SmartScreen filter 2 Click Run in the message window 3 Click Yes when the notice window saying that all browser windows will be closed 4 When the old version of the Web Viewer Plug in is installed a notice window sayi...

Page 56: ...ug in installation is completed J J In your internet explorer if you need to move to the installation screen after installing the STW webviewer plugin check whether webviewer_ activexplugin_lib control in the Tool Additional Function Management menu is Activated If not and if there is a persisting problem then select Tools Internet Options General and delete all the search records ...

Page 57: ...rmation You can read the profile information e Viewer Screen Displays the Live video on the screen You can use the mouse wheel to activate the digital zooming in Viewer screen f Profile type You can select a profile type in Video profile under the Basic setup menu When the Web Viewer is connected the profile information currently using is displayed g Screen Optimization The video size of the camer...

Page 58: ...le in the jpg format k Manual recording Users can save their video in the SD memory card or NAS on their own To take video manually change the recording setting first Refer to Storage for how to set recording page 111 l Audio Microphone Control Enable Audio and Microphone are control the Audio volume Only the Audio volume can be controlled m Alarm output Activate the Alarm Out port n PTZ Control t...

Page 59: ... not captured by IE browser in Windows 7 or 8 run the IE Browser with the Admin privilege How to record videos manually 1 Press Manual recording 2 To end the recording press Manual recording again M M After inserting the SD card go to Event Storage and turn on the SD card by selecting On or turn on NAS by selecting On after connecting to it Then you can use the manual recording function To fit the...

Page 60: ...b 2 Adjust the direction of the camera by controlling the cursor of the screen moving pad or control the zoom or focus M M For further details on PTZ use refer to PTZ setup page 79 To run a sequence Run a saved preset Refer to To configure the detailed settings for the preset for details of preset setting page 81 Run a saved swing Refer to To configure the swing settings for details of swing setti...

Page 61: ...d the home position for details of home position setting page 80 Configure preset For details on preset configuration see To configure the detailed settings for the preset page 81 To enable the Area Zoom mode For zoom movement click and drag to the location on the screen that you want to move to Change the current zoom factor to x1 Return to the previous area and settings If navigated with Prev it...

Page 62: ...tails on record settings refer to Storage page 111 Name of event search screen and its function Item Description a Search range setting Set the search date and time range for data saved in your SD memory card or NAS b Search event setting Set the event type to search within the search period c Event search Run the event search c b a ...

Page 63: ...ts are recorded within the search period your search will be limited up to the date when the 800th event is recorded For instance if the search period is between 10th and 15th day of the month and more than 800 events were recorded 10th through 11th your search will be limited up to 11th day with a total of 800 events and events after then from 12th will not be found 5 Select a data item to play i...

Page 64: ...peaker To listen to a voice signal if present in the recorded video then activate the voice signal icon when you play it d Screen optimization The camera image is converted to fit the Web browser window e Fix the resolution Regardless of the resolution setup configured in the camera it sets the resolution to 800x600 Press it again to switch back to the default resolution f Capture The current imag...

Page 65: ...ol the Play Interval Select this button to move 1 frame forward Select this button to move 1 second back To control the play speed If selecting the button will switch to x1 x2 x4 x8 and the play speed will increase accordingly When the button is selected the playing speed is decreased to 1x 2x 4x 8x and the playing speed slows down gradually Subsequently the quick playing speed is returned to the ...

Page 66: ...up The scheduling window for backup start and end time appears 2 Click button The Save As window appears 3 Confirm the save path and click Save button The screenshot will be backed up to the specified path To play the backup video The backed up images are saved in an avi format Gom Player VLC Player and Window Media Player are recommended as the media player compatible with this format M M In case...

Page 67: ...g YYYY_mm_DD AVI directory using a media player M M A filename starts with the format 001_ YYYYMMDD_HHMMSS avi and the file number is incremented by one YYYYMMDD_HHMMSS indicates the start time of data saving 001_YYYYMMDD_HHMMSS smi file is a caption file and you can view it if it exists in the same directory as its related AVI file The max recording time per AVI file is 5 minutes Once corrupted t...

Page 68: ...e directory structure for a SD memory card M M A filename starts with the format 001_ YYYYMMDD_HHMMSS avi and the file number is incremented by one YYYYMMDD_HHMMSS indicates the start time of data saving 001_YYYYMMDD_HHMMSS smi file is a caption file and you can view it if it exists in the same directory as its related AVI file The max recording time per AVI file is 30 minutes If you change or dam...

Page 69: ... PC If it is not intalled properly the installation page automatically apprears Basic Setup Video profile 1 From the Setup menu select the Basic tab 2 Click Video profile 3 Set the Video profile connection policy Keep connection when profile setting is changed Changing profile properties that is used by existing connection does not affect such connection and remains with old profile setup If not s...

Page 70: ...the profile applied to video recording on SD card or NAS Audio In Sets whether to use audio for video recordings 6 According to your situation set ATC Auto Transmit Control mode ATC mode It adjusts the video properties according to the variance in the network bandwidth controlling the bit rate Adjusting the bit rate depends on the ATC mode Control framerate Reduce the frame rate if the network ban...

Page 71: ... the previous setting value 100 Note that if you reduce the property value too much you may encounter flickering on the screen So it is advisable to adjust the value within the threshold J J It is recommended to apply ATC control only for cameras supporting ATC Set the ATC sensitivity to Very low in a network environment with high variance in the network bandwidth If the network connection is unst...

Page 72: ...te of video when the bit rate control is set to VBR J J As the bit rate can be adjusted limitedly according to the resolution frame rate and screen complexity the actual bit rate can be greater than the maximum bit rate So you must consider the use conditions when setting the value Target bitrate Set the target bit rate when the bit rate control is set to CBR Bitrate control You can select one fro...

Page 73: ...SVNP packet Multicast RTP Specify the use of the RTP protocol IP address Enter an IPv4 address with which you can connect to the IPv4 network Port Specify the video communication port TTL You can set the TTL for the RTP packet J J If you set the Multicast address to 224 0 0 0 224 0 0 255 multicast may not work properly in all environments In that case we recommend you change the multicast address ...

Page 74: ...least three types of upper case lower case numeric and special characters 8 to 9 characters A combination of at least two types of upper case lower case numeric and special characters 10 to 15 characters Should be different from the ID For higher security you are not recommended to repeat the same characters or consecutive keyboard inputs for your passwords Special characters that are allowed _ Wh...

Page 75: ... but can only view the live Viewer screen The ID password for the guest account is guest guest which cannot be changed Authentication setup If you select Enable RTSP connection without authentication you can access RTSP without logging in and view the video Current users If you select Use you can set or change the user permissions The administrator can set the audio input audio output alarm output...

Page 76: ...ime zone for the specified time period This option will be displayed only in areas where DST is applied System time setup Specify the time and date that will be applied to your system Manual Specify the time manually Synchronize with NTP server Sync with the time of the specified server address Synchronize with PC viewer Sets to the time of the computer connected 4 When done click Apply J J If you...

Page 77: ...splays the Subnet mask for the set IP Gateway Displays the Gateway for the set IP DNS1 DNS2 Displays the DNS Domain Name Service server address 4 Set the IPv6 setup Set to Use to use IPv6 address Default Use the default IPv6 address DHCP Display and use the IPv6 address obtained from the DHCP server Manual Enter IP address and gateway manually and use it J J The IP addressing system will be defaul...

Page 78: ...nnecting to RTSP this function resets the connection if there s no response for a certain time Device port Set a port used to transfer video signals with the Samsung protocols M M If changed the HTTP port the browser exits Afterwards address should contain the newly assigned HTTP port trailing the IP ex IP address 192 168 1 100 HTTP port Assigned 8080 http 192 168 1 100 8080 If HTTP port is set to...

Page 79: ...the faster it moves on the screen 5 Control zoom movement Zoom In Move up the bar in the right of the UI or press the button The farther the bar is from the center the faster the screen expands Zoom Out Move down the bar in the right of the UI or press the button The farther the bar is from the center the faster the screen reduces in size 6 Adjust the focus Manual focus The user sets the focus Aut...

Page 80: ...ebooted after setting the screen is located at the home position If the camera was on another sequence operation the sequence is performed To add a preset 1 Click on the button 2 Select the preset number to be added 3 Set the preset name and click on the OK button To delete a preset 1 Select the preset number to delete 2 Press the button To move to a desired preset 1 Double click on the preset num...

Page 81: ...unction Video analysis MD VA operation is run Camera setup You can change the camera setting to the environment of the selected preset Refer to Camera setup for how to set the camera page 92 MD VA You can set the system to generate an event signal when a movement is detected in the preset or an intelligent video analysis event is detected For more details refer to MD VA Page 123 2 When done click ...

Page 82: ...ng the Tilt function Pan Tilt You can set the swing monitoring only using both PAN and Tilt functions 3 Set First preset and Second preset to specify a swing range J J When moving to the second preset from the first preset the camera will move to the right direction on the screen If you set Flip Mirror to On in the video setup it will move in the opposite direction Page 89 4 Set the moving speed a...

Page 83: ...p setting screen 2 Select a group setting mode Group No Select a group number Preset No Select a preset number Speed Specify the speed of movement Dwell time Specify the duration for which an operation is kept at the preset position 3 Press the button Saved in the bottom list 4 Press the button It performs the group operation 5 Press the button The running group will be stop 6 Press the button Sel...

Page 84: ... button The running tour will be stop 6 Press the button Selected tour data will be deleted To set the tracing function Tracking remembers the trace of movements instructed using the direction button and reproduces it for your reference 1 Select Trace Auto Run This will bring up the tracing and auto operation setting menu screen 2 Select a tracking number The operation will be saved with display o...

Page 85: ...ode Home It is moved to the home position Preset It is moved to the selected preset number Swing Automatically executes the operation in Swing mode Group Automatically executes the operation in Group mode Tour Automatically executes the operation in Tour mode Trace Automatically executes the operation in Trace mode Auto pan Automatically executes the 360 rotation in the pan direction You can desig...

Page 86: ...art limit setting Provide the start and end points If you want to change the point setting click this to return to the input dialog 4 Set the Propotional PT mode Pan and tilt speed is adjusted according to the zoom magnification As the zoom magnification grows the pan and tilt speed decreases Off Turns off the zoom interworking mode Slow The manual pan and tilt control speed is changed according t...

Page 87: ... set RS 485 422 Protocol Select the same protocol version as the controller choosing from SAMSUNG T SAMSUNG E PELCO D PELCO P PANASONIC HONEYWELL AD VICON GE BOSCH Camera ID Set the camera ID 1 255 Baudrate Set the RS 485 422 communication speed 5 When done click Apply M M For this operation the network camera and controller must be properly connected Also the controller must have a serial port se...

Page 88: ...1 6 O O 1 4 O O 1 4 O HONEYWELL O O 1 6 O O 1 6 O X O X O AD O O 1 6 O O 1 6 O x O X O VICON O O 1 6 O O 1 6 O x O X O GE O O 1 6 O O 1 6 O O 1 4 O X O BOSCH O O 1 6 O O 1 6 O O 1 4 O X X Company Protocol Name Version AD RS 422 RS 485 Communications REV B BOSCH AutoDome Protocol 5 30 11 GE Calibur ImpacNet RS485 Protocol REV 4 01 05 21 2004 HONEYWELL ScanDomeII Protocol V1 05 02 11 2004 PANASONIC ...

Page 89: ... of the camera lens 4 Click Activate or Inactivate of the analog video output function 5 Select the matching Video type of the display equipment 6 Select the sensor mode You can set the number of frames captured by the CMOS sensor per second M M Refer to Video profile for the framerate setup range of the Video profile according to mode setup Page 69 You cannot select WDR for the Back light mode if...

Page 90: ... indication restriction function select Off and then click on the OK button If the displayed field and setting field are different press on the Cancel button and reset 7 When using the zoom indication restriction function select On and click on the OK button The privacy field will be set and a popup will appear At this time move to the zoom position that you wish to set for the zoom operation and ...

Page 91: ...ne The option is enabled if External microphone is selected Codec Specify the audio codec G 711 A audio codec standard it uses 64 Kbps PCM Pulse Code Modulation encoding ITU standard audio codec that is adequate for digital voice transfer in PSTN network or through a PBX G 726 ITU standard audio codec applying ADPCM Adaptive Differential Pulse Code Modulation for variable bit rates of 40 32 24 16 ...

Page 92: ... Focus OSD 4 When done click Apply M M If a certain time timeout 240s is elapsed with your not pressing the Apply button after changing the settings your changes will not be applied SSDR Samsung Super Dynamic Range Setup In a scene where the difference between bright and dark is severe you can increase the brightness of the dark area alone to regulate the overall brightness 1 Select SSDR 2 Set Mod...

Page 93: ...tings accordingly Outdoor Automatically corrects the video colors of the camera to be optimized to the outdoor environment Indoor Automatically corrects the video colors of the camera to be optimized to the indoor environment MERCURY The image automatically compensates to the mercury lamp environment M M In AWC mode click the Set button if you want to keep the white balance level of the current im...

Page 94: ...he BLC box step are displayed on the PTZ Control screen 3 Select each item and set it properly BLC level You can change the level to adjust the brightness of the monitoring area BLC box Mode Specify the mode of BLC box Box adjustment Use the arrow buttons to adjust the size and position of the BLC Box BLC box Step Specify the pixel unit for movement You can use the arrow buttons of Box adjustment ...

Page 95: ...ause an afterimage on the screen Ex J J If you select WDR you may encounter the following problems So set it to Not Used Unnatural change of colors that cause an unnatural image on the screen Noise on the bright area of the image As the performance of the WDR function may differ depending on the bright area size of the image it is recommended to optimize the installation angle for the best perform...

Page 96: ...e ambient lighting SSNR3 Specify whether you want to remove the noises in the video When AGC mode is set to Off SSNR3 cannot be used SSNR3 level Set the level of SSNR3 Iris You can set the camera iris to Auto or Manual to your preference Auto Automatically sets the iris adaptively to the ambient lighting and shutter speed Manual Iris F No is set manually Iris F No If the iris mode is set to Manual...

Page 97: ...time interval of lighting at which the sequence operation is triggered Sharpness mode Adjust the overall sharpness of the image If selecting On you can adjust the sharpness of the image Sharpness level The higher the level is the sharper and clearer the outline of the image becomes Color level Adjust the color level of the image Defog You can improve images in foggy or cloudy weather Off Fog remov...

Page 98: ...rack Zoom speed Adjust the zoom tracking speed Init lens Reset the lens to prevent the step out in zoom mode Duration Specify the frequency of resetting the lens You can specify the date of resetting the lens that will perform in auto focus mode Specify the time between 1 and 7 days and the resetting will be performed at 24 hour interval starting from the specified date J J The auto focus function...

Page 99: ...on on the screen Preset name Specify whether or not to display preset name on the screen Camera ID Specify whether or not to display the camera ID number on the screen Azimuth This function allows you to indicate the azimuth of the field seen in the current screen Eight compass directions appear on the lower right side of the screen reflecting the current orientation E W S N NE NW SE SW J J A posi...

Page 100: ...e range of the face rotation is 30 degrees vertically and 60 degrees horizontally The minimum size of the face is 20x20 based on the resolution of 320x240 J J Only when a face detection event is activated can the field of interest be set as face detection For details on face detection events see Face detection page 129 4 Select a quality for the ROI area The ROI area will be displayed in the speci...

Page 101: ...ded by Samsung Techwin Product ID Enter the product ID that is registered with the Samsung DDNS service Quick connect It sets port forwarding automatically when used with a UPnP Universal Plug and Play supporting router Public DDNS Select one of provided public DDNS servers when you use a public DDNS server Service Select desired public DDNS service server Host name Enter the name of the host that...

Page 102: ...r select DDNS SERVICE MY DDNS 3 Click PRODUCT REGISTRATION 4 Enter the product ID You must perform the duplicate check for the ID that you entered 5 Select a CLASSIFICATION and specify the MODEL NUMBER 6 Specify the product location with a description if necessary 7 Click REGISTRATION The product will be added to the product list that you can check setup screen 102_ setup screen ...

Page 103: ... Configuring public DDNS in Camera Settings 1 Open the DDNS settings page and select Public DDNS for DDNS 2 Enter the corresponding site s host name user name and password 3 Click Apply button If the connection properly establishes Success appears 4 When done click Apply M M To use DDNS service properly both DDNS setup and the router s port forwarding setup are required For port forwarding setup r...

Page 104: ...that you want to grant or deny access from When you enter an IP address and a Prefix the list of IP addresses available will appear in the right side filter range column M M If selected Allow for IP Filtering and IPv6 setup of IP Port is set to Use both IPv4 and IPv6 addresses of the computer currently configuring should be assigned The IP address of the computer used for the current setup cannot ...

Page 105: ...ra To install the certificate on the camera you need to provide a certificate name it can be arbitrarily assigned by the user certificate file issued from the certification authority and a key file The HTTPS Secure connection mode using the public certificate item will be active only if there exists a public certificate installed 5 When done click Apply Installing the certificate 1 Enter the certi...

Page 106: ... will not operate properly even if you set it 4 Install remove the certificate CA certificates Select a public certificate that contains the public key Client certificate Select a public certificate that contains the client certificate key Client private Key Select a public certificate that contains the client private key 5 When done click Apply To install remove 802 1x related certificates 1 Pres...

Page 107: ...lete button 6 When done click Apply SNMP With the SNMP protocols the system or network admin can monitor the network devices on a remote site and configure the environment settings 1 From the Setup menu select the Network tab 2 Click SNMP 3 Specify the SNMP Enable SNMP v1 SNMP version 1 will be active Enable SNMP v2c SNMP version 2 will be active Read community Provide the name of the read communi...

Page 108: ... installing the product Note that the security and other related issues caused by the unchanged password shall be responsible for the user Password should be longer than 8 characters no more than 16 characters 4 When done click Apply J J SNMP v3 is only able to be set when the secure connection mode is HTTPS Refer to SSL page 105 If you don t use SNMP v3 there may be a security issue Auto IP confi...

Page 109: ...ork are displayed 5 Set the Bonjour Cameras can be automatically searched in the client and operating system in support of the Bonjour protocol Bonjour It specifies Able or Disable for Bonjour Friendly name Display the camera name Friendly name is displayed in the format of SAMSUNG Model Name MAC Address M M In the Mac operating system which support Bonjour by default the connected cameras are aut...

Page 110: ...of the FTP server that you transfer the alarm or event images to ID Enter the user ID with which you will log in to the FTP server Password Enter the user account password for logging into the FTP server Upload directory Specify the FTP path where you will transfer the alarm or event images Port The default port of the FTP server is 21 however you can use a different port number according to the F...

Page 111: ...t be sent Subject Enter a subject for your email Body Provide the text for the massage Attach the alarm or event images to the email that you are preparing 4 When done click Apply Storage You can activate recording on your device set the recording conditions check the saved data capacity and format the device itself 1 From the Setup menu select the Event tab 2 Click Storage 3 Select a device to sa...

Page 112: ...the recording type for a certain event that occurs Pre event duration Specify the time point before the occurrence of the event starting from the time point the images will be transferred You can specify up to 5 seconds before the occurrence of the event Post event duration Specify the time point after the occurrence of the event to the specified time point the images will be transferred You can s...

Page 113: ... your NAS IP address Unique IP address assigned to the NAS ID An ID registered in the NAS Password Password registered in the NAS Default folder Designate the NAS user folder to save data in 3 Click the Test button to see if you can successfully connect to the NAS J J If the success message is displayed it means that you can successfully save data in the NAS If the fail message is displayed check ...

Page 114: ... of the NAS from Off to On and click the Apply button 5 Access the NAS to check the available capacity and the total capacity 6 If there is not enough space check the data size and click on the Format button to format the NAS folder connected to the webpage Due to network access errors you might be unable to save the NAS temporarily The data traffic will increase when the camera is set to higher r...

Page 115: ... to NAS recommended specs Page 11 If you change the NAS saving while saving data in the NAS it will not be reflected in the system immediately If you remove NAS equipment on your own while saving data or if the network is disconnected NAS saving operation will be terminated abnormally As a rule of thumb you are recommended to use one NAS sharing directory per camera without duplicated use The foll...

Page 116: ...ed folder name ID click the OK button to create a shared folder In this example the shared folder name is testDirectory 6 In Windows for NAS access set the privilege for the shared folder as follows Check the admin s Read Write 7 Click on the User in the file sharing and privilege menu setup screen 116_ setup screen ...

Page 117: ...nt do not allocate the capacity for use 9 In Windows set the privilege for NAS access For the shared folder created in step 4 called testDirectory check Read Write 10 Basic setting in the NAS is completed Connect your camera to the actual NAS As shown below enter the NAS connection setting items 11 After entering item 10 check On 12 Click the Apply button Finish saving by using the NAS English _11...

Page 118: ...circuit status of the sensor or alarm input device as normal and triggers alarm event if becomes Open circuit status 4 Set the alarm output button Mode Sets the alarm output method There is difference between operations when clicked alarm output button while disabled Pulse It is activated during the time period specified by the duration switching interval and then becomes inactive automatically Ac...

Page 119: ...e Always Always check if an alarm occurs It activates in operated mode when the alarm occurs If set to Always the activation time cannot be changed Only scheduled time Check if an alarm occurs at a specified day of the week for a specified time period It activates in operated mode when the alarm occurs Clear Reset all settings Minute Click an area in Activation Time and set the time by minutes Hou...

Page 120: ...arm input setup Refer to FTP E mail for more details page 110 Record Specify the use of recording in the alarm input setup Set Record to On in Storage page 111 Alarm output1 Alarm output2 Select whether to set the alarm output if an alarm is incoming and specify the alarm output time Goto preset Moves to the specified preset location when setting the alarm input 8 When done click Apply setup scree...

Page 121: ...not to Enable 4 Specify the Transfer interval 5 Specify the Activation time Always Always activates in operated mode at the set interval Only scheduled time Periodically activates in operated mode at a specified time and date 6 Specify the activation conditions FTP Specify the use of the FTP transfer if an event occurs Refer to FTP E mail for more details page 110 7 When done click Apply English _...

Page 122: ... For more information about Activation time and Action refer to Alarm input page 119 6 When done click Apply J J The default tampering detection function may not work properly in the following cases Under circumstances of simple background or low illumination and night time may lower the detection sensitivity A severe shaking of the camera or a drastic change to the illumination can be considered ...

Page 123: ... Motion detection Video analytics is used 4 According to your purpose select from motion detection and intelligent video analysis 5 Set Sensitivity Size and Area When selected Intelligent Video Analysis set Analytics too 6 Specify the activation time and activation condition For more information about Activation time and Action refer to Alarm input page 119 7 When done click Apply English _123 set...

Page 124: ... you can select any value up to 1920x1080 J J Motions smaller than the specified minimum size or bigger than the maximum size are not detected To avoid unintended detections caused by great and small noises set minimum maximum motion sizes appropriately in accordance to your environments Note that same motions on the same location can be differently detected in their detection size it is recommend...

Page 125: ...alent to or higher than 32 x 32 Maximum size pixel To restrict the maximum movement to be observed select Maximum size pixel and enter the width and height The unit is pixels and you can select any value up to 1920x1080 J J Motions smaller than the specified minimum size or bigger than the maximum size are not detected To avoid unintended detections caused by great and small noises set minimum max...

Page 126: ...eset line Entering Exiting The system detects the change in which an object passes the preset area Appearing Disappearing The system detects the change in which an object appears or disappears in the present area 5 Select use of Overlay Detection result overlay The detection result is indicated on the video 6 When done click Apply ...

Page 127: ...line to open popup context menu and select Delete button Entering Exiting 1 Set the type to Entering Exiting 2 Click 4 points on the screen to set the base area You can cancel the line while drawing an area by right clicking the mouse 3 Select the desired rule Entering Detects motions of moving object whose center point entering into the defined area from outside of the area Exiting Detects motion...

Page 128: ...splayed If camera is capturing a close object the video analysis capability may degrade In the following cases motion detection and intelligent video analysis function may be degraded or cause improper detection The object color or brightness is similar to the background Small activities around the border area of the camera s field of view Multiple movements continue occurring at random due to a s...

Page 129: ...mes more close and detailed 5 Select Area tab and drag on the screen to define the desired detection area You can specify up to 4 detection areas While drawing the area you can cancel an area by right clicking 6 To delete an area right click on the area and select delete OK on the pop up menus 7 Specify the activation time and activation condition For more information about Activation time and Act...

Page 130: ...gned to normalize the input data to a value between 1 and 100 and detect the signal larger than threshold level It is unrelated to the decibel dB level 5 Specify the activation time and activation condition For more information about Activation time and Action refer to Alarm input page 119 6 When done click Apply M M If detected audio level is too low set the audio input gain to a higher level in ...

Page 131: ...and Action refer to Alarm input page 119 5 When done click Apply App event You can set the system to generate signals for the events defined on the application The event signals provided vary depending on the application function 1 From the Setup menu select the Event tab 2 Click App event 3 Set whether or not to Enable 4 Specify the activation time and activation condition For more information ab...

Page 132: ...t serial number Device name Provide a device name that will be displayed on the Live screen Location Specify the location where the camera is installed Description Provide detailed information about the camera location Memo Provide an explanation about the camera for better understanding Language Select a preferred language for the Web Viewer OSD M M The default language is set to English 4 When d...

Page 133: ... the open SDK installation files and internal settings All Resets all settings including the camera settings however the log information will not be reset The IP addressing system will be defaulted to DHCP if you reset the camera If no DHCP server is found the previous settings will be restored automatically Configuration backup Restore Backs up the current system settings before performing the re...

Page 134: ...pleted upgrading the browser exits and the camera restarts M M It may take a max of 10 minutes for the upgrade process If you forcibly terminate the upgrade process upgrade will not be completed properly During restarting the system accessing with web viewer will not be made You can download the latest version from the Samsung web site www samsungcctv com setup screen 134_ setup screen ...

Page 135: ...the format of bin To restore the backup settings 1 To restore the backup settings click Restore 2 Select a backup file and click Open M M If you perform the backup or restoration the web browser will be closed and the camera will reboots If you try to recover the config file backed up in other model some functions may malfunction and you need to change the setting manually English _135 setup scree...

Page 136: ...isplay all the logs available use the bottom buttons to move to the previous next or the last item 6 Click on the Backup button to save all the log data for the currently selected mode system event in the time stamp value create by camera in modelname mode camera txt file in the download folder for the browser M M By clicking on Info to the right of each log message you can check the details of th...

Page 137: ...and applications exceeds 80 an ongoing application will be forced to stop In this case the priority set by the user is used to determine which application should be stopped first Auto start When the camera s power supply or main task is running a certain application for which auto execution has been activated will run automatically Task manager This displays the resource occupation rate of an appl...

Page 138: ...set frame rate ATC Show the ATC status Concurrent users count Show the number of concurrent users who access the profile Current users Shows information on users accessing web viewer and displaying monitoring video Profile Show the name of the profile accessed by the user Bitrate kbps Show the current bit rate Network connection status It shows whether the network is working fine IP Show the IP ad...

Page 139: ...allation environment For more detailed setup information please refer to the chart on the next page 2 The camera may malfunction if the switches are not fully turned On Off please double check the switches before finishing setup 3 Be cautious that the switch can be damaged when it is operated with a sharp tool 4 Be cautious that the switch can be damaged when it is operated with an excessive force...

Page 140: ...er Mode Switch RS 422 4Wire RS 485 2Wire Termination Settings To prevent the attenuation of communication signals between the camera and controller the items at the end of line must be set up with the termination settings Camera Input Position SW1 2 SW1 3 Termination of Longest Path ON ON On the Path OFF OFF M M The default value is shaded in each setting table To use a third party controller with...

Page 141: ...roller RS 422 Communications D D TXD TXD TXD TXD RXD RXD Camera Controller Communications Cable For the camera to communicate with the controller a RS 485 422 communications line is required J J A 30m or shorter length is recommended for the connection The communication cable is not enclosed with the camera ...

Page 142: ...AGC High 0 0005 Lux 2sec F1 6 50IRE AGC High Color 0 15 Lux 1 30sec F1 6 30IRE 0 0025 Lux 2sec F1 6 30IRE B W 0 015 Lux 1 30sec F1 6 30IRE 0 00025 Lux 2sec F1 6 30IRE S N Ratio 50dB Video Out CVBS 1 0 Vp p 75Ω composite 720x480 N 720x576 P for installation Lens Focal Length Zoom Ratio 4 44 142 6mm Optical 32X Max Aperture Ratio F1 6 Wide F4 4 Tele Angular Field of View H 62 8 Wide 2 23 Tele V 36 8...

Page 143: ...ayed up to 45 characters Day Night Auto ICR Color B W Backlight Compensation Off BLC Wide Dynamic Range 120dB Contrast Enhancement SSDR Samsung Super Dynamic Range Off On Digital Noise Reduction SSNRIII 2D 3D Noise Filter Off On Digital Image Stabilization Off On Defog Auto Manual Off Motion Detection Off On 4ea Rectangle zone Privacy Masking Off On 32 Zones of Rectangle zone with Zoom Threshold M...

Page 144: ... Triggers Motion detection Tampering Audio Detection Face Detection Video Analytics Alarm Input Network Disconnection Alarm events y y File upload via FTP and E Mail y y Notification via E Mail TCP and HTTP y y Local storage SD SDHC SDXC or NAS recording at Event Alarm Triggers y y External output Network Ethernet RJ 45 10 100BASE T Video Compression Format H 264 MPEG 4 Part 10 AVC Motion JPEG Res...

Page 145: ...ps 24Kbps 32Kbps 40Kbps Audio Communication Bi dierctional IP IPv4 IPv6 Protocol TCP IP UDP IP RTP UDP RTP TCP RTCP RTSP NTP HTTP HTTPS SSL DHCP PPPoE FTP SMTP ICMP IGMP SNMPv1 v2c v3 MIB 2 ARP DNS DDNS QoS PIM SM UPnP Bonjour Security HTTPS SSL Login Authentication Digest Login Authentication IP Address Filtering User access Log 802 1x Authentication Streaming Method Unicast Multicast Max User Ac...

Page 146: ... Apple Safari Ver 6 0 2 Mac OS X 10 8 10 7 only 5 1 7 Mac OS X only Central Management Software SmartViewer SSM Environmental Operating Temperature Humidity 10 C 55 C 14 F 131 F Less than 90 RH AC24V 50 C 55 C 58 F 131 F Less than 90 RH PoE 30 C 55 C 22 F 131 F Less than 90 RH Storage Temperature Humidity 30 C 60 C 22 F 140 F Less than 90 RH Ingress Protection IP66 Vandal Resistance Available when...

Page 147: ...English _147 appendix Product Overview SNP 6321 Unit mm inch Ø152 5 98 Ø133 2 5 24 ...

Page 148: ...appendix 148_ appendix SNP 6321H Unit mm inch 1 1 2 inch PF TAP Diameter max 47 803mm Pitch 2 3091mm Ø223 4 8 8 ...

Page 149: ...t Explorer 7 0 y y An error may be generated when connecting with a new window or tab since the cookie data are shared Do not use a new window or tab select File New session The camera connected to the network is not detected in the IP installer program y y Turn off the firewall settings on your PC and then search the camera again Images overlap y y Check whether two or more cameras are set to a s...

Page 150: ...e memory card again in Setup Event Record menu Cannot format the SD memory card y y Check if the write protection tab of the memory card is set to Lock Cannot record in the NAS y y Confirm that the information registered in the NAS is correct It reports that NAS setting has failed y y Confirm that the IP address of the NAS is valid y y Confirm that the ID password of the NAS is valid y y Confirm t...

Page 151: ...h as CD ROM the cost of physically performing source distribution might be charged GPL SW Component Name License URL Base Kernel Busybox iproute2 3 1 0 alsa utils 1 0 24 2 alsa lib 1 0 24 1 iptables 1 4 12 2 ethtool 3 2 mtd 1 4 1 mii diag 2 11 rp pppoe 3 10 wpa_supplicant 0 7 3 bash 4 2 zeroconf GPL 3 0 GPL 2 0 GPL 2 0 GPL 2 0 GPL 2 0 GPL 2 0 GPL 2 0 GPL 2 0 GPL 2 0 GPL 2 0 GPL 2 0 GPL 3 0 GPL 2 0...

Page 152: ...or a portion of it either verbatim or with modifications and or translated into another language Hereinafter translation is included without limitation in the term modification Each licensee is addressed as you Activities other than copying distribution and modification are not covered by this License they are outside its scope The act of running the Program is not restricted and the output from t...

Page 153: ...are not responsible for enforcing compliance by third parties to this License 7 If as a consequence of a court judgment or allegation of patent infringement or for any other reason not limited to patent issues conditions are imposed on you whether by court order agreement or otherwise that contradict the conditions of this License they do not excuse you from the conditions of this License If you c...

Page 154: ... a sample alter the names Yoyodyne Inc hereby disclaims all copyright interest in the program Gnomovision which makes passes at compilers written by James Hacker signature of Ty Coon 1 April 1989 Ty Coon President of Vice This General Public License does not permit incorporating your program into proprietary programs If your program is a subroutine library you may consider it more useful to permit...

Page 155: ...ll the source code needed to generate install and for an executable work run the object code and to modify the work including scripts to control those activities However it does not include the work s System Libraries or generalpurpose tools or generally available free programs which are used unmodified in performing those activities but which are not part of the work For example Corresponding Sou...

Page 156: ...quire recipients to copy the Corresponding Source along with the object code If the place to copy the object code is a network server the Corresponding Source may be on a different server operated by you or a third party that supports equivalent copying facilities provided you maintain clear directions next to the object code saying where to find the Corresponding Source Regardless of what server ...

Page 157: ...explicitly and finally terminates your license and b permanently if the copyright holder fails to notify you of the violation by some reasonable means prior to 60 days after the cessation Moreover your license from a particular copyright holder is reinstated permanently if the copyright holder notifies you ofthe violation by some reasonable means this is the first time you have received notice of ...

Page 158: ...rogram the only way you could satisfy both those terms and this License would be to refrain entirely from conveying the Program 13 Use with the GNU Affero General Public License Notwithstanding any other provision of this License you have permission to link or combine any covered work with a work licensed under version 3 of the GNU Affero General Public License into a single combined work and to c...

Page 159: ...y License Copyright C 1995 1998 Eric Young eay cryptsoft com All rights reserved This package is an SSL implementation written by Eric Young eay cryptsoft com The implementation was written so as to conform with Netscapes SSL This library is free for commercial and non commercial use as long as the following conditions are aheared to The following conditions apply to all code found in this distrib...

Page 160: ...UENTIAL DAMAGES INCLUDING BUT NOT LIMITED TO PROCUREMENT OF SUBSTITUTE GOODS OR SERVICES LOSS OF USE DATA OR PROFITS OR BUSINESS INTERRUPTION HOWEVER CAUSED AND ON ANY THEORY OF LIABILITY WHETHER IN CONTRACT STRICT LIABILITY OR TORT INCLUDING NEGLIGENCE OR OTHERWISE ARISING IN ANY WAY OUT OF THE USE OF THIS SOFTWARE EVEN IF ADVISED OF THE POSSIBILITY OF SUCH DAMAGE Copyright c 1998 2001 University...

Page 161: ...the distribution 3 Neither the name of Thomas BERNARD nor the names of its contributors may be used to endorse or promote products derived from this software without specific prior written permission THIS SOFTWARE IS PROVIDED BY THE COPYRIGHT HOLDERS AND CONTRIBUTORS AS IS AND ANY EXPRESS OR IMPLIED WARRANTIES INCLUDING BUT NOT LIMITED TO THE IMPLIED WARRANTIES OF MERCHANTABILITY AND FITNESS FOR A...

Page 162: ... yy Neither the name of the Sun Microsystems Inc nor the names of its contributors may be used to endorse or promote products derived from this software without specific prior written permission THIS SOFTWARE IS PROVIDED BY THE COPYRIGHT HOLDERS AND CONTRIBUTORS AS IS AND ANY EXPRESS OR IMPLIED WARRANTIES INCLUDING BUT NOT LIMITED TO THE IMPLIED WARRANTIES OF MERCHANTABILITY AND FITNESS FOR A PART...

Page 163: ...distributions of source code must retain the above copyright notice this list of conditions and the following disclaimer 2 Redistributions in binary form must reproduce the above copyright notice this list of conditions and the following disclaimer in the documentation and or other materials provided with the distribution 3 Neither the name of Apple Inc Apple nor the names of its contributors may ...

Page 164: ... according to the MOZILLA Public license 1 1 we are not obliged to provide the source code of the corresponding component Version 1 1 1 Definitions 1 0 1 Commercial Use means distribution or otherwise making the Covered Code available to a third party 1 1 Contributor means each entity that creates or contributes to the creation of Modifications 1 2 Contributor Version means the combination of the ...

Page 165: ...used by i third party modifications of Contributor Version or ii the combination of Modifications made by that Contributor with other software except as part of the Contributor Version or other devices or 4 under Patent Claims infringed by Covered Code in the absence of Modifications made by that Contributor 3 Distribution Obligations 3 1 Application of License The Modifications which You create o...

Page 166: ...cape Communications Corporation Netscape may publish revised and or new versions of the License from time to time Each version will be given a distinguishing version number 6 2 Effect of New Versions Once Covered Code has been published under a particular version of the License You may always continue to use it under the terms of that version You may also choose to use such Covered Code under the ...

Page 167: ...sdiction of the Federal Courts of the Northern District of California with venue lying in Santa Clara County California with the losing party responsible for costs including without limitation court costs and reasonable attorneys fees and expenses The application of the United Nations Convention on Contracts for the International Sale of Goods is expressly excluded Any law or regulation which prov...

Page 168: ...onsibility for any undesirable consequences the authors accept NO LIABILITY for damages of any kind These conditions apply to any software derived from or based on the IJG code not just to the unmodified library If you use our work you ought to acknowledge us Permission is NOT granted for the use of any IJG author s name or company name in advertising or publicity relating to this software or prod...

Page 169: ...nt Part to enable it to be operated on the T Engine Hardware or the Similar Hardware to T Engine Hardware The Ported Source Code which is registered with T Engine Forum shall be included in the Source Code 9 Modified Source Code means a source program modified from the Source Code for the purpose of improving its performance increasing or decreasing its function and the like The Ported Source Code...

Page 170: ...T Engine Forum 4 The Distributor of Modification shall determine the name of the Modified Source Code subject to the rules separately established by T Engine Forum and publish an appropriate notice as required by the rules on the Patch for Modification and the Modified Source Code 5 The Distributor of Modification may distribute the Modified Source Code to a third party whether with or without pay...

Page 171: ...h has been committed by it 3 Any legal dispute which may arise in relation to any breach of this License Agreement shall be subject to the exclusive jurisdiction of the Tokyo District Court Article 11 Governing Law and Language 1 This License Agreement shall be governed by and interpreted under the laws of Japan 2 This License Agreement is executed in both Japanese text and English text provided t...

Page 172: ...r different license terms and conditions for use reproduction or distribution of Your modifications or for any such Derivative Works as a whole provided Your use reproduction and distribution of the Work otherwise complies with the conditions stated in this License 5 Submission of Contributions Unless You explicitly state otherwise any Contribution intentionally submitted for inclusion in the Work...

Page 173: ... 0 5 of 10 December 2007 University of Illinois NCSA Open Source License Copyright c 1999 2007 The Board of Trustees of the University of Illinois All Rights Reserved Component Name License iperf 2 0 5 University of Illinois NCSA Open Source Iperf performance test Mark Gates Ajay Tirumala Jim Ferguson Jon Dugan Feng Qin Kevin Gibbs John Estabrook National Laboratory for Applied Network Research Na...

Page 174: ...LIMITED TO THE IMPLIED WARRANTIES OF MERCHANTABILITY AND FITNESS FOR A PARTICULAR PURPOSE ARE DISCLAIMED IN NO EVENT SHALL THE PHP DEVELOPMENT TEAM OR ITS CONTRIBUTORS BE LIABLE FOR ANY DIRECT INDIRECT INCIDENTAL SPECIAL EXEMPLARY OR CONSEQUENTIAL DAMAGES INCLUDING BUT NOT LIMITED TO PROCUREMENT OF SUBSTITUTE GOODS OR SERVICES LOSS OF USE DATA OR PROFITS OR BUSINESS INTERRUPTION HOWEVER CAUSED AND...

Page 175: ...rking life Where marked the chemical symbols Hg Cd or Pb indicate that the battery contains mercury cadmium or lead above the reference levels in EC Directive 2006 66 If batteries are not properly disposed of these substances can cause harm to human health or the environment To protect natural resources and to promote material reuse please separate batteries from other types of waste and recycle t...

Page 176: ...SUNG TECHWIN AMERICA Inc 100 Challenger Rd Suite 700 Ridgefield Park NJ 07660 Toll Free 1 877 213 1222 Direct 1 201 325 6920 Fax 1 201 373 0124 www samsung security com SAMSUNG TECHWIN EUROPE LTD 2nd Floor No 5 The Heights Brooklands Weybridge Surrey KT13 0NY UK Tel 44 1932 82 6700 Fax 44 1932 82 6701 www samsungsecurity co uk www samsungtechwin com www samsungsecurity com www samsungipolis com ...

Reviews: