background image

28_

 using your microwave oven 

USING ThE SNACkS bUTTON (     )

1. 

Press the 

snacks

 button. The display will show 

SELECT MENU 1 TO 4

 (Refer to the snack 

bar table) Press the button repeatedly to cycle through the available items.

2. 

Press the number 

1

 or 

2

 buttons to select the serving size. Only number 

1

 (serving) is 

available for Nachos (Refer to the snack bar table for the serving size).

3. 

Press the 

start

 button to begin cooking.

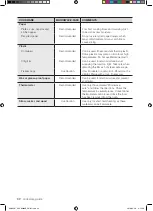
Snack bar table

item

Amount

remArks

Nachos

1 serving

Place the nachos on a plate without letting them 
overlap. Sprinkle cheese evenly over them.

Contents:

2 cups tortilla chips
1/3 cup grated cheese

Chicken wings

5-6 oz.
7-8 oz.

Use precooked, refrigerated chicken wings.
Place the chicken wings around the plate in a spoke-
like fashion and cover with wax paper.
Let stand for 1 to 2 minutes.

Potato skins

1 cooked potato
2 cooked 
potatoes

Cut the cooked potato into 4 even wedges. Scoop or 
cut out the potato flesh, leaving about a ¼ in. of skin.
Place the skins in a spoke-like fashion around the 
plate.
Sprinkle with bacon, onions and cheese.
Do not cover.
Let stand 1 to 2 minutes.

Cheese sticks 
(frozen)

5-6 pcs
7-10 pcs

Place the cheese sticks on a plate in a spoke-like 
fashion. Do not cover.
Let stand for 1 to 2 minutes after heating.

The sizes of the cheese sticks may vary.  For 
smaller size cheese nuggets, use the 

less (1)


button to decrease the heating time.  For larger 
size cheese sticks, use the 

more (9)

 button to 

increase the heating time.

using your microwave oven

6

SMH9207_XAC-03686B_EN-01.indd   28

2010-02-20     3:55:39

Summary of Contents for SMH9207ST

Page 1: ...sibilities Thank you for purchasing this Samsung product Please register your product at www samsung com global register Microwave Oven user manual SMH9207 ENGLISH SMH9207_XAC 03686B_EN 01 indd 1 2010...

Page 2: ...latches broken or loosened 3 door seals and sealing surface D The oven should not be adjusted or repaired by anyone except properly qualified service personnel safety information Congratulations on y...

Page 3: ...eading this section keep it in a safe place for future reference IMPORTANT SAFETY INSTRUCTIONS When using any electrical appliance basic safety precautions should be followed including the following W...

Page 4: ...of fire in the oven cavity a Do not overcook food Carefully attend appliance when paper plastic or other combustible materials are placed inside the oven to facilitate cooking b Remove wire twist ties...

Page 5: ...the grounding instructions or if you are not sure if the appliance is properly grounded We do not recommend using an extension cord with this appliance If the power supply cord is too short have a qua...

Page 6: ...s Failing to do so may result in electric shock or fire Keep all packaging materials out of the reach of children Children may use them for play This appliance must be properly grounded Read and follo...

Page 7: ...Exposure to Excessive Microwave Energy found in the beginning of this Section If the appliance generates a strange noise a burning smell or smoke unplug the power plug immediately and contact your ne...

Page 8: ...shock or fire Keep all packaging materials well out of the reach of children as packaging materials can be dangerous to children If a child places a bag over its head it may result in suffocation Do n...

Page 9: ...cturers recommendations Do not stand on top of the appliance or place objects such as laundry oven cover lighted candles lighted cigarettes dishes chemicals metal objects etc on the appliance Items su...

Page 10: ...iners can explode due to buildup of pressure even after oven has been turned off SEVERE WARNING SIGNS FOR CLEANING Do not clean the appliance by spraying water directly onto it Do not use benzene thin...

Page 11: ...ing The More Less Button 19 Using The Hi Mid Lo Off Vent Button 20 Using The Vent Delay Off Button 20 Using The Light Hi Lo Off Button 20 Using The Light Timer Button 21 Using The Turntable On Off But...

Page 12: ...Roller Rings 40 Storing And Repairing Your Microwave Oven 40 Replacing The Cooktop Night Bulb 40 Replacing The Oven Bulb 41 Cleaning The Grease Filter 42 Replacing The Charcoal Filter appendix 43 43 S...

Page 13: ...re you ve received all parts shown below If your microwave oven was damaged during shipping or if you do not have the parts contact Samsung Customer Service Refer to the WARRANTY AND SERVICE INFORMATI...

Page 14: ...e the glass tray securely in the center of the pre assembled roller ring Installing the metal shelf When you need to use the Metal Shelf place it on the plastic hooks inside your oven and make sure it...

Page 15: ...nuggets hot dogs French fries and frozen sandwiches SNACKS Press this button to cook nachos chicken wings potato skins and cheese sticks SOFTEN MELT Press this button to cook melt chocolate soften cr...

Page 16: ...rn off the turntable OFF will appear in the display Turntable On Off is not available in sensor cook and defrost modes If you want to turn On Press this button again STOP CLEAR Press this button to st...

Page 17: ...5 0 0 The display will show 500 4 Press the Enter Start button again 5 The display will show AM TOUCH1 PM TOUCH2 6 Use the Number buttons to select AM PM 7 Press the Enter Start button again 8 A colon...

Page 18: ...tions The options are summarized in the following table No Function Description 1 Weight mode selected 1 Lbs 2 Kg 2 Sound on off control 1 Sound ON 2 Sound OFF 3 Clock display control 1 12HR 2 24HR 4...

Page 19: ...Reheat Sensor Cooking except Beverage Add 30 sec Custom Cook Kitchen Timer Soften Melt Kids Meals Snack Bar and Time Cook modes Use the More 9 Less 1 button only after you have already begun cooking w...

Page 20: ...Light Hi Lo Off button once for high light 2 Press the Light Hi Lo Off button twice for low light 3 Press the Light Hi Lo Off button three times to turn the light off completely Using The Light Timer...

Page 21: ...a microwave browning dish on the shelf The shelf could overheat Do not use the oven with the shelf on the microwave floor This could damage the microwave Use pot holders when handling the shelf as it...

Page 22: ...he appropriate containers and covers in the Cookware section on p31 Always use microwave safe containers and cover with a lid or plastic wrap When using plastic wrap turn back one corner to allow stea...

Page 23: ...4 servings Place the fresh vegetables in a microwave safe ceramic glass or plastic dish and add 2 4 tbs water Cover with a lid or vented plastic wrap while cooking and stir before standing Let the ov...

Page 24: ...table Follow the instructions below when reheating different types of food FOOD AMOUNT PROCEDURE Dinner plate 1 serving 1 plate Use only precooked refrigerated foods Cover the plate with vented plasti...

Page 25: ...10 minutes Whole Chicken 2 5 6 0 lbs Remove giblets before freezing poultry Start defrosting with the breast side down After the first stage turn the chicken over and shield any warm portions with na...

Page 26: ...Soften Melt table ITEM AMOUNT REMARKS Melt chocolate 1 cup chips or 1 square Place the chocolate chips or squares in a microwave safe container When the oven beeps stir the chocolate and restart the o...

Page 27: ...hot enough Hot dogs 2 hot dogs 4 hot dogs Pierce the hot dogs and place them on a plate When the oven beeps add the buns and restart the oven Let stand for 1 minute after heating For the best texture...

Page 28: ...erated chicken wings Place the chicken wings around the plate in a spoke like fashion and cover with wax paper Let stand for 1 to 2 minutes Potato skins 1 cooked potato 2 cooked potatoes Cut the cooke...

Page 29: ...s to enter the power level The display will show PRESS START OR ENTER NEXT STAGE COOKING TIME 3 Press the Start button to begin cooking If you want to change the power level press the Stop Clear butto...

Page 30: ...r the cooking time The display will show the set time 3 Press the Power Level button and use the number buttons to enter the power level The display will show the selected power level You can set the...

Page 31: ...an be used in small quantities to protect areas against overcooking Arcing can occur if the foil is too close to the oven wall or if too much foil is used Browning plate Recommended Do not preheat for...

Page 32: ...used to retain moisture Avoid wrapping the food too tight Take care when removing the film as hot steam will escape Freezer bags Use Caution Only if boilable or oven proof Should not be airtight Pierc...

Page 33: ...Cooking techniques If the oven is set to cook for more than 25 minutes it will automatically adjust to 70 percent power after 25 minutes to avoid overcooking Stirring Stir foods such as casseroles and...

Page 34: ...ING TIME POWER LEVEL INSTRUCTIONS Roast beef boneless Up to 4 lbs Cooking Time 7 11 min lb for 145 F Rare 8 12 min lb for 160 F Medium 9 14 min lb for 170 F Well Done Place the roast fat side down on...

Page 35: ...Level Medium High 7 Cooking Seafood Place the fish on a microwave safe roasting rack in a microwave safe dish Use a tight cover to steam the fish A lighter cover of wax paper or paper towel will decr...

Page 36: ...hey will cook more evenly if turned over halfway through the cooking process Always place vegetables such as asparagus and broccoli with the stems pointing towards the edge of the dish and the tips to...

Page 37: ...stand for 10 minutes Remove bay leaves before serving Makes 6 servings Broccoli and cheese casserole cup butter or margarine cup chopped onion 1 Tbs flour tsp salt tsp dry mustard 1 8 tsp pepper 1 cup...

Page 38: ...t flour celery seed and pepper Cook at High until mixture boils 30 40 seconds Stir in vinegar and cup water Cook at High until liquid boils and thickens slightly 1 2 minutes stir once Add bacon to dre...

Page 39: ...prevent the door from closing correctly Wash the glass door with very mild soap and water Be sure to use a soft cloth to avoid scratching If steam accumulates inside or outside the oven door wipe wit...

Page 40: ...is for home use only and is not intended for commercial use Replacing The Cooktop Night Bulb When replacing the cooktop night light make sure that you are wearing gloves to avoid injury from the heat...

Page 41: ...ack the grease filter as shown in the fig 3 Pull the grease filter 4 Seperate the grease filter from the base bottom 5 Reassembly by reverse 6 Soak the grease filter in hot water and a mild detergent...

Page 42: ...e Center or Samsung dealer Charcoal filter part no DE63 00367D 1 Unplug the oven plug or turn off the power at the main power supply 2 Remove the two screws from the top vent grille 3 Remove the top v...

Page 43: ...60 Hz Power Consumption 1650 Watts Power Output 1100 Watts Cook top Light 40 Watts incandescent bulb Oven Light 40 Watts incandescent bulb Oven Cavity Dimensions 22 1 32 W X 10 7 8 H X 14 7 8 D Outsi...

Page 44: ...re the set time has elapsed If there was a power outage the time indicator will display 88 88 If no power outage occurred remove the plug from the outlet wait ten seconds and plug it in again Reset th...

Page 45: ...elow along with the other requested information Keep this information in a safe place as a permanent record of your purchase to aid in identification in case of theft or loss and a copy of your sales...

Page 46: ...ents abuse neglect fire water lightning or other acts of nature use of products equipment systems utilities services parts supplies accessories applications installations repairs external wiring or co...

Page 47: ...memo SMH9207_XAC 03686B_EN 01 indd 47 2010 02 20 3 55 45...

Page 48: ...Code No DE68 03686A 01 SMH9207_XAC 03686B_EN 01 indd 48 2010 02 20 3 55 46...

Reviews: