background image

1

3. Disassembly and Reassembly

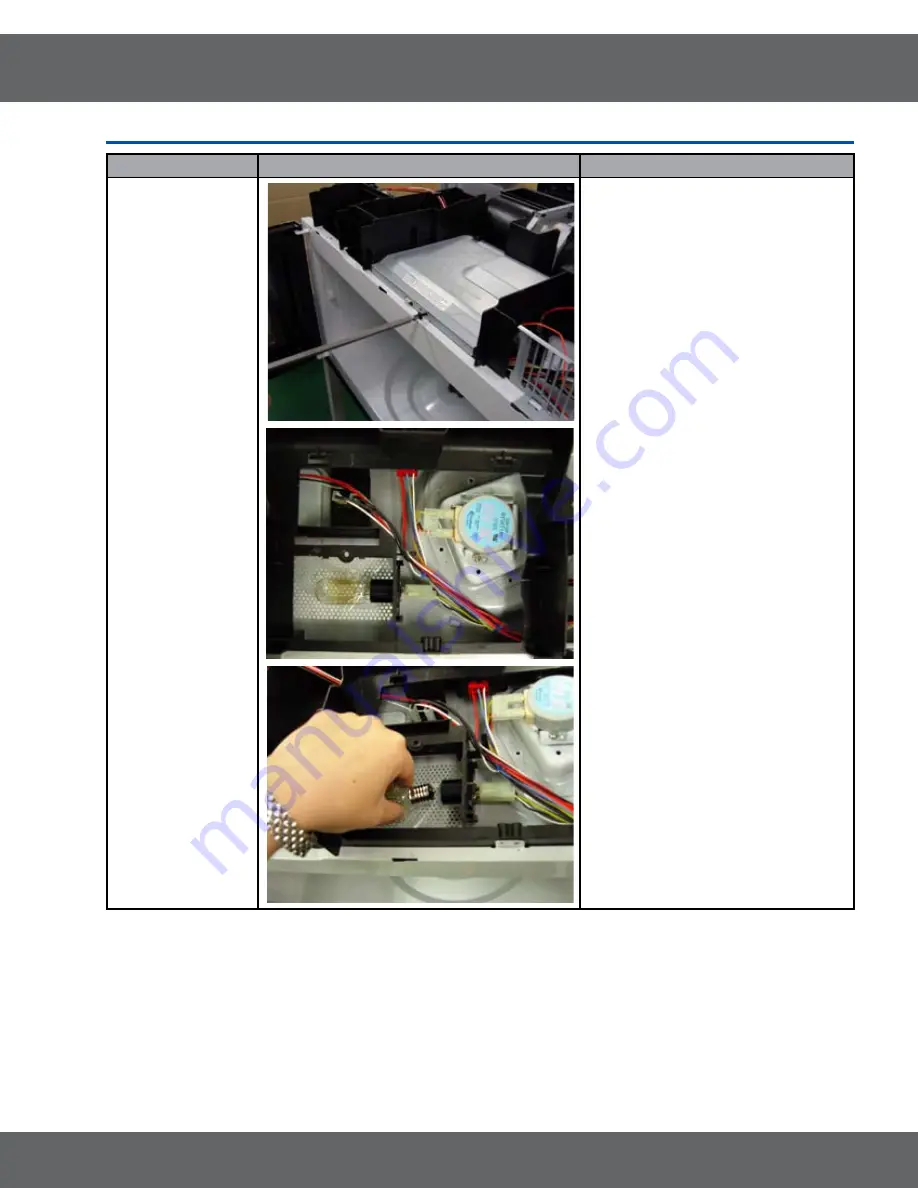
3-11 Replacement of Oven Light

Parts

Explaination Photo

Explaination

Oven Light

1. 

Disconnect Oven power .

Remove the Grille

3. 

Remove the bracket Duct upper by 

remove 1 screw .

4. 

Replace the bulb with a 40 watt 

appliance bulb .

Summary of Contents for SMH7185

Page 1: ...over for the more information 1 Precaution 2 Product Specification 3 Disassembly and Reassembly 4 Troubleshooting 5 Exploded Views and Part List 6 PCB Diagrams 7 Wiring Diagrams 8 Schematic Diagrams BASIC SMH9187W MODEL SMH9187B MODEL CODE SMH9187B XAA ...

Page 2: ...6 Replacement of Drive Motor 16 3 7 Replacement of stirrer motor 17 3 8 Removal of stirrer 18 3 9 Replacement of Control Circuit Board 19 3 10 Replacement of Cooktop lamp 20 3 11 Replacement of Oven Light 21 4 Troubleshooting 22 4 1 Error Code Numbering Rule 22 4 2 Error Code List 22 4 3 Electrical Malfunction 24 5 Exploded Views and Parts List 27 5 1 Exploded Views 27 5 2 Main Parts List 28 5 3 D...

Page 3: ... 1 Precaution ...

Page 4: ...k Monitor Switch Replace all of the following at the same time Primary door sensing switch and power relay as well as the Interlock Monitor Switch The correct adjustment of these switches is described elsewhere in this manual Make sure that the fuse has the correct rating for the particular model being repaired 13 Design Alteration Warning Use exact replacement parts only i e only those that are s...

Page 5: ...ained within specified limits by close tolerance safety related components and adjustments If the high voltage exceeds the specified limits check each of the special components H V Diode Short H V Capacitor PRECAUTION There exists HIGH VOLTAGE ELECTRICITY with high current capabilities in the circuits of the HIGH VOLTAGE TRANSFORMER secondary and filament terminals It is extremely dangerous to wor...

Page 6: ...uivalent noise level to other OTR with lower ventilation power The Strongest power without additional noise That s the benefit you can feel from New OTR Big Interior capacity for convenience With the 1 8 cu ft capacity it offers enough space to cook The big capacity combined with 1 100 watts of output achieves superior cooking results Sensor cook Don t worry about failure of your cooking New OTR s...

Page 7: ...ry Item Description Code No Q ty TRAY COOKING DE74 20002A 1 ASSY GUIDE ROLLER DE97 00368A 1 ASSY HOOD DAMPER DE92 90242D 1 ASSY HARD WARE DE92 90505E 1 FILTER AIR DE63 00196A 2 FILTER CHARCOAL DE63 00367D 1 RACK WIRE DE75 00036B 1 ...

Page 8: ... 99seconds 99 minutes 99seconds Power Source 120VAC 60Hz 120VAC 60Hz Power consumption 1650 Watts 1650 Watts Power Output 1100 Watts 1100 Watts Oven Cavity Dimensions W x H x D inches 207 8 x 931 32 x 149 16 207 8 x 931 32 x 149 16 Outside 297 8 x 161 2 x 1515 32 297 8 x 161 2 x 1515 32 Shipping 333 8 x 1915 16 x 1913 32 333 8 x 1915 16 x 1913 32 Net Gross Weight 51 6Kg 62 7lbs 51 6Kg 62 7lbs Expo...

Page 9: ...ed on metal tabs at bottom of wall mounting plate and to cabinet by 3 top cabinet bolts 3 1 Disassembly of Assembly Grille and Panel Outer Parts Explaination Photo Explaination Grille 1 Disconnect oven power 2 Remove Grille 1 Remove 2 screws 2 Slide the Grille to the left then pull it straght out Panel Outer 1 Disconnect oven power 2 Remove Grille 3 Remove Screw 7 4 Remove Screw 4 ...

Page 10: ...and Reassembly Parts Explaination Photo Explaination Panel Outer 5 Remove Screw 4 6 Remove Screw 2 7 Remove Screw 2 Explaination Photo Explaination 8 Remove Panel Outer 3 1 Disassembly of Assembly Grille and Panel Outer ...

Page 11: ... Remove Panel Outer 3 Discharge The High Voltage Capacitor ATTENTION When discharge must become ground terminal of HVC and metal of around 4 Remove screw 1 5 Disconnect the Lead Wire Base Bottom 1 Remove Screw 5 2 Disconnect Lamp Housing 3 Remove Base bottom HV Trans 1 Disconnect Oven Power 2 Remove the Base bottom and Panel Outer 3 Disassembly the Bracket Duct upper after remove screw ...

Page 12: ...isassembly and Reassembly Parts Explaination Photo Explaination HV Trans 4 Disconnect the Lead Wire 5 Remove screw 3 6 Take out the HV Trans 3 2 Replacement of High Voltage Transformer and HVC and Base bottom ...

Page 13: ...magnetron 2 Remove nuts 4 securing the magnetron to the wave guide 3 Take out the magnetron very carefully NOTE1 When removing the magnetron make sure that it antenna does not hit any adjacentparts or it may be damaged NOTE2 When replacing the magnetron be sure to remount the magnetron gasket in the correct position and make sure the gasket is in good condition PRECAUTION During replacement be cer...

Page 14: ...r Assembly 1 Open the Assembly Door by degree 90º 2 Seperate lifting Assembly Door from Set Removal of Door C 2 Insert flat screwdriver into the gap between Door A and Door C to remove Door C Becareful when handling Door C because it is fragile Removal of Key Door Spring 3 Detach the spring and key door from Door 90º ...

Page 15: ...or A Removal of Door E 5 Following the procedure as shown in the figure insert and bend a thin metal plate between Door E and Door A until you hear the tick sound Insertion depth of the thin metal plate should be 0 5mm or less PRECAUTION PERFORM MICROWAVE LEAKAGE TEST 3 4 Replacement of Door Assembly ...

Page 16: ...itor switch and power relay 4 When the above four switches operate properly check if any other part such as the control circuit board blower motor or high voltage transformer is defective 3 6 Replacement of Drive Motor Parts Explaination Photo Explaination Drive Motor 1 Disconnect power and remove Base bottom screws 5 2 Remove Base bottom and disconnect the turntable motor drive 3 Remove turntable...

Page 17: ...motor Parts Explaination Photo Explaination Stirrer Motor 1 Disconnect power and remove Grille screws 3 2 Remove the bracket duct upper 3 Disconnect the stirrer motor wire 4 Remove stirrer motor screws 1 and after turn to arrow direction pull the stirrer motor ...

Page 18: ...otor driver and located on the upper side of the cavity The oven uses a top feed wave guide The stirrer is located in the wave guide and the motor is located on the wave guide 1 Disconnect power and open the door 2 Remove the clip and turn the stirrer cover left 3 Remove stirrer cover and the stirrer will come with it ...

Page 19: ... screw securing the control box assembly 4 Disconnect the connectors from the control circuit board Removal of P C B Assembly 1 Pull the lever end of the plastic fastener and remove the Flexible Printed Circuit FPC of membrane panel 2 Remove screws 3 securing the control circuit board 3 Lift up the control circuit board from the Ass y control box 4 When reconnecting the FPC connector make sure tha...

Page 20: ...o avoid injury from the heat of the bulb Parts Explaination Photo Explaination Cooktop Lamp 1 Unplug the oven or turn off the power at the main power 2 Remove the bulb cover and mounting screws 3 Replace the bulb with a 40 watt appliance bulb 4 Replace the bulb cover and mounting screws 5 Turn the power back on at the main power supply ...

Page 21: ...embly 3 11 Replacement of Oven Light Parts Explaination Photo Explaination Oven Light 1 Disconnect Oven power 2 Remove the Grille 3 Remove the bracket Duct upper by remove 1 screw 4 Replace the bulb with a 40 watt appliance bulb ...

Page 22: ...o 1 and No 2 refer to Open Error not sensed and Short Error respectively 4 This numbering rule has been applied to models to have been developed since January 1 2005 But GE or Customize model are excluded DEVICE ERROR CASE 0 Others 1 Open 1 Gas Sensor 2 Short 2 Temp Sensor 3 Weight Sensor 4 Easy PH Sensor 5 EEPROM 4 2 Error Code List Error Code Others E 0X Letter Solution Page SE Key Short Error 1...

Page 23: ...n again and check if it is working properly S W Error Is a specific key not recognized Is the key recognized intermittently The membrane is defective Replace the Control Panel Is the key not recognized at all After Power On does the symptom continue Replace the PCB 4 2 1 Key Short Error ...

Page 24: ...rmer NOTE 2 Oven does not accept key input Key input is not in Sequence Open or loose connection of membrane key pad to Ass y PCB Shorted or open membrane panel Refer to operation procedure Replace PCB main Defective Ass y PCB Timer starts countdown but no microwave Off alignment of latch switches Open or loose connection of high Adjust door and latch switches Check high voltage component accordin...

Page 25: ...Off alignment of primary interlock Defective secondary interlock S W Open or loose wiring of Replace turntable motor Loud buzzing noise can be heard Loose fan and fan motor Tighten screws of fan motor Tighten screws of H V Transformer Replace H V Diode Loose screws on H V Transformer Shorted H V Diode Microwave output is low Decrease in power source voltage Consult electrician Open or loose wiring...

Page 26: ...ing foods such as soup cocoa or milk Sparks Turntable motor does not rotate Open or loose wiring of turntable motor Replace turntable motor Defective turntable motor Oven stops operation during cooking Open or loose wiring of primary interlock switch Adjust door and latch switches Operation of thermal cutout Magnetron Sparks Metallic ware or cooking dishes touching on the oven wall Inform the cust...

Page 27: ...18 H018 M023 M017 P109 M021 M061 U005 M036 P015 P030 P124 P122 U003 P016 P034 M068 P013 P012 P014 P001 W002 P025 P039 P097 M001 M015 M035 M029 M040 M041 M039 M042 M206 P059 P121 M050 B002 C081 B013 U003 U007 U001 U012 P122 P123 M038 P007 M024 M060 P090 P087 P088 P089 P091 B001 B001 B006 M036 U004 M048 M155 P086 P024 ...

Page 28: ...mm 1 SA M040 DE61 00115A BRACKET HVC SMH7175 SECC T0 6 1 SA M041 DE91 70063D ASSY HVD HV03 12 MWO GE RED 1 SA M042 DE59 00002A DIODE H V 2CL4512H 450mA 13KV MWO ALL 1 SA M048 DE61 00905A BASE PLATE MAYTAG2 0 SECC T0 6 1 SA M049 DE31 10172A MOTOR SYNCHRONOUS M2HJ24Z709 ST 16F 21V 1 SA TURNTABLE M050 DE31 10173A MOTOR SYNCHRONOUS M2HJ29A709 ST 16F 21V 1 SA STIRRER M059 DE61 00375A HOLDER RACK OTR 1 ...

Page 29: ...0 0 23 1 SA P122 DE47 20059A THERMOSTAT PW 2N 8XV 125V15A V 120 0 23 1 SA P123 DE47 20034A THERMOSTAT 40 70 M5 1 SA P124 DE60 30063A NUT MOUNTING M6 3 S10C ZNC YEL 2 SA T001 DE74 20002A TRAY COOKING GLASS T6 1 SA T017 DE97 00368A ASSY GUIDE ROLLER SMH7175 SPS G ROLLER R 1 SA T030 DE75 00036B RACK WIRE SMH7175 SNCR W315 D4 1 SA T036 DE31 00023A BLADE STIRRER SMH7175 ALP1050 PI82 T 1 SNA T037 DE61 0...

Page 30: ...ESTER L479 T0 0 1 SA D006 DE64 00759A DOOR C SMH7175 PP T1 5 BLK 1 SA D007 DE61 00048A SPRING KEY BLUING HSWR PI1 95 D8 75 L43 1 SA D011 DE64 01308A DOOR KEY MODULAR 2 POM BLK 1 SA D019 DE64 02068A HANDLE DOOR CYMA PC 1 SNA D020 DE94 01998A ASSY HANDLE SMH9187 PC BLACK 1 SA D026 DE63 00526A COVER HANDLE CYMA PC 1 SNA D049 DE94 01997A ASSY DOOR SMH9187 PC BLACK 1 SA D059 DE64 02228A BADGE LOGO SMH9...

Page 31: ... DE34 00330A SWITCH MEMBRANE SMH9187B PET 120V 1 SA C005 DE64 02066A CONTROL PANEL CYMA PC 1 SA C009 DE64 02086A WINDOW DISPLAY CYMA SAN 1 SA C082 DE94 01999A ASSY CONTROL BOX SMH9187 120V60HZ BLACK 1 SNA P156 DE61 01045A BRACKET CONTROL PANEL CYMA SECC T0 4 1 SNA P157 DE94 02002A ASSY BRACKET C PANEL SMH9187 SECC T0 4 1 SA 5 4 Control Parts List C082 P157 P156 C004 C005 C009 C001 ...

Page 32: ... MOTOR PANEL OUTER 1 1 DE60 10080A SCREW WASHER M5 L12 2S 3 SA HVT 1 1 DE60 10082I SCREW A 2S 4X10 FEFZY 16 SA B PLATE CVT BACK BKT DUCT REAR DUCT UPPER FAN MOTOR MOUNTING PLATE PANEL OUTER VENT MOTOR 1 1 DE60 30015A NUT FLANGE M5 P0 8 MSWR10 FEFZY 4 SA MGT 1 2 DE60 10111A SCREW LAG MSWR W1 4X50 1 SNA 1 2 DE60 20022A BOLT TOGGLE MSWR W3 16X75 3 SNA 1 2 DE60 20066A BOLT FLAT UNF1 4 L110 MSWR10 OTR6...

Page 33: ...rminal for Detecting Gas Sensor and SMPS Power supply 4 CN401 A Terminal for connecting with Door A Terminal for Connecting Door and SMPS Power supply 5 CN601 A Terminal for connecting with Connector A Terminal for Connecting with Connector and SMPS Power Supply 6 RY201 Main Relay Power Supply Relay 7 RY202 Inrush Relay Inrush Electric Current Decrease Device 9 RY203 Power High Relay MWO Control R...

Page 34: ...34 6 PCB Diagrams 6 2 PCB Diagrams This Document can not be used without Samsung s authorization ...

Page 35: ...35 7 Wiring Diagrams 7 1 Wiring Diagrams This Document can not be used without Samsung s authorization ...

Page 36: ...36 7 Wiring Diagrams 7 1 Wiring Diagrams This Document can not be used without Samsung s authorization ...

Page 37: ...10uF TR503 KRC246M C202 R106 51K PC817 PC102 4 3 1 2 1 3 5 7 9 KRC246M TR207 SMW250 09AV_RED CN201 D606 1N4148M 1N4148M D603 1N4148M D605 100nF C302 1mH L101 22uF 10D471 ZNR101 C102 TR504 KRC246M KRC246M TR210 2 3 4 6 7 8 9 10 11 ST SM3GV ST101 1 4 3 1 2 G5T 1A 12VDC RY208 PC817 PC101 R304 2K R305 R604 2K 100K 2K R603 1nF KRC246M TR203 R103 1K C104 D213 1N4148M 12V CN401 SMW250 05V_WHT 3 4 1 5 2 C...

Page 38: ...ungportal com Latin America latin samsungportal com CIS cis samsungportal com Europe europe samsungportal com China china samsungportal com Asia asia samsungportal com Mideast Africa mea samsungportal com Samsung Electronics Co Ltd March 2009 Printed in Korea Code No DE68 05344A ...

Reviews: