background image

Apps and features

71

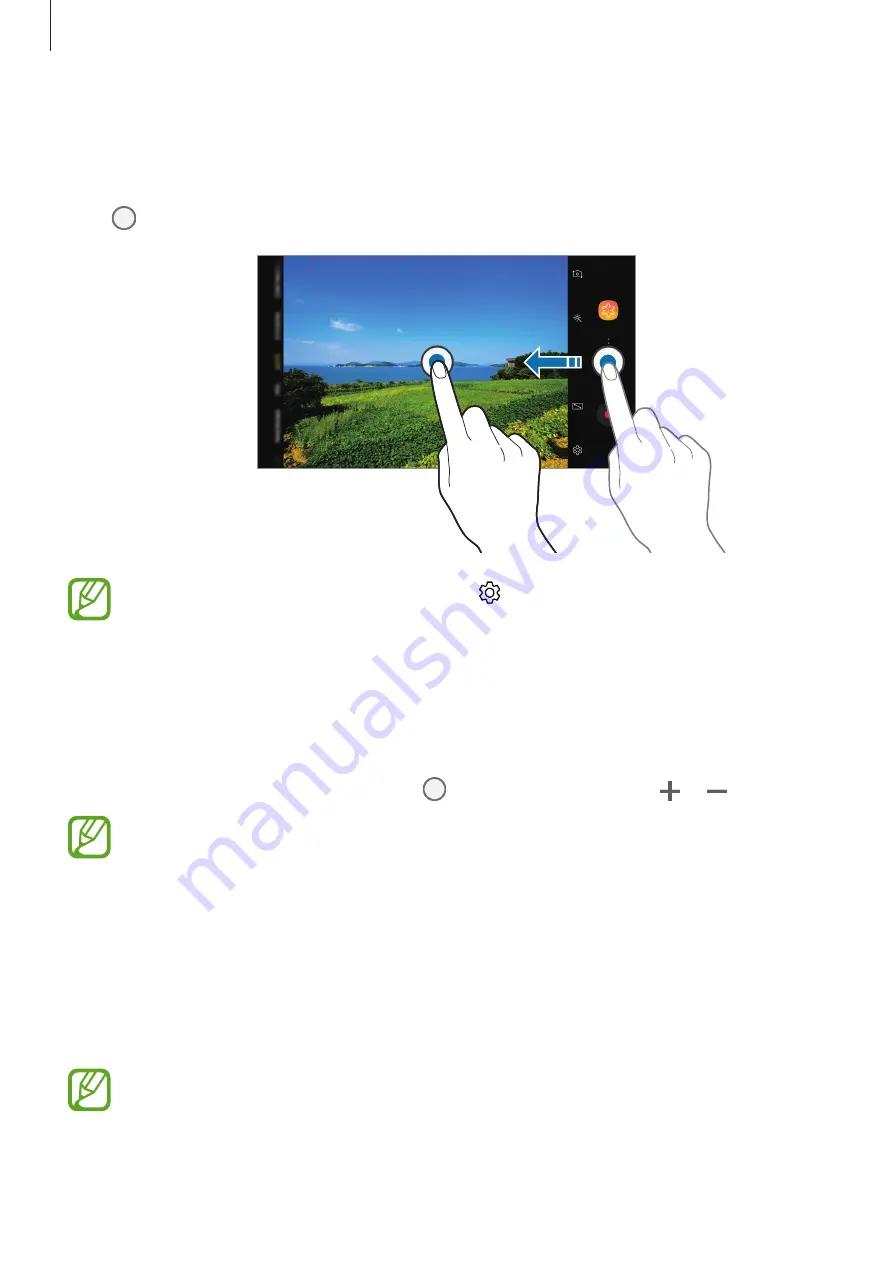
Adding another camera button

Add another camera button to the location you want on the screen to capture photos more 
conveniently.
Drag   to the preview screen.

If another camera button is not added, tap   on the preview screen and tap the 

Floating Camera button

 switch to activate it.

Zooming in and out

Use various methods to zoom in or out.

•  

Spread two fingers apart on the screen to zoom in, and pinch to zoom out.

•  

Control the zoom with one finger. Drag   on the zoom bar towards   or  .

Zooming features are available only when using the rear camera.

Locking the focus (AF) and exposure (AE)

You can lock the focus or exposure on a selected area to prevent the camera from 
automatically adjusting based on changes to the subjects or light sources.
Tap and hold the area to focus, the AF/AE frame will appear on the area and the focus and 
exposure setting will be locked. The setting remains locked even after you take a photo.

This feature is available only in 

AUTO

 and 

PRO

 modes.

Summary of Contents for SM-J400G

Page 1: ...www samsung com User Manual English 04 2018 Rev 1 0 SM J400G DS SM J400G...

Page 2: ...Transferring data from your previous device 31 Understanding the screen 40 Notification panel 42 Entering text Apps and features 45 Installing or uninstalling apps 47 Bixby 54 Phone 59 Contacts 64 Me...

Page 3: ...19 Dolby Atmos surround sound 119 Notifications 120 Display 121 Blue light filter 121 Changing the screen mode or adjusting the display colour 123 Screensaver 123 Wallpapers and themes 124 Advanced fe...

Page 4: ...e or apps to work improperly Software sound sources wallpapers images and other media provided with this device are licensed for limited use Extracting and using these materials for commercial or othe...

Page 5: ...a loss or inconvenience caused by forgotten unlock codes Depending on the region you can view the regulatory information on the device To view the information launch the Settings app and tap About pho...

Page 6: ...top charging Do the following when the device heats up Disconnect the charger from the device and close any running apps Wait for the device to cool down and then begin charging the device again If th...

Page 7: ...recording videos for extended periods When streaming videos while using the maximum brightness setting When connecting to aTV While multitasking or when running many apps in the background When using...

Page 8: ...ntinues to overheat contact a Samsung Service Centre Device limitations when the device overheats When the device heats up the features and performance may be limited or the device may turn off to coo...

Page 9: ...arger or battery Device layout and functions Package contents Refer to the quick start guide for package contents The items supplied with the device and any available accessories may vary depending on...

Page 10: ...ayout Power key Back key Earphone jack Recents key Multipurpose jack Home key Microphone Front camera Proximity sensor Flash Speaker Touchscreen Volume key Speaker Rear camera Back cover Flash GPS ant...

Page 11: ...Do not cover the proximity sensor area with screen accessories such as a screen protector or stickers Doing so may cause the sensor to malfunction Do not allow water to contact the touchscreen The tou...

Page 12: ...ver Be careful not to damage your fingernails when you remove the back cover Do not bend or twist the back cover excessively Doing so may damage the cover 2 Insert the battery with the battery s gold...

Page 13: ...Basics 13 3 Replace the back cover Removing the battery 1 Remove the back cover 2 Pull out the battery...

Page 14: ...gy unplug the charger when not in use The charger does not have a power switch so you must unplug the charger from the electric socket when not in use to avoid wasting power The charger should remain...

Page 15: ...ltiple apps at once network apps or apps that need a connection to another device the battery will drain quickly To avoid losing power during a data transfer always use these apps after fully charging...

Page 16: ...ards are inserted in the device than when one SIM card is inserted Use only a microSIM card Use caution not to lose or let others use the SIM or USIM card Samsung is not responsible for any damages or...

Page 17: ...ary SIM or USIM card into SIM card slot 1 1 and the secondary SIM or USIM card into SIM card slot 2 2 Do not insert a memory card into the SIM card slot If a memory card happens to be lodged in the SI...

Page 18: ...Basics 18 Removing the SIM or USIM card 1 Remove the back cover and battery 2 Pull out the SIM or USIM card Single SIM models Dual SIM models...

Page 19: ...he Settings app tap Connections SIM card manager and then select a SIM or USIM card to access the following options Icon Change the icon of the SIM or USIM card Name Change the display name of the SIM...

Page 20: ...ght side up The device supports the FAT and the exFAT file systems for memory cards When inserting a card formatted in a different file system the device will ask to reformat the card or will not reco...

Page 21: ...a Doing so can cause data to be corrupted or lost or cause damage to the external storage or device Samsung is not responsible for losses including loss of data resulting from the misuse of external s...

Page 22: ...of wireless devices is restricted such as aeroplanes and hospitals Emergency mode You can switch the device to emergency mode to reduce battery consumption Some apps and functions will be restricted I...

Page 23: ...lect your preferred device language and select Select a language 3 Select aWi Fi network and connect to it If you do not connect to aWi Fi network you may not be able to set up some device features du...

Page 24: ...nt You can enjoy Samsung services and keep your data up to date and secure across all of your devices Refer to Samsung account for more information 7 Select features you want to use and complete the i...

Page 25: ...m Samsung Members and more Create your Samsung account with your email address To check the list of services that can be used with your Samsung account visit account samsung com For more information o...

Page 26: ...you remove your registered Samsung account from the device your data such as contacts or events will also be removed 1 Launch the Settings app and tap Cloud and accounts Accounts 2 Tap Samsung account...

Page 27: ...previous device to your device wirelessly viaWi Fi Direct 1 On the previous device launch Smart Switch If you do not have the app download it from Galaxy Apps or Play Store 2 On your device launch the...

Page 28: ...on app from www samsung com smartswitch Back up data from your previous device to a computer and import the data to your device 1 On the computer visit www samsung com smartswitch to download Smart Sw...

Page 29: ...On your previous device sign in to your Samsung account 2 Launch the Settings app select the backup option and back up your data If your device supports Samsung Cloud launch the Settings app tap Cloud...

Page 30: ...th Checking data You can check the saved items and used memory of your Samsung Cloud Launch the Settings app and tap Cloud and accounts Samsung Cloud You can immediately check your used memory and sav...

Page 31: ...ply excessive pressure to it with your fingertips Leaving the touchscreen idle for extended periods may result in afterimages screen burn in or ghosting Turn off the touchscreen when you do not use th...

Page 32: ...p and hold an item and drag it to the target position Double tapping Double tap the screen Swiping Swipe upwards downwards to the left or to the right Spreading and pinching Spread two fingers apart o...

Page 33: ...ice s features It displays widgets shortcuts to apps and more The Apps screen displays icons for all apps including newly installed apps The screen may appear differently depending on the region or se...

Page 34: ...n the Apps screen Alternatively press the Home key or tap the Back key Home screen Apps screen If you add the Apps button on the Home screen you can open the Apps screen by tapping the button On the H...

Page 35: ...her similar applications to quickly access and launch apps 1 On the Home screen or the Apps screen tap and hold an app and then drag it over another app 2 Drop the app when a folder frame appears arou...

Page 36: ...s colours icons and wallpapers will change depending on the selected theme Widgets Widgets are small apps that launch specific app functions to provide information and convenient access on your Home s...

Page 37: ...aming outside of normal service area Preferred SIM or USIM card for calls dual SIM models GPRS network connected EDGE network connected UMTS network connected HSDPA network connected HSPA network conn...

Page 38: ...locks it Also the screen turns off and automatically locks if the device is not used for a specified period To unlock the screen swipe in any direction when the screen turns on If the screen is off pr...

Page 39: ...lock the screen PIN Enter a PIN with at least four numbers to unlock the screen Password Enter a password with at least four characters numbers or symbols to unlock the screen None Do not set a screen...

Page 40: ...rag the status bar downwards To close the notification panel swipe upwards on the screen You can open the notification panel even on the locked screen You can use the following functions on the notifi...

Page 41: ...n features Swipe downwards on the notification panel to view more buttons To change feature settings tap the text under each button To view more detailed settings tap and hold a button To rearrange bu...

Page 42: ...e a preceding character Enter symbols Enter uppercase For all caps tap it twice Additional keyboard functions Enter a space View more keyboard functions Changing the input language Tap Languages and t...

Page 43: ...text by voice Change the keyboard settings Change the keyboard for one handed operation Copying and pasting 1 Tap and hold over text 2 Drag or to select the desired text or tap Select all to select a...

Page 44: ...ed text 2 Tap More Dictionary on the options list If a dictionary is not preinstalled on the device tap Move to Manage dictionaries next to a dictionary to download it 3 View the definition in the dic...

Page 45: ...ownload free apps tap INSTALL To purchase and download apps where charges apply tap the price and follow the on screen instructions To change the auto update settings tap Settings Auto update apps and...

Page 46: ...device When you open an app a pop up window may appear and request access to certain features or information Tap ALLOW on the pop up window to grant permissions to the app To view your app permission...

Page 47: ...To use the Bixby feature you must register and sign in to your Samsung account Starting Bixby When you launch Bixby for the first time the Bixby intro page will appear You must register and sign in t...

Page 48: ...ides by analysing your usage patterns and your routine Opening Bixby Home 1 Swipe to the right on the Home screen The Bixby Home screen will appear 2 Swipe upwards or downwards to view recommended con...

Page 49: ...rds update automatically at a specified interval To manually update cards swipe downwards on the screen Editing Bixby cards list To pin a card to the top of the Bixby Home screen tap Pin to top To unp...

Page 50: ...must register and sign in to your Samsung account To use location reminders the GPS feature must be activated Starting Reminder You can start Reminder from Bixby Home 1 Swipe to the right on the Home...

Page 51: ...h as a single memo or webpage address and view it later For example create a reminder to alert you to Water the flowers when I get home 1 Launch the Reminder app 2 Tap Write a reminder and enter Water...

Page 52: ...minder app to view your reminders list To view reminder details select a reminder Setting reminder details Add or edit reminder details such as frequency date and time or location 1 Select a reminder...

Page 53: ...To delete multiple reminders tap and hold a reminder tick reminders to delete and then tap DELETE Customising Bixby settings On the Bixby Home screen tap Settings Samsung account View your Samsung acc...

Page 54: ...number If the keypad does not appear on the screen tap to open the keypad 2 Tap to make a voice call or tap to make a video call For dual SIM models tap or to make a voice call Create a new contact Pr...

Page 55: ...and then add a phone number To make a call tap and hold a speed dial number on the keypad For speed dial numbers 10 and up tap the first digit s of the number and then tap and hold the last digit For...

Page 56: ...r Open the notification panel to view the list of missed calls Alternatively launch the Phone app and tap RECENTS to view missed calls Blocking phone numbers Block calls from specific numbers added to...

Page 57: ...e When using the speakerphone keep the device away from your ears Mute Turn off the microphone so that the other party cannot hear you Keypad Hide Open or close the keypad End the current call During...

Page 58: ...e calls list 1 Launch the Phone app and tap RECENTS 2 Tap a phone number Details 3 Tap Create contact to create a new contact or tap Update existing to add the number to an existing contact Adding a t...

Page 59: ...1 Launch the Contacts app tap and then select a storage location 2 Enter contact information Select a storage location Scan contact information from a business card Add an image Open more information...

Page 60: ...port and tap DONE 4 Select a storage location to save contacts to and tap IMPORT Synching contacts with your web accounts Sync your device contacts with online contacts saved in your web accounts such...

Page 61: ...it quickly Tap the search field at the top of the contacts list and enter search criteria Tap the contact s name Details Then take one of the following actions Add to favourite contacts Make a voice o...

Page 62: ...it To use the profile sharing feature your phone number must be verified You can view your contacts updated profile information in Contacts To change the scope of contacts to share your profile with t...

Page 63: ...te contacts Merge duplicate contacts into one to streamline your contacts list 1 Launch the Contacts app and tap Manage contacts Merge contacts 2 Tick contacts and tap MERGE Deleting contacts 1 Launch...

Page 64: ...2 Add recipients and tap START 3 Enter a message To record and send a voice message tap and hold say your message and then release your finger The recording icon appears only while the keyboard is hid...

Page 65: ...ck numbers and messages Block numbers 2 Tap INBOX and select a contact Or tap CONTACTS select contacts and then tap DONE To manually enter a number tap Enter number enter a phone number and then tap S...

Page 66: ...nd launch the Internet app 2 Tap the address field 3 Enter the web address or a keyword and then tap Go To view the toolbars drag your finger downwards slightly on the screen Bookmark the current webp...

Page 67: ...T MODE If you are using this feature for the first time set whether to use a password for secret mode In secret mode you cannot use some features such as screen capture In secret mode the device will...

Page 68: ...t tap Add account If you have more than one email account you can set one as the default account Tap Set default account Sending emails 1 Tap to compose an email 2 Add recipients and enter an email te...

Page 69: ...s in places where you may violate other people s privacy Launching Camera Use the following methods to launch Camera Launch the Camera app On the locked screen drag outside the circle Some methods may...

Page 70: ...nt bar appears drag on the adjustment bar towards or To capture an image from the video while recording tap To change the focus while recording a video tap where you want to focus To use auto focus mo...

Page 71: ...screen to zoom in and pinch to zoom out Control the zoom with one finger Drag on the zoom bar towards or Zooming features are available only when using the rear camera Locking the focus AF and exposur...

Page 72: ...tos and videos while manually adjusting various shooting options such as exposure value and ISO value On the shooting modes list tap PRO Select options and customise the settings and then tap to take...

Page 73: ...on the camera s viewfinder If the preview image is out of the guide frame or you do not move the device the device will automatically stop taking photos Avoid taking photos of indistinct backgrounds s...

Page 74: ...CONTINUOUS SHOT Tap and hold to take several photos continuously Sports mode Take clearer photos of fast moving subjects such as a person running or a pet in motion On the shooting modes list tap SPOR...

Page 75: ...g methods and then tap the switches to activate them Using the selfie flash When taking self portraits with the front camera in low light situations the touchscreen can serve as a flash On the preview...

Page 76: ...mer will appear When the time is up the device will take a photo To use various shooting options for the front camera tap Shooting methods and then tap the switches to activate them 5 Slowly swivel th...

Page 77: ...weighted uses the light in the centre portion of the shot to calculate the exposure of the shot Spot uses the light in a concentrated centre area of the shot to calculate the exposure of the shot Mat...

Page 78: ...ation tags Attach a GPS location tag to the photo GPS signal strength may decrease in locations where the signal is obstructed such as between buildings or in low lying areas or in poor weather condit...

Page 79: ...Apps and features 79 Gallery Introduction View images and videos stored in your device You can also manage images and videos by album or create stories...

Reviews: