background image

5

4

5

4

 1 

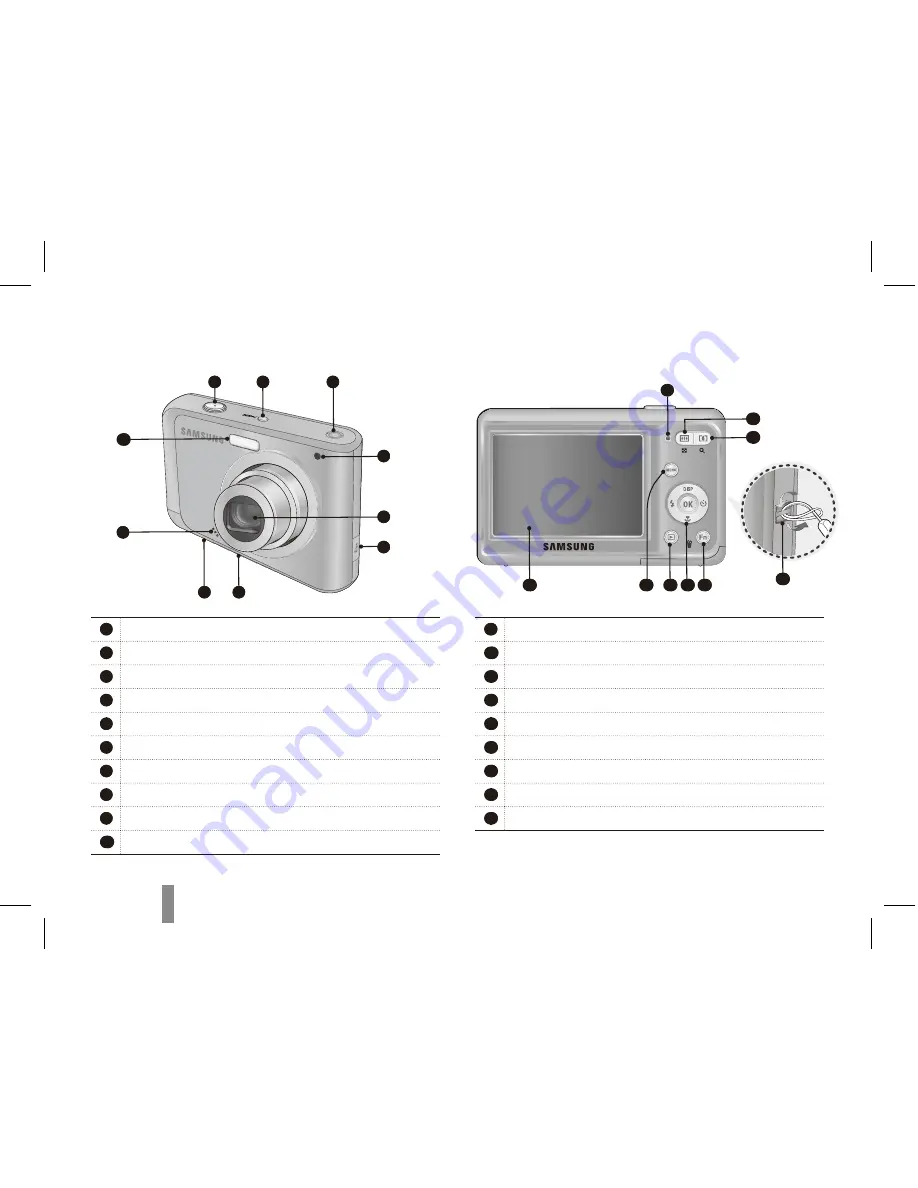
Shutter button

 2 

POWER button

 3 

Speaker

 4 

AF-assist light/timer lamp

 5 

Lens / Lens cover

 6 

USB / AV terminal

 7 

Tripod mount

 8 

Battery chamber cover

 9 

Microphone

 10 

Flash

Camera layout

 11 

Status lamp

 12 

Zoom Wide(W) button (Thumbnail)

 13 

Zoom Tele(T) button (Digital zoom)

 14 

Strap eyelet

 15 

Fn / Delete button

 16 

Navigation button/OK button

 17 

Playback button

 18 

MENU button

 19 

LCD monitor

 2 

 3 

 1 

 10 

 9 

 4 

 5 

 6 

 7 

 8 

 11 

 13 

 12 

 19 

 14 

 15 

 16 

 17 

 18 

Summary of Contents for SL35 - Digital Camera - Compact

Page 1: ...lease read the Quick Start Manual and User Manual carefully to ensure safe and correct use Quick Start Manual SL35 For more information refer to the User Manual included on the supplied CD ROM ENG SPA...

Page 2: ...all children and animals Small parts may cause choking or serious injury if swallowed Moving parts and accessories may present physical dangers as well Prevent damage to subjects eyesight Do not use t...

Page 3: ...tion Prevent memory cards from making contact with liquids dirt or foreign substances If dirty wipe the memory card clean with a soft cloth before inserting in your camera Handle and dispose of batter...

Page 4: ...pod mount 8 Battery chamber cover 9 Microphone 10 Flash Camera layout 11 Status lamp 12 Zoom Wide W button Thumbnail 13 Zoom Tele T button Digital zoom 14 Strap eyelet 15 Fn Delete button 16 Navigatio...

Page 5: ...l included AD46 00284A Memory cards Rechargeable Battery AD81 00879A Charger AD81 00898A A V Cable AD81 00735A AC Cord AD81 00696A Camera case Optional accessories Please check that you have the corre...

Page 6: ...ra Push gently until the card disengages from the camera and then pull it out of the slot Removing the memroy card Removing the battery 2 1 4 With the gold coloured 3 contacts facing up Inserting the...

Page 7: ...the navigation buttons to scroll to an 2 option or menu Back EV Move To move left or right press or To move up or down press or Press 3 to confirm the highlighted option or menu Press again to go bac...

Page 8: ...bject in the frame 2 Press 3 Shutter Press to pause or resume Press 4 Shutter again to stop the recording Note Number of photos by resolution for 1 GB SD Resolution Super fine Fine Normal 3648 x 2736...

Page 9: ...g photos Press 1 Press 2 or to scroll through files Press and hold to view files quickly Viewing videos Press 1 Press 2 Play Capture Use the following buttons to control playback 3 Scan backward Pause...

Page 10: ...ive 1 and follow the onscreen instructions Connect the camera to the PC with the USB 2 cable Turn on the camera 3 On your PC select 4 My Computer Removable Disk DCIM 100PHOTO Select the files you want...

Page 11: ...1 1 2 000 sec Program 1 1 2 000 sec Night 8 1 2 000 sec Firework 2 sec Storage Internal memory approx 7 MB External memory Optional SD card up to 4 GB guaranteed SDHC card up to 8 GB guaranteed MMC P...

Page 12: ...que se traguen las piezas m s peque as y como consecuencia se asfixien o sufran graves lesiones Los accesorios y las piezas m viles tambi n pueden causar da os f sicos Evite da ar la vista del sujeto...

Page 13: ...arjetas de memoria entren en contacto con l quidos suciedad o sustancias extra as Si la tarjeta de memoria se ensucia l mpiela con un pa o suave antes de insertarla en la c mara Utilice y deseche las...

Page 14: ...r 5 Objetivo Tapa del objetivo 6 Terminal USB AV 7 Orificio para el montaje del tr pode 8 Cubierta de la c mara de la bater a 9 Micr fono 10 Flash 11 Luz indicadora de estado 12 Bot n Wide W de zoom M...

Page 15: ...iguraci n de la c mara Tarjetas de memoria Bater a recargable AD81 00879A Cargador AD81 00898A Cable A V AD81 00735A Cable de CA AD81 00696A Estuche para la c mara Accesorios opcionales Revise que est...

Page 16: ...a una leve presi n hasta que la tarjeta se desprenda de la c mara y luego ret rela de la ranura Quitar la tarjeta de memoria Quitar la bater a 2 1 4 Con los contactos de 3 color dorado hacia arriba In...

Page 17: ...plazarse hacia una opci n o hacia un men Atr s EV Mover Para desplazarse hacia la izquierda o hacia la derecha pulse o Para desplazarse hacia arriba o hacia abajo pulse o Pulse 3 para confirmar la opc...

Page 18: ...3 Obturador Pulse para pausar o reanudar Pulse 4 Obturador nuevamente para detener la grabaci n Nota Cantidad de fotograf as por resoluci n para SD de 1GB Resoluci n Superfina Fina Normal 3648 x 2736...

Page 19: ...ra desplazarse por los archivos Mantenga la tecla pulsada para ver los archivos r pidamente Ver v deos Pulse 1 Pulse 2 Reproducir Captura Utilice los siguientes botones para controlar 3 la reproducci...

Page 20: ...a las instrucciones que aparezcan en la pantalla Conecte la c mara a su PC con el cable USB 2 Encienda la c mara 3 En el ordenador seleccione 4 Mi PC Disco extra ble DCIM 100PHOTO Seleccione los archi...

Page 21: ...00 s Programa de 1 a 1 2 000 s Nocturno de 8 a 1 2 000 s Fuegos Artificiales 2 s Almacenamiento Memoria interna aprox 7 MB Memoria externa opcional tarjeta SD hasta 4 GB garantizados tarjeta SDHC hast...

Page 22: ...Please refer to the warranty that came with your product or visit our website http www samsung com for after sales service or inquiries AD68 04185A 1 1...

Reviews: