background image

2

.3

CHAPTER TWO

Remote Control and On-Screen Menus

2

2

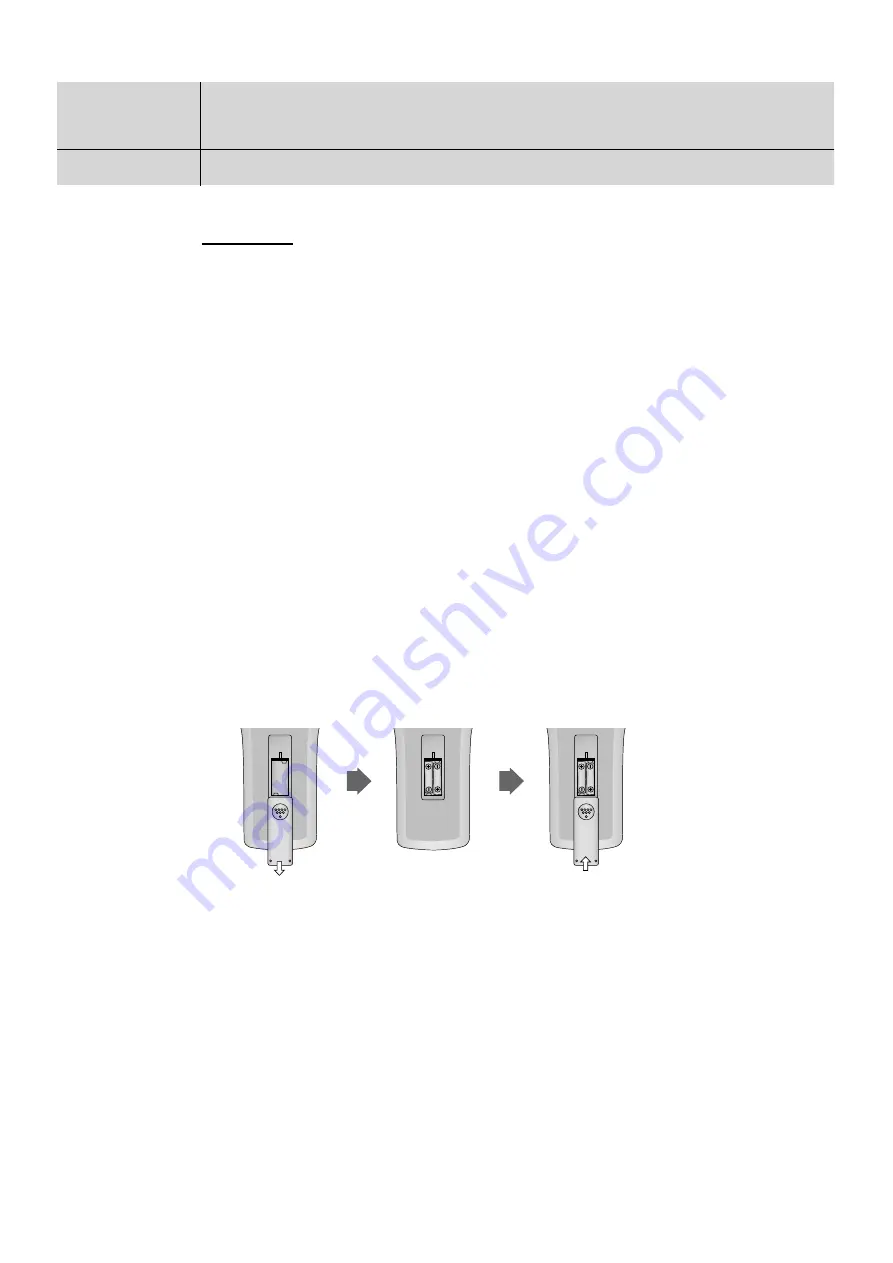
Installing the Batteries

Press and remove the battery cover on the back of the remote control. 
Put two AAA batteries into the compartment and replace the battery cover.

Programming the Remote Control 

To program the remote control to operate a VCR, Cable Box, TV or DVD player, see
“Programming the Remote Control to Operate Other Components” (See page 4.11).

Special Notes:

#1  The Channel buttons (CH 

▲▼

, FAV-CH): 

To use these buttons, the available channels must first be memorized. (See page 3.1)

#2 The “TV” buttons (VOL +-, Mute, TV/Video and +100 ): 

To use these buttons, you must first switch the remote control to “TV” mode.

(Use the SELECT button on the remote control to select “TV.”)

#3 The “VCR” buttons (FF, REW, PLAY, STOP, PAUSE): 

To use these buttons, you must first switch the remote control to “VCR” mode. 
(Use the SELECT button on the remote control to select “VCR.”)

#4 The “CATV” buttons

To use the CABLE Set-Top Box, you must first switch the remote control to “CATV”
mode. (Use the SELECT button on the remote control to select “CATV.”)

#5 The “DVD” buttons (FF, REW, PLAY, STOP, PAUSE): 

To use these buttons, you must first switch the remote control to “DVD” mode.
(Use the SELECT button on the remote control to select “DVD.”)

Summary of Contents for SIR-T150

Page 1: ...Owner s Instructions DIGITAL TV SET TOP BOX AA68 01291A ENG SIR T150 Samsung Electronics America inc 105 Challenger Road Ridgefield Park N J 07660 SERVICE DIVISION TEL 1 800 SAMSUNG 1 800 726 7864 ...

Page 2: ...shall be connected to the grounding system of the building as close to the point of cable entry as practical Caution FCC regulations state that any unauthorized changes or modifications to this equipment may void the user s authority to operate it Caution To prevent electric shock match the wide blade of plug to the wide slot and fully insert the plug Attention pour eviter les chocs electriques in...

Page 3: ...ripod bracket or table where it can fall A falling product can cause serious injury to a child or adult and serious damage to the appliance Use only with a cart stand tripod bracket or table recommended by the manufac turer or sold with the product Follow the manufacturer s instructions when mounting the unit and use a mounting accessory recommended by the manufacturer Move the product and cart wi...

Page 4: ...vice the product yourself Refer all servicing to qualified service personnel Unplug the unit from the wall outlet and refer servicing to qualified service personnel under the following conditions when the power supply cord or plug is damaged if liquid has been spilled on the unit or if objects have fallen into the unit if the product has been exposed to rain or water if the product does not operat...

Page 5: ...3 3 How to Set Your Favorite Channels 3 4 Checking Digital Signal Reception 3 5 Setting the Time and Date 3 6 Chapter 4 Special Features 4 1 Changing the Screen Format 4 1 Choosing a Sound Multitrack 4 3 Choosing a Digital Sound Format AC3 or PCM 4 4 Setting Up Captions On screen Text Messages 4 5 Rating Control Menu 4 6 Electronic Program Guide 4 9 Using the EPG Electronic Program Guide 4 10 Prog...

Page 6: ...ime Program title Program dura tion Caption Rating control Digital picture grade and MTS language EXIT Press to completely exit all the on screen menus ˆ MENU Press to display the on screen menus Ø Menu Left Right Up Down Use to change channels or to move the arrow pointer when using the on screen menus ENTER Press to activate a selection when using the on screen menus NOTES In this instruction bo...

Page 7: ... Or connect this terminal to the digital audio input of a separate component i e AC3 AMP Ø DTV OUT R G B FORMAT Connect to the R G B inputs of a TV set computer moni tor or some other video component DTV OUT COMPONENT Y PB PR format Connect to the Y PB PR digital video input of a digital compatible TV set or the Y PB PR inputs of some other video component Lt Rt ANALOG AUDIO OUTPUTS Connect these ...

Page 8: ...y Digital Output jack fiber optic connector on the set top box and the Optical jack on the TV Or connect an Audio Video cable between the Lt Rt Analog Audio Output jacks on the Set Top Box and the L R Audio IN jacks on the TV Normal TV Connect an Audio cable between the Audio Out jacks on the Set Top Box and the Analog Left Right jacks on the TV NOTE The TV set must be digital compatible i e it mu...

Page 9: ... Set Top Box 2 Connect a Computer Video Monitor cable between the Video Out jack R G B format on the Set Top Box and the Video IN jack on the Computer Monitor 3 Connect an Audio cable between the Lt Rt Audio Out jacks on the Set Top Box and the L R Audio IN jacks on the Computer Monitor Set Top Box Rear Panel Computer Monitor Rear Panel From Antenna ...

Page 10: ...and program Channel number Time Program title Program duration Caption Rating control Digital picture grade and MTS language ˇ MTS Multitrack Sound Press to select among the available multitracks for example depending on the particular broadcast one or more foreign language translations might be available FAV CH Favorite Channel 1 Press to switch among your favorite channels ˆ 100 2 Press to selec...

Page 11: ...able languages can be selected When an analog signal is received either CC1 CC2 CC3 CC4 can be selected ı CH Channel Up and Down 1 2 3 4 Press to change channels ENTER While using the on screen menus press ENTER to activate or change a particular item MENU Press to display the on screen menus or to switch back to the pre vious menu screen that was displayed GUIDE Press to display the on screen Ele...

Page 12: ... be memorized See page 3 1 2 The TV buttons VOL Mute TV Video and 100 To use these buttons you must first switch the remote control to TV mode Use the SELECT button on the remote control to select TV 3 The VCR buttons FF REW PLAY STOP PAUSE To use these buttons you must first switch the remote control to VCR mode Use the SELECT button on the remote control to select VCR 4 The CATV buttons To use t...

Page 13: ...o move the arrow pointer As the on screen pointer passes over a particular icon the icon is highlighted The menu system has three different levels The four icons on the left side of the screen are the first level menu Guide Channel Setup and Help On or Off When you activate one of these four icons the on screen display presents a second level sub menu which often leads to a third level sub menu Ma...

Page 14: ...ing the pointer over each of the icons and reading a description of the features that each icon represents Once you are comfortable moving the pointer highlight any icon and press ENTER You will see the contents of that icon s menu You can press EXIT at any time and the menus will disappear from the screen To turn the on screen help off Highlight the Help On icon and press ENTER The icon changes t...

Page 15: ...The status of closed captions if the broadcast includes them and if you have turned on the closed captions fea ture See page 4 5 Rating control settings See page 4 6 The digital picture grade such as HD High Definition or SD Standard Definition The audio track language English French etc See page 4 3 To view the Display Press DISPLAY on the remote control To hide the Display Press DISPLAY again or...

Page 16: ...hlight the Channel icon and press ENTER Push the I point control up or down to highlight Memorize Channels and press ENTER 3 That s it The Set Top Box will auto matically scan and store all of the digital DTV channels that are available in your local area 4 Press EXIT when channel memorization is complete NOTES The Set Top Box MUST be connected to an antenna in order to receive digital TV signals ...

Page 17: ...ol Push the I point control up or down to highlight the Channel icon and press ENTER 3 Push the I point control up or down to highlight Add Delete Channels and press ENTER 4 Repeatedly pressing ENTER will alternate between Add channel Message the channel is in memory and Delete channel Message The channel is not in memory Press the number buttons or CH buttons to switch to the appropriate channel ...

Page 18: ...ton Press to return to the previous channel you viewed For example if the box is tuned to channel 55 and then you change to chan nel 56 pressing PRE CH will return to channel 55 FAV CH button Press to switch among your favorite channels See page 3 4 CH and button Press CH or to move up or down to the next available channel Press and hold CH or to cycle quickly through the channels NOTES You must f...

Page 19: ...highlight Set Favorite Channels and press ENTER 3 To designate a particular channel as a Favorite Channel highlight the channel number and press ENTER For each Favorite Channel a yellow dot icon will appear next to the channel number When more than six favorite channels exist press the arrow buttons to add channels 4 Press EXIT 5 You can now jump from one favorite channel to another by press ing t...

Page 20: ...annels 1 Press the MENU button on the remote control 2 Push the I Point control to high light the Channel icon and press ENTER Push the I Point control to highlight Check Signal Reception and press ENTER 3 If the signal strength meter indi cates that the signal is weak physically adjust your antenna to increase the signal strength Continue to adjust the antenna until you find the best position wit...

Page 21: ...tions and press ENTER 4 You will be asked if your local area observes Daylight Savings Time Push the I Point control up or down to highlight Yes or No as appropriate and press ENTER 5 Push the I Point control right or left to highlight the time zone for your local area move the arrow pointer to the appropriate time zone on the map of the United States Press ENTER That s it Because you are receive ...

Page 22: ...s the MENU button on the remote control 2 Push the I Point control up or down to highlight the Setup icon and press ENTER Push the I Point control up or down to highlight Screen Format and press ENTER 3 Repeatedly press ENTER to select your TV screen size 4 Push the I Point control up down right or left to highlight the screen format and press ENTER 5 Press EXIT Continued 4 1 ...

Page 23: ...Monitor If you are using a 16 9 ratio TV or monitor and receive an image with a 4 3 aspect ratio the image will be displayed at the 4 3 ratio on your monitor unless you specify otherwise The Screen Format menu allows you to adjust the image through the following options Pillar box Choose this when receiving a 4 3 image and you want the on screen appearance of the video to be a centered picture wit...

Page 24: ...int control up or down to highlight Sound Options and press ENTER 3 Push the I Point control up or down to highlight Multi Track Sound 4 Repeatedly press enter until the appropriate language appears the available languages will vary depending on the particular program 5 Press EXIT NOTES The Multitrack Sound Selection feature on the menu allows you to select any of available languages on your prefe...

Page 25: ... the transmission for mat PCM or AC 3 as appropriate to your particular equipment 1 Press the MENU button on the remote control 2 Push the I Point control up or down to highlight the Setup icon and press ENTER Push the I Point control up or down to highlight Sound Options and press ENTER 4 Push the I Point control up or down to highlight Dolby Digital Output 5 Repeatedly press ENTER until the appr...

Page 26: ...he remote control 2 Push the I Point control up or down to highlight the Setup icon and press ENTER 3 Push the I Point control up or down to highlight Closed Caption and press ENTER Repeatedly press enter to alternate between On and Off 4 Press EXIT Note Availability of captions depends on the particular pro gram being broadcast NOTES In Caption On press the CAPTION button on the remote control to...

Page 27: ...wn to highlight Rating Control and press ENTER 3 Push the I Point control up or down to highlight Change and press ENTER Use the number buttons on the remote control 0 9 to enter your current secret code 4 Use the number buttons on the remote control to enter a changed password 5 Re enter the new password when prompted by the on screen menu 6 Your new password is active Press EXIT NOTES Password E...

Page 28: ...lay 4 After you enter your password the screen will display the rating control menu This menu lists both MPAA and TV FCC Parental Ratings You can independently lock the MPAA and TV Ratings The MPAA ratings that are unlocked disappear as the symbol Ratings that are locked are indicated by the symbol TV FCC ratings that are unlocked are indicated by the symbol Ratings that are locked are indicated b...

Page 29: ...ding chil dren from ages two six TV FCC Guidelines The particular rating that you select will be locked indicated by a red L on a blue background Also within the particular group i e group 1 or group 2 all of the more restrictive ratings will also be locked Suppose for example the TV G rating and all of its V S L and D sub categories are locked In that case all of the more restrictive ratings TV P...

Page 30: ... Scrolls backwards quickly 2 hour jumps through the program times Highlight and repeatedly press ENTER until the appropriate time is displayed E Scrolls back through program times in 1 hour jumps Highlight and repeated ly press ENTER until the appropriate time is displayed F Displays titles and other details about upcoming programs for particular chan nels Highlight the program and press ENTER to ...

Page 31: ...ayed 5 You may now Jump directly to a channel Push the I Point control up or down to highlight the channel number in the left most column and press ENTER Obtain additional program details Push the I Point control up down right or left to highlight a program title and press ENTER Exit the Program Guide and return to normal viewing mode Push the I Point control up down right or left to highlight the...

Page 32: ...icator is illuminated 2 Press the SET button on the remote control The LED for the active component will light for 30 seconds While the LED is illuminated use the number buttons to enter the code number for the particular manufacturer see table on page 4 12 4 14 Each code numbers must be three digits long For example to enter the code 6 press 0 0 and 6 To enter the code 76 press 0 7 and 6 If the n...

Page 33: ...51 52 7 8 19 21 26 28 29 32 33 40 41 44 14 42 57 61 75 76 Anvision Cable Star Eagle Eastern International General Instrument GI Hamlin Hitachi Jerrold Macom Magnavox NSC Oak Osk Sigma Panasonic Philips Pioneer Randtek 7 8 7 8 7 8 12 46 4 5 15 23 24 25 30 36 67 68 69 3 12 13 34 48 37 43 46 4 5 15 23 24 25 30 36 46 62 65 37 43 7 8 19 21 26 28 29 32 33 40 41 9 16 38 16 3 27 39 61 73 74 7 8 19 21 26 2...

Page 34: ...29 53 56 15 2 15 9 30 15 30 69 8 8 9 15 21 67 5 13 19 48 49 7 9 7 14 16 16 14 16 7 5 6 7 8 9 12 13 15 27 31 35 2 14 16 30 46 11 17 26 79 Admiral Aiwa Akai Audio Dynamics Bell Howell Broksonic Candle Canon Citizen Colortyme Craig Curtis Mathes Daewoo DB Dimensia Dynatech Electrohome Emerson Fisher Funai General Electric Go Video Goldstar Harman Kardon Hitachi Instant Replay JC Penney JCL Kenwood KL...

Page 35: ... 61 6 8 90 91 89 80 15 19 88 90 85 24 25 69 84 6 114 77 74 1 50 12 6 19 37 6 50 1 61 6 12 98 92 20 100 82 2 6 90 12 20 72 69 6 59 88 46 6 90 50 12 19 94 84 96 97 84 1 6 90 A Mark Admiral Akai Anam Aoc Bell Howell Broksonic Candle Centrion Citizen Classic Concerto Contec Coronado Craig Croslex Crown Curtis Mathes CXC Daewoo Daytron Dynasty Emerson Fisher Funai General Electric Goldstar Hitachi Infi...

Page 36: ...ust the antenna Make sure the MUTE button is off No picture or sound Try another channel Make sure the Set Top Box is plugged in Check the antenna connections No color or wrong colors Make sure the program is broadcasted in color Picture rolls vertically Adjust the antenna Check all wire connections Remote control failure Press the SELECT button to put your remote control into DTV mode Make sure t...

Page 37: ...s that create magnetic fields Liquids Do not handle liquids near or on the Set Top Box Cabinet Never open the cabinet or touch the parts inside Wipe your Set Top Box with a clean dry cloth Never use water cleaning fluids wax or chemicals Do not put heavy objects on top of the cabinet Temperature If your Set Top Box is suddenly moved from a cold to a warm place unplug the power cord for at least tw...

Page 38: ...ons W x D x H 16 54 x 14 21 x 3 07 in Weight 1 72 lbs Tuning system type F S Band coverage VHF 2 13 UHF 14 69 Antenna 75 ohm external antenna terminal for VHF UHF Number of inputs outputs 75 ohm V UHF In Out DTV Out component Y PB PR DTV Out RGB Video Out S Video Out Dolby Digital Out Optical Dolby Digital Out Coxial 2 Analog Audio Out Rt Lt Resolution Select Switch DTV Out Select Switch ...

Reviews: