background image

Setup and Copying

1−6

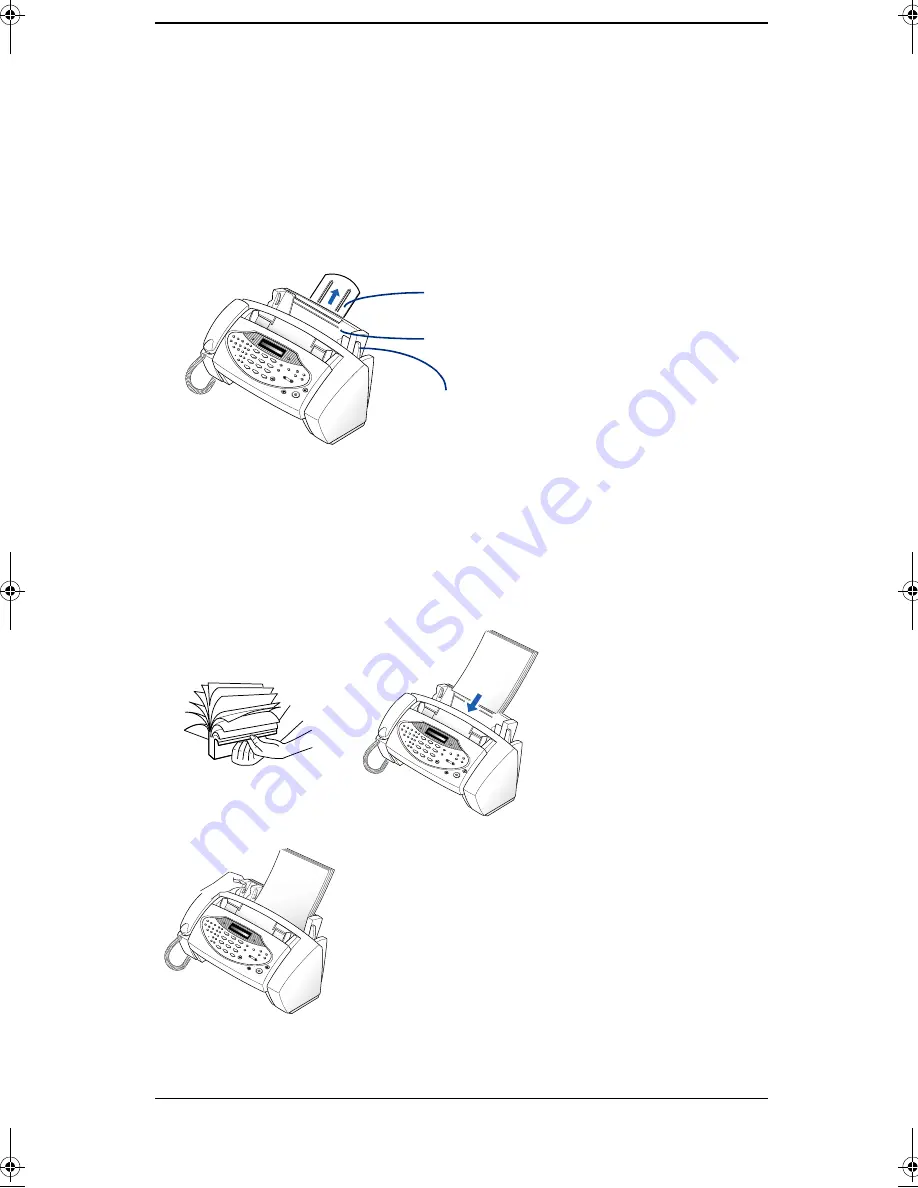
Loading Paper

To receive faxes or make copies, you should load the paper in
the ASF (Automatic Sheet Feeder). You can load
approximately 100 sheets of paper.

1

Pull the Paper Support on the ASF

all the way up.

2

Before loading papers,

push down the

blue

Paper

Lever.

Failure to do so will result in paper jams while copying
or receiving a fax.

3

Fan the papers and insert them into the ASF

with the

print side facing up.

4

Squeeze the Paper Guide

, and

move it to the right to

match

the width of the paper.

5

When completed,

replace the Paper Lever

to its

original position.

Before loading the papers, see if the paper size is set
correctly in the System Setup. To change it, ”System
Setup Options” on page 6−8.

Paper Support

Paper Lever

ASF

zmTZYWW|rU‰––’GGwˆŽŒG]GG{œ™š‹ˆ SGtˆ™ŠG_SGYWWXGG`a[[Gwt

Summary of Contents for SF-3200T

Page 1: ...i 0 1 2 3 0 3 0 0 4 ...

Page 2: ...ii 2 W W W W W W 0 5 6 110 0 7 5 89 0 959 350 0 435 ...

Page 3: ...py 1 12 Making a 2 up Copy 1 12 Making a Page to Page Copy 1 13 Copying Receiving in Save Ink Mode 1 14 Chapter 2 Automatic Dialling One Touch Dialling 2 2 Storing a Number for One Touch Dialling 2 2 Dialling a One Touch Number 2 3 Speed Dialling 2 4 Storing a Number for Speed Dialling 2 4 Dialling a Speed Number 2 5 Group Dialling for Multi Address Transmission 2 6 Storing Speed Dial Numbers for ...

Page 4: ...warding SF 3200 3 12 Fax Forwarding SF 3200T 3 13 Voice Request 3 14 Making a Voice Request 3 14 Answering a Voice Request 3 14 Chapter 4 The Answering Machine Recording TAM Message SF 3200T only 4 2 Checking Your TAM Greeting Message 4 2 Monitoring an Incoming Call 4 3 Erasing Old Messages You ve Heard 4 4 To Erase All Recorded Messages 4 4 To Erase a Selected Message 4 4 Playing Back Messages 4 ...

Page 5: ...apter 6 Special Features REDIAL PAUSE 6 2 To Redial the Last Number Called 6 2 To Redial the Number in Memory 6 2 To Insert a Pause 6 2 Using Recall R or Flash 6 3 Chain Dialling 6 4 User Reports 6 5 Your fax machine can print reports containing useful information Scheduled Info System Data Help report etc 6 5 To Print a report 6 5 User Options 6 7 Setting SYSTEM TAM Options 6 7 System Setup Optio...

Page 6: ... Feeding Problems 7 15 Clearing Jams 7 16 Document Jams During Transmission 7 16 Paper Jams During Printing 7 17 Chapter 8 Appendix Specifications 8 2 Paper Type and Sizes for the ASF 8 3 Acceptable Documents for ADF 8 4 A Sample of ITU 4 Chart reduced to 60 5 8 5 Replacing the Fitted Plug UK 8 6 Important 8 6 Notes For Use of This Device New Zealand 8 7 Declaration of Conformity European Countrie...

Page 7: ... chapter describes the preliminary setup procedure A full installation instruction is explained in the separate Installation Guide If you are installing or reinstalling the machine from the beginning refer to the Installation Guide provided with the machine ...

Page 8: ...nvenient 99 page desktop copier 15 page Skew Free Document Feeder 10 One Touch and 80 Speed Dialling locations Group Dialling to eliminate repetitive dialling to the multiple destinations Five reception modes TEL FAX AUTO TAM1 and DRPD Broadcasting to send the same document to multiple des tinations Delayed FAX to send the document at a later time Send Receive Polling Voice request to signal a req...

Page 9: ...looking at the pictures on the next few pages Front View Rear View ASF Automatic Sheet Feeder Document Tray Paper Tray Document Guide Control Panel Document Exit Tray AC Power Socket Connect telephone line here Connect extension phone or TAM Telephone Answering Machine here if applicable SF 3200 Handset Bottom View EXT LINE TEL LINE HANDSET ...

Page 10: ...message used in TAM Mode Erase Use this to erase a message or all messages Play Play incoming messages Fax MSG Forward Answer Activates the TAM Mode on off It lights when in TAM Mode and blinks when a new message is recorded Microphone Use to record the outgoing message for TAM Mode One Touch Dial Buttons 1 10 Use to call most frequently used numbers with one button Resolution Improve the clarity ...

Page 11: ...t Help Use to print status reports or to access HELP files for information on how to operate your machine Search Delete Use to search for a number in memory Or use to delete digits in the edit mode Recall R Flash Performs a switch hook operation such as Call Waiting Redial Pause Use to redial the last number called You can also use it to add a pause while storing a number in memory Scroll Volume a...

Page 12: ...aper Lever Failure to do so will result in paper jams while copying or receiving a fax 3 Fan the papers and insert them into the ASF with the print side facing up 4 Squeeze the Paper Guide and move it to the right to match the width of the paper 5 When completed replace the Paper Lever to its original position Before loading the papers see if the paper size is set correctly in the System Setup To ...

Page 13: ...ion such as fax name number and date time which must be entered before using the machine See page 1 8 Advanced The variables you can set up while using the machine depending on your liv ing area and preferences such as language and ring to answer etc See page 6 8 We strongly recommend that you do not start the Advanced setup until you have read through the User s Guide to make yourself familiar wi...

Page 14: ...NAME and press Start Enter 3 Press Start Enter when display shows FAX NUMBER 4 Enter the fax number to which your machine is connected You can enter up to 20 digits and include special characters space plus sign etc To enter a space press Redial Pause or To enter plus symbol press If you enter a wrong number use or to move to the number and correct it 5 Press Start Enter when finished 6 Press Star...

Page 15: ...inking cursor moves right and the next letter appears in the display If the additional letter is in the middle of or at the end of the letters assigned to the button you have pressed move the cursor by pressing or then press that button 3 Press Start Enter when you re finished entering letters Keypad Character Assignments Time Date Setup The current date and time are shown in the display when the ...

Page 16: ...e EUROPE format the date will be dis played as DD MM YYYY HH MM for example 20 03 1999 10 20 6 Set the date and time You can move the cursor by pressing or If you enter an invalid number the machine beeps and doesn t proceed to the next step If this happens just re enter the correct number DD Day 01 31 MM Month 01 12 YYYY Year four digits HH Hour 00 23 MM Minute 00 59 7 Press Start Enter when the ...

Page 17: ...e that you are within a 30cm range You can record a message which lasts up to 60 seconds You are advised to record a message of less than 15 seconds in duration to prevent the incoming faxes from malfunctioning due to a long message Press Stop or OGM if you want to stop recording before the time is up After the message has been recorded the machine briefly displays the date and time when the messa...

Page 18: ...following steps Activating 2 up Copy 1 Press Paper The display shows the current setting such as ON or OFF 2 Press Paper repeatedly until the display shows ON and waits until the machine returns to the Standby mode Now every copy will be printed by 2 up unless you change the mode to OFF in this step Making a 2 up Copy 1 Turn the page face down and insert it into the document feeder 2 Adjust the do...

Page 19: ...s in the page 4 Press Copy The display shows NUMBER OF COPIES If you want two or more copies press Start Enter and enter the number If you want to change copy rate select COPY RATE by pressing or and Start Enter You can scale the document from 75 to 150 by entering the number and this change will remain on the non volatile mem ory and affect every copy you are going to make The default copy rate i...

Page 20: ...tting such as ON or OFF 2 Press Ink repeatedly until the display shows ON and wait until the machine returns to the Standby mode The button backlights to indicate Save Ink mode is active From now on every printout will consume less ink In Save Ink mode ink consumes 30 less than in nor mal mode If you think the print quality is not good as you expected exit the Save Ink mode and print in normal mod...

Page 21: ...Automatic Dialling 2 1 Chapter 2 2AUTOMATIC DIALLING ...

Page 22: ...Enter the machine returns to Standby Mode with the old number untouched To delete old number select Y Yes press Start Enter and start over 2 Enter the number you want to store up to 46 digits If you want a pause between numbers press Redial Pause a P appears in the display If you make a mistake while entering a number use or to move the cursor under the digit then enter the correct digit 3 Press S...

Page 23: ...Standby Mode You can refer to each button s assigned number by printing Phonebook To learn how to print Phonebook see User Reports on page 6 5 To stop One Touch dialling press Stop at any time If you are making a phone call when no document is loaded pick up the handset when the other person answers When the remote fax machine answers the phone the machine scans the document into memory and begins...

Page 24: ...the number then asks if you want to delete If you select N No and press Start Enter the machine returns to Standby Mode with the old number untouched To delete old number select Y Yes press Start Enter and try with another location number 3 Enter the number you want to store up to 46 digits To insert a pause between numbers press Redial Pause a P appears in the display If you make a mis take while...

Page 25: ...h location by printing Phonebook To learn how to print Phonebook see User Reports on page 6 5 To stop Speed Dialling press Stop at any time If you are making a phone call when no document is loaded pick up the handset when the other person answers When the remote fax machine answers the phone the machine scans the document into memory and begins to transmit if a document is loaded in the document ...

Page 26: ...roup Dialling 1 Press Setup 2 Press or to select GROUP DIAL SETUP and press Start Enter 3 Press a One Touch button you want to use for Group Dial The display shows GROUP NO Txx where xx is the number of the One Touch button If the One Touch button is previously assigned to Group Dial the display indicates GROUP xx USED and DELETE Y N To keep the old one untouched select N No press Start Enter and ...

Page 27: ... you have stored the Group you can use Group Dialling for Broadcasting Save Toll and Delayed fax Follow the instructions for the desired operation When you come to a step in which the display requests the remote fax number 1 Press the One Touch button under which you stored the Group number You can use only one Group number per operation Then continue the procedure to complete the desired operatio...

Page 28: ...time you press or the number in the next memory displays Pressing allows you to search downward through the entire memory in alphabetical order from A to Z and allows you to search upward in reverse alphabetical order from Z to A Scanning is looped when you search past the last number in memory you ll start over again at the beginning While searching through the machine s memory you ll see that ea...

Page 29: ...mber iis stored If the machine cannot find a name that begins with the letter you selected the machine beeps and shows the message NOT FOUND 3 If the name appearing in the display is not the name you want press to display the next name in the list or to display the previous name Pressing allows you to search downward through the entire memory in alphabetical order from A to Z and allows you to sea...

Page 30: ...Automatic Dialling 2 10 ...

Page 31: ...The Fax Machine 3 1 Chapter 3 3THE FAX MACHINE ...

Page 32: ...ument consisting of up to 15 sheets until the Automatic Document Feeder seizes and pulls it in The display will indicate DOCUMENT READY when it senses that a document has been loaded If you are sending more than one sheet make sure the bottom sheet enters first Insert the sheets with a slight push to ensure smooth feeding To add pages while faxing place them over the top sheet If you re loading pa...

Page 33: ...ess and clarity There are three resolution modes STANDARD FINE and SUPER FINE SUPER FINE mode is not used when sending documents scanned into memory i e Broad casting and Delayed Fax STANDARD works well for printed or typewritten originals with normal sized characters FINE is good for documents containing a lot of detail SUPER FINE works well for documents containing extremely fine detail SUPER FI...

Page 34: ...that you can send the document 3 Press Start Enter when you hear the fax tone If you have set Multiple ID option to ON via User Option you will be asked CHANGE ID Y N as soon as you press Start Enter If you want to use another ID instead of default ID 1 answer Y and select the ID you want by pressing or The machine automatically scans the document into memory and begins to transmit 4 Replace the h...

Page 35: ... information on the Voice Request feature see Voice Request on page 3 14 When the last page of your document has been sent successfully the machine beeps and returns to Standby Mode If something went wrong during your transmission an error message appears in the display see LCD Error Messages on page 7 13 Press Stop to clear the message and try to send the document again You can set your machine t...

Page 36: ...ive mode expecting a fax to be received Receiving in FAX Mode TEL The automatic fax reception is turned off You can receive a fax only by manually pressing Start Enter Receiving in TEL Mode AUTO Your fax machine will answer faxes automatically after the number of rings you specify If the machine does not pick up a fax signal it will give another ringing tone to tell you it is a phone call You shou...

Page 37: ...If you want to change the Rings to Answer option see System Setup Options on page 6 8 Receiving in TEL Mode Before receiving in TEL Mode you have to set the machine to TEL Mode by pressing Rcv Mode Contrast repeatedly until TEL MODE is displayed In Standby Mode TEL appears in the right hand corner of the display 1 Pick up the handset and answer it when the telephone rings If your machine is an SF ...

Page 38: ...he display When a call comes in the answering machine answers and stores the caller s message if they leave one If the machine detects a fax signal it goes into receive mode If you have set your machine to TAM Mode and your answering machine is switched off or the answering machine is not connected to your fax machine the machine will automatically go into receive mode after several rings If your ...

Page 39: ...ou will need to delete the messages that you have already listened to in order to make more memory available When you get a call the machine answers the call with the TAM greeting message The machine records the caller s message If a fax tone is sensed the machine goes into receive mode Anytime the greeting message is playing or an incoming message is being recorded you can talk to the other perso...

Page 40: ...tart Enter DRPD Mode On Start Enter Once you have activated DRPD mode it can be one of the receiving modes which can be selectable by press ing the Rcv Mode button as FAX TEL and AUTO 3 Press Rcv Mode repeatedly until DRPD MODE apeears in the display Now the machine will manage the fax and call as pro grammed In Standby Mode DRPD appears in the right hand corner of the display If you turn DRPD Mod...

Page 41: ...hen you hear a fax tone Your fax machine detects the code and starts to receive the document The code is preset at the factory The first and the last asterisks are fixed but you can change the middle digit to whatever you prefer 0 through 9 For more informa tion see System Setup Options on page 6 8 3 Hang up the phone if your fax machine starts to receive Cancelling Reception Press Stop to cancel ...

Page 42: ...ARD by pressing or 3 Enter the fax number through the Number Keypad The display will show START TIME 4 Press Start Enter and enter the time to start When entering date and time the format should be the same as when you first set up machine s date format To learn about date format see Time Date Setup on page 1 9 If you enter wrong time the machine will beep and asks for the time again 5 Press Start...

Page 43: ...PRINT FORWARD prints a fax and forwards it to your new location 3 Press Start Enter after selecting FORWARD or PRINT FORWARD by pressing or 4 Enter the fax number through the Number Keypad The display will show START TIME 5 Press Start Enter and enter the time to start When entering date and time the format should be the same as when you first set up machine s date format To learn about date forma...

Page 44: ...s up and returns to Standby Mode If the remote fax machine doesn t have the Voice Request feature you cannot make a Voice Request You can cancel a Voice Request by pressing OHD V Req again while you are sending or receiving a document 2 Pick up the handset and answer it when the phone rings 3 Hang up the phone when you re finished Answering a Voice Request Remote party can also make a Voice Reques...

Page 45: ...ephone This chapter is only for SF 3200T users If your machine is SF 3200 please refer to the User s Guide supplied by the answering machine manufacturer All the instructions in this chapter assume that your fax machine is set to TAM Mode 490 The SF 3200T uses electronic memory as a recording medium Recording time is dependent on the content of the message The total recording time TAM OGM ICM is a...

Page 46: ...to record a message of less than 15 seconds in duration to prevent the fax receive from malfunctioning due to a long message Press Stop or OGM if you want to stop recording before the time is up After the message has been recorded the machine briefly displays the date and time when the message was recorded Then it displays the elapsed time as the message plays back automatically Checking Your TAM ...

Page 47: ... the TAM Options To learn how to set this feature on or off see TAM Options SF 3200T only on page 6 10 1 When the call monitor option is on and an incoming message is being recorded you hear the caller s voice through the speaker 2 Lift the handset to speak to the caller The machine stops recording the caller s message and you can speak directly to the caller If there s a power failure while recor...

Page 48: ...which was being recorded will be lost from memory This is why you should erase old messages To Erase All Recorded Messages 1 Press Erase The display asks if you want to erase ALL messages 2 Press Start Enter if you re sure All messages in memory are erased while displaying ERASING If you do not want to erase all messages press Stop when asked and the machine returns to Standby Mode To Erase a Sele...

Page 49: ...s 50s 01 03 01 is the number of the caller message currently being played and 03 is the total number of caller messages in memory 50s is the play back time for the message currently playing This time counts down as the message plays back During message playback you can adjust the speaker volume by pressing and Playing Back All Messages 1 Press and hold Play until you hear a beep All the messages a...

Page 50: ... you want to be notified whenever there s new message left on your machine you need to use the Message Forwarding feature supplied with your machine In TAM Mode you can set your machine to transfer incoming calls to another number In order to use the Message Forwarding feature you must set the Message Forwarding option to ON See Setting the Message Forwarding on page 4 7 Message Forwarding operate...

Page 51: ...u have to set the Message Forwarding on and enter the number where the machine to dial To activate Message Forwarding 1 Press Fax MSG Forward until the display shows MSG 2 Press Start Enter 3 Press Fax MSG Forward until the display shows ON and press Start Enter 4 Enter the telephone number where the machine to dial Now the machine will dial the designated place whenever a new incoming message is ...

Page 52: ...ne to tone dialling If you can switch it to tone after you dial the fax number but before you enter any Remote Password or Remote Command 2 Enter your Remote Password when the machine answers with the greeting When the correct password is recognized by the machine you will hear two short beeps the confirma tion tone If the machine doesn t immediately respond to a remote password try to enter the c...

Page 53: ... back new messages The machine beeps and plays all new messages If there are no new messages the machine beeps four times and waits for another command to be entered 6 Skips a message forward The machine skips the current message and plays the next one 7 Erases the message currently playing and plays back the next message 8 Turns TAM Mode on off The machine plays the greeting message when TAM Mode...

Page 54: ...The Answering Machine 4 10 ...

Page 55: ...s chapter you will learn how to use the advanced fax features of your machine For example how to send the same documents to many different locations Broadcasting or how to set up your machine to send faxes at a preset time Save Toll and Delayed Fax ...

Page 56: ... correct number appears in the display If you have more destinations select Y Yes and press Start Enter when asked ANOTHER Y N and repeat steps from 4 If you have finished entering all the numbers answer N No and press Start Enter 6 Enter the name if you want to name the transmission If not skip this step 7 Press Start Enter The document will be scanned into memory before transmission If the scann...

Page 57: ...r than the current time the doc ument s will be sent at that time on the following day 5 Press Start Enter when the time appears correctly in the display Activating Save Toll Once you ve set up Save Toll Time you are ready to use Save Toll Your machine can hold only one Save Toll job at one time which can include many destinations in it 1 Turn the document face down and feed it into the loading sl...

Page 58: ...our fax machine will display MEMORY FULL and ask CANCEL JOB Y N If you select Y and press Start Enter the scanned pages will be deleted from memory You should then divide your pages into several transmissions or send them directly from the feeder not from the memory If you select N and press Start Enter only the scanned pages will be sent You should send the remaining pages later when the memory i...

Page 59: ...AYED FAX by pressing or 3 Press Start Enter 4 Enter the number of the remote machine You can use any Auto Dial key such as One Touch Group Dial or two digit Speed Dial location number or enter the number through the number keypad If you are using Group Dial it should be primarily used 5 Press Start Enter when the number appears in the display If you have more destinations select Y Yes and press St...

Page 60: ...cument This is useful when a person who has a document to be sent is leaving the office The person who wants to receive the document at a later time places a call to the machine holding the original and requests that the document be sent In other words it requests the machine holding the original Setting Send Polling You can programme your fax machine to send documents in your absence when it is r...

Page 61: ...nd Polling state 2 Press Advanced FAX when you hear a fax tone from the remote machine The display shows RECEIVE POLLING 3 Press Start Enter Your machine starts to retrieve the document To Cancel the Scheduled Job All scheduled jobs remain in memory after they have been set Cancel unnecessary scheduled jobs to make more memory available 1 Press Advanced FAX and select CANCEL SCHEDULE by pressing o...

Page 62: ...Advanced Fax 5 8 ...

Page 63: ...Special Features 6 1 Chapter 6 6SPECIAL FEATURES ...

Page 64: ... number by pressing or Memory can hold ten unique numbers 3 Press Start Enter to start dialling The number is dialled automatically If a document is loaded the machine automatically begins to send 4 Pick up the handset when the person answers To Insert a Pause With some private telephone systems you must dial an access code 9 for example and listen for a second dial tone before dialling an outside...

Page 65: ...ould disconnect the line If you get a call and you want to transfer it to someone else press Recall and dial the number of that other person This may not work with some phone systems Refer to your telephone s instruction manual for more information The recall is of Time break type 1 Press Recall when you are on the telephone 2 Enter the phone number to transfer it to someone else In UK you may hav...

Page 66: ...mber is not advised However you can store your ID number for example in one memory location and the rest of the information such as your card number in another memory location Dial the phone number of the special service first Then when the service answers dial the rest of the information such as a long distance number We call this procedure Chain Dialling 1 Lift the handset and place a call to th...

Page 67: ...n and reception activities They can be printed on command or if the machine is set to do so System Setup Options on page 6 8 They will automatically print after every 40 transmissions or receptions Phonebook This report shows all of the numbers currently stored in the fax machine s memory as One Touch Dial Speed Dial and Group Dial Sending Confirm This report shows the fax number the number of pag...

Page 68: ...if you ve listened to it or not Multi Communication This report prints automatically if you have faxed documents to more than one location by using Broadcasting Call Back Message This report is printed automatically when you do not respond to a remote operator s Voice Request Power Fail Report If experience a power failure this report is printed automatically when power is restored to notify you t...

Page 69: ...r TAM SETUP SF 3200T only by pressing or The System Setup includes settings related to fax operation and TAM Setup has settings related to answering machine operations 3 Press Start Enter to enter specified Setup mode 4 Scroll up or down by pressing or to select the option you want to change 5 Press Start Enter when the option you want appears in the display 6 Press or to choose the desired status...

Page 70: ...ch shows the image of the first page with the various information PAPER SIZE Select the paper size you will use for fax receive print and copying Choose LETTER for letter A4 for A4 size or LEGAL to use legal size paper AUTO REDUCTION When receiving a document as long as or longer than the paper loaded the machine can reduce the data to fit your paper If the fax machine cannot fit the data into one...

Page 71: ...u will need another telephone line at your location or someone available to dial your FAX number from outside Choose SET to setup the Ring Pattern Detection The LCD displays WAITING RING Call your fax number from another telephone It is not necessary to place the call from a fax machine When your machine begins to ring do not answer the call The machine requires several rings to learn the pattern ...

Page 72: ...ed OFF you will not be asked when sending a fax BEHIND PABX If your machine is connected to the line from PABX Private Automatic Branch eXchange you need to enable this option by selecting ON Choose ON to turn the feature on Choose OFF to turn the feature off DIALLING MODE Sets the dialling mode to match the type of service you have If you have touch tone service select TONE If you have pulse serv...

Page 73: ...e middle numbers Enter the characters you want to use BATTERY ALARM You can turn on the Battery Alarm feature With this feature on the machine displays a low or no battery message in the LCD and sounds beeps to alert you of the low or no battery condition Choose ON to turn on the Battery Alarm feature Choose OFF to turn off the Battery Alarm feature SILENCE CHECK In TAM mode the machine decides th...

Page 74: ...ss Start Enter The display shows the type of volume you can choose There are two volume types you can choose ALARM VOLUME and KEY VOLUME 4 Scroll through the options by pressing or 5 Press Start Enter when the volume type you want appears 6 Select ON or OFF by pressing or Select ON to turn on sound or OFF to turn it off 7 Press Start Enter to confirm ...

Page 75: ...ant to delete by pressing or The types of information you can clear are FAX NUMBER NAME deletes your system ID DEFAULT SETUP restores user selectable options to factory default value DIAL SCHEDULE clears the One Touch Speed Dial or Group Dial numbers stored in memory In addition all the Scheduled Jobs are also cancelled JOURNAL clears all records of transmissions and receptions 5 Press Start Enter...

Page 76: ...Special Features 6 14 ...

Page 77: ...Care and Maintenance 7 1 Chapter 7 7CARE AND MAINTENANCE ...

Page 78: ...ower off to clean the scanner documents stored in memory will be lost 1 Open the Control Panel 2 Disassemble the White Roller At the right hand end of the White Roller there is a bushing that is secured with a small white tab Push the tab slightly inward then rotate towards you Then pull up the right hand part to take it out 3 Wipe the roller surface with a soft cloth dampened with water 4 Clean t...

Page 79: ...lass with a soft dry cloth If the glass is very dirty first wipe it with a slightly dampened cloth then with a dry one Be careful not to scratch the glass surface 6 Replace the roller in reverse order and then close the Control Panel firmly until it clicks into place ...

Page 80: ...lay shows NEW 2 Select NEW or OLD by pressing or When you put in a new cartridge you must choose NEW When you put in a used cartridge choose OLD This helps you to check the correct amount of ink you have left If you mix up several used cartridges it is not possible to check the correct amount of remaining ink Once you have put in a new cartridge use it until it is completely exhausted 3 Open the C...

Page 81: ...rmly until it clicks into place If the Cartridge moves loosely in the Carrier it has not clicked into place Repeat this step 7 Replace the Cartridge Compartment Cover and Control Panel 8 Press Start Enter The Cartridge Carrier moves to the original position and then returns to Standby mode ...

Page 82: ...AINTENANCE by pressing or 2 Press Start Enter and scroll to CLEAN HEAD by pressing or 3 Press Start Enter The test pattern is printed 4 Examine the test pattern If print quality does not improve reinstall the cartridge and repeat CLEAN HEAD If the line is still broken wipe the nozzles and contacts For more information on cleaning them see Wiping the Print Nozzles and Contacts on page 7 7 ...

Page 83: ...ier moves to the install position and the display shows NEW 2 Open the Control Panel and Cartridge Compartment Cover and remove the Cartridge 3 Gently blot and wipe the contacts and nozzles dry Use a clean cloth dampened with water only to gently clean the entire copper colored area including the nozzles and contacts To dissolve any dried ink hold the damp cloth against the nozzles for about three...

Page 84: ...e 7 8 5 Press Start Enter after selecting the cartridge type OLD or NEW by pressing or If the line is still broken clean the Cartridge Carrier contacts see Cleaning the Cartridge Carrier Contacts and Deflector on page 7 9 ...

Page 85: ...machine all data will be lost 1 Remove the Print Cartridge To learn how to remove the cartridge see Replacing the Print Cartridge on page 7 4 2 Unplug the power cord from the electrical outlet or the rear of the machine Before unplugging ensure that you have no scheduled job remaining in memory 3 Clean the Cartridge Carrier contacts and Deflector metal piece with clean and dry cloth 4 Plug in the ...

Page 86: ...ber For examples 1 8 means that ink is low and you need to replace the cartridge 8 8 means that a new cartridge is installed To view the current ink level 1 Press Setup and find MAINTENANCE by pressing or 2 Press Start Enter and scroll to INK LEVEL VIEW by pressing or 3 Press Start Enter The display shows the current ink level in fraction ...

Page 87: ... BE CAREFUL Printing quality may be unexpectedly worse if you do not use a plain WHITE paper for the adjustment 2 Press Setup and find MAINTENANCE by pressing or 3 Press Start Enter and scroll to ADJUST SHADING by pressing or 4 Press Start Enter The machine starts to scan the document to adjust Shading and it displays SHADING If there s no document loaded the display prompts you LOAD WHITE DOC wit...

Page 88: ...DO NOT unpack the cartridge until you are ready to use it 2 Store it in the same environment as the printer 3 If you have unpacked the cartridge but are not using it store it in a storage unit If you do not have a storage unit store the cartridge in an airtight plastic bag 4 DO NOT leave it exposed for an extended period 5 DO NOT refill the cartridge The warranty will not cover damage caused by us...

Page 89: ...ing as per each message Replace the print cartridge with new one Load the paper and press Start Enter There might be a jam clear the jam as described Paper Jams During Printing on page 7 16 Install a print cartridge NO ANSWER The other machine has not answered after all your attempts to redial Or the other operator does not press START NO BATTERY The backup battery is not installed or is completel...

Page 90: ...p in the display You may have hung up the handset before you pressed Start Enter Check if the machine to which you are sending can receive your fax You cannot poll another machine The fax machine you are polling may be using a Poll Code The fax you received has blank bits on it The machine sending to you may be faulty A noisy phone line can cause line errors Check your machine by making a copy Spo...

Page 91: ...ng the Print Cartridge on page 7 4 Remove and reinstall the Print Cartridge Clean the Print Cartridge See Cleaning the Printhead on page 7 6 Improperly formed or misaligned characters Clean the Print Cartridge See Cleaning the Printhead on page 7 6 Abnormal black horizontal lines Clean the Carrier Deflector inside the printer See Cleaning the Cartridge Carrier Contacts and Deflector on page 7 9 Pr...

Page 92: ...ams during transmission or copying DOCUMENT JAM appears in the display DO NOT pull the document out of the slot Doing so could harm your machine To clear document jam 1 Open the Control Panel 2 Carefully remove the jammed document 3 Close the Control Panel firmly until it clicks into place ...

Page 93: ...o could harm the fax machine If the paper is jammed in the Received Paper Output Area Remove the jammed paper by pulling it out smoothly in the direction of the arrow as shown If the paper is jammed in the Paper Feed Area 1 Remove the jammed paper as shown below 2 Reload new paper with the print side facing toward you after removing the jammed paper 3 Press Start Enter when finished ...

Page 94: ...Care and Maintenance 7 18 ...

Page 95: ...Appendix 8 1 Chapter 8 8APPENDIX ...

Page 96: ...ity range 20 to 80 RH non condensing Dimension WxDxH 382 x 273 x 192 mm Without ASF stacker 382 x 310 x 210 mm Including ASF stacker Weight 3 8 Kg including Handset Power source See Rating Label attached on the back of ASF Scan resolution 200 dpi ADF 15 sheets 0 075 0 12 mm thick ASF 100 sheets 70g m2 90g m2 ECM mode YES Sending resolution Standard 3 85 lines mm Fine 7 7 lines mm Super Fine 15 4 l...

Page 97: ...r another package of the same kind of paper DO NOT use the following types of paper with your machine Continuous form feed paper Synthetic paper Thermal paper Multi sheet forms and documents Chemically treated paper Papers with raised embossed lettering To load paper with a preferred print side If you re using xerographic paper load the paper with the preferred print side facing down If you re usi...

Page 98: ...bel voucher etc made of cloth or metal To send these documents use an office copier to make a photocopy first and then send the copy Single Sheet 2 or More Sheets Document Size Max 8 5 in W x 14 in L 216 mm x 356 mm 8 5 in W x 11 7 in L 216 mm x 297 mm Min 5 8 in W x 5 0 in L 148 mm x 128 mm Effective Scanning Width 8 26 in 210 mm Number of sheets which can be loaded at a time Up to 15 Thickness o...

Page 99: ...Appendix 8 5 Chapter 8 A Sample of ITU 4 Chart reduced to 60 5 ...

Page 100: ... amp plug sockets You need to buy a suitable plug adaptor Do not remove the moulded plug Important warning You must earth this machine The wires in the mains lead have the following colour code Green and Yellow Earth Blue Neutral Brown Live If the wires in the mains lead do not match the colours marked in your plug do the following You must connect the green and yellow wire to the pin marked by th...

Page 101: ... will work correctly in all respects with another item of Telepermitted equipment of a different make or model nor does it imply that any product is compatible with all of Telecom s network services This equipment shall not be set up to make automatic calls to the Telecom 111 Emergency Service This equipment may not provide for the effective hand over of a call to another device connected to the s...

Page 102: ...g Electronics Co Ltd representative EC Certification Certification to 1999 5 EC Radio Equipment Telecommunica tions Terminal Equipment Directive This Samsung product has been self certified by Samsung for pan European single terminal connection to the analogue public switched telephone network PSTN in accordance with Directive 1999 5 EC The product has been designed to work with the national PSTNs...

Page 103: ...it can often be easily remedied First determine if the source of interference really is your FAX machine To do this turn its power off and on while observing the equipment experiencing the interference If the interference disappears when you turn the FAX machine off the following steps can be very effective in correcting interference problems Connect the FAX machine to an AC outlet which is on a d...

Page 104: ...nity to maintain uninterrupted service Telephone Company Information US FCC IDENTIFICATION NUMBER The Ringer Equivalence Number and FCC Registration Number for this equipment may be found on the label located on the bottom or rear of the machine In some instances you may need to provide these numbers to the telephone company RINGER EQUIVALENCE NUMBER The Ringer Equivalence Number REN is a measure ...

Page 105: ... with all the equipment It is recommended that no other equipment except for a regular telephone share the line with your FAX machine If your area experiences a high incidence of lightning or power surges we recommend that you install surge protectors for both the power and the telephone lines Surge protec tors can be purchased from your dealer or telephone and electronic specialty stores When pro...

Page 106: ...Appendix 8 12 ...

Page 107: ...8 B Broadcasting 5 2 C Cartridge carrier 7 5 7 9 cleaning 7 7 contacts 7 7 7 9 deflector 7 7 7 9 ink level view 7 10 life 8 2 maintenance 7 12 nozzle 7 6 part number 8 2 print nozzle 7 7 printhead 7 6 replace 7 4 Contrast 3 3 Control panel left 1 4 right 1 5 Copy 1 12 activate a 2 up copy 1 12 ...

Page 108: ...forward SF 3200 3 12 SF 3200T 3 13 polling receive 5 7 send 5 6 reception modes 3 6 save toll 5 3 activating 5 3 cancelling 5 4 setting 5 3 scheduled job cancel 5 7 send 3 2 automatically 3 5 contrast 3 3 manually 3 4 resolution 3 3 voice Request 3 14 FAX mode 3 7 Features 1 2 Flash 6 3 G Group Dial dialling 2 7 one touch 2 6 speed location 2 6 storing 2 6 I ITU 4 chart 8 5 L Language display repo...

Page 109: ...olution standard fine super fine 3 3 S Save ink 1 2 1 14 paper 1 2 1 12 toll money 1 2 Search 2 8 directory 2 8 particular 2 9 sequentially 2 8 Setup time date 1 9 Specification acceptable documents 8 4 ADF 8 2 ASF 8 2 battery 8 2 compatibility 8 2 document size 8 2 modem speed 8 2 paper size 8 3 paper type 8 3 power consumption 8 2 power source 8 2 recording width 8 2 scan resolution 8 2 scan wid...

Page 110: ...ime 6 11 remote password 6 11 silence check 6 11 TEL mode 3 7 U User options 6 7 auto journal 6 10 auto reduction 6 8 caller ID 6 10 discard size 6 8 DRPD 6 9 ECM 6 9 language 6 8 multiple ID 6 10 paper size 6 8 receive start code 6 9 rings to answer 6 8 save toll 6 9 sending confirm 6 8 setting 6 7 User reports 6 5 call back message 6 6 help 6 5 journal 6 5 multi communication 6 6 phonebook 6 5 p...

Reviews: