
8
7
6
5
CONNECTION
3. OPTIONAL ACCESSORIES FOR INSTALLATION
Output of the adaptor should be either one of AC 24 V, 1.5 A or DC 12 V, 1.0 A. Note
that using DC 12 V may cause lower heater temperature.
•
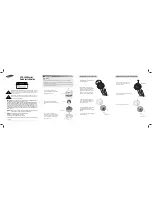
Connecting to Power
P/No. : Z6806-1320-01A
MEMO
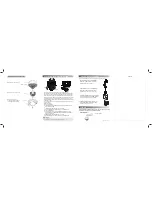
1) Adjust the lens in a desired direction.
2) Secure the inner cover to the main unit.
3) Assemble the Dome Cover.
For waterproof purpose, fix and secure
the bolt using L-wrench provided.
Case
Main Body (Camera)
Inner cover
Dome Cover
Reinstall the dome cover to the main body
1) You can adjust the camera direction only when the camera is fixed on the ceiling.
Then, turning the camera to the left or right is referred to as "Panning", while moving the camera
angle up or down is "Tilting". For panning, the panning limit is 220° for the clockwise, and 135°
for the counter-clockwise, a total of 355° enabled; further rotation is prevented by the stopper.
2. ADJUSTING THE MONITORING DIRECTION OF THE CAMERA
• Adjust the panning angle so that the camera settles in the right horizontal position. You can adjust
the panning up to 135° in each one direction, and 220° in the other direction, a total of 355°.
• Adjust the tilting angle so that the camera settles in the right vertical position. You can adjust the
tilting between 0° and 90°.
• The total rotation range is 355°. You can make adjustment in one direction up to 125°, and 230°
in the other direction.
2) Methods of adjustment
• The case of wall installation
➊
After mounting the camera on the wall, adjust the panning angle so that the camera faces a
desired direction when tilting.
➋
Adjust the Rotate position to fit the video to the screen borders.
➌
Then, adjust the tilting angle so that the camera faces the monitoring direction.
• The case of ceiling installation
➊
After mounting the camera on the ceiling, adjust the panning angle according to the
monitoring direction. You should adjust the panning angle lest that the video be displayed
upside down on the monitor.
➋
Adjust the Rotate position to fit the video to the screen borders.
➌
Then, adjust the tilting angle so that the camera faces the monitoring direction.
1) WALL MOUNT ADAPTOR(SCX-300WM)/HANGING
MOUNT(SCX-300HM) This adaptor is used when
installing the dome camera onto a wall.
For your easier installation, you can purchase appropriate optional accessories.
2) CEILING MOUNT ADAPTOR(SCX-300CM)/ HANGING
MOUNT(SCX-300HM) This adaptor is used when
installing the dome camera on a concrete ceiling.
3) POLE MOUNT ADAPTOR(SCX-300PM) This is an adaptor
for WALL MOUNT ADAPTOR (SCX-300WM) installation
on a pole whose diameter is bigger than 80mm.
4) CORNER MOUNT ADAPTOR (SCX-300KM) This is an
adaptor for WALL MOUNT ADAPTOR (SCX-300WM)
installation on the corner of wall joint.
---- Power Input Terminal
Panning
Tilting
Lens rotation
60˚ ~ 80˚
0˚
• For smoother Rotate adjustment, set the Tilt position between 60˚ ~ 80˚.
Notes


