


Getting to Know Your Camcorder
5
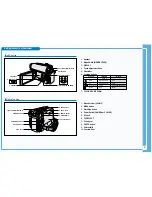
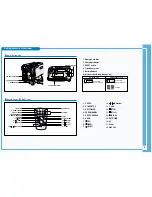
Left Side View
1. Speaker
2. Mode Switch (MEMORY/TAPE)
3. DISPLAY
4. Focus Adjustment Knob
5. Viewfinder
6. Function buttons
7. COLOR NITE/PB ZOOM
Right & Top View
1. Menu Selector (VOL/MF)
2. MENU button
3. Start/Stop button
4. Power Switch (CAMERA or PLAYER)
5. DC Jack
6. TAPE EJECT
7. Zoom Lever
8. PHOTO button
9. External MIC
10. Cassette Door
3. DISPLAY
2. Mode Switch
1. Speaker
5. Viewfinder
4. Focus Adjustment Knob
7. COLOR NITE/PB ZOOM
6. Function buttons
S.SHOW
MULTI
FADE
BLC
REC SEARCH
2. MENU button
3. Start/Stop button
4. Power Switch
1. Menu Selector (VOL/MF)
5. DC Jack
6. TAPE EJECT
7. Zoom Lever
8. PHOTO button
10. Cassette Door
9. External MIC
PLAYER
CAMERA M.Player
-
EASY.Q
-
: REW
REC SEARCH –
REV
: FF
REC
FWD
: PLAY/STILL
FADE
S.SHOW(SLIDE SHOW)
: STOP
BLC
MULTI


