background image

18

Precautions for installation and use

40 mm 

30 ~ 65 mm

55 ~ 90 mm


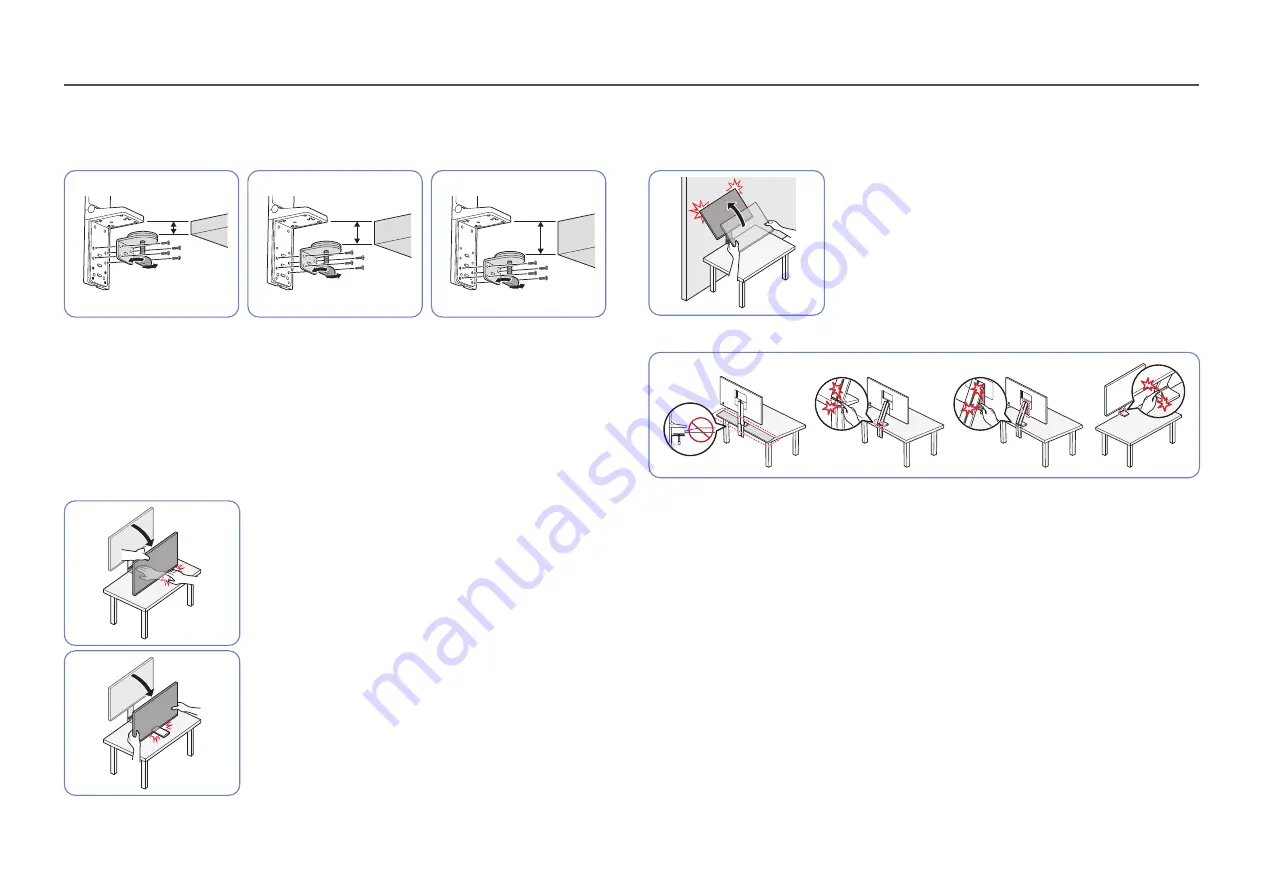
• Table thickness for installation: ≤

40 mm, 30 ~ 65 mm, 55 ~ 90 mm


To install the product on a table, make sure the table is strong enough to bear the product weight. 
Installing the product on a table made of glass or other fragile material may damage the product.


It is difficult to install the product on a table that has a raised edge. Exercise caution during 
installation.


If the table top surface is uneven or inclined, the product may not be able to stand properly.


Installing the stand may cause an imprint of the stand to form on the table.


When lowering the product close to the floor, make sure you 
hold the sides of the product. Do not lower the product with 
excessive force. There is a risk of damage to your hands.


Do not put any object under the product. There is a risk of 
damage to the object when lowering the product close to the 
floor.


If the product is set up close to a wall and you tilt the stand to 
raise it up, the product may collide with the wall and become 
damaged. Do not raise the product with excessive force.


Pay attention when children or senior users are handling the product to avoid injury.


Do not install the product on an angled part of the table.


When adjusting the product height, do not put your hand near the region where the stand is folded.


If you set the product to an incompatible resolution, screen flickering may occur. Change to a supported 
resolution by referring to the Standard Signal Mode Table.

Summary of Contents for S32R75 Q Series

Page 1: ...parts or entirety without the authorization of Samsung Electronics is prohibited Trademarks other than that of Samsung Electronics are owned by their respective owners An administration fee may be charged in the following situations a An engineer is called out at your request but it is found that the product has no defect i e where the user manual has not been read b You bring the unit to a repair...

Page 2: ... 21 Tidying Up the Connected Cables 22 2 Screen Adjustment 29 Configuring the PIP PBP Settings PIP PBP Mode 30 Screen Size 31 Position 31 Screen Ratio 31 Contrast 32 Adjusting OSD On Screen Display settings Transparency 33 Position 33 H Position 33 V Position 33 Language 33 Display Time 33 Connecting and Using a Source Device Read below before installing the product 23 Connecting and Using a PC 23...

Page 3: ...tallation 40 Upgrade by downloading the firmware from the website 40 System Requirements 40 Troubleshooting Guide Requirements Before Contacting Samsung CustomerService Centre 41 Product diagnosis Screen issue 41 Checking the Resolution and Frequency 41 Check the following 41 Q A 43 Setup and Reset Self Diagnosis 34 DisplayPort Ver 35 HDMI Mode 35 FreeSync 36 Eco Saving Plus 37 Off TimerPlus 37 PC...

Page 4: ...SER SERVICEABLE PARTS INSIDE REFER ALL SERVICING TO QUALIFIED PERSONNEL This symbol indicates that high voltage is present inside It is dangerous to make any kind of contact with any internal part of this product AC voltage Rated voltage marked with this symbol is AC voltage This symbol indicates that this product has included important literature concerning operation and maintenance DC voltage Ra...

Page 5: ...th to wipe the exterior of the product clean 5 Connect the power cord to the product when cleaning is finished 6 Power on the product and PC Electricity and Safety Warning Do not use a damaged power cord or plug or a loose power socket Do not use multiple products with a single power socket Do not touch the power plug with wet hands Insert the power plug all the way in so it is not loose Connect t...

Page 6: ...ren Edible oil such as soybean oil may damage or distort the product Keep the product away from oil pollution And do not install or use the product in the kitchen or near the kitchen stove Caution Do not drop the product while moving Do not set down the product on its front When installing the product on a cabinet or shelf make sure that the bottom edge of the front of the product is not protrudin...

Page 7: ...rm power off the product and remove the power cable Do not drop objects on the product or apply impact Do not move the product by pulling the power cord or any cable If a gas leakage is found do not touch the product or power plug Also ventilate the area immediately Do not lift or move the product by pulling the power cord or any cable Do not use or keep combustible spray or an inflammable substan...

Page 8: ...g apparatus Otherwise a fire may result Keep the AC DC adapter in a well ventilated area If you place the AC DC power adapter hanging with the cord input facing upwards water or other foreign substances could enter the Adapter and cause the Adapter to malfunction Make sure to rest the AC DC power adapter flat on a table or the floor Do not hold the product upside down or move it by holding the sta...

Page 9: ...is power status indicator and works as Power On Power button Power LED Off Power saving mode Power LED Blinking Power Off Power button Power LED On The Power LED operation can be swapped by changing in the menu System PowerLED On Actual models because of functional variation maybe haven t this function Press the power button on the JOG button to turn it on or off Function Key Guide Press the JOG b...

Page 10: ...other users from changing settings Enable Disable To enable or disable the on screen display menu lock display the Menu screen move the JOG button to the right to go to the next stage and then press and hold the button to the left for10 seconds until the Function Key Guide disappears If the on screen display menu lock is enabled Brightness and Contrast can be adjusted Eye SaverMode is available In...

Page 11: ...Button Action UP DOWN Move the option LEFT Exit the menu Function Key Guide Close Sublist without saving value Value decreases in the slider RIGHT Move to sublist Value increases in the slider PRESS ENTER Save the value and close Sublist Direct Key Guide On the Direct Key Guide screen the following menu options appearwhen the product screen is switched on or the input source is changed Eye Saver M...

Page 12: ...ending on the region Brightness This menu is not available when SAMSUNG MAGICBright is set to Dynamic Contrast mode This menu is not available when Eco Saving Plus is enabled This menu is not available when Eye SaverMode is enabled Contrast This menu is not available when SAMSUNG MAGICBright is in Cinema or Dynamic Contrast mode This menu is not available when Game Mode is enabled This menu is not...

Page 13: ...ce to improve quality Refer to the actual product DC 19V SERVICE MINI DP IN HDMI IN Port Description SERVICE Use a USB memory stick to perform software upgrade MINI DP IN MINI DPIN Connects to a PC using a MINI DP cable MINI DP IN support 2560 x 1440 144 Hz HDMI IN Connects to a source device using an HDMI cable HDMI IN support 2560 x 1440 144 Hz DC 19V DC 19V Connects to the AC DC adapter ...

Page 14: ... for approximately 5 seconds Power Off 2 When the message as shown in the following figure is displayed on the product select Yes to upgrade the software Yes No Do you want to update via USB 3 When the screen as shown in the following figure is displayed select Yes Update now Update from version XXXX X to version XXXX X Yes No 4 The software upgrading proceeds Update now Updating product Software ...

Page 15: ...digit number is the checksum For example M R7532SGAA 0800 0 D06E bin conforms to the naming conventions for the S32R75 Q model and should be copied to the root directory 4 If the No valid update files found Please check yourUSB device and try again message is displayed this is probably due to the following reasons Update now No valid update files found Please check your USB device and try again OK...

Page 16: ...facing down It is recommended that the product be tilted to an angle within the optimum range When installing the product close to a wall with excessive force exercise caution so that your hand is not caught between the product and the wall The rotation and height adjustment has a certain tolerance Stay within the tolerances when rotating or adjusting the height of the product Hold the sides of th...

Page 17: ...ing the product Do not directly apply pressure on the screen Do not hold the screen when moving the product Do not hold the product upside down only by the stand Hold the lower corners or edges of the product when moving it ...

Page 18: ...r make sure you hold the sides of the product Do not lower the product with excessive force There is a risk of damage to your hands Do not put any object under the product There is a risk of damage to the object when lowering the product close to the floor If the product is set up close to a wall and you tilt the stand to raise it up the product may collide with the wall and become damaged Do not ...

Page 19: ... before installing the stand on the table It is difficult to tidy up cables if the gap between the table and the partition is narrow For details on how to tidy up cables refer to Tidying Up the Connected Cables 15 mm 75 mm 95 mm Table with a raised edge The stand can be installed if a 90 mm space is available between the spot 15 mm away from one end of the table and the other end or if the distanc...

Page 20: ... product screen 1 3 4 Make sure the product front faces down as shown in the figure Attach and fix the stand to the rear of the product by using the screws Attach the Cover Clean Back Stand Assembling the coverwith excessive force may damage the hook After attaching the stand to the product tidy up the cables Fordetails on how to tidy up cables referto Tidying Up the Connected Cables 5 6 7 Install...

Page 21: ...a risk of damaging the product Before placing the product facing down to the table put a cushion on the table to protect the product screen 1 2 3 4 Turn the clamp on the stand installed on the table to the left to disengage the lock If you turn it to the right the lock will be engaged Remove the stand from the table by holding the stand and the bottom of the product Make sure the product front fac...

Page 22: ... as shown in the figure 2 Tidy up the connected Y cable by aligning it with the stand groove as shown in the figure Make sure the Y cable is tidied up at the left of the groove The MINI DP cable can be tidied up at the right side 3 Use the same method to tidy up other cables ...

Page 23: ... you read the user guide to acquaint yourself with the product functions precautions and other information required to use the product properly Connecting and Using a PC Select a connection method suitable foryour PC Connecting parts may differ in different products Provided ports may vary depending on the product Connection Using the HDMI Cable First make sure that the power cables for product an...

Page 24: ...card of the MINI DP source supports 2560 x 1440 144 Hz Connecting the Power 1 5 3 4 2 1 Connect the power cable of the Y cable to the DC19V port on the rear of the product 2 Connect the power cable to the AC DC adapter 3 Connect the power cable of the power adapter to the Y cable which has been tidied up 4 Next connect the power cable to the power outlet 5 Press the JOG button on the back of the p...

Page 25: ...or blink frequently then eye fatigue will be relieved Driver Installation You can set the optimum resolution and frequency for this product by installing the corresponding drivers To install the latest version of the product driver download it from the Samsung Electronics website at http www samsung com Setting Optimum Resolution An information message about setting optimum resolution will appear ...

Page 26: ...onitors suitable for enjoying video and DVD content Dynamic Contrast Obtain balanced brightness through automatic contrast adjustment In AV mode When the external input is connected through HDMI MINI DP and PC AV Mode is set to AV SAMSUNG MAGIC Bright has four automatic picture settings Dynamic Standard Movie and Custom that are preset at the factory You can activate either Dynamic Standard Movie ...

Page 27: ...mode This menu is not available when Game Mode is enabled This menu is not available when Eye SaverMode is enabled Not available when PIP PBP Mode is set to On Red Adjust the red saturation level Values closer to 100 mean greater intensity for the colour Green Adjust the green saturation level Values closer to 100 mean greater intensity for the colour Blue Adjust the blue saturation level Values c...

Page 28: ...e devices The HDMI Black Level feature is only activated at a certain AV resolution such as 720P 60 Hz and1080P 60 Hz Eye Saver Mode Set to an optimum picture quality suitable for eye relaxation TÜV Rheinland Low Blue Light Content is a certification for products which meet requirements for lower blue light levels When Eye SaverMode is On the blue light that wavelength is around 400nm will decreas...

Page 29: ...e ports provided with the product Changing the Screen Ratio is available when the following conditions are satisfied The input source is 480p 576p 720p or1080p and product can display normally Not every model can support all of these signals This can only be set when the external input is connected through HDMI MINI DP and PC AV Mode is set to AV Screen Adjustment This option is only available whe...

Page 30: ...ion is set to the optimum resolution change the resolution to 1280 x 1024 The screen may flicker briefly or appear after a delay when you enable or disable the PIP PBP function or when you change the screen size with the PIP PBP function activated This can typically arise when a PC and a product are connected to two or more input sources It has nothing to do with the performance of a product The i...

Page 31: ...input source In AV mode 4 3 Display the picture of the sub screen with an aspect ratio of 4 3 Suitable forvideos and standard broadcasts 16 9 Display the picture of the sub screen with an aspect ratio of 16 9 Screen Fit Display the picture of the sub screen with the original aspect ratio without cutting anything off The function may not be supported depending on the ports provided with the product...

Page 32: ...the picture of the sub screen with the original aspect ratio without cutting anything off The function may not be supported depending on the ports provided with the product Changing the screen size is available when the following conditions are satisfied The input source is 480p 576p 720p or1080p and product can display normally Not every model can support all of these signals This can only be set...

Page 33: ...ice to improve quality Transparency Set the transparency for the menu windows Position H Position Move the menu position to the left or right V Position Move the menu position up or down Language Set the menu language A change to the language setting will only be applied to the onscreen menu display It will not be applied to other functions on your PC Display Time The OSD menu will automatically d...

Page 34: ...osis 1 Use the Function Key Guide and go to System Self Diagnosis Self Diagnosis DisplayPort Ver HDMI Mode FreeSync Eco Saving Plus Off Timer Plus PC AV Mode System 1 2 2 0 Off Off Perform this test when you experience a problem with your monitor s picture Return 2 Select OK when the following screen is prompted OK The test screen will now be shown Please look carefully at the screen for the next ...

Page 35: ...port on your monitor Reset your monitor by pressing the jog button on the monitor and selecting System Reset All Replace the cable with the one enclosed with your monitor OK DisplayPort Ver Select the DisplayPort version to use Incorrect settings may cause the screen to go blank If this occurs check the device specifications If the product when set to DisplayPort is displaying the message Check th...

Page 36: ...ation of the output frequency from the graphics card The response rate during the game may fluctuate depending on the resolution A higher resolution generally decreases the response rate The sound quality of the monitor may be degraded If you encounter any issues when using the function contact the Samsung Service Centre If you change the screen resolution while the function is On the screen may i...

Page 37: ...rgy compared to the maximum brightness Off Timer Plus Configuring Off Timer Off Timer Turn on Off Timer mode Turn Off After The off timer can be set within a range of 1 to 23 hours The product will automatically power off after the specified number of hours This option is only available when Off Timer is set to On For products for the market in some regions the Off Timer is set to automatically ac...

Page 38: ...e HDMI DisplayPort PC or AV Source Detection Select either Auto or Manual as the method to recognise input source Not available when PIP PBP Mode is set to On Key Repeat Time Control the response rate of a button when the button is pressed Acceleration 1 sec or 2 sec can be selected If No Repeat is selected a command responds only once when a button is pressed Power LED On Configure the settings t...

Page 39: ...rove quality Information View the current input source mode frequency and resolution that are in use and the current product version Information Picture PIP PBP OnScreen Display System Information Information Exit HDMI x kHz Hz Current Version The displayed image may differ depending on the model PIP Information Picture PIP PBP OnScreen Display System Information Exit HDMI x kHz Hz DisplayPort Cur...

Page 40: ...tcut icon does not appear press the F5 key Restrictions and Problems with the Installation The Easy Setting Box installation may be affected by the Graphics Card Motherboard and the Networking Environment Upgrade by downloading the firmware from the website Visit the Samsung Electronics website at http www samsung com enter the product model and download the firmware file For details on how to upg...

Page 41: ... keeps switching on and off Check the cable connection between the product and PC and ensure the connectors are locked Blank spaces are found on all four sides of the screen when an HDMI cable is connected to the product and PC The blank spaces found on the screen have nothing to do with the product Blank spaces on the screen are caused by the PC or graphics card To resolve the problem adjust the ...

Page 42: ...within the range of resolution and frequency compatible with the product Next if required change the settings referring to Standard Signal Mode Table P 45 in this manual and the Information menu on the product The screen is too bright The screen is too dark Adjust Brightness and Contrast Screen colour is inconsistent Change the Color settings The colours on the screen have a shadow and are distort...

Page 43: ...en refresh rate under Monitorsettings How can I change the resolution Windows 7 Go to Control Panel Appearance and Personalization Display Screen Resolution Adjust Resolution Windows 8 Windows 8 1 Go to Settings Control Panel Appearance and Personalization Display Adjust Resolution and adjust the resolution Windows 10 Go to Settings System Display Advanced display settings and adjust the resolutio...

Page 44: ... C 45 C 4 F 113 F Humidity 5 95 non condensing Plug and Play This product can be installed and used with any Plug and Play compatible systems Two way data exchange between the product and PC system optimises the product settings Product installation takes place automatically However you can customise the installation settings if desired Panel Dots Pixels Due to the nature of the manufacturing of t...

Page 45: ...s card user manual DisplayPort MINI DisplayPort Resolution Horizontal Frequency kHz Vertical Frequency Hz Pixel Clock MHz Sync Polarity H V IBM 720 x 400 31 469 70 087 28 322 MAC 640 x 480 35 000 66 667 30 240 MAC 832 x 624 49 726 74 551 57 284 MAC 1152 x 870 68 681 75 062 100 000 VESA DMT 640 x 480 31 469 59 940 25 175 VESA DMT 640 x 480 37 861 72 809 31 500 VESA DMT 640 x 480 37 500 75 000 31 50...

Page 46: ...1440 150 919 99 946 410 500 VESA CVT 2560 x1440 182 996 119 998 497 750 VESA CVT 2560 x1440 222 192 144 000 586 586 HDMI Resolution Horizontal Frequency kHz Vertical Frequency Hz Pixel Clock MHz Sync Polarity H V IBM 720 x 400 31 469 70 087 28 322 MAC 640 x 480 35 000 66 667 30 240 MAC 832 x 624 49 726 74 551 57 284 MAC 1152 x 870 68 681 75 062 100 000 VESA DMT 640 x 480 31 469 59 940 25 175 VESA ...

Page 47: ...560 x1440 222 192 144 000 596 807 Horizontal Frequency The time required to scan a single line from the left to the right side of the screen is called a horizontal cycle The reciprocal number of a horizontal cycle is called horizontal frequency Horizontal frequency is measured in kHz Vertical Frequency Repeating the same picture dozens of times per second allows you to view natural pictures The re...

Page 48: ...ogramme If customer requests software installation and setup for the product If a service technician removes cleans dusts or foreign materials inside of the product If customer requests an installation additionally after purchasing a product through home shopping or online A Product damage caused by customer s fault Product damage caused by customer s mishandling orwrong repair If a product damage...

Reviews: