background image

13

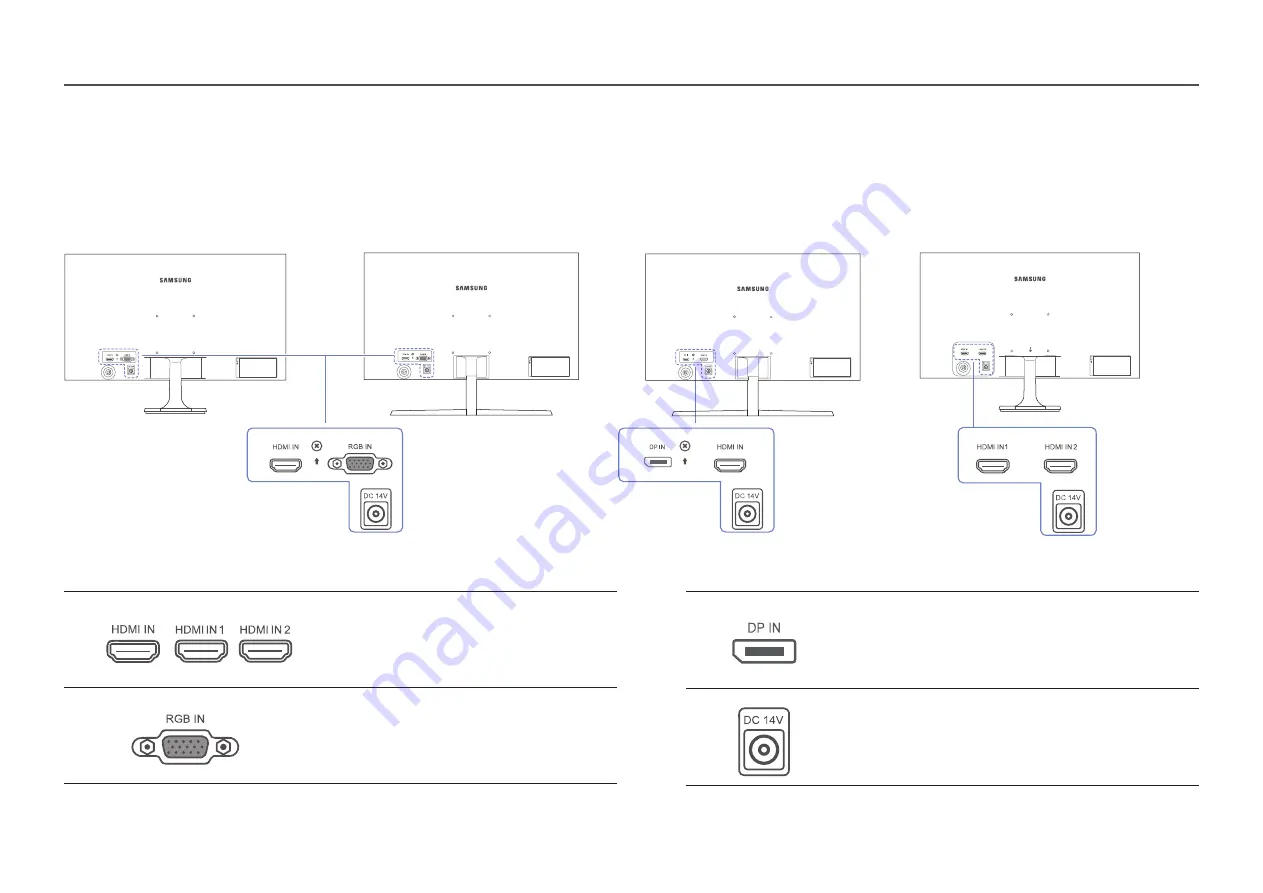
Port

Description

Connects to a source device using an HDMI cable or 
HDMI-DVI cable.

Connect to a PC using the D-SUB cable. 

Port

Description

Connects to a PC using a DP cable.

Connects to the AC/DC adapter.

Reverse Side


― The color and shape of parts may differ from what is shown. Specifications are subject to change without notice to improve quality.

S22F350FH*/S22F352FH*/S22F354FH*/S24F350FH*/
S24F352FH*/S24F354FH*/S24F359FH*/S27F350FH*/
S27F352FH*/S27F354FH*/S27F359FH*

S24F356FH*

S27F358FW*

S32F351FU*

Summary of Contents for S24F352FH

Page 1: ...d Trademarks other than that of Samsung Electronics are owned by their respective owners S22F350FH S22F352FH S22F354FH S24F350FH S24F352FH S24F354FH S24F356FH S24F359FH S27F350FH S27F352FH S27F354FH S...

Page 2: ...FH S27F359FH S32F351FU 19 Removing the Stand S22F350FH S22F352FH S22F354FH S24F350FH S24F352FH S24F354FH S24F359FH S27F350FH S27F352FH S27F354FH S27F359FH S32F351FU 20 Attaching the Stand S24F356FH S2...

Page 3: ...etection 35 Key Repeat Time 35 PowerLED On 36 Reset All 36 Information 36 Installing the Software Easy Setting Box 37 Troubleshooting Guide Requirements Before Contacting Samsung CustomerService Cente...

Page 4: ...r nearest Samsung Customer Service Center if you want to clean the inside of the product Service fee will be charged Safety Precautions Caution RISK OF ELECTRIC SHOCK DO NOT OPEN Caution TO REDUCE THE...

Page 5: ...g Do not use a damaged power cord or plug or a loose power socket Do not use multiple products with a single power socket Do not touch the power plug with wet hands Insert the power plug all the way i...

Page 6: ...roduct within the reach of young children The product may fall and injure children Edible oil such as soybean oil may damage or distort the product Keep the product away from oil pollution And do not...

Page 7: ...m power off the product and remove the power cable Do not drop objects on the product or apply impact Do not move the product by pulling the power cord or any cable If a gas leakage is found do not to...

Page 8: ...ating apparatus Otherwise a fire may result Keep the AC DC adapter in a well ventilated area If you place the AC DC power adapter so that it is hanging with the cord input facing upwards water or othe...

Page 9: ...the product The button can be used to move up down left or right or as Enter Power LED This LED is power status indicator and works as Power On Power button Off Power saving mode Blinking Power Off P...

Page 10: ...ill activate the Auto Adjustment function This function is only available in Analog mode Display Function Key Guide S32F351FU S27F358FW Brightness Features Eye Saver Mode Off Adjust Brightness Contras...

Page 11: ...itor s feature appears OSD control lock Maintain the current settings or lock the OSD control to prevent unintended changes to settings Enable Disable To lock unlock the OSD control press the LEFT but...

Page 12: ...ess settings You can adjust Brightness Contrast or Sharpness by moving the JOG button up or down if no OSD menu is displayed Brightness Contrast Sharpness 100 The displayed image may differ depending...

Page 13: ...nects to a PC using a DP cable Connects to the AC DC adapter Reverse Side The color and shape of parts may differ from what is shown Specifications are subject to change without notice to improve qual...

Page 14: ...locking method depend on the manufacturer Refer to the user guide provided with your anti theft locking device for details To lock an anti theft locking device S22F350FH S22F352FH S22F354FH S24F350FH...

Page 15: ...be installed 10 cm or farther away from the wall Be sure to use a wall mount kit that complies with the standards To install the monitor using a wall mount disconnect the stand base from the monitor...

Page 16: ...e purchase the wall mount tailored to the dimensions of 75 0 x 75 0 mm and its external dimension required by VESA shall be less than 94 0 mm Some wall mounts available in the market that have a 100 0...

Page 17: ...t to install the wall mount kit on your own To mount the product on a wall ensure you purchase a wall mount kit that can be installed 10 cm or farther away from the wall Be sure to use a wall mount ki...

Page 18: ...d for the dimensions of both 100 0 x 100 0 mm and 75 0 x 75 0 mm please ensure that its external dimensions are less than 115 0 x 115 0 mm Some wall mounts with special shapes and with their dimension...

Page 19: ...own in the figure Push the assembled stand into the main body in the direction of the arrow as shown in the figure Caution Do not hold the product upside down only by the stand 3 Caution Do not press...

Page 20: ...separate it 3 Remove the stand neck from the stand base by pulling it in the direction of the arrow as shown in the figure Caution Do not hold the product upside down only by the stand 3 Caution Do no...

Page 21: ...t is facing downwards Hold the back of the monitor as shown in the figure Push the assembled stand into the main body in the direction of the arrow as shown in the figure Caution Do not hold the produ...

Page 22: ...the bottom of the stand base to separate it 3 Remove the stand neck from the stand base by pulling it in the direction of the arrow as shown in the figure Caution Do not hold the product upside down...

Page 23: ...evice first before connecting the power cable Connecting the power cable during connection may damage the product Check the types of ports at the back of the product you want to connect Connecting and...

Page 24: ...4F350FH S24F352FH S24F354FH S24F359FH S27F350FH S27F352FH S27F354FH S27F359FH S24F356FH S27F358FW HDMI IN1 HDMI IN 2 S32F351FU Connection Using an DP Cable DP IN S27F358FW A DP cable shorter under1 5m...

Page 25: ...3 Press the JOG button on the back of the monitor to turn it on The input voltage is switched automatically Optional S24F356FH 1 S22F350FH S22F352FH S22F354FH S24F350FH S24F352FH S24F354FH S24F359FH S...

Page 26: ...ptimum resolution and frequency for this product by installing the corresponding drivers To install the latest version of the product driver download it from the Samsung Electronics website at http ww...

Page 27: ...depending on the model In PC mode Custom Customize the contrast and brightness as required Standard Obtain a picture quality suitable for editing documents or using Internet Cinema Obtain the brightne...

Page 28: ...ble when Game Mode is enabled Color Adjust the tint of the screen This menu is not available when SAMSUNG MAGICBright is set to Cinema or Dynamic Contrast mode This menu is not available when Game Mod...

Page 29: ...d SAMSUNG MAGIC Upscale SAMSUNG MAGICUpscale function can enhance the layers of the picture details and the vividness of the picture The function has more obvious effects on low resolution pictures Th...

Page 30: ...F354FH S24F356FH S24F359FH S27F350FH S27F352FH S27F354FH S27F358FW S27F359FH S32F351FU Accelerate the panel response rate to make video appear more vivid and natural It is best to set Response Time to...

Page 31: ...Fit to adjust horizontal position in 0 6 levels Configuring H Position V Position H Position Move the screen to the left or right V Position Move the screen up or down Configuring Coarse Adjust the sc...

Page 32: ...ime Configure the transparency of the menu windows On English 20 sec Return The displayed image may differ depending on the model Position Adjust the menu position Language Set the menu language A cha...

Page 33: ...use maximum screen refresh rate for optimal freesync effect The refresh rate setting method please refer to Q A How can I change the frequency When using the FreeSync function use the HDMI DP cable p...

Page 34: ...he official AMD website Select FreeSync Off if you are using a graphics card from a different manufacturer AMD Radeon R9 300 Series AMD Radeon R9 Fury X AMD Radeon R7 360 AMD Radeon R9 295X2 AMD Radeo...

Page 35: ...only available when Off Timer is set to On For products for the market in some regions the Off Timer is set to automatically activate 4 hours after the product powers on This is done in accordance wit...

Page 36: ...d on Stand by The power LED is on when the product is turned off Reset All Return all the settings for the product to the default factory settings Information View the current input source frequency a...

Page 37: ...sy Setting Box icon may not appear depending on the computer system and the product specifications If the shortcut icon does not appear press the F5 key Restrictions and Problems with the Installation...

Page 38: ...esolution may vary depending on the computer system settings and cables Check the following Installation issue PC mode The screen keeps switching on and off Check the cable connection between the prod...

Page 39: ...ust Brightness and Contrast Screen color is inconsistent Change the Color settings The colors on the screen have a shadow and are distorted Change the Color settings White does not really look white C...

Page 40: ...00 Go to Control Panel Display Settings and adjust the resolution Windows Vista Go to Control Panel Appearance and Personalization Personalize Display Settings and adjust the resolution Windows 7 Go t...

Page 41: ...ifferent countries Signal connectors D SUB HDMI HDMI Applicable only to models S32F351FU HDMI DisplayPort Applicable only to models S27F358FW Environmental conditions Operating Temperature 50 F 104 F...

Page 42: ...o the following table by referring to the graphics card user manual S22F350FH S22F352FH S22F354FH S24F350FH S24F352FH S24F354FH S24F356FH S24F359FH S27F350FH S27F352FH S27F354FH S27F358FW S27F359FH Re...

Page 43: ...106 500 VESA DMT 1600 x 900 60 000 60 000 108 000 VESA DMT 1680 x1050 65 290 59 954 146 250 VESA DMT 1920 x1080 67 500 60 000 148 500 Horizontal Frequency The time required to scan a single line from...

Page 44: ...m If customer requests software installation and setup for the product If a service technician removes cleans dusts or foreign materials inside of the product If customer requests an installation addi...

Reviews: