background image

56

PC/AV Mode

Set 

PC/AV Mode

 to 

AV

. The picture size will be enlarged.

This option is useful when you view a movie.


Wireless Charging

FreeSync

Eco Saving Plus

Off Timer

PC/AV Mode

Source Detection

Key Repeat Time

System

Set to AV to enlarge 

the picture.

Off

Off

Off

Auto

Acceleration

Return


PC/AV Mode

HDMI

DisplayPort

PC

AV

Select the PC/AV 

mode for the HDMI 

source.

Return


-

The displayed image may differ depending on the model.


This function does not support 

Analog

 mode.


Supplied for the wide models only such as 16:9 or 16:10.


If the monitor is in 

HDMI

DisplayPort 

mode and the screen says 

Check Signal Cable

 or power saving mode activates, 

press the JOG button to display the function-button screen and then select the 

 icon. You can select 

PC

 or 

AV

.

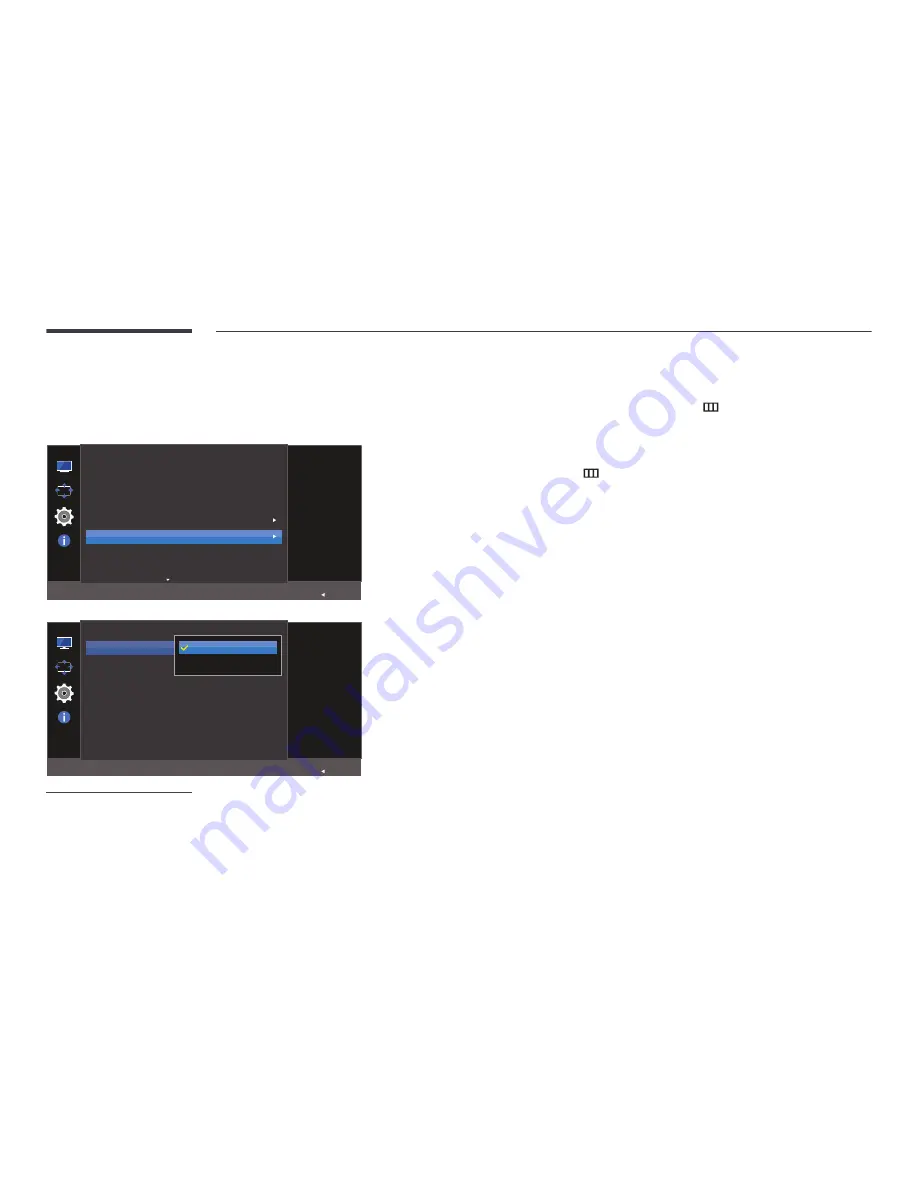
Configuring PC/AV Mode

When the Function Key Guide appears, select 

 by moving the JOG button UP. Next, press the JOG button.

Move to 

System

 controlling the JOG button UP/DOWN and press the JOG button.

Move to 

PC/AV Mode

 controlling the JOG button UP/DOWN and press the JOG button.

Move to the 

HDMI

,


DisplayPort 

controlling the JOG button UP/DOWN and press the JOG button.


Set to 

PC

 when connected to a PC.


Set to 

AV

 when connected to an AV device.

Move to the desired option controlling the JOG button UP/DOWN and press the JOG button.

The selected option will be applied.

Summary of Contents for S24E370

Page 1: ...Monitor User Manual The colour and the appearance may differ depending on the product and the specifications are subject to change without prior notice to improve the performance S24E370 S27E370 ...

Page 2: ...ion Using an HDMI DVI Cable 23 Connection Using an DP Cable 24 Connecting to Headphones 24 Connecting the Power 25 Driver Installation 26 Setting Optimum Resolution 26 Using the Wireless Charging function Wireless Charging 27 Precautions 28 Screen Setup SAMSUNG MAGIC Bright 30 Configuring SAMSUNG MAGIC Bright 30 Brightness 32 Configuring Brightness 32 Contrast 33 Configuring Contrast 33 Sharpness ...

Page 3: ...ng Source Detection 57 Key Repeat Time 58 Configuring Key Repeat Time 58 Power LED On 59 Configuring Power LED On 59 Reset All 60 Initializing Settings Reset All 60 Information Menu and Others Information 61 Displaying Information 61 Configuring Brightness Contrast and Sharpness from the Initial Screen 62 Configuring Volume in the Initial Screen 63 Volume 63 Installing the Software Easy Setting Bo...

Page 4: ...ibility for the Pay Service Cost to Customers 76 Not a product defect 76 A Product damage caused by customer s fault 76 Others 76 Correct Disposal 77 Correct Disposal of This Product Waste Electrical Electronic Equipment 77 Terminology 78 ...

Page 5: ...Use or reproduction of this manual in parts or entirety without the authorization of Samsung Electronics is prohibited Microsoft Windows are registered trademarks of Microsoft Corporation VESA DPM and DDC are registered trademarks of the Video Electronics Standards Association Ownership of all other trademarks is attributed to their due owner Before Using the Product Chapter 01 ...

Page 6: ... be charged Safety Precautions Caution RISK OF ELECTRIC SHOCK DO NOT OPEN Caution TO REDUCE THE RISK OF ELECTRIC SHOCK DO NOT REMOVE COVER OR BACK THERE ARE NO USER SERVICEABLE PARTS INSIDE REFER ALL SERVICING TO QUALIFIED PERSONNEL This symbol indicates that high voltage is present inside It is dangerous to make any kind of contact with any internal part of this product This symbol alerts you tha...

Page 7: ...roduct 4 Wet a soft and dry cloth in water and wring thoroughly to clean the exterior of the product 5 Connect the power cord to the product when cleaning is finished 6 Power on the product and computer Electricity and Safety The following images are for reference only Real life situations may differ from what is shown in the images Warning Do not use a damaged power cord or plug or a loose power ...

Page 8: ...A fire or electric shock may result Keep the power socket where the power cord is connected unobstructed The power cord must be disconnected to cut off power to the product when an issue occurs Hold the plug when disconnecting the power cord from the power socket An electric shock or fire may result Installation Warning DO NOT PLACE CANDLES INSECT REPELLANTS OR CIGARETTES ON TOP OF THE PRODUCT DO ...

Page 9: ...t in a kitchen or near a kitchen counter Caution Do not drop the product while moving Product failure or personal injury may result Do not set down the product on its front The screen may become damaged When installing the product on a cabinet or shelf make sure that the bottom edge of the front of the product is not protruding The product may fall and become damaged and or cause an injury Install...

Page 10: ...er cord Then contact Samsung Customer Service Centre Continued use can result in a fire or electric shock Do not leave heavy objects or items that children like toys sweets etc on top of the product The product or heavy objects may fall as children try to reach for the toys or sweets resulting in a serious injury During a lightning or thunderstorm power off the product and remove the power cable A...

Page 11: ...amsung Customer Service Centre Product failure an electric shock or fire may result Caution Leaving the screen fixed on a stationary image for an extended period of time may cause afterimage burn in or defective pixels Activate power saving mode or a moving picture screen saver if you will not be using the product for an extended period of time _ Disconnect the power cord from the power socket if ...

Page 12: ...es for more than 5 minutes for every 1 hour of product use Eye fatigue will be relieved Do not touch the screen when the product has been turned on for an extended period of time as it will become hot Store small accessories out of the reach of children Exercise caution when adjusting the product angle or stand height Your hand or finger may get stuck and injured Tilting the product at an excessiv...

Page 13: ...t the screen Keep your eyes directly in front of the screen Adjust the angle so light does not reflect on the screen Keep your forearms perpendicular to your upper arms and level with the back of your hands Keep your elbows at about a right angle Adjust the height of the product so you can keep your knees bent at 90 degrees or more your heels attached to the floor and your arms lower than your hea...

Page 14: ...ook different from the actual components Components Components may vary depending on the country Quick Setup Guide Warranty card Not available in some locations Regulatory guide DC power adapter Detachable P 25 Power cable P 25 D SUB cable Optional P 22 HDMI cable Optional P 23 HDMI DVI cable Optional P 23 DP cable Optional P 24 Non Slip Pad P 28 ...

Page 15: ...or as Enter Power LED This LED is power status indicator and works as Power On Power button Off Power saving mode Blinking Power Off Power button On The power Indicator operation can be swapped by changing in the menu System Power LED On Actual models because of functional variation maybe haven t this function Function Key Guide Press the JOG button when the screen is turned on The Function Key Gu...

Page 16: ...es or the input source changes Analog mode option UP Adjust Brightness Contrast Sharpness DOWN Auto Adjustment Changing the resolution in Display Properties will activate the Auto Adjustment function This function is only available in Analog mode LEFT RIGHT Adjust Volume Mute PRESS ENTER Display Function Key Guide HDMI DisplayPort mode option UP DOWN Adjust Brightness Contrast Sharpness LEFT RIGHT...

Page 17: ...OSD On Screen Display of your Monitor s feature appears OSD control lock Maintain the current settings or lock the OSD control to prevent unintended changes to settings Enable Disable To lock unlock the OSD control press the LEFT button for 10 seconds when the main menu displayed If the OSD control is locked Brightness and Contrast can be adjusted Wireless Charging is available System Power LED On...

Page 18: ...UP Source Change Down PRESS ENTER for 2 seconds Power Off When the monitor displays the Main menu the JOG Button could be used as below JOG Button Action UP DOWN Move the option LEFT Exit the Main menu Close Sublist without saving value Value decreases in the slider RIGHT Move to next depth Value increases in the slider PRESS ENTER Move to next depth Save the value and close Sublist ...

Page 19: ...e subject to change without notice to improve quality Port Description Connects to a PC using a DP cable Connects to a source device using an HDMI cable or HDMI DVI cable Connect to an audio output device such as headphones Connect to a PC using the D SUB cable Connects to the DC power adapter ...

Page 20: ...e colour and shape of parts may differ from what is shown Specifications are subject to change without notice to improve quality 1 2 20 2 You can adjust the product tilt Hold the lower part of the product and adjust the tilt carefully ...

Page 21: ...g device 1 Fix the cable of your anti theft locking device to a heavy object such as a desk 2 Put one end of the cable through the loop on the other end 3 Insert the locking device into the anti theft lock slot at the back of the product 4 Lock the locking device An anti theft locking device can be purchased separately Refer to the user guide provided with your anti theft locking device for detail...

Page 22: ...the product you want to connect Connecting and Using a PC Select a connection method suitable for your PC Connecting parts may differ in different products Connection Using the D SUB Cable Analog Type Do not connect the power cable before connecting all other cables Ensure you connect a source device first before connecting the power cable RGB IN 1 Connect the D SUB cable to the RGB IN port on the...

Page 23: ...et Provided ports may vary depending on the product Connection Using an HDMI DVI Cable Do not connect the power cable before connecting all other cables Ensure you connect a source device first before connecting the power cable HDMI IN 1 Connect the HDMI DVI cable to the HDMI IN port on the back of the product and the DVI port on the PC 2 Connect the DC power adapter to the product and a power soc...

Page 24: ... DisplayPort controlling the JOG button UP DOWN when input source is not set A DP cable shorter under 1 5m in length is recommended Using a cable longer than 1 5m can affect the picture quality Provided ports may vary depending on the product Connecting to Headphones Do not connect the power cable before connecting all other cables Ensure you connect a source device first before connecting the pow...

Page 25: ... Connect the power cable to the DC power adapter Then connect the DC power adapter to the DC14V port on the back of the product 2 Next connect the power cable to the power outlet 3 Press the JOG button on the back of the monitor to turn it on The input voltage is switched automatically ...

Page 26: ...Setting Optimum Resolution An information message about setting optimum resolution will appear if you power on the product for the first time after purchase Select a language on the product and change the resolution on your PC to the optimum setting Setup Guide The optimal resolution for this monitor is as follows x Hz Use the above settings to set the resolution on your PC Current Resolution Clos...

Page 27: ...on the mobile device position the wireless charging cover module and battery life For Qi certified devices that can be wirelessly charged go the following website http www wirelesspowerconsortium com LED indications for each status Status LED Indication Power is connected Red Green Orange Charging is in progress Red Charging is completed Green Error occurred while charging Red Green Flashes in ora...

Page 28: ...ce supports wireless charging After placing the mobile device in the correct position make sure that the device starts charging The charging progress is indicated by the LED at the bottom of the stand in addition to sound message and charging icon notifications on the device Wireless charging may not work or the mobile device may fall off if the device is not correctly positioned inside the effect...

Page 29: ...ception rate of the mobile device may decrease if you charge the device wirelessly in an area with weak signal strength Placing an object that has a magnet such as a credit card phone card bankbook and transportation ticket in the wireless charging area can damage data contained in the object Take extra care to prevent data loss An object larger than 2mm including an accessory and wireless chargin...

Page 30: ...or HDMI Black Level Set to an optimum picture quality suitable for the working environment Custom Standard Cinema Dynamic Contrast Off Return The displayed image may differ depending on the model Configuring SAMSUNG MAGIC Bright 1 When the Function Key Guide appears select by moving the JOG button UP Next press the JOG button 2 Move to Picture controlling the JOG button UP DOWN and press the JOG b...

Page 31: ...he surroundings are bright This also provides a sharp image Movie Select this mode when the surroundings are dark This will save power and reduce eye fatigue Custom Select this mode when you want to adjust the image according to your preferences 4 Move to the desired option controlling the JOG button UP DOWN and press the JOG button 5 The selected option will be applied In AV mode SAMSUNG MAGICBri...

Page 32: ...ightness Contrast Sharpness Color HDMI Black Level Adjust the brightness level Values closer to 100 mean a brighter screen Custom 100 75 60 Off Return The displayed image may differ depending on the model Configuring Brightness 1 When the Function Key Guide appears select by moving the JOG button UP Next press the JOG button 2 Move to Picture controlling the JOG button UP DOWN and press the JOG bu...

Page 33: ...Sharpness Color HDMI Black Level Adjust the contrast level Values closer to 100 mean a bigger light dark contrast Custom 100 75 60 Off Return The displayed image may differ depending on the model Configuring Contrast 1 When the Function Key Guide appears select by moving the JOG button UP Next press the JOG button 2 Move to Picture controlling the JOG button UP DOWN and press the JOG button 3 Move...

Page 34: ...icture Brightness Contrast Sharpness Color HDMI Black Level Adjust the sharpness of the picture Values closer to 100 mean a sharper image Custom 100 75 60 Off Return The displayed image may differ depending on the model Configuring Sharpness 1 When the Function Key Guide appears select by moving the JOG button UP Next press the JOG button 2 Move to Picture controlling the JOG button UP DOWN and pr...

Page 35: ...ove to Color controlling the JOG button UP DOWN and press the JOG button Red Adjust the red saturation level Values closer to 100 mean greater intensity for the colour Green Adjust the green saturation level Values closer to 100 mean greater intensity for the colour Blue Adjust the blue saturation level Values closer to 100 mean greater intensity for the colour Color Tone Select a colour tone that...

Page 36: ...ance picture detail and vividness Custom 100 75 Off Mode1 Mode2 Return The displayed image may differ depending on the model Configuring SAMSUNG MAGIC Upscale 1 When the Function Key Guide appears select by moving the JOG button UP Next press the JOG button 2 Move to Picture controlling the JOG button UP DOWN and press the JOG button 3 Move to SAMSUNG MAGICUpscale controlling the JOG button UP DOW...

Page 37: ...rn The displayed image may differ depending on the model Configuring the HDMI Black Level Settings 1 When the Function Key Guide appears select by moving the JOG button UP Next press the JOG button 2 Move to Picture controlling the JOG button UP DOWN and press the JOG button 3 Move to HDMI Black Level controlling the JOG button UP DOWN and press the JOG button Normal Select this mode when there is...

Page 38: ...et the requirements of TÜV Rheinland Low Blue Light Content standards Picture Eye Saver Mode Game Mode ResponseTime Picture Size Screen Adjustment Set to an optimum picture quality suitable for eye relaxation Wide Off On Return The displayed image may differ depending on the model Configuring Eye Saver Mode 1 When the Function Key Guide appears select by moving the JOG button UP Next press the JOG...

Page 39: ...ending on the model Configuring Game Mode 1 When the Function Key Guide appears select by moving the JOG button UP Next press the JOG button 2 Move to Picture controlling the JOG button UP DOWN and press the JOG button 3 Move to Game Mode controlling the JOG button UP DOWN and press the JOG button 4 Move to the desired option controlling the JOG button UP DOWN and press the JOG button 5 The select...

Page 40: ...cture Size Screen Adjustment Off Return The displayed image may differ depending on the model Configuring the Response Time 1 When the Function Key Guide appears select by moving the JOG button UP Next press the JOG button 2 Move to Picture controlling the JOG button UP DOWN and press the JOG button 3 Move to Response Time controlling the JOG button UP DOWN and press the JOG button Standard Faster...

Page 41: ...model Changing the Picture Size 1 When the Function Key Guide appears select by moving the JOG button UP Next press the JOG button 2 Move to Picture controlling the JOG button UP DOWN and press the JOG button 3 Move to Picture Size controlling the JOG button UP DOWN and press the JOG button In PC mode Auto Display the picture according to the aspect ratio of the input source Wide Display the pictu...

Page 42: ...atio without cutting off The function may not be supported depending on the ports provided with the product Changing the screen size is available when the following conditions are satisfied A digital output device is connected using the HDMI DP cable The input signal is 480p 576p 720p or 1080p and monitor can display normally Not every model can support all of these signals This can only be set wh...

Page 43: ...the screen up or down 50 50 2200 0 Return The displayed image may differ depending on the model Configuring H Position V Position H Position Move the screen to the left or right V Position Move the screen up or down 1 When the Function Key Guide appears select by moving the JOG button UP Next press the JOG button 2 Move to Picture controlling the JOG button UP DOWN and press the JOG button 3 Move ...

Page 44: ...rse 1 When the Function Key Guide appears select by moving the JOG button UP Next press the JOG button 2 Move to Picture controlling the JOG button UP DOWN and press the JOG button 3 Move to Screen Adjustment controlling the JOG button UP DOWN and press the JOG button 4 Move to the Coarse controlling the JOG button UP DOWN and press the JOG button 5 Adjust the Coarse controlling the JOG button LEF...

Page 45: ...model Configuring Fine 1 When the Function Key Guide appears select by moving the JOG button UP Next press the JOG button 2 Move to Picture controlling the JOG button UP DOWN and press the JOG button 3 Move to Screen Adjustment controlling the JOG button UP DOWN and press the JOG button 4 Move to the Fine controlling the JOG button UP DOWN and press the JOG button 5 Adjust the Fine controlling the...

Page 46: ...ff On 20 sec Return The displayed image may differ depending on the model Changing Transparency 1 When the Function Key Guide appears select to display the corresponding menu screen 2 Move to OnScreen Display controlling the JOG button UP DOWN and press the JOG button 3 Move to Transparency controlling the JOG button UP DOWN and press the JOG button Off On 4 Move to the desired option controlling ...

Page 47: ... menu position up or down 1 When the Function Key Guide appears select by moving the JOG button UP Next press the JOG button 2 Move to OnScreen Display controlling the JOG button UP DOWN and press the JOG button 3 Move to Position controlling the JOG button UP DOWN and press the JOG button 4 Move to the H Position or V Position controlling the JOG button UP DOWN and press the JOG button 5 Adjust t...

Page 48: ...he menu language On The displayed image may differ depending on the model Configuring Language 1 When the Function Key Guide appears select by moving the JOG button UP Next press the JOG button 2 Move to OnScreen Display controlling the JOG button UP DOWN and press the JOG button 3 Move to Language controlling the JOG button UP DOWN and press the JOG button 4 Move to the desired option controlling...

Page 49: ... it is not in use 5 sec 10 sec 20 sec 200 sec On Return The displayed image may differ depending on the model Configuring Display Time 1 When the Function Key Guide appears select to display the corresponding menu screen 2 Move to OnScreen Display controlling the JOG button UP DOWN and press the JOG button 3 Move to Display Time controlling the JOG button UP DOWN and press the JOG button 5 sec 10 ...

Page 50: ...tion Off On The displayed image may differ depending on the model Configuring Wireless Charging 1 When the Function Key Guide appears select by moving the JOG button UP Next press the JOG button 2 Move to System controlling the JOG button UP DOWN and press the JOG button 3 Move to Wireless Charging controlling the JOG button UP DOWN and press the JOG button Off On 4 Move to the desired option cont...

Page 51: ...d Engine Enable the basic FreeSync functions of the AMD graphics card Ultimate Engine Enable the FreeSync feature with a wider range of screen frame rate Screen tearing abnormal sync between the screen and content is reduced in this mode Note that screen flickering may occur during game play If the FreeSync function is enabled the screen may flicker when you play games 4 Move to the desired option...

Page 52: ...depending on the resolution A higher resolution generally decreases the response rate If the FreeSync function is enabled the screen can flicker depending on the game option settings Decreasing the game setting values might help to remove the flicker Installing the latest drivers from the AMD website may also fix this issue Point the right mouse button select the AMD Catalyst Control Center ...

Page 53: ...ring Eco Saving Plus 1 When the Function Key Guide appears select by moving the JOG button UP Next press the JOG button 2 Move to System controlling the JOG button UP DOWN and press the JOG button 3 Move to Eco Saving Plus controlling the JOG button UP DOWN and press the JOG button Off Deactivate the Eco Saving Plus function Auto The power consumption will automatically be reduced by about 10 over...

Page 54: ...e model Configuring Off Timer 1 When the Function Key Guide appears select by moving the JOG button UP Next press the JOG button 2 Move to System controlling the JOG button UP DOWN and press the JOG button 3 Move to Off Timer controlling the JOG button UP DOWN and press the JOG button Off Deactivate the off timer so that the product does not power off automatically On Activate the off timer so tha...

Page 55: ...er controlling the JOG button UP DOWN and press the JOG button 4 Move to Turn Off After controlling the JOG button UP DOWN and press the JOG button 5 Adjust the Turn Off After controlling the JOG button LEFT RIGHT 6 The selected option will be applied The off timer can be set within a range of 1 to 23 hours The product will automatically power off after the specified number of hours For products f...

Page 56: ... mode and the screen says Check Signal Cable or power saving mode activates press the JOG button to display the function button screen and then select the icon You can select PC or AV Configuring PC AV Mode 1 When the Function Key Guide appears select by moving the JOG button UP Next press the JOG button 2 Move to System controlling the JOG button UP DOWN and press the JOG button 3 Move to PC AV M...

Page 57: ... Source Detection 1 When the Function Key Guide appears select by moving the JOG button UP Next press the JOG button 2 Move to System controlling the JOG button UP DOWN and press the JOG button 3 Move to Source Detection controlling the JOG button UP DOWN and press the JOG button Auto The input source is automatically recognized Manual Manually select an input source 4 Move to the desired option c...

Page 58: ...n the model Configuring Key Repeat Time 1 When the Function Key Guide appears select by moving the JOG button UP Next press the JOG button 2 Move to System controlling the JOG button UP DOWN and press the JOG button 3 Move to Key Repeat Time controlling the JOG button UP DOWN and press the JOG button Acceleration 1 sec or 2 sec can be selected If No Repeat is selected a command responds only once ...

Page 59: ...Function Key Guide appears select by moving the JOG button UP Next press the JOG button 2 Move to System controlling the JOG button UP DOWN and press the JOG button 3 Move to Power LED On controlling the JOG button UP DOWN and press the JOG button Working The power LED is on when the product is turned on Stand by The power LED is on when the product is turned off 4 Move to the desired option contr...

Page 60: ...t Yes No The displayed image may differ depending on the model Initializing Settings Reset All 1 When the Function Key Guide appears select by moving the JOG button UP Next press the JOG button 2 Move to System controlling the JOG button UP DOWN and press the JOG button 3 Move to Reset All controlling the JOG button UP DOWN and press the JOG button 4 Move to the desired option controlling the JOG ...

Page 61: ...Hz Hz PP x Optimal Mode x Hz The displayed image may differ depending on the model Displaying Information View the current input source frequency and resolution 1 When the Function Key Guide appears select by moving the JOG button UP Next press the JOG button 2 Move to Information controlling the JOG button UP DOWN and press the JOG button The current input source frequency and resolution will app...

Page 62: ...enu is not available when Eco Saving Plus is enabled This menu is not available when Eye Saver Mode is enabled Contrast This menu is not available when SAMSUNG MAGICBright is in Cinema or Dynamic Contrast mode This menu is not available when Game Mode is enabled Sharpness This menu is not available when SAMSUNG MAGICBright is in Cinema or Dynamic Contrast mode This menu is not available when Game ...

Page 63: ...hoppy audio when applying the headphones or speakers Set the input volume for the input device to at least 20 and control the volume using the volume control JOG button LEFT RIGHT on the product What is Auto Mute The function mutes the audio to improve sound effect when there is sound noise or when the input signal is weak usually due to a problem with the volume of an input device To activate the...

Page 64: ...after the installation The Easy Setting Box icon may not appear depending on the computer system and the product specifications If the shortcut icon does not appear press the F5 key Restrictions and Problems with the Installation Easy Setting Box The Easy Setting Box installation may be affected by the Graphics Card Motherboard and the Networking Environment System Requirements OS Windows Vista 32...

Page 65: ...en though the product is properly connected to a PC perform a self diagnosis test 1 Power off both the PC and product 2 Disconnect the cables from the product 3 Power on the product 4 If the message Check Signal Cable appears the product is working normally Checking the Resolution and Frequency For a mode that exceeds the supported resolution refer to Standard Signal Mode Table the message Not Opt...

Page 66: ... screen size update the graphics card driver to the latest version Please contact the graphics card or computer manufacturer for further details about how to adjust the screen settings Screen issue Issues Solutions The power LED is off The screen will not switch on Check that the power cable is connected properly The message Check Signal Cable appears Check that the cable is properly connected to ...

Page 67: ...o dark Adjust Brightness and Contrast Screen colour is inconsistent Change the Color settings The colours on the screen have a shadow and are distorted Change the Color settings White does not really look white Change the Color settings There is no image on the screen and the power LED blinks every 0 5 to 1 second The product is operating in power saving mode Press any key on the keyboard or move ...

Page 68: ...p to the maximum level adjust the volume on your PC sound card or software Programme Video is available but there is no sound Sound cannot be heard if a HDMI DVI cable is used to connect the input device Connect the device using an HDMI cable or a DP cable Source device issue Issues Solutions A beeping sound is heard when my PC is booting If a beeping sound is heard when your PC is booting have yo...

Page 69: ...nitor settings Windows 8 Windows 8 1 Go to Settings Control Panel Appearance and Personalization Display Screen Resolution Advanced settings Monitor and adjust Refresh rate under Monitor settings How can I change the resolution Windows XP Go to Control Panel Appearance and Themes Display Settings and adjust the resolution Windows ME 2000 Go to Control Panel Display Settings and adjust the resoluti...

Page 70: ...or BIOS SETUP on the PC Windows Vista Set power saving mode in Control Panel Appearance and Personalization Personalize Screen Saver Settings or BIOS SETUP on the PC Windows 7 Set power saving mode in Control Panel Appearance and Personalization Personalize Screen Saver Settings or BIOS SETUP on the PC Windows 8 Windows 8 1 Set power saving mode in Settings Control Panel Appearance and Personaliza...

Page 71: ... 2715 mm V 0 3114 mm H x 0 3114 mm V Dimensions W x H x D Weight Without Stand 548 3 x 335 0 x 54 8 mm 3 6 kg 626 0 x 377 2 x 70 8 mm 4 7 kg With Stand 548 3 x 438 8 x 196 9 mm 4 1 kg 626 0 x 461 0 x 196 9 mm 5 2 kg Maximum Pixel Clock 148 5 MHz Power Supply AC 100 240 V 10 50 60 Hz 3 Hz Refer to the label at the back of the product as the standard voltage can vary in different countries Signal co...

Page 72: ...a exchange between the monitor and PC system optimizes the monitor settings Monitor installation takes place automatically However you can customize the installation settings if desired Panel Dots Pixels Due to the nature of the manufacturing of this product approximately 1 pixel per million 1ppm may be brighter or darker on the LCD panel This does not affect product performance The above specific...

Page 73: ...C with a power saving function PowerSaver Power Consumption Power saving mode Power off Power button Power Indicator Off Blinking On Power Consumption S24E370 Typical 30 W Max 35 W 1 4 W or lower 0 3 W or lower S27E370 Typical 33 W Max 35 W The displayed power consumption level can vary in different operating conditions or when settings are changed This product is not ENERGY STAR certified SOG Syn...

Page 74: ...following standard signal modes is transmitted from your PC the screen will automatically be adjusted If the signal transmitted from the PC does not belong to the standard signal modes the screen may be blank even though the power LED turns on In such a case change the settings according to the following table by referring to the graphics card user manual Resolution Horizontal Frequency kHz Vertic...

Page 75: ...80 x 1024 79 976 75 025 135 000 VESA 1440 x 900 55 935 59 887 106 500 VESA 1600 x 900 RB 60 000 60 000 108 000 VESA 1680 x 1050 65 290 59 954 146 250 VESA 1920 x 1080 67 500 60 000 148 500 Horizontal Frequency The time required to scan a single line from the left to the right side of the screen is called a horizontal cycle The reciprocal number of a horizontal cycle is called horizontal frequency ...

Page 76: ...mme If customer requests software installation and setup for the product If a service technician removes cleans dusts or foreign materials inside of the product If customer requests an installation additionally after purchasing a product through home shopping or online A Product damage caused by customer s fault Product damage caused by customer s mishandling or wrong repair If a product damage is...

Page 77: ...types of waste and recycle them responsibly to promote the sustainable reuse of material resources Household users should contact either the retailer where they purchased this product or their local government office for details of where and how they can take these items for environmentally safe recycling Business users should contact their supplier and check the terms and conditions of the purcha...

Page 78: ...t pitch refers to the distance between the shortest distance between dots of the same colour Dot pitch is measured in millimeters Horizontal Frequency____ Characters or images displayed on the monitor screen consist of numerous dots pixels Pixels are transmitted in horizontal lines which are then arranged vertically to create an image The horizontal frequency is measured in kHz and represents how ...

Reviews: