background image

setting up _15

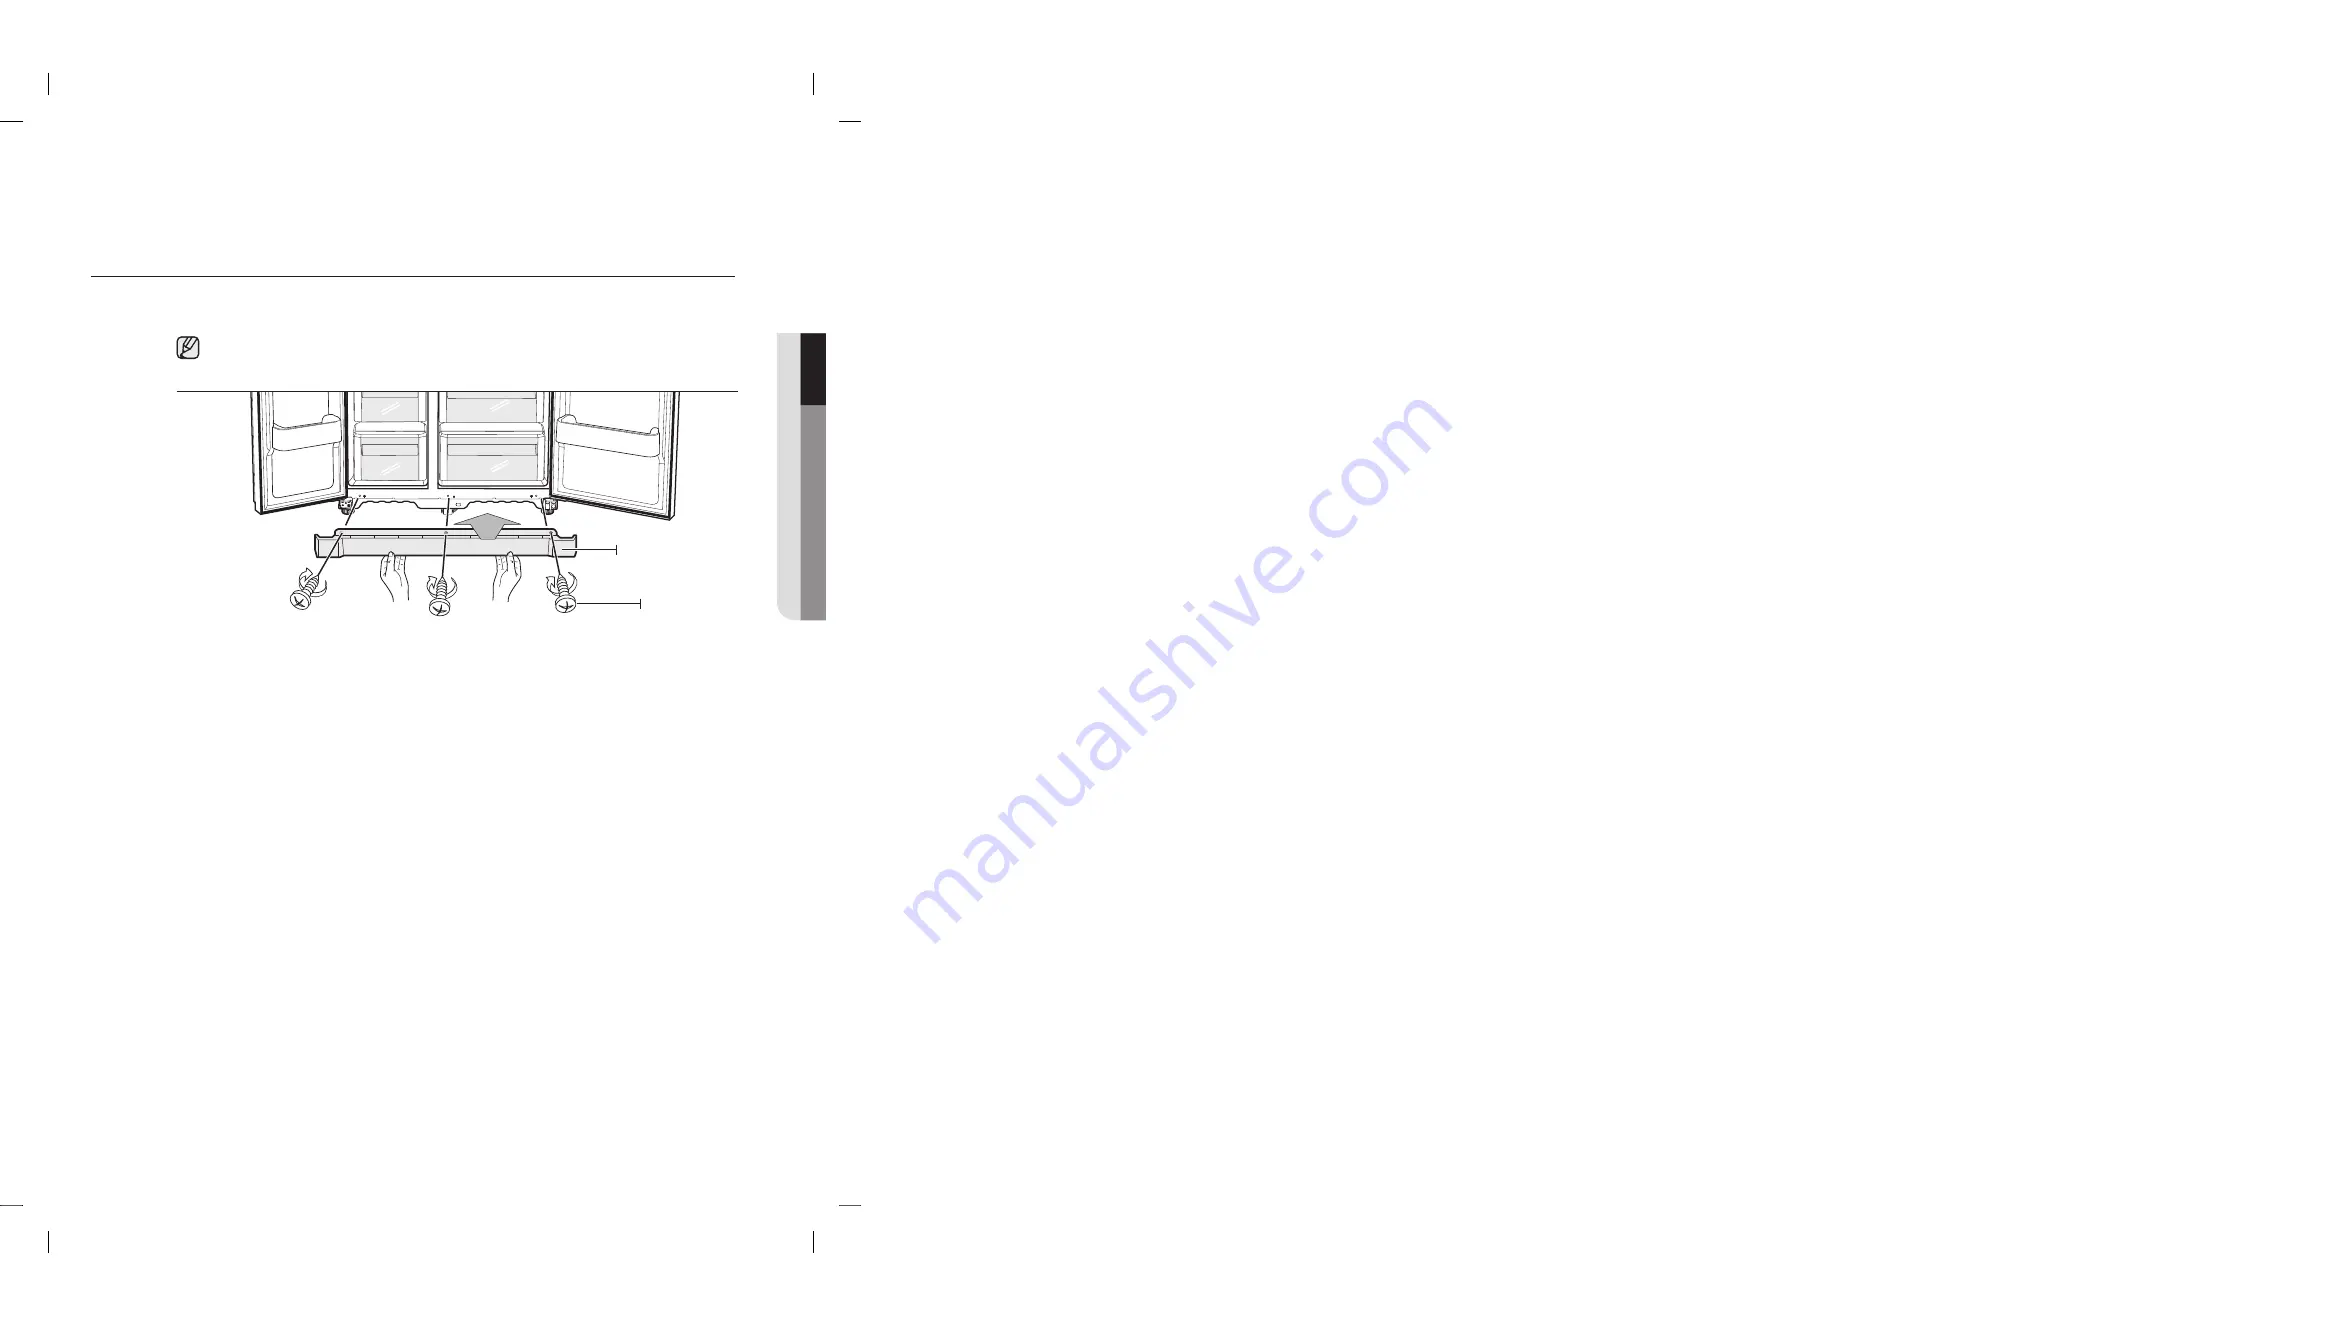
Reattaching the Front Leg Cover

Before attaching the cover, check water connector for leakage.

Replace the front leg cover by turning the three screws clockwise, as shown in the figure.

Front Leg Cover

Screw

setting up your side-by-side 

refrigerator

10

S

E

G

NI

T

T

U

P

Summary of Contents for RSA1WTVG

Page 1: ...er manual imaginethe possibilities Thank you for purchasing a Samsung product To receive a more complete service please register your product at www samsung com global register English RSA1W Free Stan...

Page 2: ...lick covered hidden hinges door s w helps Neat Stylish square frontal view TALL DISPENSER Putting clean water into fridge door Water Tank easy to drink cooling water without opening door BLACK CLEAR L...

Page 3: ...ent injury to you and others Please follow them explicitly After reading this section keep it in a safe place for future reference This refrigerator must be properly installed and located in accordanc...

Page 4: ...as a voltage rating that matched the rating plate This provides the best performance and also prevents overloading house wiring circuits which could cause a re hazard from overheated wires Never unplu...

Page 5: ...material damage CAUTION SIGNS This product is intended only for the storage of food in a domestic environment Manufacturer s recommended storage times should be adhered to Refer to relevant instructi...

Page 6: ...ee which refrigerant is used for your refrigerator When this product contains flammable gas Refrigerant R600a contact your local authority in regard to safe disposal of this product Cyclopentane is us...

Page 7: ...s designed Do not store food which goes bad easily at low temperature such as bananas melons Place the ice tray at the originally provided posistion by manufacturer in order to achieve optimal ice fre...

Page 8: ...TING THE SAMSUNG SIDE BY SIDE REFRIGERATOR 18 18 Setting up the refrigerator 19 Operating the refrigerator 20 Using the digital displa y 21 Controlling the temperature 22 Using the ice box and cold wa...

Page 9: ...Select a location with level or nearly level ooring Select a location with enough space for the refrigerator doors to open easily Allow suf cient space to install the refrigerator on a at surface If y...

Page 10: ...the refrigerator to pass easily through it you can remove the doors 1 Removing the Front Leg Cover First open both the freezer and refrigerator doors and then take off the front leg cover by turning t...

Page 11: ...remove the upper hinge cover 1 using a screwdriver and then disconnect the wires by gently pulling them apart 2 2 Remove hinge screws 3 and the ground screw 4 by turning counter clockwise and take off...

Page 12: ...cover 1 using a screwdriver 2 Remove hinge screws 2 and the ground screw 3 by turning counter clockwise and take off the upper hinge 4 Be careful that the door does not fall on you as you are removing...

Page 13: ...hole on the corner of the freezer door 4 Make sure the hinge is level between the upper hinge hole 5 and the hole of the cabinet 6 and reattach the hinge screws 7 and ground screw 8 by turning in a c...

Page 14: ...on the hinge 6 Make sure the hinge is level between the upper hinge hole 7 and the hole on the top of the cabinet 8 Then reattach hinge screws 9 and the ground screw 10 by turning it in a clock wise...

Page 15: ...g Cover Before attaching the cover check water connector for leakage Replace the front leg cover by turning the three screws clockwise as shown in the gure Front Leg Cover Screw setting up your side b...

Page 16: ...also adjustable When the Freezer door is lower than the fridge Insert a at blade screwdriver into a notch on the Leg turn it clockwise or counter clockwise to level the freezer When the Freezer door i...

Page 17: ...turning the bolt 2 clockwise or counter clockwise When you turn clockwise the door will move up Adjustment part 3 2 1 Wrench Bolt Nut 3 2 Wrench 1 0 SE G N I T T UP MAKING MINOR ADJUSTMENTS TO THE DOO...

Page 18: ...ur Samsung Electronics service center 1 Place the refrigerator in an appropriate location with reasonable clearance between the wall and the refrigerator Refer to installation instructions in this man...

Page 19: ...LED of Vacation will be on It is strongly requested to remove foods in the fresh food compartment and do not leave the door open when you select Vacation function CHILD LOCK FUNCTION By pressing the V...

Page 20: ...press the button again to cancel the Power Freeze mode When you use this function the energy consumption of the refrigerator will increase This function must be activated before putting large amount...

Page 21: ...r temperature can be set between 7 C 46 F and 1 C 34 F to suit your particular needs Press the Fridge button repeatedly until the desired temperature is shown in the temperature display The temperatur...

Page 22: ...freeze temperature get zero degre below you can use Ice Box to make ice 2 Taking out Ice Box from shelf first putting clean water water temperature not warm into it and not take too much water into t...

Page 23: ...AND BINS Freezer Fridge Ice Maker Box Door Bins Lamp Cover Front Leg Cover Lamp Cover Glass Shelves Vegetable Fruit Drawers Wine Shelf Glass Shelves Drawers Water Tank Door Bins Dairy Bin Tray Utility...

Page 24: ...ger Remember in order to prevent odor penetration to the ice stored food should be wrapped securely and as airtight as possible To get more space you can remove top freezer drawers since it does not a...

Page 25: ...sy access FRUIT VEGETABLE DRAWER Used to preserve the freshness of your stored vegetables and fruits It has been speci cally designed to control the level of humidity within the drawer DAIRY BIN Can b...

Page 26: ...ront Leg Cover by opening both the freezer and refrigerator doors and removing the three screws Once the screws are free detach the cover To reattach the front leg cover place it back in its original...

Page 27: ...by holding the bin with both hands and gently lifting it up 4 The Wine Shelf is attached to the cabinet wall Remove the wine shelf by pulling forward with both hands Before removing any accessories m...

Page 28: ...ure an even distribution of moisture to the surface The doors handles and cabinet surfaces should be cleaned with a mild detergent and then wiped dry with a soft cloth To keep your appliance looking i...

Page 29: ...erator CHANGING THE INTERIOR LIGHTS W ARNING 2 0 O E P R A G N I T Do not replace LED lamp privately and please contact the specialized repair staff if necessary And make it sure that the new LED lamp...

Page 30: ...door opening and closing feature that ensures that the doors close all the way and are securely sealed After opening beyond a certain point the door will catch and remain open When the door is ajar a...

Page 31: ...ontracting or expanding in relation to the temperature of the refrigerator interior The front corners and sides of the appliance are hot and condensation is occurring Some heat is normal as anti conde...

Page 32: ...to the environment or human health from uncontrolled waste disposal please separate these items from other types of waste and recycle them responsibly to promote the sustainable reuse of material res...

Page 33: ...MEMO...

Page 34: ...Y 01805 SAMSUNG 7267864 0 14 Min www samsung de HUNGARY 06 80 SAMSUNG 7267864 www samsung com hu ITALIA 800 SAMSUNG 7267864 www samsung com it LUXEMBOURG 261 03 710 www samsung com lu NETHERLANDS 0900...

Reviews: