background image

21

INST

ALLA

TION INSTR

UCTIONS

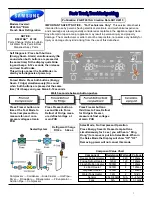
Reattaching the Freezer Door

REATTACHING THE REFRIGERATOR DOORS

1) Insert the lower hinge (

) in the bracket lower

hinge (

).

2) Reattach the freezer door by inserting the hose   

(

) in the lower side of the door into the hole in 

the lower hinge (

) and pulling the hose down.

3) Insert the upper hinge shaft (

) into the hole (

). After levelling between the upper hinge hole (

) and

the hole of the cabinet (

). reattach hinge screws (

) and ground screw (

) in a clockwise direction.

4) Connect the wires.

5) Put the front part of the upper hinge cover ( ) on

the front part of the upper hinge (   ) and reattach

from the front part of the upper hinge cover first.

11

12

DA68-01506C(0.1)EN-1  

2006.5.6 11:45 AM  

페이지21

Summary of Contents for RS265LA series

Page 1: ...TRUCTIONS 17 INSTALLATION OF THE REFRIGERATOR 17 REMOVING THE REFRIGERATOR DOORS 18 REATTACHING THE REFRIGERATOR DOORS 21 LEVELING REFRIGERATOR 24 ADJUSTING THE CLEARANCE BETWEEN THE DOORS 25 CHECKING THE WATER DISPENSER LINE 26 INSTALLING THE WATER DISPENSER LINE 27 TROUBLESHOOTING 29 CONSUMER SUPPORT 30 In the CANADA for questions about features operation performance parts accesories or service ...

Page 2: ...se electric shock or fire Pull the power plug out of the socket before chang ing the refrigerator s interior light Otherwise there is a risk of electric shock If you wish to dispose of the refrigerator throw it away by first removing the doors and seals Do so in a way that it is not possible for a child to remain trapped inside Do not store volatile or flammable substances in the refrigerator The ...

Page 3: ...n cleaning the plug Remove any foreign matter or dust from the power plug pins Otherwise there is a risk of causing a fire If the refrigerator is disconnected from the power supply you should wait for at least five minutes before plugging it back in CAUTION SIGNS Do not overfill the refrigerator with food When you open the door an item may fall out and cause personal injury or material damage Do n...

Page 4: ... Drawer RS267 RS269 User can select Quick Cool Thaw and Select buttons to quickly chill thaw and cool items Select Soft Freeze Cool or Chill to control the temperature of drawer SETTING UPTHE REFRIGERATOR Once you have performed the following steps your refrigerator should be fully operational If not check the power supply and electricity source If you have any questions contact your SAMSUNG servi...

Page 5: ... and 46 F POWER COOL BUTTON Speeds up the cooling process in the refrigerator POWER FREEZE BUTTON Speeds up the freezing process in the freezer CHILD LOCK BUTTON When this button is pressed for 3 sec the Power Freeze Power Cool Freezer Temp and Fridge Temp are locked and can not be modified The Water and Ice dispensers are not locked and can still be used To cancel this function press Child Lock b...

Page 6: ...tor is red quick replacement is strongly recommended When the water filter is replaced reset the indicator by pressing the Ice Type button and the Child Lock buttons simultaneously for 3 seconds To turn this indicator off press the Ice Type and Child Lock buttons simultane ously and hold for 5 seconds Filter Indicator Power Cool Deodorizer Freezer indicates the current freezer temperature Fridge i...

Page 7: ...freezer and refrigerator return to normal temperature WARNING If the temperature control does not reset temp unplug the refrigerator wait 9 min then plug it back in ICE and COLDWATER DISPENSER Water Dispenser The capacity of the water tank is approximately 0 3 gal Cold Water Push the water dispenser lever with a cup If you have just installed the refrigerator or installed a new water filter throw ...

Page 8: ...ers Front Leg Cover Tilt Pockets Freezer RS265 Model Egg Container Foldable Shelf RS267 RS269 Light upper Water Filter Spill proof glass Shelf Dairy Compartment Wine Shelf Gallon Door Bin Lights lower Gallon Door Bins Door Bin Top Lips CoolSelect ZoneTM Drawer for RS267 RS269 Chilled Bin for RS265 Vegetable Fruit Drawers Refrigerator RS267 RS269 Model ...

Page 9: ...tration to the ice stored food should be wrapped securely Tempered Glass Shelf Wire Shelf Can be used to store all types of frozen food Plastics Drawer Wire Drawer Can be used to store meats and dry foods Stored food should be wrapped securely using foil or other suitable wrapping materials or containers WARNING Do not put your fingers hands or any other unsuitable objects in the chute or ice make...

Page 10: ...taste of food and prolongs its freshness Use to store cheese meat poultry fish or any other foods used quickly Fruit Vegetable Drawer Upper and Lower Is used to store fruits and vegetables This drawer is airtight Optimized humidity control design helps to preserve the freshness of the stored vegetables and fruits Dairy Compartment Can be used to store butter or margarine Gallon Door Bins Can be us...

Page 11: ...ntially keeping the meat partially frozen When Thaw ends the CoolSelect ZoneTM displayreturns to chill condition When Thaw ends meats are in a half frozen state so it is easy to cut them for cooking To cancel this option press any button except Thaw The approximate thawing times of meat and fish are shown below Based on 1inch thickness Thaw Time 4 hours 6 hours 10 hours 12 hours Weight 0 8 lb 1 3 ...

Page 12: ...r longer Chill When Chill is selected the temperature of the CoolSe lect ZoneTM Drawer is kept at 30 F 1o C regardless of the set refrigerator temperature Chill temperature helps keep meat or fish fresh for longer Cool When Cool is selected the temperature will be the same as the set temperature of the refrigerator The digi tal panel shows the same temperature as that of the dis play panel When us...

Page 13: ...mble the front leg cover put it back to original position and tighten the three screws NOTE REMOVINGTHE REFRIGERATOR ACCESSORIES Spill Proof Glass Shelf Pull the shelf out as far as it will go Then lift it up and gently remove it Vegetable Fruit Drawer Remove the drawer by holding the handle pulling the drawer out and lifting it up smoothly Remove the optimized humidity control cover by pulling it...

Page 14: ...id dry do not touch ice and water dispenser Interior Clean the accessories with a mild detergent then wipe out with a dry cloth After washing the accessories make sure that they are dry before using them again Exterior Wipe the digital panel and display panel with a clean cloth The surface of doors handles and cabinet should be cleaned with a mild detergent and soft cloth then wipe off the surface...

Page 15: ...a Repeat this process once or twice a year If cartridge is dried in a confined area there may be some odor Keep children away from contaminated water CLEANINGTHE ACCESSORIES NOTE Replacement bulbs for both the freezer and refrigerator are available at retail outlets such as Lowe s Wal mart and The Home Depot Use replacement bulb size E26 maximum 40 watts NOTE Replacement bulbs for both the freezer...

Page 16: ...ght changes to red see Install the water filter section for more information If you install water filter throw away the first six glassfulls of water filter or until water flows clearly to flush impurities in the water supply system Using the dispenser without the water filter You can not use the water and ice dispenser without a water filter cartridge because the water line blocks at water supply...

Page 17: ...supply line can be damaged See Separating the water supply line from the refrigerator on the next page Dimension inch Width Capacity Cu Ft Model RS265 RS267 RS269 26 1 without Hinge Case Height with Hinge with door Depth without door 36 69 70 35 30 Checking the Dimensions of your Entrance Door Selecting the Location for the Refrigerator Allow clearance to the right left back and top when installin...

Page 18: ...lling the water tube away Open the freezer and refrigerator doors and then take off the front leg cover by turning the three screws counter clockwise a a FRONT LEG COVER SCREW Removing the Front Leg Cover Separating the Water Supply Line from the Refrigerator Do not cut the water tube Separate it from the coupler NOTE ...

Page 19: ...per hinge along the arrow Be careful when removing the door to ensure that it does not fall on you 3 Remove the door from the lower hinge by carefully lifting the door 4 Remove the lower hinge from the bracket lower hinge by lifting the lower hinge in the direction of the arrow Removing the Freezer Door Lift the door straight up Be careful not to pinch the water tubing and wire harness on the door...

Page 20: ... bracket by lifting the lower hinge 1 With the door closed remove the upper hinge cover using a screwdriver 2 Remove hinge screws and ground screw counter clockwise and take off the upper hinge in the direction of the arrow Be careful when removing the door to ensure that it does not fall on you Removing the Refrigerator Door ...

Page 21: ... door into the hole in the lower hinge and pulling the hose down 3 Insert the upper hinge shaft into the hole After levelling between the upper hinge hole and the hole of the cabinet reattach hinge screws and ground screw in a clockwise direction 4 Connect the wires 5 Put the front part of the upper hinge cover on the front part of the upper hinge and reattach from the front part of the upper hing...

Page 22: ...e lower hinge 3 Insert the upper hinge shaft into the hole After levelling between the upper hinge hole and the hole of the cabinet reattach hinge screws and ground screw in the clockwise direction 4 Connect the wires 5 Put the front part of the upper hinge cover on the front part of the upper hinge and reattach it from the front part of the upper hinge cover first 11 12 ...

Page 23: ...ace of coupler insert the water line in the coupler 2 Tighten the screw on the clamp a a Put on the front leg cover by turning the three screws clockwise as shown in the figure Reattaching the Water Supply Line Reattaching the Front Leg Cover Before attaching check water connector be sure to check for leakage NOTE ...

Page 24: ...tor Insert a flat blade screwdriver into a slot of the control lever turn it clockwise and level the refrigerator DIFFERENCE OF HEIGHT DIFFERENCE OF HEIGHT DRIVER DRIVER CONTROL LEVER CONTROL LEVER The doors will be uneven if the refrigerator is not level Make sure the refrigerator is level before adjusting its doors The front of refrigerator is adjustable NOTE Do not make small adjustments with t...

Page 25: ...bolt may be released 2 Please adjust the height difference between the doors by turning the bolt clockwise or counter clockwise When you turn clockwise the door goes up WRENCH Adjustment part NUT BOLT Adjustment part WRENCH NUT BOLT NUT BOLT WRENCH WRENCH WRENCH BOLT BOLT Please open the doors and adjust them as follows 1 Release the nut on the lower hinge until it reaches the upper end of the bol...

Page 26: ...lled initially Push the water dis penser lever until the water runs from the outlet NOTE Water line installation kit is available at extra cost from your dealer The refrigerator manufacturer recommends using a water supply kit containing copper tubing Connecting to water supply line Shut off the main water supply line and turn the Ice maker to the off position Locate the nearest cold drinking wate...

Page 27: ...er filter NOTE Keep the cap A in a safe place for recapping when you don t use the filter NOTE Connect the water line to the refrigerator Water line must be connected to drinkable water only Cut off 1 4 inch of the provided plastic tubing squarely to prevent leaks when reconnect Do not overtighten the compression nut NOTE NOTE Compression Nut 1 4 Provided Compression Fitting Provided Compression N...

Page 28: ...stalling filter Check the amount of water supplied to the ice tray 1 Lift up and pull out the ice maker bucket in the freezer ICE MAKER 1 Turn on the main water supply shut off the valve of the water supply line 2 Run water through the dispenser until the water runs clear 6 7 minutes This will clean the water supply system and clear air from the lines 3 Additional flushing may be required in some ...

Page 29: ...expanded The front corners and sides of the cabinet are hot condensation occurs Anti condensators are installed in the front corners of the refrigerator to prevent condensation Condensation can occur when you leave the door open for a long time Ice is not dispensed Did you stop the ice making function Is there any ice in the ice storage unit Is the water line connected and the shut off valve open ...

Page 30: ...MEMO ...

Page 31: ...MEMO ...

Page 32: ...RIO L5R 4B2 CANADA TEL 905 542 3535 FAX 905 542 3835 1 800 SAMSUNG 7267864 www samsung com ca To obtain service please call our toll free CAMCO CUSTOMER SERVICE number at 1 800 361 3400 If further help is needed concerning warranty contact Manager Consumer Relations Camco Inc 1 Factory Lane Moncton New Brunswick E1C 9M3 You can also contact us on our web site www geappliances ca ...

Reviews: