background image

Installation

English

36


Ins
tallation

6. 

Open the door 90 degrees. While 

holding the door, pull up and remove 
the top hinge. Be careful not to damage 
the connector wires when you remove 
the hinge.

7. 

Gently pull up the door vertically to 

remove. Do not apply excessive force 
to the door. The door may fall, causing 
physical injury.

8. 

Lay the door down on a flat surface.

9. 

Repeat steps 1-8 for the other door, 

except for step 3. There is no water tube 
on the right side door.
-  Step 2 does not apply to the models 

without the Showcase door.

Untitled-15   36

2023-05-16     3:32:41

Summary of Contents for RF59C701ES9/EU

Page 1: ...Refrigerator User manual Free Standing Appliance Untitled 15 1 2023 05 16 3 32 37...

Page 2: ...the WEEE 27 Installation 28 Refrigerator at a glance 28 Step by step installation 31 Operations 50 Main panel 50 Setting the desired temperature or function 52 Turning on or off the ice maker applica...

Page 3: ...English 3 Contents Open Source Announcement 78 Untitled 15 3 2023 05 16 3 32 37...

Page 4: ...refrigerator may differ slightly from those described in this manual and not all warning signs may be applicable If you have any questions or concerns contact your nearest service center or find help...

Page 5: ...mount of refrigerant in your particular appliance is shown on the identification plate inside the appliance Refrigerant squirting out of the pipes could ignite or cause an eye injury When refrigerant...

Page 6: ...in severe personal injury property damage and or death CAUTION Hazards or unsafe practices that may result in severe personal injury and or property damage NOTE Useful information that helps users und...

Page 7: ...tion Do not use mechanical devices or any other means to accelerate the defrosting process other than those recommended by the manufacturer Do not damage the refrigerant circuit Do not use electrical...

Page 8: ...agent or similarly qualified persons in order to avoid a hazard The socket must be easily accessible so that the appliance can be quickly disconnected from the supply in an emergency It must be outsid...

Page 9: ...lock any vents or grilles is recommended for energy efficiency Allow warm food to cool down before placing it in the appliance Put frozen food in the refrigerator to thaw You can then use the low temp...

Page 10: ...otels and other residential type environments bed and breakfast type environments catering and similar non retail applications Severe warning signs for transportation and site WARNING When transportin...

Page 11: ...warnings WARNING Do not install the refrigerator in a damp location or place where it may come in contact with water Deteriorated insulation on electrical parts may cause an electric shock or fire Do...

Page 12: ...jects or push the power cord into the space behind the appliance When moving the refrigerator be careful not to roll over or damage the power cord This may result in an electric shock or fire Never un...

Page 13: ...terials on his or her head Do not install this appliance in a humid oily or dusty location in a location exposed to direct sunlight and water rain drops Deteriorated insulation of electrical parts may...

Page 14: ...eakages can cause severe electric shock Never use gas pipes telephone lines or other potential lightning attractors as an electrical ground You must ground the refrigerator to prevent any power leakag...

Page 15: ...ailing to do so may result in an electric shock fire explosion problems with the product or injury Critical usage warnings WARNING Do not insert the power plug into a wall socket with wet hands This m...

Page 16: ...n should be supervised to ensure that they do not play with the appliance Keep fingers out of pinch point areas Clearances between the doors and cabinet are necessarily small Be careful when you open...

Page 17: ...slip Do not leave the doors of the refrigerator open while the refrigerator is unattended and do not let children enter inside the refrigerator Do not allow babies or children go inside the drawer It...

Page 18: ...o not stand on top of the appliance or place objects such as laundry lighted candles lighted cigarettes dishes chemicals metal objects etc on the appliance This may result in an electric shock fire pr...

Page 19: ...Do not attempt to repair disassemble or modify the refrigerator yourself Do not use any fuse such as cooper steel wire etc other than a standard fuse If your refrigerator needs to be repaired or rein...

Page 20: ...cells leaching out moisture and changing the integrity of the product Do not thaw meat at room temperature Safety will depend on whether the raw product was handled properly Do not place glass bottles...

Page 21: ...putting it into the refrigerator Please observe maximum storage times and expiration dates of frozen goods There is no need to disconnect the refrigerator from the power supply if you will be away fo...

Page 22: ...hould wait for at least five minutes before plugging it back in When the refrigerator got wet by water pull out the power plug and contact your Samsung Electronics service center Do not strike or appl...

Page 23: ...leaning cautions CAUTION Do not spray water directly on the inside or outside the refrigerator There is a risk of fire or electric shock Do not use a hair dryer to dry the inside of the refrigerator D...

Page 24: ...ing maintenance unplug the appliance from the wall socket Failing to do so may result in an electric shock or fire Use a clean sponge or soft cloth and a mild detergent in warm water to clean the refr...

Page 25: ...n disposing of this refrigerator remove the door door seals and door latch so that small children or animals cannot become trapped inside Children should be supervised to ensure that they do not play...

Page 26: ...become too warm in the frozen food compartment if sited for an extended period of time in a location where ambient air temperatures are constantly below the temperatures for which the appliance is des...

Page 27: ...possible harm to the environment or human health from uncontrolled waste disposal please separate these items from other types of waste and recycle them responsibly to promote the sustainable reuse o...

Page 28: ...ed by a qualified technician Dispose of the product packaging material in compliance with the local regulations To prevent electric shock unplug the power plug before servicing or replacing parts Refr...

Page 29: ...f 02 Fridge door bin A Fridge B Freezer 03 Quick Space shelf 04 Crisper Flex Crisper Drawers 05 Water tank 06 Auto ice maker Cubed Ice 07 Twist Ice maker 08 Freezer door bin 09 Freezer shelf 10 Freeze...

Page 30: ...on the vertical hinged section If you close a door forcefully the other door may open If the internal or external LED lamp is out of order contact a local Samsung service center Door bins Your refrig...

Page 31: ...sunlight Have adequate room for opening and closing the door Be away from any heat source Provide room for maintenance and servicing Have a temperature range between 10 C and 43 C Clearance See the fo...

Page 32: ...del RF59C7 01 more than 50 mm recommended 02 125 03 1488 mm 04 290 mm 05 610 mm 06 54 mm 07 1093 mm NOTE The measurements in the tables may differ slightly from the actual measurements depending on th...

Page 33: ...ace you install the refrigerator on must support a fully loaded refrigerator To protect the floor put a large piece of cardboard along the path to the refrigerator s final installation location Once t...

Page 34: ...ve the doors go to page 42 to continue the installation procedure WARNING Unplug the power cord of the refrigerator before removing the doors Tools required not provided Phillips screwdriver Flat head...

Page 35: ...one door at a time Otherwise any of the doors may fall and cause physical injury Make sure the refrigerator is off before disconnecting the connectors 3 Disconnect the water tube from the coupler on...

Page 36: ...ve the hinge 7 Gently pull up the door vertically to remove Do not apply excessive force to the door The door may fall causing physical injury 8 Lay the door down on a flat surface 9 Repeat steps 1 8...

Page 37: ...om connectors A 1 Open the freezer door 2 Use a Phillips screwdriver to remove the screw holding the cover A 3 Disconnect the wire connectors 4 Locate the hinge shaft While holding the door with one h...

Page 38: ...TION After re attaching the doors make sure all the electrical connectors are properly connected The freezer doors must be re attached before the fridge doors Be careful not to damage or step on the w...

Page 39: ...hinge Release the hinge shaft so that it enters the shaft hole 3 With the door open connect the bottom connectors in the direction of the arrows 4 Attach the cover using a Phillips screwdriver Be car...

Page 40: ...into the hole on the bottom of the door 2 Put the top hinge into position on the top of the refrigerator and then insert the hinge shaft into the top hole of the door Make sure the wires from the doo...

Page 41: ...ON To prevent water leaks make sure the red clips tighten the coupler properly Keep the clips out of children s reach 7 Repeat steps 1 5 for the other door Step 5 does not apply to the models without...

Page 42: ...e higher than the rear Level the refrigerator using the special screws levelers on the front legs Use a flat head screwdriver to turn the levelers To adjust the height of the left side Insert a flat h...

Page 43: ...lever A until the two doors are aligned at the top Turn the lever toward UP as marked to raise the right side door and turn it toward DOWN as marked to lower the door Lift the fridge door slightly to...

Page 44: ...es 1 mm 1 5 mm 2 mm and 2 5 mm 1 Check the height difference between the doors and then lift up and hold the door with the lower height A B 2 Insert a suitable sized snap ring A between the door gromm...

Page 45: ...right to adjust the height Adjusting the gap between the fridge doors and the main body of the refrigerator applicable models only You can adjust the gap between both fridge doors and the main body o...

Page 46: ...tion of the adjustment dial A 1 Open the door that is closer to the main body than the others Then turn the adjustment dial A counterclockwise until the gap becomes even with the others B 2 After adju...

Page 47: ...or the water line installation If water leaks occur contact the installer of the water line To connect the cold water pipe to the water filtering hose CAUTION Make sure the water filtering hose is con...

Page 48: ...4 If there are no leaks dispense about a 3 liters of water before actually using the refrigerator to remove impurities inside the water filtering system NOTE If you have to relocate the refrigerator a...

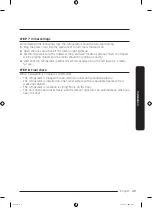
Page 49: ...the motor should be running smoothly 4 Wait until the refrigerator reaches the set temperature Now the refrigerator is ready for use STEP 8 Final check When installation is complete confirm that The r...

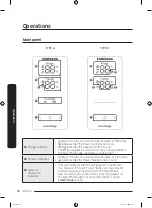
Page 50: ...s app applicable models only 02 Freezer indicator Displays the current or desired temperature of the freezer indicates that the Power Freeze function is on 03 Network connection indicator This icon in...

Page 51: ...indicator Ice Maker Off turns on To enable ice making you must turn the ice maker on 06 Buttons When the display is off tap any button to wake up the display Tap to select the desired item on the main...

Page 52: ...3 F 2 F 1 F 0 F 1 F 2 F 3 F 4 F 5 F Power Freeze speeds up the freezing process at maximum fan speed The freezer keeps running at full speed for 50 hours and then returns to the previous temperature...

Page 53: ...only You can turn on or off the auto ice maker in the freezer 1 Tap any button or to wake up the display This step may not apply to some models 2 Tap until the Ice Maker indicator blinks 3 Tap or to...

Page 54: ...g com Recommended encryption systems include WPA TKIP and WPA2 AES Any newer or non standard Wi Fi authentication protocols are not supported Wireless networks may be affected by the surrounding wirel...

Page 55: ...able devices tap Supported Devices select the device type Refrigerator and then select the specific device model Follow the instructions in the app to set up your device Once setup is complete your re...

Page 56: ...the function Alarms Abnormally high temperature This alarm is triggered when the fridge or the freezer has abnormally high temperatures Door opening This alarm is triggered if the fridge door or the f...

Page 57: ...bucket full of ice For first time use Let the ice maker make ice for 1 2 days Discard the first 1 2 buckets of ice to remove impurities in the water supply system Diagnosis The overall design and or...

Page 58: ...ontain a mix of melted and jammed ice cubes which can prevent the ice maker from working properly To prevent this make sure to empty the ice bucket before using the refrigerator Do not put fingers or...

Page 59: ...y break Make sure the ice box is in place under the ice tray The ice box has a drain hole at the bottom Do not store ice in the box in ambient temperatures The ice melts and runs out In case of a powe...

Page 60: ...a filled tank Physical injury may occur if the tank is dropped Regularly check and fill the water tank as it is the water source for the ice maker To fill the water tank For first time use clean the i...

Page 61: ...use When the refrigerator recovers power after a power failure the ice bucket may contain a mix of melted and jammed ice cubes which can prevent the ice maker from working properly To prevent this ma...

Page 62: ...r pressure required for ice making is between 206 861 kPa Noise from the ice maker as it produces ice during the ice making process is normal Fridge shelves The appearance of the shelves differs by mo...

Page 63: ...remove To reinsert insert the door bin slightly above its final location making sure that the back of the bin is against the door Hold the rear of the door bin with both hands and then press down so t...

Page 64: ...le models only Gently lift up the front of the drawer and slide out We recommend that you remove the door bins before removing the drawer This is to prevent damage to the door bins To reinsert insert...

Page 65: ...rd 2 Use a moistened soft lint free cloth or paper towel to clean the refrigerator s interior and exterior 3 When done use a dry cloth or paper towel to dry well 4 Plug in the power cord Rubber seals...

Page 66: ...o Support Support home and then enter the model name For detailed instructions on dismantling lamp s and or control gear s simply follow the replacement instruction reached as described above Door pan...

Page 67: ...ce Not enough clearance between refrigerator and nearby walls or cabinets Make sure there is a gap of at least 5 cm between the refrigerator back and sides and any nearby walls or cabinets The refrige...

Page 68: ...ood is blocking the vents Make sure no food blocks the refrigerator vents Frost on interior walls Door is not closed properly Make sure food does not block the door Clean the door gasket Condensation...

Page 69: ...eezer temperature is too high Set the freezer temperature below 18 C or 20 C in warm ambient air Ice maker is off Turn on the ice maker Ice does not dispense Ice may jam if the ice dispenser is not us...

Page 70: ...When starting or ending an operation the refrigerator may make sounds similar to a car engine igniting As the operation stabilizes the sounds will decrease Clicking or Chirping Buzzing While the fan i...

Page 71: ...ases plastic parts contract and expand creating knocking noises These noises occur during the defrosting cycle or when electronic parts are working Cracking For ice maker models When the water valve o...

Page 72: ...ablished yet In this case use the SmartThings app to connect and register your refrigerator to the access point AP of your house Could not log into the app You must log into your Samsung account to us...

Page 73: ...oduct may not operate properly at temperatures outside of the specific range You can find climate class on label inside of your refrigerator Effective temperature range The refrigerator is designed to...

Page 74: ...e Remember to turn it off when you don t need it and return the freezer to your original temperature setting How to store for best preservation applicable models only Cover foods to retain moisture an...

Page 75: ...sing its flavour or drying out place in airtight containers Refrigerator Freezer Storage Chart The freshness longevity depends on temperature and exposure to moisture Since product dates aren t a guid...

Page 76: ...sh 3 4 days 1 month Fish salad 1 day Not recommended Dried or pickled fish 3 4 weeks Fruits Product Refrigerator Freezer Apples 1 month Peaches 2 3 weeks Pineapple 1 week Other fresh fruit 3 5 days 9...

Page 77: ...available 7 Years thermostats temperature sensors printed circuit boards and light sources door handles door hinges trays baskets boxes or drawers 10 Years door gaskets The minimum duration of the gu...

Page 78: ...software included in this product contains open source software The following URL http opensource samsung com opensource SMART_TP1_0 seq 0 leads to open source license information as related to this p...

Page 79: ...Memo Untitled 15 79 2023 05 16 3 32 49...

Page 80: ...rmity may be found at http www samsung com go to Support Search Product Support and enter the model name Frequency range Transmitter power Max Wi Fi 2412 2472 MHz 20 dBm Bluetooth 2402 2480 MHz 20 dBm...

Reviews: