background image

English - 6

Basic Features

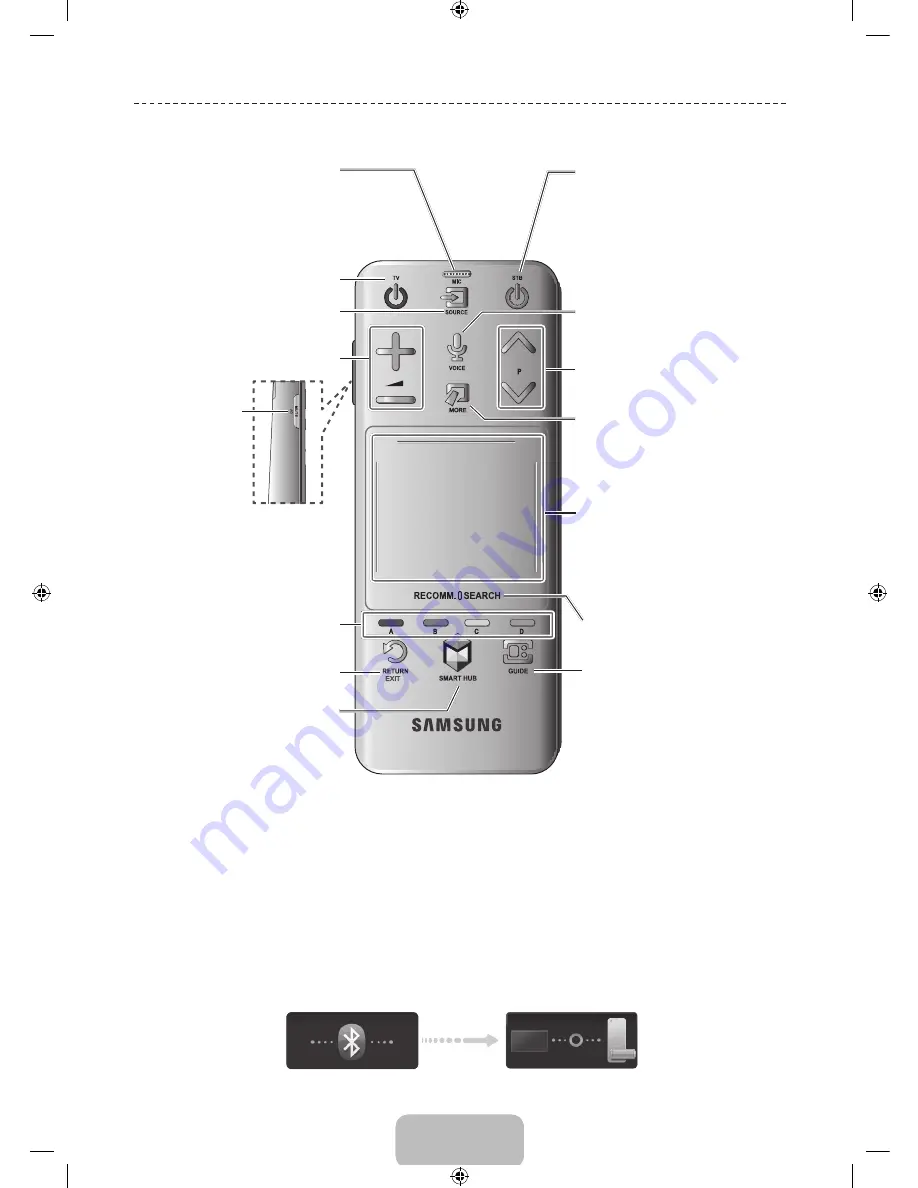
Using the Smart Touch Control

Cuts off the sound 

temporarily. Press 

and hold this button 

to select 

Audio 

Description

 and 

Subtitle

. (Depending on 

the country or region.)

Touchpad

• 

Drag on the Touchpad to move the focus 

on the screen.

• 

Press the Touchpad to run, activate, or 

select the highlighted item.

• 

Press and hold the touch pad to display 

the 

Channel List

.

VOICE

˜

: Take your voice command and 

enter a text using your voice.

You can use the MIC to give Voice 

Recognition commands. Simply press the 

VOICE

˜

 button.


Voice Recognition 

function can be 

affected by unclear pronunciation, voice 

level, or surrounding noise.

Displays a virtual remote control on the 

screen. Press and hold the 

MORE

 button to 

select a desired function (e.g. 

MENU

(

m

), 

TOOLS

(

T

), 

INFO

(

`

), etc.) easily. See the 

e-Manual chapter, 

Controlling TV

 > 

Using 

the Virtual Remote Control

.

Changes channels.

View each digital channel's programming 

schedule, including showtimes. In addition, 

sets a 

Schedule Viewing

 or 

Schedule 

Recording

 to press the touchpad on the 

programme entry scheduled to air later.

Turn on and off the satellite or cable set-top 

box connected to the TV. For this, the Smart 

Touch Control must be configured as a 

universal remote control.

Turns the TV on and off.

Displays and selects the available video 

sources.

Adjusts the volume.

Returns to the previous menu. Press and 

hold this button to exit all currently running 

applications.

Brings up Smart Hub applications. See the 

e-Manual chapter, 

SMART TV Features

 > 

Smart Hub

.


To exit an application that is running, 

press the 

 button.

The colour buttons work differently, 

depending on the function that the TV is 

currently performing.

Press and hold the 

{

 button while watching 

TV to view information about the current 

programme.

Toggles this button between 

Recommended


and 

Search

.

Connecting to the TV


We recommend to use the Smart Touch Control in less than 6m. A usable distance may differ 
depending on the wireless environmental conditions.

In order to operate the TV using a Smart Touch Control unit, you must first pair it to the TV via Bluetooth.

1. 

When the TV is off, point the Smart Touch Control at the remote control receiver of the TV and press 
the TV button for the first pairing. Only this buttons sends an IR signal. The remote control receiver's 
location may vary depending on the model.

2. 

A Bluetooth icon will appear at the bottom left of the screen as shown below. The TV will then attempt 
to connect to the Smart Touch Control unit automatically.

<Attempting to connect and completion icons>

[PF5500-XY]BN68-04884A-ENG.indb   6

2013-10-11   �� 2:41:48

Summary of Contents for PS64F5500AM

Page 1: ...w samsung com ph SINGAPORE 1800 SAMSUNG 726 7864 www samsung com sg THAILAND 0 2689 3232 1800 29 3232 www samsung com th TAIWAN 0800 32 9999 www samsung com tw VIETNAM 1 800 588 889 www samsung com GEORGIA 0 800 555 555 www samsung com ARMENIA 0 800 05 555 www samsung com AZERBAIJAN 088 55 55 555 www samsung com UZBEKISTAN 8 10 800 500 55 500 www samsung com KYRGYZSTAN 00 800 500 55 500 www samsun...

Page 2: ...voltage designation of the DC adaptor corresponds to the local electrical supply Never insert anything metallic into the open parts of this apparatus Doing so many create a danger of electric shock To avoid electric shock never touch the inside of this apparatus Only a qualified technician should open this apparatus Make sure to plug the power cord in until it is firmly inserted When removing the ...

Page 3: ...s video posts on Facebook and Twitter You can also make video calls to friends by connecting the TV to a camera sold separately Apps Download and install applications such as WebBrowser On TV Check a listing of programmes that are currently aerialing and are scheduled to aerial Photos Videos Music Play back photo video and music files from an external storage device Anynet HDMI CEC This allows you...

Page 4: ...ting a cable open the ferrite core and clip it around the cable near the plug as shown in the figure A Maximum distance between the ferrite core and the end of the cord inserted in the TV 3 4 inches Power Cord Ferrite Core The ferrite cores are used to shield the cables from interference When connecting a cable open the ferrite core and clip it around the cable near the plug as shown in the figure...

Page 5: ...etween Video Sources 16 Viewing the e Manual 16 Scrolling a Page 16 Using the Top Icons 16 Searching Pages 17 Jumping to a Menu Item 17 Updating the e Manual Network Configuration 18 Connecting to a Network 18 Network Connection Wireless 19 Network Connection Wired 3D Basics 20 3D Active Glasses 20 Pairing 3D Active Glasses 22 Watching 3D Video Troubleshooting and Other Information 23 What is Remo...

Page 6: ...d as a universal remote control Turns the TV on and off Displays and selects the available video sources Adjusts the volume Returns to the previous menu Press and hold this button to exit all currently running applications Brings up Smart Hub applications See the e Manual chapter SMART TV Features Smart Hub To exit an application that is running press the button The colour buttons work differently...

Page 7: ... and blanks low while using the Smart Touch Control the following alarm window blinks and appears at the bottom left of the screen If the alarm window pops up replace the batteries of the Smart Touch Control Use alkaline batteries for longer usage Low battery alarm window Inserting the Batteries AAA X 2 1 2 3 1 Slightly lift the battery cover using a plastic card Next pull on the cover s notch wit...

Page 8: ...ature easily accommodates both right handed and left handed users Move your finger horizontally on the projected line at the top of the touchpad You can horizontally scroll a horizontal list or the Smart Hub panel Changing Channels by Entering Numbers While watching TV tap on the protruding line on the left or right edge of the touchpad to bring up the numerical input window on the screen Use your...

Page 9: ...rom the list displayed at the bottom of the screen Select a programme that is currently airing to jump to the corresponding channel or a programme that is scheduled to air to set up a Schedule Viewing or Schedule Recording setting Select an application to launch Samsung Apps will launch if the selected application is not installed on the TV History Tap on RECOMM SEARCH and then select History from...

Page 10: ... virtual remote panel appears on the screen Press and hold the touch pad for one second Users can change a position of the virtual remote panel of the screen Using the Number Panel Use the number panel to enter numbers on a keypad screen or webpage or to change the channel while watching TV Changing the channel using the number pad leaves a record allowing you to easily return to previous channels...

Page 11: ...e Guide Displays information on the TV screen Turns the TV on and off Gives direct access to channels Adjusts the volume Opens the OSD Menu Quickly selects frequently used functions Returns to the previous menu Use these buttons according to the directions on the TV s screen Use these buttons in a specific feature Use these buttons according to the directions on the TV s screen Moves the cursor se...

Page 12: ...ding on the model Turning on the TV Turn on the TV using the P button on the remote control or TV panel The product colour and shape may vary depending on the model The TV s Controller a small joy stick like button on the rear left side of the TV lets you control the TV without the remote control m R P The image is drawn by facing the front side of the TV Function menu TV Controller Remote control...

Page 13: ...sword Change Screen Menu System Change PIN Change the TV s password 1 Run Change PIN and then enter the current password in the password field The default password is 0 0 0 0 2 Enter a new password and then enter it again to confirm it The password change is complete If you forget the PIN code press the buttons in the following sequence which resets the PIN to 0 0 0 0 For Standard Remote Control I...

Page 14: ...te that it should be no obstacle between IR Extender and external device The presence of an obstacle will interfere with the transmission of the remote control signal Add the External Device 1 Turn on the external device you wish to set up universal remote function for and then press SOURCE to bring up the Source screen 2 Select Universal remote setup from the top of the screen This initiates the ...

Page 15: ... TV s HDMI DVI port via an HDMI to DVI cable for example you can change Edit Name to DVI PC With an AV device connected to the TV s HDMI DVI port via an HDMI to DVI cable for example you can change Edit Name to DVI Devices Anynet HDMI CEC A list appears showing Anynet compatible ones of external devices connected to the TV This function is only available Anynet HDMI CEC function set to On Disconne...

Page 16: ...ad Place the focus on the or button at the right edge of the screen drag or flick up or down on the touchpad Using the Top Icons Use the Back Forward and Opened page icons on the top left of the screen to navigate through pages These icons are available when two or more pages are passed Returning to the Home Page To return to the home page press the a button or select on the top right of the scree...

Page 17: ...n select e Manual on the virtual control panel that appears on the screen This feature may not be available depending on the menu Updating the e Manual Open the Smart Hub and navigate to Apps screen and then select More Apps The e manual can be updated in the same way with an application update On the More Apps screen select Apps to update Select e Manual from the list The e Manual starts updating...

Page 18: ...currently being used by another device the result is usually interference and or a communications failure Most wireless networks have an optional security system To enable a wireless network s security system you need to create a security key using characters and numbers This security key is then needed to connect to the wireless network Network Security Protocols The TV only supports the followin...

Page 19: ...lied TV Rear Panel External Modem ADSL VDSL Cable TV The Modem Port on the Wall Modem Cable Not Supplied LAN Cable Not Supplied LAN Cable Not Supplied TV Rear Panel External Modem ADSL VDSL Cable TV IP Router that has a DHCP Server The LAN Port on the Wall LAN Cable Not Supplied TV Rear Panel The TV does not support network speeds less than or equal to 10Mbps Use Cat 7 cable for the connection PF5...

Page 20: ...Battery Cover Replacing the Battery If the red LED blinks every two seconds continually replace the battery with a new one Insert the side of the battery into the side marked with in the battery compartment To check the remaining battery capacity refer to the pairing section in this manual Pull the battery cover downward Open the battery cover Remove the battery Replace the battery Push the batter...

Page 21: ...nce 2013 If you keep trying to pair the glasses and the TV the battery level will decrease significantly However the battery level will recover to a certain degree in about a minute The working distance depends on the existence of obstacles a person metal walls etc between the glasses and the TV and the strength of the Bluetooth signal Turn off the 3D glasses while they are not in use If you leave...

Page 22: ...se to the TV Make sure that the distance between the TV and your 3D glasses is less than 19 5 feet 6m in a straight line Check the 3D function settings of your TV The LED keeps blinking The battery is dead Replace the battery Specifications Model Number SSG 5100GB Optics Shutters Liquid crystal Transmittance 36 2 Recommended operating distance 2 6m 6 5 to 19 5 ft Field Rate 120 fields second Weigh...

Page 23: ...et your TV Install recommended firmware updates How Does it Work Having a Samsung Tech remotely service your TV is really pretty simple 1 Call Samsung Contact Centre and ask for remote support 2 Open the menu on your TV and go to the Support section 3 Select Remote Management and Provide the Pin to the agent 4 The agent will then access your TV That s it PF5500 XY BN68 04884A ENG indb 23 2013 10 1...

Page 24: ...example if an external device s output is HDMI it should be connected to an HDMI input on the TV Make sure your connected devices are powered on Be sure to select the correct input source Reboot the connected device by unplugging it and then reconnecting the device s power cable The remote control does not work Replace the remote control batteries Make sure the batteries are installed with their p...

Page 25: ...ials please contact your nearest dealer If installed on a ceiling or slanted wall it may fall and result in severe personal injury NOTE Standard dimensions for wall mount kits are shown in the table below When purchasing our wall mount kit a detailed installation manual and all parts necessary for assembly are provided Do not use screws that do not comply with the VESA standard screw specification...

Page 26: ...after you remove the sticker Please clean the debris off before watching TV The exterior and screen of the product can get scratched during cleaning Be sure to wipe the exterior and screen carefully using the cloth provided or a soft cloth to prevent scratches Do not spray water directly onto the product Any liquid that goes into the product may cause a failure fire or electric shock Clean the pro...

Page 27: ...sing a stand or a wall mount we strongly recommend you use parts provided by Samsung Electronics only If you use parts provided by another manufacturer it may cause difficulties with the product or result in injury caused by the product falling Installation with a stand Installation with a wall mount 10 cm 10 cm 10 cm 10 cm 10 cm 10 cm 10 cm Other Warnings The actual appearance of the TV may diffe...

Page 28: ...Do not block the sensor with any material It can decrease picture brightness 1 Eco Sensor This power saving feature automatically adjusts the screen brightness of the TV according to the ambient light intensity detected by the Light Sensor 2 To enable or disable Eco Sensor go to System Eco Solution Eco Sensor and select On or Off 3 Precaution If you find the screen too dark while watching the TV i...

Page 29: ...nd string are not supplied please purchase these additionally 2 Remove the screws from the back centre of the TV put the screws into the clamps and then fasten the screws onto the TV again Screws may not be supplied with the product In this case please purchase the screws of the following specifications 3 Connect the clamps fixed onto the TV and the clamps fixed onto the wall with a strong cable a...

Page 30: ... 0 mm 1396 9 x 928 0 x 375 5 mm 1483 8 x 877 1 x 57 0 mm 1483 8 x 974 5 x 375 5 mm Weight Without Stand With Stand 18 5 Kg 20 3 Kg 27 5 Kg 30 1 Kg 33 0 Kg 35 6 Kg Display Resolution 1920 x 1080 1920 x 1080 Black White 1920 x 1080 Design and specifications are subject to change without prior notice For information about the power supply and more about power consumption refer to the label attached t...

Page 31: ...Watching the Plasma TV in 4 3 format for a long period of time may leave traces of borders displayed on the left right and centre of the screen caused by the difference of light emission on the screen Playing a DVD or a game console may cause similar effects to the screen Damages caused by the above effect are not covered by the Warranty After images on the Screen Displaying still images from Vide...

Reviews: