background image

English - 4

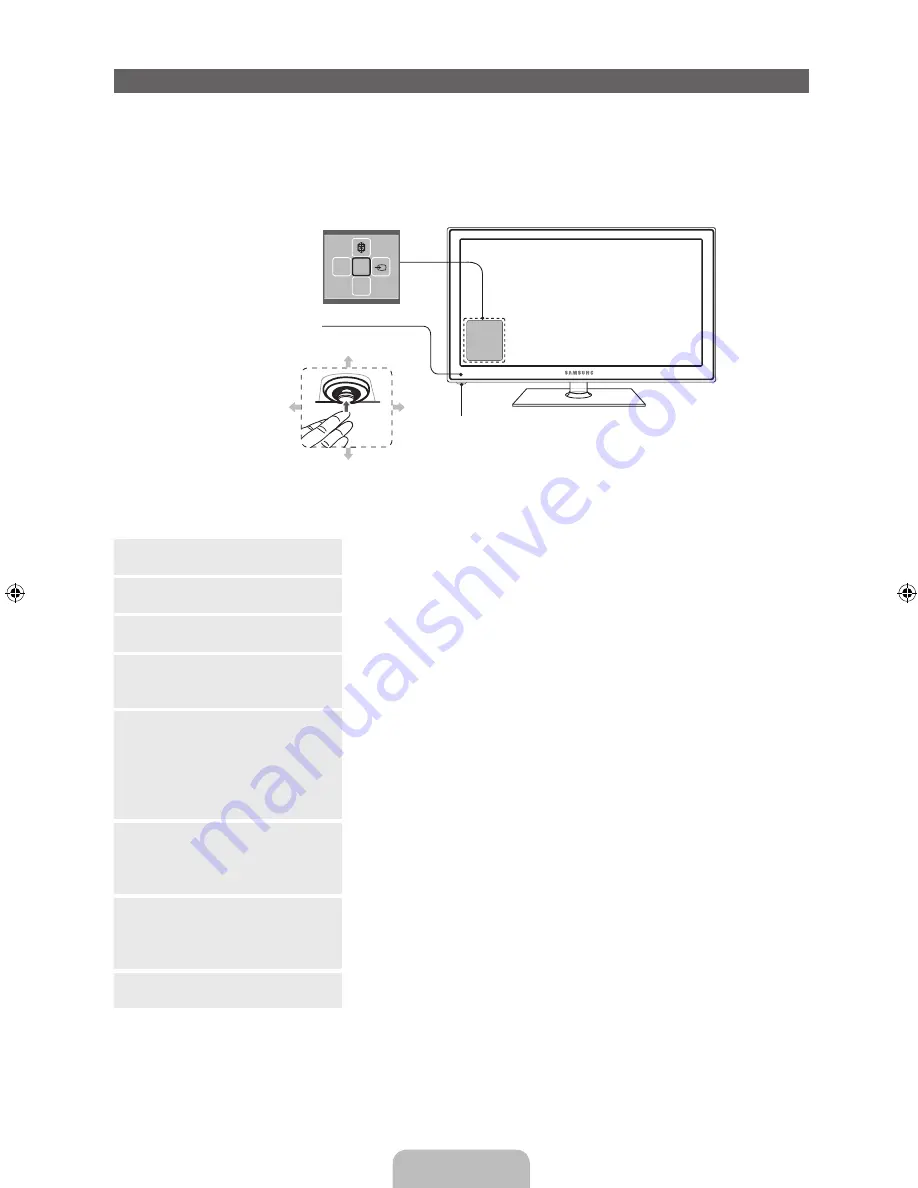
Viewing the Control Panel (Panel Key)

TV Controller is a multi directional button that helps navigate without remote control.


Some functions which require a PIN code may not be available.


The product colour and shape may vary depending on the model.


The TV's Controller, a small joy stick like button on the rear left side of the TV, lets you control the TV 
without the remote control.

m

R

P

Remote control sensor

Function menu

TV Controller


Follow these instructions facing the front of your TV.

Power on

Turn the TV on by pressing the Controller when the TV is in standby 
mode.

Adjusting the volume

Adjusts the volume by moving the controller from side to side when 
the power is on.

Selecting a channel

Select a channel by moving the Controller backwards and forwards 
when the power is on.

Using the function menu

To view and use the Function menu, press and release the Controller 
when the power is on. To close the Function menu, press and release 
the Controller again.

Selecting the MENU 

(

m

)

With the Function menu visible, select the 

MENU

 (

m

) by moving the 

Controller to the left. The OSD (On Screen Display) Menu appears. 
Select an option by moving the Controller to the right. Move the 
Controller to the right or left, or backwards and forwards to make 
additional selections. To change a parameter, select it, and then press 
the Controller.

Selecting the SMART HUB (

)

With the Function menu visible, select 

SMART HUB

 (

) by moving 

the Controller backwards. The 

SMART HUB

 main screen appears. 

Select an application by moving the Controller, and then pressing the 
Controller.

Selecting the Source

 (

s

)

With the Function menu visible, open the 

Source

 (

s

) by pushing 

the Controller to the right. The 

Source

 screen appears. To select a 

source, move the Controller back and forth. When the source you 
want is highlighted, press the Controller.

Power Off 

(

P

)

With the Function menu visible, select 

Power off 

(

P

) by pulling the 

Controller forwards, and then press the Controller.


To close the 

Menu

Smart Hub

, or 

Source

, press the Controller for more than 1 second.


When selecting the function by moving the controller to the forwards/backwards/left/right directions, 
be sure not to press the controller. If you press it first, you cannot operate it to move the forwards/
backwards/left/right directions.

Forwards

Forwards

Left

Right

[PE550_AD]BN68-04080A-00Eng.indb   4

2012-03-06   �� 5:14:20

Summary of Contents for PS51E550

Page 1: ... 1100 11 3030 8282 1800 3000 8282 1800 266 8282 www samsung com INDONESIA 0800 112 8888 021 5699 7777 www samsung com JAPAN 0120 327 527 www samsung com MALAYSIA 1800 88 9999 www samsung com PHILIPPINES 1 800 10 SAMSUNG 726 7864 for PLDT 1 800 3 SAMSUNG 726 7864 for Digitel 1 800 8 SAMSUNG 726 7864 for Globe 02 5805777 www samsung com SINGAPORE 1800 SAMSUNG 726 7864 www samsung com THAILAND 1800 2...

Page 2: ... of the product Avoid operating the TV at temperatures below 41 F 5 C A still image displayed too long may cause permanent damage to the PDP Panel Watching the Plasma TV in 4 3 format for a long period of time may leave traces of borders displayed on the left right and centre of the screen caused by the difference of light emission on the screen Playing a DVD or a game console may cause similar ef...

Page 3: ...d on screen full manual p 19 Accessories Please make sure the following items are included with your TV If any items are missing contact your dealer The items colours and shapes may vary depending on the model Cables not included in the package contents can be purchased separately Check that there are no accessories hidden behind or under packing materials when you open the box CAUTION INSERT SECU...

Page 4: ... m by moving the Controller to the left The OSD On Screen Display Menu appears Select an option by moving the Controller to the right Move the Controller to the right or left or backwards and forwards to make additional selections To change a parameter select it and then press the Controller Selecting the SMART HUB With the Function menu visible select SMART HUB by moving the Controller backwards ...

Page 5: ...video sources p 15 Returns to the previous channel Changes channels Displays the EPG Electronic Programme Guide Displays information on the TV screen u d l r Move the cursor on screen menu item E Selects the menu and changes the corresponding item value Exits the menu Family Story Connect to Family Story application See e Manual chapter Advanced Features Family Story SEARCH Support to recommendati...

Page 6: ...Antenna or Cable Connection Plug the power cord into a wall outlet only after you have made all other connections If you are connecting your TV to a cable or satellite box using HDMI Component or Composite connections you do not need to connect the ANT IN jack to an antenna or a cable connection The Plasma TV may interfere with an amateur radio or AM radio Using two way radio mobile and portable u...

Page 7: ... TV will display on screen menus using the language you select beginning with the next step in the Setup process Not available in some locations 2 Use Mode Select the Home Use Mode On the Use Mode screen select the Home Use mode using your remote and then select Next The Network Settings screen appears Store Demo mode is for retail environments only If you select Store Demo some functions will not...

Page 8: ...ters are displayed select Caps or Shift To display symbols and punctuation select F To redisplay letters select F again 3 When done select Next if you have entered a security key or WPS PIN if you have entered a WPS PIN 4 The TV checks the wireless connection If the connection is successful the You are connected to the Internet If you have any problems using online services please contact your Int...

Page 9: ...take a few seconds to display The General Disclaimer screen appears Select Agree The Privacy policy screen appears Select Agree To use Smart Hub you should select Agree for the Terms of Service Agreement 6 Select Country Select the appropriate area by pressing the or button Press the ENTERE button to confirm your choice 7 Auto Tuning Selecting how you watch your TV Select an appropriate option of ...

Page 10: ...ish The completed settings are displayed If You Want to Rerun Setup Menu System Setup You should do Setup again at home although you did in shop If You Want to Turn the Store Demo Mode On or Off To set or unset Store Demo mode outside of Setup press and release the Controller when the power is on The Function menu screen appears Push the Controller to the left to MENU m and hold for more than 5 se...

Page 11: ...ternal device to the TV that uses an older version of HDMI the video and audio may not work If this occurs ask the manufacturer of the device about the HDMI version and if it is out of date request an upgrade Be sure to purchase a certified HDMI cable Otherwise the picture may not display or a connection error may occur We recommend using a basic high speed HDMI cable or an HDMI cable that is Ethe...

Page 12: ...ellite receiver VCR Red White Red Red Blue White Green Yellow Component Cable Not Supplied Audio Cable Not Supplied Audio Cable Not Supplied Video Cable Not Supplied Device Device For better picture quality we recommend the Component connection over the A V connection When connecting to AV IN the colour of the AV IN VIDEO jack green will not match the video cable yellow ...

Page 13: ...external device supporting 5 1 CH When the receiver home theatre is set to on you can hear sound output from the TV s optical jack When the TV is receiving a DTV signal the TV will send 5 1 CH sound to the home theatre receiver When the source is a digital component such as a DVD player Blu ray player cable box STB Set Top Box satellite receiver and you connected it to the TV via HDMI you will onl...

Page 14: ...upplied Optimal resolution is 1920 X 1080 60 Hz See display resolution page for full available resolution p 27 NOTE For HDMI DVI cable connection you must use the HDMI IN 1 DVI jack For PCs with DVI video out jacks use an HDMI to DVI cable to connect the DVI out on the PC to the HDMI IN 1 DVI jack on the TV Use the PC s speakers for audio PC D Sub input is not supported Using an SERVICE Cable Conn...

Page 15: ...D Cable STB Satellite STB PVR STB AV Receiver Game Camcorder PC DVI PC DVI Devices TV IPTV Blu ray HD DVD DMA Select an input jack and then select the name of the device connected to that jack from the list that appears For example if you have your Blu ray player attached to HDMI IN 2 select Blu ray for that input If you connect a PC to the HDMI IN 1 DVI port with an HDMI cable assign PC to HDMI1 ...

Page 16: ... having DHCP Server This TV supports the IEEE 802 11a b g and n communication protocols Samsung recommends using IEEE 802 11n When you play video over a network connection the video may not play smoothly Most wireless network systems incorporate a security system that requires devices that access the network through an access point or AP typically a wireless IP Sharer router or modem to transmit a...

Page 17: ...umber buttons on the remote To enter a letter move the Highlight to the letter and then select it You can enter numbers in the same fashion if you choose To display capital letters or redisplay small letters if capital letters are displayed select Caps or Shift To display symbols and punctuation select F To redisplay letters select F again 6 When done select Next if you have entered a Security Key...

Page 18: ...e your user s manual for configuration instructions To configure the network connection for a wired network that uses DHCP follow these steps 1 Connect your TV to your network as shown in one of the illustrations 2 Turn on your TV go to the Network Settings screen Menu Network Network Settings 3 Select Start 4 The Network Connection screen appears and verifies the network connection When the conne...

Page 19: ...l for LED TV Relax for PDP TV Suitable for reducing eye strain Movie Suitable for watching movies in a dark room Entertain Suitable for watching movies and games G50 Picture Mode Cell light Contrast Brightness Sharpness Colour Tint G R Picture Changing the Preset Picture Mode Picture Mode Menu Picture Picture Mode Picture modes apply preset adjustments to the picture N When your TV is connected to...

Page 20: ...not be supported depending on the language 1 Select using your remote The Index screen appears 2 To search for a topic select a letter The Index displays a list of topics and keywords that begin with the letter you selected 3 Select a topic or keyword you want 4 The e Manual page with the topic appears To close the Index screen press the RETURNR button To Change the screen position of the e Manual...

Page 21: ...ctions to the TV input For example if an external device s output is HDMI it should be connected to an HDMI input on the TV Make sure your connected devices are powered on Be sure to select the TV s correct source by pressing the SOURCEs button on the remote control Reboot the connected device by unplugging and then reconnecting the device s power cable The remote control does not work Replace the...

Page 22: ... are provided Do not use screws that do not comply with the VESA standard screw specifications Do not use screws that are longer than the standard length or do not comply with the VESA standard screw specifications Screws that are too long may cause damage to the inside of the TV set For wall mounts that do not comply with the VESA standard screw specifications the length of the screws may differ ...

Page 23: ...and string are not supplied please purchase these additionally 2 Remove the screws from the back centre of the TV put the screws into the clamps and then fasten the screws onto the TV again Screws may not be supplied with the product In this case please purchase the screws of the following specifications Screw Specifications For a 43 64 inch M8 3 Connect the clamps fixed onto the TV and the clamps...

Page 24: ...flammable liquid e g benzene thinners or a cleaning agent Securing the Installation Space Keep the required distances between the product and other objects e g walls to ensure proper ventilation Failing to do so may result in fire or a problem with the product due to an increase in the internal temperature of the product When using a stand or wall mount use parts provided by Samsung Electronics on...

Page 25: ...s 60 inches 64 inches Sound Output 10 W X 2 Dimensions WxHxD Body With stand 1196 8 x 715 6 x 57 0 mm 1196 8 x 787 4 x 305 0 mm 1398 3 x 836 2 x 57 0 mm 1398 3 x 913 0 x 335 0 mm 1488 8 x 885 8 x 57 0 mm 1488 8 x 960 2 x 335 0 mm Weight Without Stand With Stand 21 1 kg 25 1 kg 30 0 kg 35 1 kg 36 2 kg 41 3 kg Design and specifications are subject to change without prior notice The actual appearance...

Page 26: ...te above the compatible Frame sec listed in the table above If the Index Table is in error the Seek Jump function is not supported When you play video over a network connection the video may not be played smoothly The menu may take longer to appear if the video s bit rate exceeds 10Mbps Some USB digital camera devices may not be compatible with the player Video decoder Supports up to H 264 Level 4...

Page 27: ...600 800 x 600 800 x 600 1024 x 768 1024 x 768 1024 x 768 1152 x 864 1280 x 720 1280 x 800 1280 x 1024 1280 x 1024 1366 x 768 1440 x 900 1600 x 900RB 1680 x 1050 1920 x 1080 31 469 37 861 37 500 37 879 48 077 46 875 48 363 56 476 60 023 67 500 45 000 49 702 63 981 79 976 47 712 55 935 60 000 65 290 67 500 59 940 72 809 75 000 60 317 72 188 75 000 60 004 70 069 75 029 75 000 60 000 59 810 60 020 75 ...

Reviews: