background image

English - 4

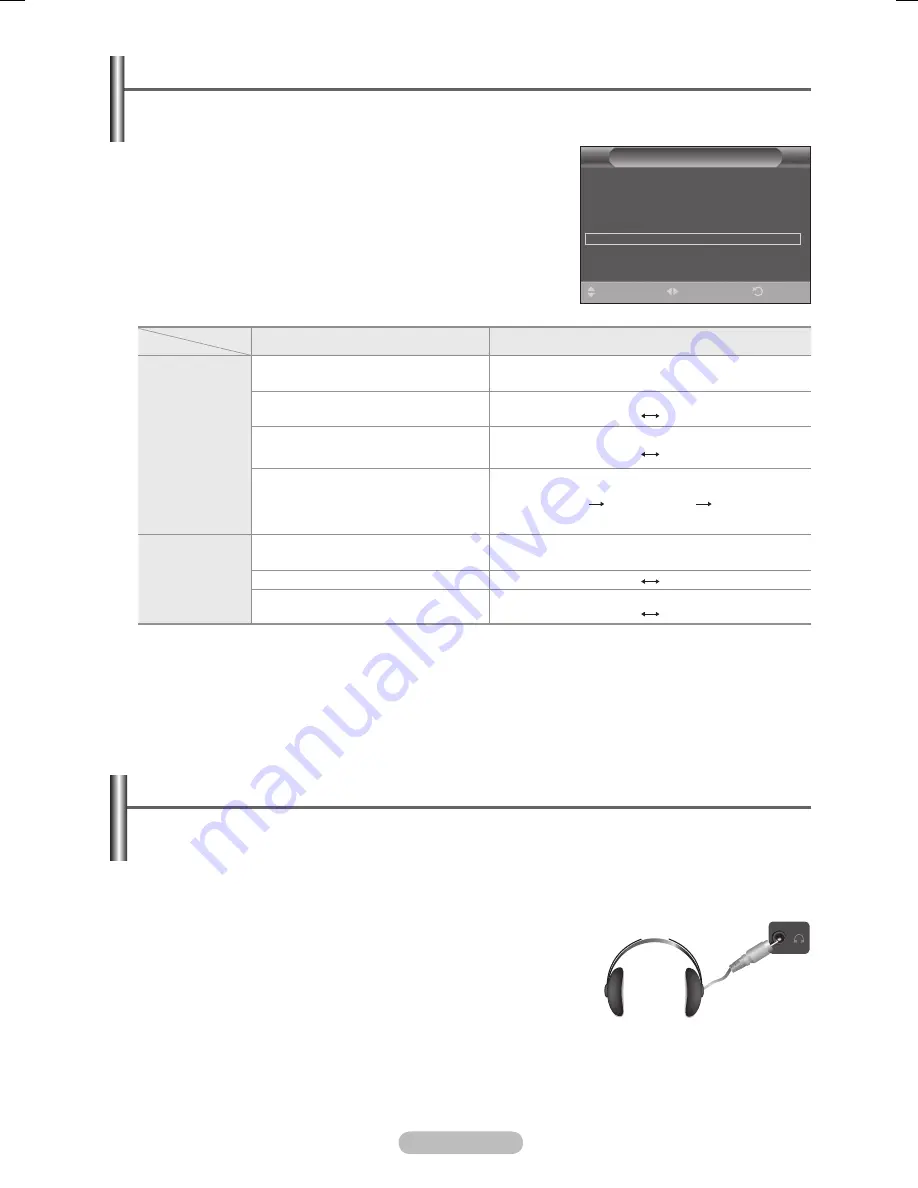
Selecting the Sound Mode 

(depending on the model)

The DUAL I-II button displays/controls the processing and output of the audio signal. When power 

is switched on, the mode is automatically preset to either “DUAL-I” or “Stereo”, depending on the 

current transmission.

Easy Setting

1

  Press the 

TOOLS

 button on the remote control.

  Press the ▲ or ▼ button to select 

Dual I-II

.

   Press the ◄ or ► button to select the required option.

Type of broadcast

On-screen indication

NICAM

Stereo

Regular broadcast

(Standard audio)

Mono

 (Normal use)

R NICAM Mono

NICAM

Mono

(Normal)

NICAM Stereo

NICAM  

stereo

Mono

(Normal)

NICAM DUAL-I/II

NICAM

dual-1

NICAM

dual-

Mono

(Normal)

A2

Stereo

Regular broadcast

(Standard audio)

Mono

 (Normal use)

Bilingual or DUAL-I/II

Dual I

Dual II

Stereo

Stereo

Mono

(Forced mono)

➢ 


If the receiving conditions deteriorate, listening will be easier if the mode is set to 

Mono

.

  


If the stereo signal is weak and automatic switching occurs, switch to 

Mono

.


This function is only available in Analog TV mode.

Connecting Headphones (Sold separately)

You can connect a set of headphones to your set if you wish to watch a TV programme 

without disturbing other people in the room.

     When you insert the head set jack into the corresponding 

port, you can operate only 

Auto Volume

 in Sound menu.

   Prolonged use of headphones at a high volume may 

damage your hearing.

   You will not hear sound from the speakers when you connect 

headphones to the TV.

   The headphone volume and TV volume are adjusted 

separately.

TV Side Panel

Tools

Picture Mode 

:  Standard

Sound Mode 

:  Custom 

Sleep Timer 

:  Off

SRS TS XT 

:  Off

Energy Saving 

:  Off

Dual I-II 

◄  Mono 

Exit

Move

Adjust

BN68-01419D.indb   24

2008-04-30   오후 7:34:21

Summary of Contents for PS42A416C1D

Page 1: ...sma TV user manual imagine the possibilities Thank you for purchasing this Samsung product To receive more complete service please register your product at www samsung com global register Model Serial...

Page 2: ...atures below 5 C 41 F A still image displayed too long may cause permanent damage to the PDP Panel Watching the PDP TV in 4 3 format for a long period of time may leave traces of borders displayed on...

Page 3: ...andard 18 Customizing the Picture Settings 18 Configuring Detailed Settings on the Picture 19 Picture Options 20 Resetting the Picture Settings to the Factory Defaults 22 Sound Control Sound Features...

Page 4: ...Cable Scart Cable PC Audio Cable HDMI Cable HDMI DVI Cable Ferrite Core Power Cord S Video The ferrite cores are used to shield the cables from interference When connecting a cable open the ferrite co...

Page 5: ...trol 4 C P Press to change channels In the on screen menu use the C P buttons as you would use the and buttons on the remote control 5 ENTER In the on screen menu use this button as you would use the...

Page 6: ...eo game device or video disc players Input Output Specification Connector Input Output Video Audio L R RGB Video Audio L R EXT 1 Only TV or DTV output is available EXT 2 Output you can choose 5 DIGITA...

Page 7: ...O HDMI DVI 60Hz X O X X O O Component O O O O O O 1 COMMON INTERFACE Slot Insert CI Common Interface card into the slot refer to page 40 When not inserting CI CARD in some channels Scramble Signal is...

Page 8: ...channel Next channel Previous channel Returns to the previous menu Exit the on screen menu Displays the main on screen menu Picture size selection Channel control button Refer to page 15 a Digital su...

Page 9: ...button on the remote control to switch the television on The programme that you were watching last is re selected automatically If you have not yet stored any channels no clear picture appears Refer t...

Page 10: ...me environment Store Demo mode is only intended for use in retail environments If the unit is accidentally set to Store Demo mode and you want to return to Home Use Standard Press the Volume button Wh...

Page 11: ...country To stop the search before it has finished press the ENTER button with Stop selected If the DTV channel is updated the Source in the source list of the Input menu is automatically changed to D...

Page 12: ...lect the channel number required Using the TOOLS Button You can use the TOOLS button to select your frequently used functions quickly and easily The TOOLS menu changes depending on which external inpu...

Page 13: ...the or button to select Channel then press the ENTER button 3 Press the ENTER button again The available countries are listed 4 Select your country by pressing the or button then press the ENTER butt...

Page 14: ...l to be stored Press the or button to select C Air channel or S Cable channel Press the button then press the or button to select the required number You can also select the channel number directly by...

Page 15: ...by muting out video and audio 6 Press the or button to select Child Lock then press the ENTER button 7 Select On by pressing the or button then press the ENTER button 8 Press the or button to select C...

Page 16: ...signed automatically when channel information is broadcast These names can be changed allowing you to assign new names 1 Press the MENU button to display the menu 2 Press the or button to select Chann...

Page 17: ...t by pressing the or button Press the ENTER button 5 Press the EXIT button to exit LNA Low Noise Amplifier This function is very useful in the situation that the TV is used in weak signal LNA amplifie...

Page 18: ...t Picture 3 Press the ENTER button again to select Mode 4 Select the required mode by pressing the or button then press the ENTER button Available modes Dynamic Standard Movie The settings values may...

Page 19: ...preference see Customizing the Colour Space Customizing the Colour Space Colour Red Green Blue Yellow Cyan Magenta Adjusts the Colour range to suit your preference Colour is available when Colour Spac...

Page 20: ...Reset Press the or button to select Reset then press the ENTER button You can initialize the setting With the HDMI Just Scan picture size depending on the AV devices the screen may be cut off or a spe...

Page 21: ...lack level low contrast low color etc is encountered by the HDMI input for RGB limited range 16 to 235 This function is active only when the externel input connects to HDMI RGB signals Blue Only Mode...

Page 22: ...o to 4 3 it darkens the left and right sides Light When you set the screen ratio to 4 3 it brightens the left and right sides To remove after images on the screen use either White or Scrolling functio...

Page 23: ...vision speakers It is fully compatible with all multichannel formats Easy Setting 1 Press the TOOLS button on the remote control 2 Press the or button to select SRS TS XT 3 Press the or button to sele...

Page 24: ...Bilingual or DUAL I II Dual I Dual II Stereo Stereo Mono Forced mono If the receiving conditions deteriorate listening will be easier if the mode is set to Mono If the stereo signal is weak and autom...

Page 25: ...or button to select Sleep Timer 3 Press the or button to select the minute then press the ENTER button Timer 1 Timer 2 Timer 3 You can set the On Off timers so that the television will switch on or o...

Page 26: ...he blue LED always lights Set the Light Effect to Off to reduce the power consumption Melody Off Low Medium High The TV power on off melody sound can be adjusted Entertainment Off Sports Cinema Game E...

Page 27: ...efresh rate with reference to the Display Modes Table Set the Vertical Frequency and Horizontal Frequency individually if you can do so instead of setting the Screen refresh rate 5 Click on OK to clos...

Page 28: ...00 60 317 72 188 75 000 60 004 70 069 75 029 60 015 25 175 31 500 31 500 40 000 50 000 49 500 65 000 75 000 78 750 85 500 HDMI DVI Input Mode Resolution Horizontal Frequency kHz Vertical Frequency Hz...

Page 29: ...n adjust the frequency as best as possible coarse and Fine tune again After the noise has been reduced re adjust the picture so that it is aligned on the center of screen 1 Press the or button to sele...

Page 30: ...ect Digital Menu then press the ENTER button Guide Now Next Guide Full Guide Scheduled List Default Guide Now Next Full Guide Digital Channel Country Auto Store Manual Store Edit Favourite Channels Ch...

Page 31: ...viewing a programme press the INFO button The programme information is displayed The information is displayed Parental Rating Video Type SD HD Radio Audio Type Mono Stereo Dual Dolby Digital Existenc...

Page 32: ...as finished the number of scanned services will be displayed The existing favourite channel list will not be deleted when the channel list is updated To stop the scan before it has finished press the...

Page 33: ...s the CH LIST button to display the favourite channel list Renumber depending on the Country In the Edit Favourite Channels menu press the or button to select the required channel Press the green butt...

Page 34: ...ated in the left hand column displays the Current programme and the Next programme information Full Guide Displays the programme information as time ordered 1 hour segments 2 hours of programme inform...

Page 35: ...en press the green button If necessary select the programme to be deleted by pressing the or button then press the blue button When watching analog TV the reserved DTV channel cannot be changed The ch...

Page 36: ...and you will not be able to change the channel even if you press the ENTER button When the No Data message appears and you cannot change the channel press the channel number directly using the numeri...

Page 37: ...ing the Audio Language Subtitle Language and the Teletext Language of the Language menu refer to page 36 are automatically changed to the selected language The Audio Language Subtitle Language and the...

Page 38: ...try again message is displayed Press the ENTER button Press the or button to select the age rating you want to lock out then press the ENTER button If you want to change the PIN code press the or butt...

Page 39: ...udio function that provides an additional audio track for visually challenged persons This function handles the Audio Stream for the AD Audio Description when it is sent along with the Main audio from...

Page 40: ...based on the PC Card menu 4 6 System This menu consists of 5 sub menus Product Information Signal Information Software Upgrade and Reset Product Information You can view your product information For s...

Page 41: ...the software upgrade is completed Reset You can reset the values stored to the factory default values The Reset operation deletes all channel information and user preferences returning all values to t...

Page 42: ...em corresponding to the required The page is displayed with other coloured information that can be selected in the same way To display the previous or next page press the corresponding coloured button...

Page 43: ...dications Date and time Text Status information FASTEXT information Teletext information is often divided between several pages displayed in sequence which can be accessed by Entering the page number...

Page 44: ...an the standard dimension as they may cause damage to the inside of the TV set For wall mounts that do not comply with the VESA standard screw specifications the length of the screws may differ depend...

Page 45: ...blue button Press the and buttons to select a save mode from either Position1 Position2 or Position3 in order to save the current position To not save the current position press the RETURN button Whe...

Page 46: ...f Entering the menu 2 Pressing a Color Red Green Yellow button moves the auto wall mount to the saved position You can move the wall mount to one of the 3 pre set positions by pressing the Red Positio...

Page 47: ...t Blurred or snowy picture distorted sound Check the direction location and connections of your aerial This interference often occurs due to the use of an indoor aerial Remote control malfunctions Rep...

Page 48: ...5 x 700 x 95 mm 1231 x 770 x 95 mm With stand 1055 x 760 x 316 mm 1231 x 822 x 316 mm Weight Body 28 kg 34 kg With stand 32 kg 37 kg Environmental Considerations Operating Temperature Operating Humidi...

Page 49: ...To avoid electric shock never touch the inside of this apparatus Only a qualified technician should open this apparatus Make sure to plug the power cord in until it is firmly inserted When removing t...

Page 50: ...UK Only United Kingdom This Samsung product is warranted for a period of twelve 12 months from the original date of purchase against defective materials and workmanship In the event that warranty serv...

Page 51: ...This page is intentionally left blank...

Page 52: ...r human health from uncontrolled waste disposal please separate this from other types of wastes and recycle it responsibly to promote the sustainable reuse of material resources Household users should...

Page 53: ......

Page 54: ...WIDE If you have any questions or comments relating to Samsung products please contact the SAMSUNG customer care centre Country Customer Care Centre Web Site EIRE 0818 717 100 www samsung com ie U K...

Reviews: