background image

English-16

Downloading the SmartThings App


f

Download and install the SmartThings app from the markets (Google Play Store, Apple App Store, 
or Samsung Galaxy Apps). To find the app, use the keyword “SmartThings”.

NOTE


f

SmartThings is incompatible with tablets and some mobile devices.


Android 6.0 or later (at least 2GB of RAM) is recommended.


f

iPad and some mobile devices may not be supported.


iOS 10.0 or later / iPhone 6 or later is supported.


f

Visit Play Store or App Store to see if your mobile device is compatible with SmartThings.


f

The supported features are subject to change without any prior notice.

Setting up a Samsung account


f

You must sign in to a Samsung account before using the SmartThings app.


f

To set up a Samsung account, you can follow the directions provided by the SmartThings app.


f

Or, if you have a Samsung smartphone, you can add your Samsung account in the setting app of 
your smartphone. Then, it will automatically sign in to your Samsung account.

NOTE


f

If you cannot complete the product registration, please take the following steps.


Try the registration procedure again as you have directed by the pop-up messages.


Confirm that the UPnP option of your wireless router is active, and then try the registration procedure 
again.


Confirm that your wireless router is operating in wireless mode, and then try the registration procedure 
again.


If you have two or more POWERbots, turn off the other POWERbots, and then try to register your 
POWERbot again.


If there is any other wireless router that has the same SSID as your wireless router, the registration might 
be failed.


f

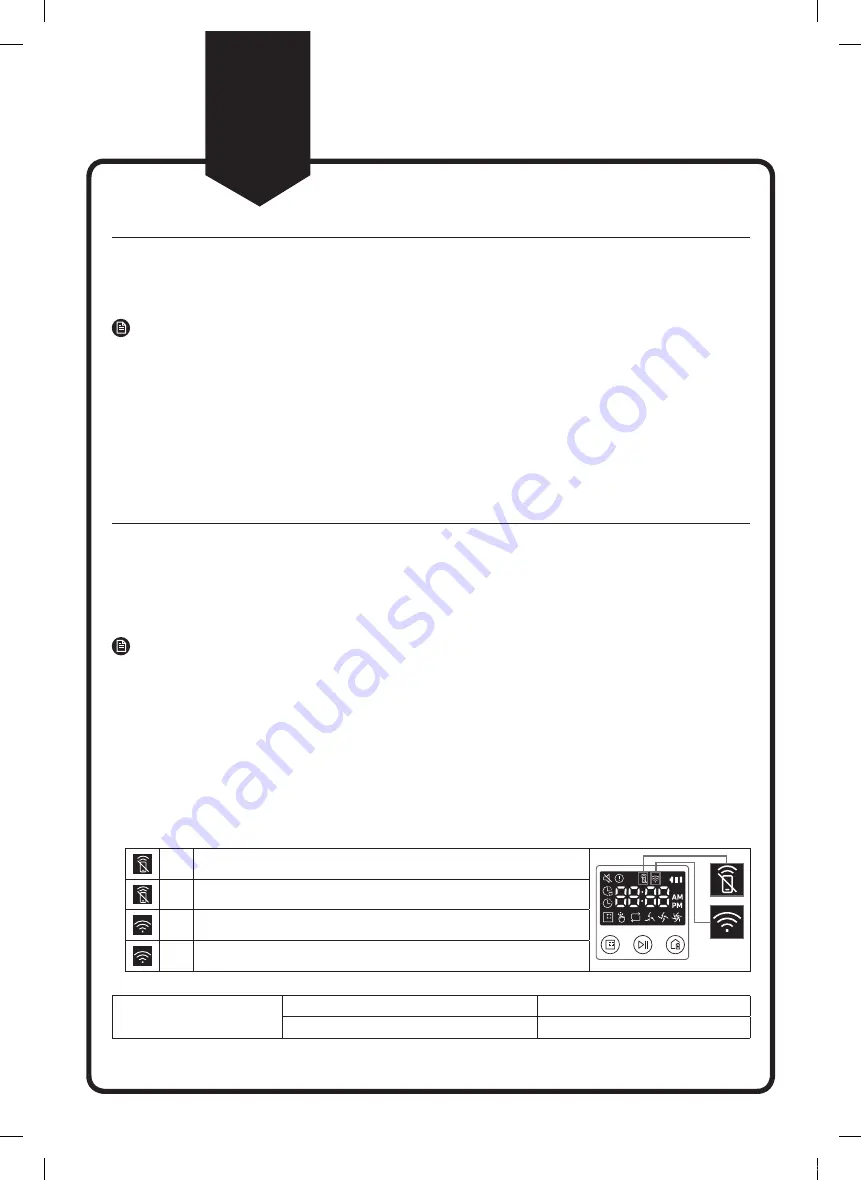
Remote control and Wi-Fi indicator

On

Remote control is blocked. (The remote controller can still be 
allowed.)

Off Remote control is allowed.

On The POWERbot is connected to the wireless router.

Off The POWERbot is trying to connect the wireless router.

Wi-Fi

Frequency range

2412 - 2472 MHz

Transmitter power(Max)

20 dBm

SmartThings App

The SmartThings App is only compatible with models that have a Wi-
Fi function.

7

1_VR7200_Q_guide_EN_00827B-03_AA.indd   16

2020-01-13   오전 1:14:19

Summary of Contents for POWERbot VR AM70 Series

Page 1: ...POWERbot Quick reference guide VR AM70 Series Before operating this unit please read the instructions carefully For indoor use only 1_VR7200_Q_guide_EN_00827B 03_AA indd 1 2020 01 13 오전 1 13 48 ...

Page 2: ...sh Brush cover Combo Brush Brush cover Accessories may differ depending on the models Refer to page 11 for the installation of boundary markers Battery Spec VR2AR72 Series Lithium ion 21 6V 3600mAh 12cell VR1AR72 Series Lithium ion 21 6V 1800mAh 6cell For VR2A726 models combo brush and soft action brush are provided A Type B Type 1_VR7200_Q_guide_EN_00827B 03_AA indd 2 2020 01 13 오전 1 13 52 ...

Page 3: ...charger docking station from outlet when not in use and before conducting maintenance WARNING To reduce the risk of fire electric shock or injury General Use only as described in this manual Do not operate POWERbot or the battery charger docking station if it has been damaged in any way If the vacuum cleaner is not working as it should has been dropped damaged left outdoors or dropped in water con...

Page 4: ...to high temperatures or allow moisture or humidity of any kind to come into contact with the battery charger docking station Do not charge the non rechargeable batteries with the battery charger docking station POWERbot Do not use to pick up hard or sharp objects such as glass nails screws coins and etc Do not use without a filter in place When servicing the unit never put fingers or other objects...

Page 5: ...les These limits are designed to provide reasonable protection against harmful interference in a residential installation This equipment generates uses and can radiate radio frequency energy and if not installed and used in accordance with the instructions may cause harmful interference to radio communications However there is no guarantee that interference will not occur in a particular installat...

Page 6: ...equipment complies with IC RSS 102 radiation exposure limits set forth for an uncontrolled environment This equipment should be installed and operated so there are at least 8 inches 20 cm between the radiator and your body This device and its antenna s must not be co located or operated in conjunction with any other antenna or transmitter Open Source License Notice This device uses open source sof...

Page 7: ... liquid The POWERbot can be severely damaged and it may contaminate other areas if the wheels pass through liquid Attach the boundary markers to places where the POWERbot may fall such as the top of a staircase or a bannister to prevent product damage and injury Please keep the cliff sensor clean at all times for safety Do not spill any liquid on the docking station There is a risk of fire or elec...

Page 8: ...the floor or product malfunction may occur Before operating the POWERbot remove the objects which could break such as a frame mirror and porcelain items so that the POWERbot works without interruption In use Using the POWERbot on thick carpet may damage both the POWERbot and the carpet The POWERbot cannot pass over carpet that is thicker than 0 4 in 1 cm Do not use the POWERbot on tables or other ...

Page 9: ...l turn on successively to indicate charging progress and FULL will appear when charging is complete When the product is purchased the battery is not charged so charging must initially be done manually 0 5 m 1 m 0 5 m Make sure the charge pins on the robot vacuum cleaner and the charger are aligned Ensure the power cord is arranged neatly next to the wall Ú Ú Install with the grain of wood floors I...

Page 10: ...echarging You can command POWERbot to recharge at the docking station automatically while it is cleaning by pressing this button Energy saving mode Refer to page 11 Auto Clean Spot Clean Repeat clean Manual Clean Manual clean mode can be selected by the direction control buttons of the remote controller Press the on the remote controller first and then press the Start Stop VR2AR72 POWERbot increas...

Page 11: ...gy saving mode turns off all functions except battery charging Use it to reduce power consumption while you are away from home for an extended period of time How to select or cancel Displayed icon Press for 5 sec About 3 seconds later the previous indicator will appear NOTE f f If you select the Auto Max Manual clean mode or press the Point cleaning button the Energy saving mode will be cancelled ...

Page 12: ...ndicator blinking 7 Turbo mode Select to clean with the strongest suction power 8 Normal mode Select to clean with moderate suction power 9 Quiet mode Select to clean with lower operation noise 10 Sound Select to set the voice guide Voice Guide English Sound Effects Mute Press and hold the sound button to change and set a language 11 Schedule Cancel 3sec Refer to page 13 12 Clock Refer to page 13 ...

Page 13: ...y schedule is set Press for 3 sec Start setting Setting complete Select AM PM Select Minute Select One time or Daily schedule Select Hour Skip to previous next setting Setting the time You must set the current time before using the One time daily schedule Setting the schedule Setting cancelling the schedule can only be done while POWERbot is docked on the docking station Setting complete Start set...

Page 14: ... remove the dustbin 2 Remove the dustbin cover 3 Remove dust in the dustbin and cyclone unit Click 4 Detach the cyclone unit from the dustbin cover and then wash the dustbin and the filter 5 Reassemble the dustbin 6 Reinsert the dustbin into the main body until it clicks 1_VR7200_Q_guide_EN_00827B 03_AA indd 14 2020 01 13 오전 1 14 11 ...

Page 15: ...ean the auto shutter tool 5 Reassemble the brush 6 Reassemble the brush cover For VR20R726 models check that the brush cover is correct for the assembled brush If a brush or brush cover is not assembled correctly after the maintenance work scratches may occur on the floor or product malfunction may occur Therefore assemble them correctly by referring to the cleaning and maintaining section of a us...

Page 16: ...tomatically sign in to your Samsung account NOTE f f If you cannot complete the product registration please take the following steps Try the registration procedure again as you have directed by the pop up messages Confirm that the UPnP option of your wireless router is active and then try the registration procedure again Confirm that your wireless router is operating in wireless mode and then try ...

Page 17: ...English 17 Memo 1_VR7200_Q_guide_EN_00827B 03_AA indd 17 2020 01 13 오전 1 14 19 ...

Page 18: ...nter Country Customer Care Center Web Site CANADA 1 800 SAMSUNG 726 7864 1 844 SAM PAYS 726 7297 www samsung com ca support English www samsung com ca_fr support French U S A 1 800 SAMSUNG 726 7864 1 844 SAM PAYS 726 7297 www samsung com us support 1_VR7200_Q_guide_EN_00827B 03_AA indd 18 2020 01 13 오전 1 14 20 ...

Page 19: ...ía de referencia rápida Series VR AM70 Antes de poner en funcionamiento esta unidad lea atentamente las instrucciones Para uso en interiores solamente 2_VR7200_Q_guide_MES_00827B 03_AA indd 1 2020 01 13 오전 1 13 27 ...

Page 20: ...l cepillo Cepillo combinado Tapa del cepillo Los accesorios pueden variar según los modelos Consulte la página 11 para obtener información acerca de los marcadores de límite Especificaciones de la batería Series VR2AR72 Ion litio 21 6 V 3600 mAh 12 celdas Series VR1AR72 Ion litio 21 6 V 1800 mAh 6 celdas Los modelos VR2AR726 incluyen el cepillo combinado y el cepillo de acción suave Tipo A Tipo B ...

Page 21: ...s LEA TODAS LAS INSTRUCCIONES ANTES DE USAR SU POWERbot Desenchúfelo del tomacorriente cuando no lo utilice y antes de realizar el mantenimiento ADVERTENCIA para reducir el riesgo de incendio descargas eléctricas o lesiones GENERAL Utilícelo solo como se describe en el manual No utilice el POWERbot ni el cargador de la batería estación de carga si presentan algún desperfecto Si la aspiradora no fu...

Page 22: ...s duros o cortantes tales como vidrio clavos tornillos monedas etc No lo utilice sin el filtro en su lugar Durante las tareas de mantenimiento no ponga los dedos ni otros objetos en la cámara del ventilador ya que la unidad puede ponerse en marcha accidentalmente No inserte objetos en las aberturas No lo utilice si hay aberturas obstruidas mantenga las aberturas libres de polvo pelusa cabellos o c...

Page 23: ...rminado que se encuentra dentro de los límites para los dispositivos digitales clase B de acuerdo con la parte 15 de las Normas de la FCC Dichos límites han sido diseñados para proporcionar una protección razonable contra la interferencia dañina en una instalación residencial Este equipo genera utiliza y puede irradiar energía de frecuencias de radio y si no se lo instala y utiliza de acuerdo con ...

Page 24: ...e equipo cumple con los límites de exposición a la radiación establecidos por la IC RSS 102 para un entorno no controlado Este equipo debe instalarse y utilizarse con una distancia mínima de 20 cm entre el radiador y su cuerpo Este aparato y su s antena s no deben ubicarse ni utilizarse junto con ninguna otra antena o transmisor Aviso de licencia de código abierto Este dispositivo utiliza software...

Page 25: ...les exteriores lugares húmedos como baños o lavaderos ni sobre mesas o estantes El POWERbot puede averiarse o funcionar inadecuadamente No deje que el POWERbot atraviese ni toque ningún tipo de líquido El POWERbot puede dañarse seriamente y ensuciar otras zonas si las ruedas pasan por un lugar donde hay algún líquido Fije los marcadores de límite en los lugares donde el POWERbot podría caer como u...

Page 26: ...je los marcadores de límite en los lugares donde el POWERbot puede resultar dañado como la puerta principal la terraza el baño y las escaleras para su seguridad En las zonas muy bajas donde el POWERbot podría quedar trabado fije los marcadores de límite para impedir que entre el POWERbot Durante el uso La utilización del POWERbot sobre alfombras gruesas puede dañar el POWERbot y la alfombra El POW...

Page 27: ...ncenderá en función del progreso de la carga y cuando esta haya terminado indicará FULL Cuando se adquiere el producto la batería no está cargada por lo que al inicio deberá cargarla manualmente 0 5 m 1 m 0 5 m Alinee los pines de carga de la aspiradora robot con el cargador Asegúrese de que el cable de alimentación esté bien alineado junto a la pared Ú Ú En los suelos de madera instale siguiendo ...

Page 28: ...ste botón puede ordenar al POWERbot que se recargue automáticamente en la estación de carga durante el proceso de limpieza Modo de ahorro de energía Consulte la página 11 Limpieza automática Limpieza localizada Limpieza repetida Limpieza manual El modo de limpieza manual puede seleccionarse con los botones del control de dirección del control remoto Presione el del control remoto primero y luego p...

Page 29: ...horrar energía El modo de ahorro de energía desactiva todas las funciones excepto la carga de la batería Utilícelo para reducir el consumo de energía cuando se ausente de su casa por un período prolongado Cómo seleccionar o cancelar Icono mostrado Presione durante 5 segundos Unos 3 segundos más tarde aparece el ícono anterior NOTA f f Si selecciona el modo de limpieza automática máxima manual o pr...

Page 30: ...oca carga y el indicador parpadee 7 Modo turbo Seleccione para limpiar con la potencia de succión más fuerte 8 Modo normal Seleccione para limpiar con una potencia de succión moderada 9 Modo silencioso Seleccione para limpiar con menos ruido de funcionamiento 10 Sonido Seleccione para configurar la guía de voz Guía de voz inglés Efectos de sonido Silencio Mantenga presionado el botón de sonido y c...

Page 31: ...ogramación Una vez o Diaria Presione durante 3 segundos Inicio del ajuste Ajuste completado Seleccione AM PM Seleccione Minuto Seleccione la programación Una vez o Diaria Seleccione Hora Ir al ajuste anterior o siguiente Ajuste de la hora Antes de utilizar la programación Una vez Diaria debe ajustar la hora actual Ajuste de la programación El ajuste o la cancelación de la programación solo puede e...

Page 32: ...apa del contenedor de polvo 3 Elimine el polvo del contenedor de polvo y de la unidad ciclónica Clic 4 Separe la unidad ciclónica de la tapa del contenedor de polvo y luego lave el contenedor y el filtro 5 Vuelva a ensamblar el contenedor de polvo 6 Vuelva a insertar el contenedor de polvo en el cuerpo principal hasta que suene un clic 2_VR7200_Q_guide_MES_00827B 03_AA indd 14 2020 01 13 오전 1 13 4...

Page 33: ...vación automática 5 Vuelva a ensamblar el cepillo 6 Vuelva a ensamblar la tapa del cepillo Para los modelos VR20R726 verifique que la tapa del cepillo sea la adecuada para el cepillo ensamblado Si un cepillo o la tapa de este no se ensambla correctamente luego de las tareas de mantenimiento es posible que el piso pueda rayarse o que el producto funcione mal Por lo tanto instálelos correctamente co...

Page 34: ...su teléfono Luego se iniciará la sesión automáticamente en su cuenta Samsung NOTA f f Si no puede completar el registro del producto siga estos pasos Vuelva a intentar el procedimiento de registro siguiendo las instrucciones de los mensajes emergentes Confirme que la opción UPnP del enrutador inalámbrico esté activa y vuelva a intentar el procedimiento de registro Confirme que su enrutador inalámb...

Page 35: ...Español 17 Memorándum 2_VR7200_Q_guide_MES_00827B 03_AA indd 17 2020 01 13 오전 1 14 00 ...

Page 36: ...DJ68 00827B 03 2_VR7200_Q_guide_MES_00827B 03_AA indd 18 2020 01 13 오전 1 14 01 ...

Reviews: