background image

English - 8


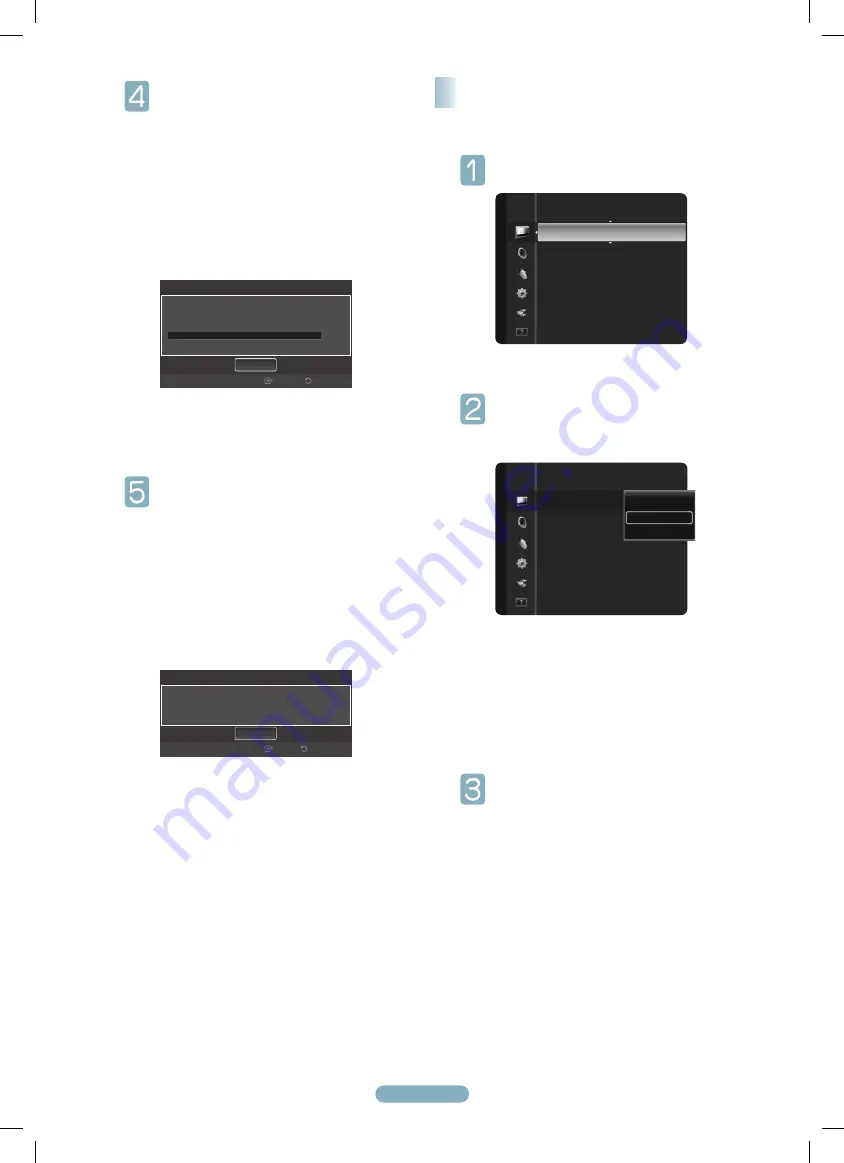
When selecting the Cable TV system:                                                              

Press the 

ENTER

E

 button to start the auto 

program. 

Press the ◄ or ► to select the correct 

analog signal cable system source among 

STD

HRC

, and 

IRC

, then press the 

ENTER

E

 button.  

If you have Digital cable TV, select the cable system 

signal source for both Analog and Digital.

➢ 

STD, HRC

, and 

IRC

 identify various types of 

cable TV systems. Contact your local cable 

company to identify the type of cable system 

that exists in your particular area. At this point 

the signal source has been selected.

  The TV begins memorizing all available stations.

➢ 

After all the available channels are stored, it 

starts to remove scrambled channels. The 

Auto 

program

 menu then reappears.

➢ 

If you want to stop Auto Programming, 

press the 

ENTER

E

 button. The 

Stop Auto 

Program? 

message will be displayed. Select 

Yes

 by pressing the ◄ or ► button, then press 

the 

ENTER

E

 button.


  Press the 

EXIT

 button to exit.

You can select the type of picture which best corresponds to 

your viewing requirements.


Press the 

MENU

 button to display the menu. 

Press the 

ENTER

E

 button to select 

Picture

.


Press the

 ENTER

 button to select 

Mode

Press the ▲ or ▼ button to select 

Dynamic, 

Standard

, or 

Movie

Press the 

ENTER

E

 button.

Dynamic

: Select a high-definition picture for 

bright environments.

Standard

: Selects the optimal picture display for 

normal environments. This setting is convenient 

for most situations.

Movie

: Selects a comfortable picture display for 

dark environments.


Press the 

EXIT

 button to exit.

Changing the Picture Standard

Auto Program

Auto Program in Progress.

Stop

11

3%

DTV Air : 5                                    Air : 4

DTV Cable : --                            Cable : --

Enter

Return

Auto Program

Auto Program is completed.

56 channels are memorized.

DTV Air : 20 

Air : 11

DTV Cable : 15 

Cable : 10

Return

Enter

OK

Picture

Mode 

Cell Light 

: 7

Contrast 

: 80

Brightness 

: 45

Sharpness 

: 50

Color 

: 50

Tint (G/R) 

: G50/R50

Dynamic

Standard

Movie

Air

Mode 

: Standard 

Cell Light 

: 4

Contrast 

: 95

Brightness 

: 45

Sharpness 

: 50

Color 

: 50

Tint (G/R) 

: G50/R50

Picture

BN68-02444A.indb   8

2009-09-10   �� 9:51:26

Summary of Contents for PN42B400P3D

Page 1: ...07660 0511 Samsung Electronics Canada Inc Customer Service 55 Standish Court Mississauga Ontario L5R 4B2 Call center hours of operation Mon Sun 9AM 12AM EST www samsung com register 1 POWER IN 2 SERV...

Page 2: ...RCE Press to display and select the available video sources 7 CH LIST Used to display Channel Lists on the screen 8 TOOLS Use to quickly select frequently used functions 9 UP DOWN LEFT RIGHT ENTER Use...

Page 3: ...rface is an interface that enables the transmission of digital audio and video signals using a single cable The difference between HDMI and DVI is that the HDMI device is smaller in size and has the H...

Page 4: ...or enhanced video quality Each DVD Blu Ray Player or Cable Box Satellite receiver Set Top Box has a different back panel configuration When connecting a DVD Blu Ray Player or Cable Box Satellite recei...

Page 5: ...nect an Optical Cable between the DIGITAL AUDIO OUT OPTICAL jack on the TV and the Digital Audio Input OPTICAL jacks on the Digital Audio System When a Digital Audio System is connected to the DIGITAL...

Page 6: ...jack of the sound card on your computer Each PC has a different back panel configuration When connecting a PC match the color of the connection terminal to the cable When using an HDMI DVI cable conne...

Page 7: ...utton to display the menu Press the or button to select Channel then press the ENTERE button Press the or button to select Auto Program then press the ENTERE button Press the or button to select an an...

Page 8: ...T button to exit You can select the type of picture which best corresponds to your viewing requirements Press the MENU button to display the menu Press the ENTERE button to select Picture Press the EN...

Page 9: ...ve its own set of screen sizes as well In general though you should view the TV in 16 9 mode as much as possible Press the MENU button to display the menu Press the ENTERE button to select Picture Pre...

Page 10: ...on method is analog The digital program displayed on the screen is originally an analog program which has been converted to digital The visual quality is of an SD Standard Definition grade Screen is b...

Page 11: ...BN68 02444A indb 11 2009 09 10 9 51 28...

Page 12: ...R 4B2 Horario de atenci n del centro de servicio Lun dom 9 AM 12 AM ESTE www samsung com register 1 POWER IN 2 SERVICE 3 DIGITAL AUDIO OUT OPTICAL 4 ANT IN 5 HDMI IN 1 DVI 2 6 DVI AUDIO IN 7 COMPONENT...

Page 13: ...deo disponibles 7 CH LIST Muestra las listas de canales en la pantalla 8 TOOLS Permite seleccionar r pidamente las funciones que se usan con mayor frecuencia 9 ARRIBA ABAJO IZQUIERDA DERECHA ENTER Pe...

Page 14: ...transmisi n de se ales digitales de audio y de v deo mediante un solo cable La diferencia entre los dispositivos HDMI y DVI es que el HDMI es m s peque o y tiene instalada la funci n de codificaci n...

Page 15: ...Cada reproductor de DVD Blu ray o receptor por cable sat lite decodificador tiene una configuraci n diferente del panel posterior Cuando conecte un reproductor de DVD Blu ray o receptor por cable sat...

Page 16: ...posterior del TV 5 3 4 Conecte un cable ptico entre los terminales DIGITAL AUDIO OUT OPTICAL y los terminales de entrada de audio digital OPTICAL del sistema de audio digital Cuando un sistema de audi...

Page 17: ...o del ordenador Cada ordenador tiene una configuraci n diferente del panel posterior Cuando conecte un ordenador debe hacer coincidir los colores del terminal de conexi n y del cable Cuando se usa una...

Page 18: ...para seleccionar Canal y a continuaci n pulse el bot n ENTERE Pulse los botones o para seleccionar Prog Auto y pulse el bot n ENTERE Pulse los botones o para seleccionar la conexi n de la antena y pul...

Page 19: ...Pulse el bot n EXIT para salir Puede seleccionar el tipo de imagen que mejor cumpla sus requisitos de visualizaci n Pulse el bot n MENU para ver el men Pulse el bot n ENTERE para seleccionar Imagen Pu...

Page 20: ...a de v deo Es posible que el receptor de sat lite tenga tambi n su propia gama de tama os de pantalla Sin embargo en general debe ver el televisor en el modo 16 9 tanto como sea posible Pulse el bot n...

Page 21: ...al alta Si el m todo de producci n original es anal gico El programa digital mostrado en la pantalla es originalmente un programa anal gico que se ha convertido a digital La calidad visual es de grado...

Page 22: ...BN68 02444A indb 22 2009 09 10 9 51 40...

Page 23: ...0511 Samsung Electronics Canada Inc Customer Service 55 Standish Court Mississauga Ontario L5R 4B2 Centre d appel heures de service du lundi au dimanche de 9 h 12 h HNE www samsung com global register...

Page 24: ...ir les sources vid o accessibles 7 CH LIST Afficher la liste des canaux l cran 8 TOOLS Permettent de s lectionner les fonctions fr quemment utilis es 9 UP DOWN LEFT RIGHT ENTER Appuyez sur ces touches...

Page 25: ...aux num riques audio et vid o l aide d un seul c ble La diff rence entre les interfaces HDMI et DVI r side dans le fait que la HDMI est de plus petites dimensions qu elle est dot e du composant de cod...

Page 26: ...s lectionner la source la page 9 La composante vid o s pare la vid o en Y Luminance luminosit PB bleu et PR rouge pour offrir une qualit d image sup rieure La configuration du panneau arri re de chaqu...

Page 27: ...udio droite et gauche du t l viseur au moyen d un connecteur en Y non fourni Il est galement possible de brancher le c ble la prise R Le panneau arri re de chaque magn toscope est diff rent Lors du br...

Page 28: ...carte son de votre ordinateur Branchement d un ordinateur La configuration du panneau arri re de chaque ordinateur est diff rente Lors du branchement d un ordinateur les couleurs du c ble et de la bor...

Page 29: ...r afficher le menu Appuyer sur la touche ou pour s lectionner Cha ne suivie de la touche ENTERE Appuyer sur la touche ou pour s lectionner Prog Auto suivie de la touche ENTERE Appuyer sur la touche ou...

Page 30: ...NTERE Appuyer sur la touche EXIT pour quitter Il est possible de choisir le type d image qui correspond le plus ses exigences Appuyer sur la touche MENU pour afficher le menu Appuyer sur la touche ENT...

Page 31: ...ent offrir ses propres tailles d cran En r gle g n rale toutefois il est conseill d utiliser le mode 16 9 autant que possible Appuyer sur la touche MENU pour afficher le menu Appuyer sur la touche ENT...

Page 32: ...mission num rique affich e l cran est une mission analogue l origine mais convertie au format num rique La qualit visuelle est de calibre SD d finition standard L cran est noir et le t moind alimentat...

Page 33: ...Cette page est laiss e intentionnellement en blanc BN68 02444A indb 33 2009 09 10 9 51 53...

Page 34: ...Cette page est laiss e intentionnellement en blanc BN68 02444A indb 34 2009 09 10 9 51 53...

Page 35: ...800 SAMSUNG 7267864 www samsung com ca Samsung Electronics Canada Inc Customer Service 55 Standish Court Mississauga Ontario L5R 4B2 Canada Samsung Electronique Canada Inc Service la Client le 55 Sta...

Reviews: