background image

English - 12

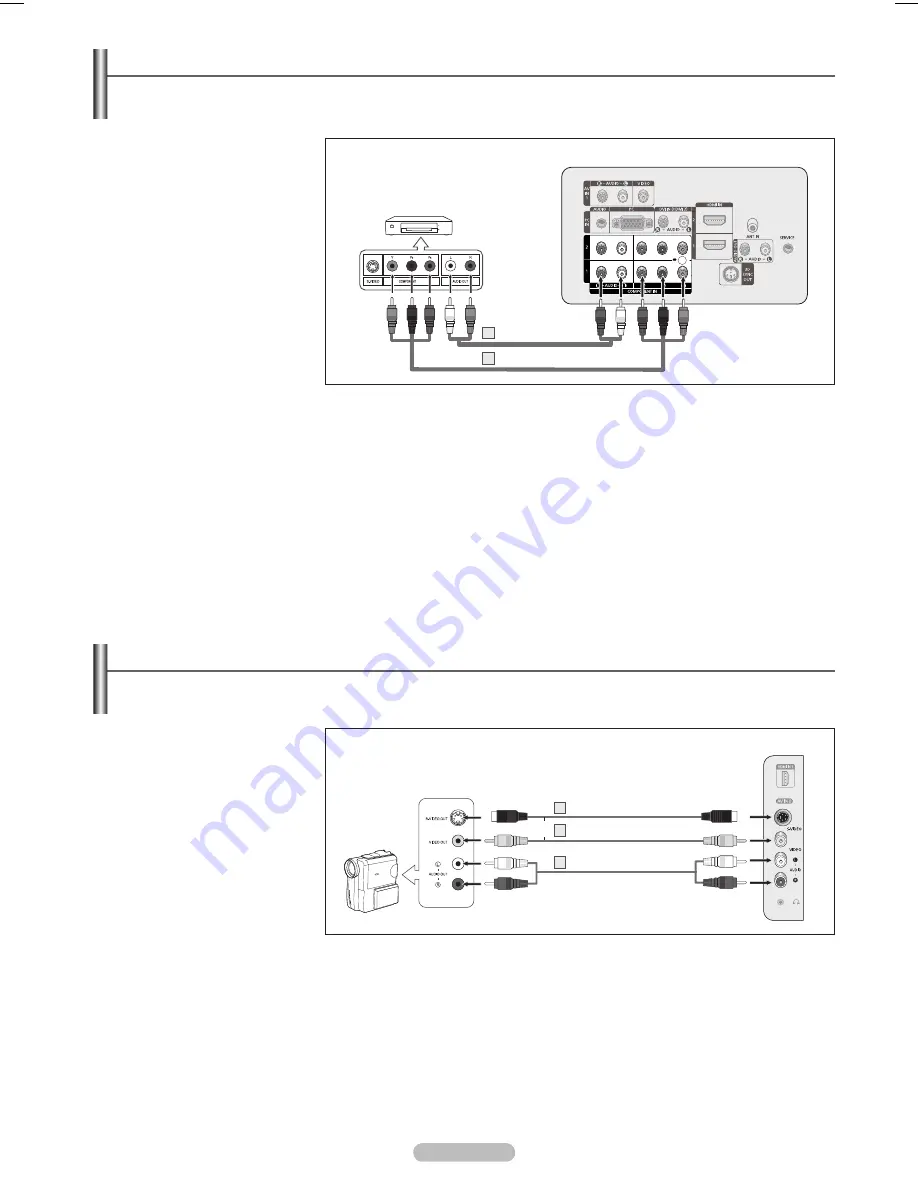
Connecting a Camcorder

The side panel jacks on your TV make it easy to connect a camcorder to your TV.

They allow you to view the camcorder tapes without using a VCR.

Connect a Video Cable

(or S-Video Cable) between 

the AV IN 2 [VIDEO]

(or S-VIDEO) jack on the TV 

and the VIDEO OUT jack on 

the Camcorder. 

Connect Audio Cables 

between the AV IN 2

[L-AUDIO-R] jacks on the TV 

and the AUDIO OUT jacks on 

the Camcorder.

  Each Camcorder has a different back panel configuration.

  When connecting a Camcorder, match the color of the connection terminal to the cable.

Connecting a DVD Player or Cable Box / Satellite receiver (Set-Top Box) via Component cables

The rear panel jacks on your TV make it easy to connect a DVD Player or Cable Box / Satellite receiver (Set-Top 

Box)  to your TV.

Connect Component Cables 

between the COMPONENT 

IN (1 or 2) [Y, P

B

, P

R

jacks on the TV and the 

COMPONENT [Y, P

B

, P

R

jacks on the DVD Player or 

Cable Box / Satellite receiver 

(Set-Top Box).

Connect Audio Cables 

between the COMPONENT 

IN (1 or 2) [R-AUDIO-L] jacks 

on the TV and the AUDIO 

OUT jacks on the DVD Player 

or Cable Box / Satellite 

receiver (Set-Top Box).

  Component video separates the video into Y (Luminance (brightness)), P

B


(Blue) and P

R

 (Red) for enhanced video quality. Be sure to match the component 

video and audio connections. For example, if connecting the video cable to 

COMPONENT IN 1, connect the audio cable to COMPONENT IN 1 also.

  Each DVD Player or Cable Box / Satellite receiver (Set-Top Box) has a different 

back panel configuration.

  When connecting a DVD Player or Cable Box / Satellite receiver (Set-Top Box), 

match the color of the connection terminal to the cable.

DVD Player or Cable Box/

Satellite receiver (Set-Top Box)

TV Rear Panel

Audio Cable (Not supplied)

2

Component Cable (Not supplied)

1

Camcorder

TV Side Panel

S-Video Cable(Not supplied)

1

Video Cable (Not supplied)

1

Audio Cable (Not supplied)

2

or

BN68-01449A.indb   12

2008-04-07   오후 6:02:18

Summary of Contents for PL-42A450

Page 1: ...he possibilities Plasma TV user manual Country Customer Care Center Web Site ARGENTINE 0800 333 3733 www samsung com ar BRAZIL 0800 124 421 4004 0000 www samsung com CHILE 800 SAMSUNG 726 7864 www samsung com cl COLOMBIA 01 8000112112 www samsung com co COSTA RICA 0 800 507 7267 www samsung com latin ECUADOR 1 800 10 7267 www samsung com latin EL SALVADOR 800 6225 www samsung com latin GUATEMALA 1...

Page 2: ...y images and text such as stock market reports video game displays station logos web sites or computer graphics and patterns should be limited as described above for all televisions Displaying stationary images that exceed the above guidelines can cause uneven aging of PDP Displays that leave subtle but permanent burned in ghost images in the PDP picture To avoid this vary the programming and imag...

Page 3: ... level pixels which require sophisticated technology to produce However there may be a few bright or dark pixels on the screen These pixels will have no impact on the performance of the product Avoid operating the TV at temperatures below 5 C 41 F A still image displayed too long may cause permanent damage to the PDP Panel Watching the Plasma TV in 4 3 format for a long period of time may leave tr...

Page 4: ...tting the Picture Settings to the Factory Defaults 32 Sound Control Changing the Sound Standard 33 Customizing the Sound 33 Setting the TruSurround XT 34 Choosing a Multi Channel Sound MTS Track 35 Automatic Volume Control 35 Setting the TV Speakers On Off 36 Listening to the Sound of the Sub PIP Picture 36 Connecting Headphones Sold separately 37 Channel Control Adding and Erasing Channels 38 Act...

Page 5: ...lease make sure the following items are included with your TV If any items are missing contact your dealer Remote Control AAA Batteries Not available in all locations Power Cord Owner s Instructions Cover Bottom Screws 2ea Refer to page 60 Warranty Card Safety Guide Manual Not available in all locations Cloth Clean The following parts are sold separately and are available at most electronics store...

Page 6: ...l 2 MENU Press to see an on screen menu of your TV s features 3 VOL Press to increase or decrease the volume In the on screen menu use the VOL buttons as you would use the and buttons on the remote control 4 CH Press to change channels In the on screen menu use the CH buttons as you would use the and buttons on the remote control 5 Power Indicator Blinks and turns off when the power is on and ligh...

Page 7: ...s connection When using an optional HDMI DVI adapter the DVI analog audio inputs on your TV allow you to receive left and right audio from your DVI device 5 ANT IN Connects to an antenna or cable TV system 6 AUDIO OUT R L Audio outputs to external devices 7 SERVICE For service only 8 3D SYNC OUT Connect to 3D IR Emitter 9 COMPONENT IN 1 2 Connects Component video audio 0 PC IN PC AUDIO Connect to ...

Page 8: ...TruSurround XT mode E MODE Press to select the preset display and sound modes for sports cinema and games Use these buttons in the DMA and Anynet modes This remote can be used to control recording on Samsung recorders with the Anynet feature SOURCE Press to display all of the available video sources PRE CH Tunes to the previous channel CH Press to change channels CC Controls the caption decoder ME...

Page 9: ... antennas to the TV This procedure requires an optional combiner adaptor available at most electronics shops 1 Connect both antenna leads to the combiner 2 Plug the combiner into the ANT IN terminal on the bottom of the back panel Installing Batteries in the Remote Control 1 Lift the cover at the back of the remote control upward as shown in the figure 2 Install two AAA size batteries Make sure to...

Page 10: ...T IN terminal on your cable box This terminal might be labeled ANT IN VHF IN or simply IN 2 Connect this cable to a two way splitter 3 Connect an Antenna cable between an OUTPUT terminal on the splitter and the IN terminal on the cable box 4 Connect an Antenna cable between the ANT OUT terminal on the cable box and the B IN terminal on the RF A B switch 5 Connect another cable between the other OU...

Page 11: ... Top Box match the color of the connection terminal to the cable Connecting a DVD Player or Cable Box Satellite receiver Set Top Box via DVI This connection can only be made if there is a DVI Output jack on the external device 1 Connect a HDMI DVI Cable or DVI HDMI Adapter between the HDMI IN 2 jack on the TV and the DVI jack on the DVD Player or Cable Box Satellite receiver Set Top Box 2 Connect ...

Page 12: ... 2 Y PB PR jacks on the TV and the COMPONENT Y PB PR jacks on the DVD Player or Cable Box Satellite receiver Set Top Box 2 Connect Audio Cables between the COMPONENT IN 1 or 2 R AUDIO L jacks on the TV and the AUDIO OUT jacks on the DVD Player or Cable Box Satellite receiver Set Top Box Component video separates the video into Y Luminance brightness PB Blue and PR Red for enhanced video quality Be...

Page 13: ...l on the VCR and the ANT IN terminal on the TV 4 Connect a Video Cable between the VIDEO OUT jack on the VCR and the AV IN 1 or AV IN 2 VIDEO jack on the TV 5 Connect Audio Cables between the AUDIO OUT jacks on the VCR and the AV IN 1 or AV IN 2 R AUDIO L jacks on the TV S Video Connection Your Samsung TV can be connected to an S Video jack on a VCR This connection delivers a better picture as com...

Page 14: ...fier is connected to the AUDIO OUT R AUDIO L jacks terminals Decrease the volume of the TV and adjust the volume level with the Amplifier s volume control Each Amplifier DVD Home Theater has a different back panel configuration When connecting an Amplifier DVD Home Theater match the color of the connection terminal to the cable Amplifier DVD Home Theater TV Rear Panel Audio Cable Not supplied ...

Page 15: ...ur computer 2 Connect a 3 5mm Stereo mini plug 2RCA cable between the DVI IN HDMI 2 R AUDIO L jack on the TV and the Audio Out jack of the sound card on your computer Each PC has a different back panel configuration When connecting a PC match the color of the connection terminal to the cable When using an HDMI DVI cable connection you must use the HDMI IN 2 terminal PC TV Rear Panel PC Audio Cable...

Page 16: ...Use then press the ENTER button The default selection is Home Use We recommend setting the TV to Home Use mode for the best picture in your home environment Store Demo mode is only intended for use in retail environments If the unit is accidentally set to Store Demo mode and you want to return to Home Use Standard Press the Volume button When the volume OSD is displayed press and hold the MENU but...

Page 17: ...you have finished press the ENTER button Even if the ENTER button is not pressed the message will automatically disappear after several seconds If you want to reset this feature 1 Press the MENU button to display the menu 2 Press the or button to select Setup then press the ENTER button 3 Press the ENTER button again to select Plug Play The message Start Plug Play is displayed Plug Play Enter Skip...

Page 18: ...on The button is used to select stations that broadcast a digital signal 1 To select a channel over 100 for channel 122 press then 2 then 2 Using the PRE CH Button to select the Previous Channel Use the number buttons to quickly tune to any channel 1 Press the PRE CH button The TV will switch to the last channel viewed To quickly switch between two channels that are far apart tune to one channel t...

Page 19: ...button on the remote control The TV will display the channel the type of sound and the status of certain picture and sound settings Press the INFO button once more or wait approximately 10 seconds and it disappears automatically 1 With the power on press the MENU button The main menu appears on the screen Its left side has five icons Picture Sound Channel Setup Input 2 Press the or button to selec...

Page 20: ...ls automatic and adding and deleting channels Channel manager Selecting the Video Signal source Before your television can begin memorizing the available channels you must specify the type of signal source that is connected to the TV i e an Air or a Cable system 1 Press the MENU button to display the menu Press the or button to select Channel then press the ENTER button 2 Press the ENTER button to...

Page 21: ...nu Press the or button to select Input then press the ENTER button Press the or button to select Edit Name then press the ENTER button 2 Press the or button to select AV1 AV2 S Video Component1 Component2 PC HDMI1 HDMI2 or HDMI3 input jack then press the ENTER button 3 Press the or button to select VCR DVD Cable STB Satellite STB PVR STB AV Receiver Game Camcorder PC TV IPTV Blu Ray HD DVD or DMA ...

Page 22: ...tem Press the ENTER button Press the EXIT button to exit When you make changes to Cell Light Contrast Brightness Sharpness Color or Tint the OSD will be adjusted accordingly When in PC mode Tint Sharpness and Color are not available Each adjusted setting will be stored separately according to its input mode Cell Light Sets the pixel brightness 10 being the highest setting Contrast Adjusts the cont...

Page 23: ...he or button to select Dynamic Contrast then press the ENTER button 7 Press the or button to select Off Low Medium or High Press the ENTER button Off Turns off the dynamic contrast adjustment function Low Sets the dynamic contrast to low Medium Sets the dynamic contrast to medium High Sets the dynamic contrast to high Activating Gamma You can adjust the Primary Color Red Green Blue Intensity 3 3 8...

Page 24: ...olor then press the ENTER button Color is available when Color Space is set to Custom 14 Press the or button to select Red Green Blue Yellow Cyan or Magenta Press the ENTER button 15 Press the or button to select Red Green or Blue to change it Press the ENTER button 16 Press the or button to decrease or increase the value of a particular item Press the ENTER button In Color you can adjust the RGB ...

Page 25: ...esh tone in the picture 20 Press the or button to select Flesh Tone then press the ENTER button 21 Press the or button to decrease or increase the value Press the ENTER button Changing the adjustment value will refresh the adjusted screen Activating Edge Enhancement You can emphasize object boundaries in the picture 22 Press the or button to select Edge Enhancement then press the ENTER button 23 P...

Page 26: ...up and down After selecting ZOOM mode Select by pressing the or button Use the or button to move the picture up and down After selecting use the or button to magnify or reduce the picture size in the vertical direction After selecting Just Scan in HDMI 1080i or Component 1080i mode Press the or button to select then press the ENTER button Press the or button to move the picture up down left and ri...

Page 27: ...d 2 Refer to page 25 2 Press the or button to select Digital NR then press the ENTER button 3 Press the or button to select Off Low Medium High or Auto Press the ENTER button Off Turns the screen noise reduction function off Low Reduces screen noise at a low level Medium Reduces screen noise at a medium level High Reduces screen noise at a high level Auto Automatically recognizes and reduces scree...

Page 28: ...ons instructions numbers 1 and 2 Refer to page 25 2 Press the or button to select HDMI Black Level then press the ENTER button 3 Press the or button to select Normal or Low then press the ENTER button Normal The screen gets brighter Low The screen gets darker This function is active only when the external input connects to HDMI RGB signals HDMI Black Level function may not be compatible with or ex...

Page 29: ...en especially when you displayed a still image on the screen for a long time Scrolling This function removes after images on the screen by moving all the pixels on the PDP according to a pattern Use this function when there are remaining after images or symbols on the screen especially when you displayed a still image on the screen for a long time Side Gray When you watch TV with the screen ratio ...

Page 30: ...numbers 1 and 2 Refer to page 25 2 Press the or button to select Screen Burn Protection then press the ENTER button 3 Press the ENTER button to select Pixel Shift then press the ENTER button Pressing the or button will alternate between On and Off You will also see the items Horizontal Dot Vertical Line and Time Pixel Shift Using this function you can minutely move pixels on the PDP in the horizon...

Page 31: ... activated To use the 3D Effect function a graphics card supporting 3D or 3D software is required The 3D glasses and the Emitter must be manufacturer by the same company If you play a game or watch TV while wearing the 3D glasses for long periods of time you may experience eyestrain or a headache 3D glasses including the Emitter not manufactured by Samsung may not be supported If you find the scre...

Page 32: ...oftware See the descriptions for Steps 1 to 4 above 5 Press the or button to select Format then press the ENTER button 6 Press the or button to select Checker Board Horizontal or Vertical then press the ENTER button Checker Board If the output format of your graphic card or 3D software is Checkerboard select this input format Horizontal If the output format of your graphic card or 3D software is H...

Page 33: ...to select a particular frequency to adjust Press the or button to increase or decrease the level of the particular frequency Press the EXIT button to exit L R Sound Balance Adjustment To adjust the sound balance of the L R speakers Bandwidth Adjustment 100Hz 300Hz 1kHz 3kHz 10kHz To adjust the level of different bandwidth frequencies If you make any changes to the equalizer settings the sound mode...

Page 34: ...e or button to select Off or On then press the ENTER button Press the EXIT button to exit Press the SRS button on the remote control to select On or Off TruSurround XT SRS and Symbol are trademarks of SRS Labs Inc TruSurround XT technology is incorporated under license from SRS Labs Inc Easy Setting 1 Press the TOOLS button on the remote control 2 Press the or button to select SRS TS XT 3 Press th...

Page 35: ... the or button to select Sound then press the ENTER button 2 Press the or button to select Auto Volume then press the ENTER button 3 Press the or button to select Off or On then press the ENTER button Press the EXIT button to exit Automatic Volume Control Reduces the difference in volume level among broadcasters Easy Setting 1 Press the TOOLS button on the remote control 2 Press the or button to s...

Page 36: ...ature is activated you can listen to the sound of the sub PIP picture 1 Press the MENU button to display the menu Press the or button to select Sound then press the ENTER button 2 Press the or button to select Sound Select then press the ENTER button 3 Press the or button to select Main or Sub then press the ENTER button Press the EXIT button to exit Main Used to listen to the sound of the main pi...

Page 37: ...he room When you insert the headphone s plug into the headphone jack you can MTS in TV mode Auto Volume and Sound Select in PIP mode in Sound menu Prolonged use of headphones at a high volume may damage your hearing You will not hear sound from the speakers when you connect headphones to the TV The headphone volume and TV volume are adjusted separately TV Side Panel ...

Page 38: ... the desired channel If you press the ENTER button again the symbol next to the channel disappears and the channel is not added 5 Repeat steps 5 for each channel to be selected or canceled Press the EXIT button to exit is active when Child Lock is selected to On Press the CH LIST button on the remote control to display a list of channels Air Cable Air Auto Program Channel Manager Fine Tune Color S...

Page 39: ...tton to select Channel List then press the ENTER button 6 Press the buttons to move to the field Press the ENTER button to lock the desired channel If you press the ENTER button again the symbol next to the channel disappears and the channel lock is canceled 6 Repeat steps 7 for each channel to be locked or unlocked Press the EXIT button to exit Select On or Off in Child Lock to easily turn the ch...

Page 40: ... detects the color signal sources automatically If the color implementation is unsatisfactory select any of PAL M PAL N or NTSC 1 Press the MENU button to display the menu Press the or button to select Channel then press the ENTER button 2 Press the or button to select Color System then press the ENTER button 3 Press the or button to select the desired color standard Auto PAL M PAL N or NTSC then ...

Page 41: ...tically If the signal from the system doesn t equal the standard signal mode adjust the mode by referring to your videocard user guide otherwise there may be no video For the display modes listed below the screen image has been optimized during manufacture D Sub Input Mode Resolution Horizontal Frequency kHz Vertical Frequency Hz Pixel Clock Frequency MHz Sync Polarity H V PL42A450P1 PL50A450P1 IB...

Page 42: ...tmost and fine tune again After the noise has been reduced re adjust the picture so that it is aligned on the center of the screen Preset Press the SOURCE button to select PC mode 1 Press the MENU button to display the menu Press the or button to select Picture then press the ENTER button Press the or button to select Screen then press the ENTER button 2 Press the or button to select Coarse or Fin...

Page 43: ...Initializing the Screen Position You can replace all image settings with the factory default values Preset Press the SOURCE button to select PC mode 1 Press the MENU button to display the menu Press the or button to select Picture then press the ENTER button Press the or button to select Screen then press the ENTER button 2 Press the or button to select Image Reset then press the ENTER button The ...

Page 44: ...e directly by pressing the number buttons on the remote control Setting the On Off Timer Use this feature to set the TV to turn on or off at a desired time You must set the clock first 1 Press the MENU button to display the menu Press the or button to select Setup then press the ENTER button Press the or button to select Time then press the ENTER button Continued Clock Set am Sleep Timer Off Timer...

Page 45: ...s on for too long time Setting the Sleep Timer The sleep timer automatically shuts off the TV after a preset time 30 60 90 120 150 and 180 minutes 1 Press the MENU button to display the menu Press the or button to select Setup then press the ENTER button Press the or button to select Time then press the ENTER button 2 Press the or button to select Sleep Timer then press the ENTER button 3 Press th...

Page 46: ... and it turns off when your TV is turned on Watching TV The LED lights when watching TV and it turns off when your TV is turned off Always The LED is always lit Set the Light Effect to Off to reduce the power consumption Plug Play Language English Time Caption Light Effect In Watching TV Wall mount Adjustment Melody Off Entertainment Off Energy Saving Off AV Color System Auto PIP Setup T V Enter M...

Page 47: ...e EXIT button to exit The Melody does not play When no sound is output from the TV because the MUTE button has been pressed When no sound is output from the TV because you have reduced the volume to minimum by pressing the VOL button When the TV is turned off by Sleep Timer function Plug Play Language English Time Caption Light Effect Watching TV Wall mount Adjustment Melody Off Entertainment Off ...

Page 48: ...sole connected to the TV Press the EXIT button to exit If you set any of the three Entertainment modes to On the settings will be locked and can not be adjusted If you want to make Picture and Sound mode adjustments the Entertainment mode must be turned off The Entertainment settings are saved for each input source You can press the E MODE button on the remote control repeatedly to change the Ente...

Page 49: ... or button to select Caption or Text then press the ENTER button 4 Depending on the particular broadcast it might be necessary to make changes to Channel and Field Press the or button to make the changes Follow the same procedure as in steps 3 above Press the EXIT button to exit Different channels and fields display different information Field 2 carries additional information that supplements the ...

Page 50: ...isappear You can view Analog TV broadcasts on the PIP screen sub picture when the main picture is from an external device connected to HDMI1 HDMI2 HDMI3 Component1 2 or PC PIP Settings Main Picture Sub Picture Component1 2 TV AV1 AV2 HDMI1 HDMI2 HDMI3 PC Selecting a Signal Source External A V for PIP 3 Press the or button to select Source then press the ENTER button Select the source of the sub pi...

Page 51: ...ton In Double Window and Double Wide modes Position cannot be selected Changing the PIP Channel 6 Press the or button to select Channel then press the ENTER button Press the or button to select the desired channel in the PIP window Press the ENTER button The channel can be active when the sub picture is set to TV Easy Setting 1 Press the TOOLS button on the remote control 2 Press the or button to ...

Page 52: ...ct the HDMI IN 1 HDMI IN 2 or HDMI IN 3 jack on the TV and the HDMI OUT jack of the corresponding Anynet device using the HDMI cable 2 Connect the HDMI IN jack of the home theater and the HDMI OUT jack of the corresponding Anynet device using the HDMI cable Connect only one Home Theater You can connect an Anynet device using the HDMI cable Some HDMI cables may not support Anynet functions Anynet w...

Page 53: ...Auto turn off function is enabled If you select No the Auto turn off function is canceled Press the EXIT button to exit The Select Device setting of the TV remote control is to be set to TV to use the Anynet function If you set Auto Turn Off to Yes connected external devices are also turned off when the TV is turned off However if the device is recording it may not be turned off Switching to the s...

Page 54: ...tton After switching to the device while playing a file Backward search Forward search Stop Play Pause Device with built in Tuner After switching to the device when you are watching a TV program CH button Audio Device When Receiver is activated VOL button MUTE button The Anynet function only works when the remote control is set to TV The REC button works only while in the recordable state You cann...

Page 55: ...onnecting or removing the HDMI cable please make sure to search devices again or turn your TV off and on again Check if the Anynet Function of Anynet device is set on I want to start Anynet Check if the Anynet device is properly connected to the TV and check if the Anynet HDMI CEC is set to On in the Anynet Setup menu Press the TV button on the TV remote control to switch to TV Then press the TOOL...

Page 56: ...o digital The visual quality is of an SD Standard Definition grade Screen is black and power indicator light blinks steadily On your computer check the Power and Signal Cable The TV is using its power management system Move the computer s mouse or press any key on the keyboard On your equipment check STB DVD etc Power and Signal Cable The TV is using its power management system Press the SOURCE bu...

Page 57: ... Press the or button to select Yes then press the ENTER button The position is initialized to the default setting 3 Press the Blue button Press the and buttons to select a save mode from either Position 1 Position 2 or Position 3 in order to save the current position To not save the current position press the RETURN button When selecting a save mode you cannot use the Color buttons 4 Press the ENT...

Page 58: ...play will disappear For installation refer to the Installation Manual provided with the wall mount For product installation and the installation and moving of the wall mount make sure to consult a specialized installation company This installation manual is to be used when attaching the wall mount to a wall When attaching to other building materials please contact your nearest dealer The auto wall...

Page 59: ...han the standard dimension as they may cause damage to the inside of the TV set For wall mounts that do not comply with the VESA standard screw specifications the length of the screws may differ depending on their specifications Do not use screws that do not comply with the VESA standard screw specifications Do not use fasten the screws too strongly this may damage the product or cause the product...

Page 60: ...olution 1024 x 768 60 Hz 1360 x 768 60 Hz Sound Output 10W 10W 10W 10W Dimension W x H x D Body With stand 41 5 X 26 3 X 3 7 inches 1055 0 X 667 4 X 93 2 mm 41 5 X 28 5 X 12 4 inches 1055 0 X 724 9 X 315 9 mm 48 4 X 29 8 X 3 8 inches 1230 2 X 755 7 X 95 0 mm 48 4 X 32 0 X 12 4 inches 1230 2 X 812 7 X 315 9 mm Weight Body With stand 59 3 lbs 26 9 Kg 67 2 lbs 30 5 Kg 75 4 lbs 34 2 Kg 81 6 lbs 37 0 K...

Page 61: ...This page is intentionally left blank ...

Page 62: ...This page is intentionally left blank ...

Page 63: ...This page is intentionally left blank ...

Page 64: ...a pantallas de videojuegos logotipos de emisoras sitios Web o gráficos y dibujos de ordenador deberá limitarse en todos los televisores como ya se ha descrito La visualización de imágenes estáticas que supere los límites de las instrucciones anteriores puede producir un envejecimiento desigual de las pantallas PDP lo que provocará una reproducción superpuesta sutil pero permanente de la imagen de ...

Page 65: ...utiliza un panel compuesto de 1 230 000 nivel SD a 3 150 000 nivel HD píxeles que requieren una sofisticada tecnología para su producción No obstante puede que existan unos cuantos píxeles brillantes u oscuros en la pantalla Estos píxeles no influirán en el rendimiento del aparato Evite que el TV funcione a temperaturas por debajo de 5 C La imagen fija visualizada durante demasiado tiempo puede ca...

Page 66: ...os valores predefinidos de fábrica 32 Control del sonido Cambio del estándar de sonido 33 Personalización del sonido 33 Ajuste de TruSurround XT 34 Selección de una pista de sonido multicanal MTS 35 Control automático de volumen 35 Encendido apagado del altavoz del televisor 36 Audición del sonido de la imagen secundaria PIP 36 Conexión de los auriculares se venden por separado 37 Control de los c...

Page 67: ... siguientes vengan incluidos con su televisor Si falta alguno póngase en contacto con su distribuidor Mando a distancia Pilas AAA No disponibles en todos los lugares Cable de alimentación Manual del usuario Cubierta inferior Tornillos 2 Consulte la página 60 Tarjeta de garantía Manual de guía de seguridad No disponible en todos los lugares Paño de limpieza Las piezas siguientes se venden por separ...

Page 68: ...pantalla un menú de las características del televisor 3 VOL Púlselos para subir o bajar el volumen En el menú de la pantalla use los botones VOL del mismo modo que los botones y del mando a distancia 4 CH Permiten cambiar de canal En el menú de la pantalla use los botones CH del mismo modo que los botones y del mando a distancia 5 Indicador de encendido Parpadea y se apaga cuando se enciende el ap...

Page 69: ...l HDMI DVI Cuando se usa un adaptador HDMI DVI las entradas de señales de audio analógicas DVI del televisor permiten recibir señales de audio por las entradas derecha e izquierda desde el dispositivo DVI 5 ANT IN Permite conectar a una antena o un sistema de TV por cable 6 AUDIO OUT R L Salidas de audio para dispositivos externos 7 SERVICE Sólo para servicio 8 3D SYNC OUT Conexión para un emisor ...

Page 70: ...nales SRS Selecciona el modo SRS TruSurround XT E MODE Pulse este botón para seleccionar los modos de visualización y de sonido preconfigurados para los deportes las películas y los juegos Use estos botones en los modos DMA y Anynet Este mando remoto se puede usar para controlar la grabación en las grabadoras de Samsung con la función Anynet SOURCE Púlselo para ver todas las fuentes de vídeo dispo...

Page 71: ...to requiere un combinador adaptador opcional disponible en la mayoría de tiendas de electrónica 1 Conecte los dos cables de antena al combinador 2 Enchufe el combinador en la terminal ANT IN de la parte inferior del panel posterior Instalación de las pilas en el mando a distancia 1 Levante la tapa de la parte posterior del mando a distancia como se muestra en la ilustración 2 Instale dos baterías ...

Page 72: ...codificador de cable Esta terminal puede estar etiquetado como ANT IN VHF IN o sencillamente IN 2 Conecte este cable al separador de señales de dos vías 3 Conecte un cable de antena entre una terminal OUTPUT del separador y la terminal IN del decodificador 4 Conecte un cable de antena entre la terminal ANT OUT del decodificador y la terminal B IN del conmutador RF A B 5 Conecte otro cable entre la...

Page 73: ... televisión por cable satélite decodificador a través de DVI Esta conexión sólo se puede realizar si hay un terminal de salida de DVI en el dispositivo externo 1 Conecte un cable HDMI DVI o un adaptador de DVI HDMI entre la terminal de entrada HDMI IN 2 del televisor y la terminal DVI del reproductor de DVD receptor de cable satélite decodificador Conecte cables de audio entre la terminal de entra...

Page 74: ...NENT Y PB PR del reproductor de DVD o receptor de televisión por cable satélite decodificador Conecte los cables de audio entre las terminales COMPONENT IN 1 o 2 R AUDIO L del televisor y las terminales AUDIO OUT del reproductor de DVD o receptor de televisión por cable satélite decodificador El vídeo componente divide las señales de vídeo en Y luminancia brillo PB azul y PR rojo para mejorar la c...

Page 75: ...los cables de audio entre las terminales AUDIO OUT del aparato de vídeo y las terminales AV IN 1 o AV IN 2 R AUDIO L del televisor Conexión de S Vídeo Este televisor Samsung se puede conectar a una terminal S Video de un aparato de vídeo Esta conexión ofrece mejor calidad de imagen que un vídeo normal 1 Para empezar siga los pasos 1 a 3 del apartado anterior para conectar la antena o el sistema de...

Page 76: ...DIO OUT R AUDIO L Disminuya el volumen del TV y ajuste el nivel del volumen con el control del volumen del amplificador Cada amplificador y sistema de DVD para Sistema de cine en casa tiene una configuración diferente del panel posterior Cuando conecte un amplificador o un sistema de DVD para Sistema de cine en casa debe hacer coincidir los colores de la terminal de conexión y del cable Panel post...

Page 77: ...mm 2 RCA entre la terminal DVI IN HDMI 2 RAUDIO L del televisor y la terminal de salida de audio de la tarjeta de sonido del ordenador Cada ordenador tiene una configuración diferente del panel posterior Cuando conecte un ordenador debe hacer coincidir los colores de la terminal de conexión y del cable Cuando se usa una conexión de cable HDMI DVI se debe utilizar la terminal HDMI IN 2 Panel poster...

Page 78: ...lección predeterminada es Uso domiciliario Es recomendable configurar el televisor en el modo Uso doméstico para obtener la mejor imagen en un entorno doméstico El modo Demo comercio sólo es necesario en los entornos comerciales Si la unidad se configura accidentalmente en el modo Demo comercio y se desea volver a Uso domiciliario estándar Pulse el botón Volumen Cuando se muestra la OSD del volume...

Page 79: ...ulse el botón ENTER el mensaje desaparecerá automáticamente después de algunos segundos Si desea reiniciar esta función 1 Pulse el botón MENU para mostrar el menú Pulse los botones o para seleccionar Configuración y a continuación pulse el botón ENTER 2 Pulse el botón ENTER para seleccionar Plug Play Si desea más detalles sobre las opciones de configuración consulte las páginas 15 y 16 La función ...

Page 80: ... canal Uso del botón 1 Para seleccionar un canal superior a 100 por ejemplo el 122 pulse y a continuación 2 y 2 Utilización del botón PRE CH para seleccionar el canal anterior Utilice los botones numéricos para sintonizar rápidamente cualquier canal 1 Pulse el botón PRE CH El televisor cambiará al último canal visualizado Para conmutar rápidamente entre dos canales bastante distantes sintonice un ...

Page 81: ...O del mando a distancia El televisor mostrará el canal el tipo de sonido y el estado de ciertos ajustes de imagen y sonido Pulse el botón INFO otra vez o espere unos 10 segundos y desaparecerá automáticamente 1 Con el aparato encendido pulse el botón MENU En la pantalla aparecerá el menú principal En el lado izquierdo hay cinco iconos Imagen Sonido Canal Configuración Entrada 2 Pulse los botones o...

Page 82: ...os de sistemas de TV por cable Póngase en contacto con su proveedor de cable para saber el tipo de sistema de cable existente en su zona En este momento ya se ha seleccionado el origen de la señal Pulse el botón EXIT para salir Almacenamiento de los canales en la memoria método automático 1 Pulse el botón MENU para mostrar el menú Pulse los botones o para seleccionar Canal a continuación pulse el ...

Page 83: ... para ver el menú Pulse los botones o para seleccionar Entrada y a continuación pulse el botón ENTER Pulse los botones o para seleccionar Editar Nombre y a continuación pulse el botón ENTER 2 Pulse los botones o para seleccionar las terminales de entrada AV1 AV2 S Video Componente1 Componente2 PC HDMI1 HDMI2 o HDMI3 y a continuación pulse el botónENTER 3 Pulse los botones o para seleccionar la fue...

Page 84: ...SD se ajusta consecuentemente En el modo PC Tinte Definición y Color no están disponibles Cada valor ajustado se almacenará por separado según su modo de entrada Luz de la celda Ajusta el brillo de los píxeles siendo 10 el valor máximo Contraste Ajusta el nivel del contraste de la imagen Brillo Ajusta el nivel del brillo de la imagen Definición Ajusta la definición de los bordes de la imagen Color...

Page 85: ...ste del contraste dinámico Bajo Establece el contraste dinámico en un nivel bajo Medio Establece el contraste dinámico en un nivel medio Alto Establece el contraste dinámico en un nivel alto Activación de gamma Se puede ajustar la intensidad de los colores primarios rojo verde y azul 3 3 8 Pulse los botones o para seleccionar Gamma y a continuación pulse el botón ENTER 9 Pulse los botones o para d...

Page 86: ... está disponible cuando Espacio de color está configurado como Favorito 14 Pulse los botones o para seleccionar Rojo Verde Azul Amarillo Cián o Magenta Pulse el botón ENTER 15 Pulse los botones o para seleccionar Rojo Verde o Azul a fin de cambiarlos Pulse el botón ENTER 16 Pulse los botones o para aumentar o reducir el valor de una opción concreta Pulse el botón ENTER En Color se pueden ajustar l...

Page 87: ...de la piel Permite acentuar el tono rosa en las imágenes 20 Pulse los botones o para seleccionar Tono Piel y pulse el botón ENTER 21 Pulse los botones o para disminuir o aumentar el valor Pulse el botón ENTER El cambio del valor de ajuste renovará la pantalla ajustada Activación de la mejora de perfiles Permite acentuar los bordes de los objetos en las imágenes 22 Pulse los botones o para seleccio...

Page 88: ...arriba y abajo Después de seleccionar el modo Zoom Seleccione con los botones o Utilice los botones o para desplazar la imagen hacia arriba o hacia abajo Tras seleccionar utilice los botones o para ampliar o reducir el tamaño de la imagen en dirección vertical Después de seleccionar Sólo buscar en los modos HDMI 1080i o Componente 1080i Pulse los botones o para seleccionar después pulse el botón E...

Page 89: ...lto Reduce el ruido de la pantalla a un nivel alto Auto Reconoce y reduce el ruido de la pantalla automáticamente Pulse el botón EXIT para salir Continúa Zoom Tamaño de pantalla cuando se amplía verticalmente el formato amplio Ajusta la imagen en modo normal 4 3 Zoom ancho Aumenta el tamaño de la imagen más que 4 3 Sólo buscar Use esta función para ver la imagen completa sin cortes cuando la entra...

Page 90: ...las instrucciones 1 y 2 de Activación de las opciones de la imagen Consulte la página 25 2 Pulse los botones o para seleccionar N neg HDMI y pulse el botónENTER 3 Pulse los botones o para seleccionar Normal o Bajo y pulse el botón ENTER Normal La pantalla adquiere más brillo Bajo La pantalla se oscurece Esta función sólo está activa cuando un dispositivo externo está conectado al televisor a travé...

Page 91: ...ialmente después de haber mostrado una imagen fija en la pantalla durante un largo tiempo Desplazamiento Esta función suprime los restos de imágenes en la pantalla moviendo todos los píxeles del PDP de acuerdo con un patrón Utilice esta función si hay restos de imágenes o símbolos en la pantalla especialmente después de haber mostrado una imagen fija en la pantalla durante un largo tiempo Lateral ...

Page 92: ...n Consulte la página 25 2 Pulse los botones o para seleccionar Protección de Pantalla y a continuación pulse el botón ENTER 3 Pulse el botón ENTER para seleccionar Cambio de píxel y a continuación pulse el botón ENTER Si pulsa los botones o alterna entre Encendido y Apagado También verá las opciones Punto horizontal Línea vertical y Tiempo Cambio de píxel Con esta función podrá mover píxeles de fo...

Page 93: ...lda de luz Contraste Brillo Efecto D y Reini cio imagen Si se cancela el Efecto D N neg HDMI vuelve a su valor anterior Al usar la Función 3D necesario una tarjeta de graficos o software 3D Las gafas 3D incluido el emisor que no hayan sido fabricadas por Samsung RealD e ilixco pueden no ser compati bles Las gafas 3D y el emisor deben ser del mismo fabricante Si juega o ve la televisión durante un ...

Page 94: ...e 3D es Horizontal interlazado seleccione este formato de entrada Vertical Si el formato de salida de la tarjeta gráfica o del software 3D es Vertical interlazado seleccione este formato de entrada Efecto 3D T V Modo Formato Ingresar Mover Regresar Off Modo 1 Modo 2 Efecto 3D T V Modo Modo 1 Formato Ingresar Mover Regresar Tablero de ajedrez Horizontal Vertical Opciones de imagen T V Tono Color No...

Page 95: ...lícula Diálogo Favorito Ingresar Mover Regresar 1 Pulse el botón MENU para mostrar el menú Pulse los botones o para seleccionar Sonido a continuación pulse el botón ENTER 2 Pulse los botones o para seleccionar Ecualizador y a continuación pulse el botón ENTER 3 Pulse los botones o para seleccionar una frecuencia determinada con el fin de ajustarla Pulse los botones o para aumentar o reducir el niv...

Page 96: ... Pulse los botones o para seleccionar Apagado o Encendido y a continuación pulse el botón ENTER Pulse el botón EXIT para salir TruSurround XT SRS y el símbolo son marcas comerciales de SRS Labs Inc La tecnología TruSurround XT está incorporada bajo licencia de SRS Labs Inc Configuración sencilla 1 Pulse el botón TOOLS del mando a distancia 2 Pulse los botones o para seleccionar SRS TS XT 3 Pulse l...

Page 97: ...el programa concreto emitido puede escuchar en modo mono o estéreo o escuchar un programa de audio secundario SAP 1 Pulse el botón MENU para ver el menú Pulse los botones o para seleccionar Sonido y a continuación pulse el botón ENTER 2 Pulse los botones o para seleccionar Vol Auto y a continuación pulse el botón ENTER 3 Pulse los botones o para seleccionar Apagado o Encendido y a continuación pul...

Page 98: ...odo Favorito Ecualizador SRS TS XT Apagado MTS Estéreo Vol Auto Apagado Altavoz TV Encendido Sel Sonido Principal Sonido T V Modo Favorito Ecualizador SRS TS XT Apagado MTS Estéreo Vol Auto Apagado Altavoz TV Off Sel Sonido Main Sonido T V Apagado Encendido Ingresar Mover Regresar Ingresar Mover Regresar Audición del sonido de la imagen secundaria PIP Cuando se activa la función PIP se puede escuc...

Page 99: ...uriculares solo se pueden utilizar las opciones MTS en el modo de TV Vol Auto y Sel Sonido en el modo PIP en el menú Sonido El uso continuado de auriculares a un volumen elevado puede dañar la capacidad auditiva No recibirá sonido de los altavoces cuando conecte los auriculares al televisor El volumen de los auriculares y el del televisor se ajustan de manera distinta El volumen de los auriculares...

Page 100: ...canal que desee Si vuelve a pulsar el botón ENTER el símbolo que aparece junto al canal desaparece y éste no se añade 5 Repita el paso 5 con cada canal que desee seleccionar o cancelar Pulse el botón EXIT para salir se activa cuando Bloqueo está ajustado como Encendido Pulse el botón CH LIST del mando a distancia para que se muestre una lista de canales Lista de canales Bloqueo Apagado Gestor de c...

Page 101: ...tones o para seleccionar Lista de canais y a continuación pulse el botón ENTER 6 Pulse los botones para ir al campo Pulse el botón ENTER para bloquear el canal deseado Si vuelve a pulsar el botón ENTER el símbolo que aparece junto al canal desaparece y el bloqueo del canal se cancela 7 Repita el paso 7 con cada canal que desee bloquear o desbloquear Pulse el botón EXIT para salir Seleccione Encend...

Page 102: ...ENTER 2 Pulse los botones o para seleccionar Sistema Color y a continuación pulse el botón ENTER 3 Pulse los botones o para seleccionar el estándar de color deseado Auto PAL M PAL N o NTSC y a continuación pulse el botón ENTER Pulse el botón EXIT para salir Configuración del sistema color Normalmente el televisor puede recibir imagen y sonido de buena calidad en el modo automático Este modo detect...

Page 103: ...se ajustará automáticamente Si la señal del sistema no es igual al modo de señal estándar ajuste el modo consultando la guía del usuario de la tarjeta de vídeo de lo contrario puede no haber señal de vídeo La imagen de pantalla se ha optimizado durante la fabricación para los siguientes modos de visualización Entrada D Sub Modo Resolución Frecuencia horizontal kHz Frecuencia vertical Hz Frecuencia...

Page 104: ... fina Cuando se hayan reducido las interferencias vuelva a ajustar la imagen de forma que esté centrada en la pantalla Preselección Pulse el botón SOURCE para seleccionar el modo PC 1 Pulse el botón MENU para ver el menú Pulse los botones o para seleccionar Imagen a continuación pulse el botón ENTER Pulse los botones o para seleccionar Pantalla y a continuación pulse el botón ENTER 2 Pulse los bot...

Page 105: ... botón EXIT para salir Inicialización de la posición de la pantalla Puede recuperar todos los ajustes de imagen predeterminados de fábrica Preselección Pulse el botón SOURCE para seleccionar el modo PC 1 Pulse el botón MENU para ver el menú Pulse los botones o para seleccionar Imagen y a continuación pulse el botón ENTER Pulse los botones o para seleccionar Pantalla y a continuación pulse el botón...

Page 106: ...a Activación y desactivación del temporizador Utilice esta función para que el televisor se encienda o apague a una hora concreta Debe ajustar el reloj en primer lugar 1 Pulse el botón MENU para ver el menú Pulse los botones o para seleccionar Configuración y pulse el botón ENTER Pulse los botones o para seleccionar Tiempo y a continuación pulse el botón ENTER Continúa Config Reloj am Temporizador...

Page 107: ...lse el botón para ir al paso siguiente Ajuste otras opciones utilizando este mismo método 3 Pulse los botones o para seleccionar el siguiente elemento deseado Pulse los botones o para ajustar el valor Pulse el botón EXIT para salir Hora de encendido Seleccione la hora los minutos am pm Apagado y Encendido Para activar el temporizador con la configuración deseada establézcalo en Encendido Hora de a...

Page 108: ...er el LED azul del frontal del televisor 1 Pulse el botón MENU para ver el menú Pulse los botones o para seleccionar Configuración y a continuación pulse el botón ENTER 2 Pulse los botones o para seleccionar Efecto de luz y a continuación pulse el botón ENTER Pulse los botones o para seleccionar Apagado Modo espera act Modo vis act o Encendido y a continuación pulse el botón ENTER Pulse el botón E...

Page 109: ...dio Establece el volumen de la melodía en un nivel medio Alto Establece el volumen de la melodía en un nivel alto Pulse el botón EXIT para salir La melodía no se reproduce Cuando no hay salida de sonido desde el televisor porque se ha activado el botón MUTE Cuando no hay salida de sonido desde el televisor porque se ha reducido el volumen al mínimo pulsando el botón VOL Cuando la función de Tempor...

Page 110: ...ar Ingresar Apagado Deportes Cine Juego Plug Play Idioma Español Tiempo Subtítulo Efecto de luz Efecto de luz Ajuste de montaje en pared Melodia Apagado Entretenimiento Apagado Ahorro energía Apagado Sistema de color AV Auto PIP Configuración T V Ingresar Mover Regresar Uso de la función de ahorro de energía Esta función ajusta el consumo de energía de la unidad para ahorrar energía 1 Pulse el bot...

Page 111: ...a señal de los subtítulos de los programas televisivos por lo que las cintas de vídeo domésticas también ofrecen subtítulos La mayoría de las cintas de vídeo comerciales también ofrecen subtítulos Compruebe si aparece el símbolo de subtítulos en la programación de televisión y en la caja de la cinta 1 Pulse el botón MENU para ver el menú Pulse los botones o para seleccionar Configuración y a conti...

Page 112: ...or puede recibir imagen y sonido de buena calidad en el modo AUTO Este modo detecta automáticamente el sistema de color de la señal Si recibe un sistema de señal con un color insatisfactorio seleccione un modo del sistema de color AV como PAL M PAL N o NTSC 1 Pulse el botón MENU para ver el menú Pulse los botones o para seleccionar Configuración y a continuación pulse el botón ENTER 2 Pulse los bo...

Page 113: ...leccionar Canal y a continuación pulse el botón ENTER Pulse los botones o para seleccionar un canal de la ventana PIP Pulse el botón ENTER El canal puede estar activo cuando la imagen secundaria está configurada como TV Configuración sencilla 1 Pulse el botón TOOLS del mando a distancia 2 Pulse los botones o para seleccionar PIP y a continuación pulse el botón ENTER 3 Pulse los botones o para sele...

Page 114: ...HDMI 2 o HDMI 3 del televisor y la terminal HDMI OUT del dispositivo Anynet correspondiente mediante el cable HDMI 2 Conecte la terminal HDMI IN del sistema de cine en casa y la terminal HDMI OUT del dispositivo Anynet correspondiente mediante el cable HDMI Conecte sólo un sistema de Cine en casa Puede conectar un dispositivo Anynet mediante el cable HDMI 1 3 Algunos cables HDMI pueden no admitir ...

Page 115: ...i selecciona No se cancela la función Apagado automático Pulse el botón EXIT para salir Para usar la función Anynet el valor Seleccionar dispositivo del mando a distancia debe ajustarse en TV Si establece Apagado automático como Sí los dispositivos externos conectados también se desactivan cuando se apaga el televisor Sin embargo si el dispositivo está grabando puede que no se apague El cambio a l...

Page 116: ... pantalla Botones numéricos Botones ENTER Botones de colores Botón EXIT Después de cambiar al dispositivo mientras se reproduce un archivo Búsqueda atrás Búsqueda adelante Parar Reproducir pausa Dispositivo con sintonizador incorporado Después de cambiar al dispositivo mientras se ve un programa de TV Botones CH Dispositivo de audio Cuando la opción Receptor está activada Botones VOL Botón MUTE La...

Page 117: ... desconecta el cable HDMI se han de buscar de nuevo los dispositivos o volver a apagar y encender el televisor Compruebe si la función Anynet del dispositivo Anynet está activada Deseo iniciar Anynet Compruebe si el dispositivo Anynet está debidamente conectado al televisor y si la opción Anynet HDMI CEC del menú Configuración de Anynet está establecida en Encendido Pulse el botón TV del mando a d...

Page 118: ...nalmente un programa analógico que se ha convertido a digital La calidad visual es de grado SD definición estándar La pantalla está en blanco y el indicador de encendido parpadea constantemente En el ordenador compruebe los cables de señal y de alimentación El televisor está usando su sistema de gestión de energía Mueva el ratón del ordenador o pulse cualquier tecla En el equipo compruebe STB DVD ...

Page 119: ...n INFO para reiniciar Pulse los botones o para seleccionar Sí y a continuación pulse el botón ENTER La posición se inicializa con la configuración predeterminada 3 Pulse el botón azul Pulse los botones y para seleccionar un modo de guardar entre Posición 1 Posición 2 o Posición 3 en este orden para guardar la posición actual Si no desea guardar la posición actual pulse el botón RETURN Cuando se se...

Page 120: ...lación consulte el manual de instalación proporcionado con el equipo de montaje mural Para la instalación del producto así como la instalación y movimiento del montaje en la pared consulte a una empresa especializada en instalaciones La instalación manual se debe usar al colocar el equipo de montaje en una pared Para colocarlo en otros materiales de construcción póngase en contacto con el distribu...

Page 121: ...n tamaño superior al estándar ya que pueden causar daños en el interior del televisor Para montajes murales que no cumplen las especificaciones de tornillos estándar VESA la longitud de éstos puede variar dependiendo de las especificaciones No use tornillos que no cumplan las especificaciones de tornillos estándar VESA No apriete excesivamente los tornillos ya que podría dañar el producto o provoc...

Page 122: ...del PC 1024 x 768 60 Hz 1360 x 768 60 Hz Sonido Salida 10W 10W 10W 10W Dimensiones Al x An x Pr Cuerpo principal Con soporte 41 5 X 26 3 X 3 7 inches 1055 0 X 667 4 X 93 2 mm 41 5 X 28 5 X 12 4 inches 1055 0 X 724 9 X 315 9 mm 48 4 X 29 8 X 3 8 inches 1230 2 X 755 7 X 95 0 mm 48 4 X 32 0 X 12 4 inches 1230 2 X 812 7 X 315 9 mm Peso Cuerpo principal Con soporte 59 3 lbs 26 9 Kg 67 2 lbs 30 5 Kg 75 ...

Page 123: ...Esta página se ha dejado en blanco expresamente ...

Reviews: