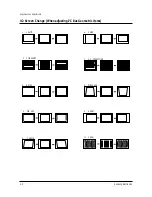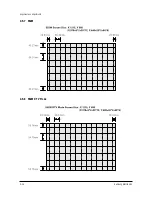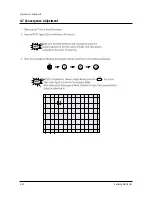
Alignment and Adjustments
Samsung Electronics
4-9
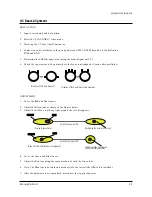
4-3 Beam Alignment
PRECAUTION
1. Input a crosshatch and dot pattern.
2. Select the “STANDARD” video mode.
3. Warm up the TV for at least 10 minutes.
4. Connect an audio oscillator to the pin jig between GT401~GT402 (located on the deflection
PCB) and GND.
5. Determine the ZERO-magnet area (using the beam-alignment CY)
6. Check the squarewave at the point where the focus is misaligned (Use an audio oscillator).
ADJUSTMENT
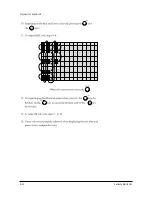
1. Cover the Red and Blue lenses.
2. Adjust the Green lens as shown in the figures below
3. Adjust the G-Focus until any light around the core disappears.
4. Cover the Green and Blue lenses.
5. Adjust the Red lens using the same method as with the Green lens.
6. Note: The Blue lens is not adjusted because its focus varies little (VM-coil is installed).
7. After the adjustments are completed, disconnect the jig pin connector.
(Creation of CPM Zero Magnet)
G-FOCUS
CORE
CORE
G-FOCUS
(Creation of the 2-pole/4-pole zero magnets)
G-FOCUS
CORE
(Varying G-Focus Pack)
Varying the 2-pole of VM
(Positioning the Core in the Center)
Varying the 4-pole of VM
CORE
G-FOCUS
(When VM 2-Pole Adjustment is completed)
(Adjust until the light around
the core becomes a circle)
Summary of Contents for PCJ522R
Page 2: ...ELECTRONICS Samsung Electronics Co Ltd JUL 2000 Printed in Korea 3P51A 6510 ...
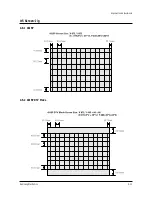
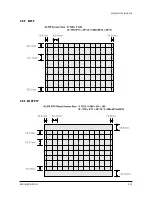
Page 29: ...Alignment and Adjustments 4 14 Samsung Electronics 4 5 3 53J5P 4 5 4 53J5P DTV Mode ...
Page 30: ...Alignment and Adjustments Samsung Electronics 4 15 4 5 5 61J5P 4 5 6 61J5P DTV ...
Page 31: ...Alignment and Adjustments 4 16 Samsung Electronics 4 5 7 552W 4 5 8 552W DTV Mode ...
Page 35: ...Alignment and Adjustments 4 20 Samsung Electronics 4 7 Convergence Adjustment ...
Page 36: ...Alignment and Adjustments Samsung Electronics 4 21 ...
Page 37: ...Alignment and Adjustments 4 22 Samsung Electronics ...
Page 38: ...Alignment and Adjustments Samsung Electronics 4 23 ...
Page 39: ...Alignment and Adjustments 4 24 Samsung Electronics ...
Page 40: ...Alignment and Adjustments Samsung Electronics 4 25 ...
Page 41: ...Alignment and Adjustments 4 26 Samsung Electronics 4 8 PC Mode 4 8 1 TV Setup Mode ...
Page 57: ...Alignment and Adjustments 4 42 Samsung Electronics 4 9 9 3D PHONIC Module 4 9 10 MTS Module ...
Page 63: ...MEMO 5 4 Samsung Electronics ...
Page 112: ...8 4 Samsung Electronics MEMO ...
Page 120: ...Schematic Diagrams Samsung Electronics 10 7 10 7 CRT ...
Page 122: ...Schematic Diagrams Samsung Electronics 10 9 10 9 CONVERGENCE MDL ...
Page 124: ...Schematic Diagrams Samsung Electronics 10 11 10 11 3D COMB 7 7 Power Line Signal Line ...
Page 125: ...Schematic Diagrams 10 12 Samsung Electronics 10 12 3D PHONIC ...
Page 126: ...Schematic Diagrams Samsung Electronics 10 13 10 13 F CONVERTER ...
Page 127: ...Schematic Diagrams 10 14 Samsung Electronics 10 14 PIP ...
Page 128: ...Schematic Diagrams Samsung Electronics 10 15 10 15 TERMINAL 1 ...
Page 129: ...Schematic Diagrams 10 16 Samsung Electronics 10 16 TERMINAL 2 ...
Page 130: ...Schematic Diagrams Samsung Electronics 10 17 10 17 IF V M MODULE ...
Page 131: ...Schematic Diagrams 10 18 Samsung Electronics 10 18 PROSCAN 1 3 ...
Page 132: ...Schematic Diagrams Samsung Electronics 10 19 10 19 PROSCAN 2 3 Power Line Signal Line ...
Page 133: ...Schematic Diagrams 10 20 Samsung Electronics 10 20 PROSCAN 3 3 Power Line Signal Line ...
Page 134: ...Schematic Diagrams Samsung Electronics 10 21 10 21 CHROMA INTERLACE ONLY ...


