background image

English - 35

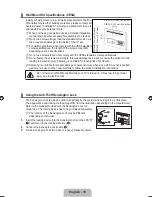
Wall Mount Kit Specifications (VESA)


¦

Install your wall mount on a solid wall perpendicular to the floor. 

When attaching to other building materials, please contact your 

nearest dealer. If installed on a ceiling or slanted wall, it may fall 

and result in severe personal injury.

When purchasing our wall mount kit, a detailed installation 


N

manual and all parts necessary for assembly are provided.

Do not use screws longer than the standard dimension, as 


N

they may cause damage to the inside of the TV set.

For wall mounts that do not comply with the VESA standard 


N

screw specifications, the length of the screws may differ 

depending on their specifications.

Do not use screws that do not comply with the VESA standard screw specifications.


N

Do not fasten the screws too strongly, this may damage the product or cause the product to fall, 


N

leading to personal injury. Samsung is not liable for these kinds of accidents.

Samsung is not liable for product damage or personal injury when a non-VESA or non-specified 


N

wall mount is used or the consumer fails to follow the product installation instructions.

Do not install your Wall Mount Kit while your TV is turned on. It may result in personal 

injury due to electric shock.

Using the Anti-Theft Kensington Lock


¦

The Kensington Lock is a device used to physically fix the system when using it in a public place. 

The appearance and locking method may differ from the illustration depending on the manufacturer. 

Refer to the manual provided with the Kensington Lock for 

proper use. The locking device has to be purchased separately.

The location of the Kensington Lock may be different 


N

depending on its model.

1. 

Insert the locking device into the Kensington slot on the LCD TV 

(

1

) and turn it in the locking direction (

2

).

2. 

Connect the Kensington Lock cable (

3

).

3. 

Fix the Kensington Lock to a desk or a heavy stationary object.

3

1

2

P2370HD :75 mm (2.95 inches)
P2570HD :100 mm (3.94 inches)

P2370HD :75 mm (2.95 inches)

P2570HD :100 mm (3.94 inches)

Summary of Contents for P2370HD - Full 1080p HDTV LCD Monitor

Page 1: ...rica Inc 105 Challenger Road Ridgefield Park NJ 07660 0511 CANADA 1 800 SAMSUNG 726 7864 www samsung com ca Samsung Electronics Canada Inc Customer Service 55 Standish Court Mississauga Ontario L5R 4B2 Canada Samsung Electronique Canada Inc Service à la Clientèle 55 Standish Court Mississauga Ontario L5R 4B2 Canada LCD TV MONITOR user manual imagine the possibilities Thank you for purchasing this ...

Page 2: ...een moving images not stationary patterns or dark bars On LCD models that offer picture sizing features use these controls to view different formats as a full screen picture Be careful in the selection and duration of television formats used for viewing Uneven LCD aging as a result of format selection and use as well as burned in images are not covered by your Samsung limited warranty Precautions ...

Page 3: ... a DVD Blu Ray player Satellite receiver Set Top Box via Component cables 8 Connecting a Digital Audio System 9 Connecting a PC 9 Operation Turning the TV On and Off 11 Plug Play Feature 11 CHANNEL CONTROL Configuring the Channel Menu 12 Managing Channels 13 Channel List Option Menu in All Channels Added Channels Favorite 13 Channel List Option Menu in Programmed 14 Picture Control Configuring the...

Page 4: ...ducts as a product feature N N Viewing the Control Panel The product color an shape may vary depending on the model N N 1 Toggles between all the available input sources In the on screen menu use this E button as you use the button on the remote control 2 MENU Press to see an on screen menu of your TV s features 3 4 Moves from one menu item to another horizontally or adjusts selected menu values A...

Page 5: ...on N N 8 COMPONENT IN Connect the port of the DVD VCR DVD DTV Set Top Box to the R AUDIO L port of the product Connect the VIDEO OUT port of the DVD DTV Set Top Box to the PR PB Y input ports using a component video cable PR PB Y 9 DIGITAL AUDIO OUT OPTICAL Connects to a Digital Audio component 0 SERVICE Connector for service only AV IN Video and audio inputs for external devices such as a camcord...

Page 6: ...e previous channel viewed MUTE M Press to temporarily cut off the sound CH Press to change channels SOURCE Press to display and select the available video sources FAV CH Press to switch to your favorite channels MENU Displays the main on screen menu RETURN Returns to the previous menu EXIT Press to exit the menu a CC Controls the caption decoder Installing Batteries in the Remote Control 1 Lift th...

Page 7: ...e the wires from the twin leads under the screws on a 300 75 Ω adapter not supplied Use a screwdriver to tighten the screws 2 Plug the adaptor into the ANT IN terminal on the back of the TV Antennas with 75 Ω Round Leads Plug the antenna lead into the ANT IN terminal on the back of the TV Separate VHF and UHF Antennas If you have two separate antennas for your TV one VHF and one UHF you must combi...

Page 8: ...t electronics stores Splitter Cable Box Incoming cable TV Rear ANT IN RF A B Switch 1 Find and disconnect the cable that is connected to the ANT IN terminal on your cable box This terminal might be labeled ANT IN VHF IN or simply IN N N 2 Connect this cable to a two way splitter 3 Connect an RF cable between the OUTPUT terminal on the splitter and the IN terminal on the cable box 4 Connect an RF c...

Page 9: ...ble The difference between HDMI and DVI is that the HDMI device is smaller in size and has the HDCP High Bandwidth Digital Copy Protection coding feature installed Each DVD Blu Ray player Satellite receiver Set Top Box has a different back panel N N configuration The TV may not output sound and pictures may be displayed with abnormal color when DVD N N Blu Ray player Satellite receiver Set Top Box...

Page 10: ...ox via Component cables The rear panel jacks on your TV make it easy to connect a DVD Blu Ray player Satellite receiver Set Top Box to your TV ANT IN HDMI IN SERVICE HDMI PC DVI D AUDIO IN AV IN AUDIO R L VIDEO DVI D IN PC IN DIGITAL AUDIO OUT OPTICAL ANT IN HDMI IN SERVICE HDMI PC DVI D AUDIO IN AV IN AUDIO R L VIDEO DVI D IN PC IN DIGITAL AUDIO OUT OPTICAL TV Rear Panel 2 Audio Cable Not supplie...

Page 11: ... you can hear sound output from the TV s Optical N N jack When the TV is displaying a DTV air signal the TV will send out 5 1 channel sound to the Home theater receiver When the source is a digital component such as a DVD Blu Ray player Satellite receiver Set Top Box and is connected to the TV via HDMI only 2 channel sound will be heard from the Home Theater receiver If you want to hear 5 1 channe...

Page 12: ...NT IN SERVICE AV IN AUDIO R L VIDEO DVI D IN PC IN DIGITAL AUDIO OUT OPTICAL ANT IN HDMI IN SERVICE HDMI PC DVI D AUDIO IN AV IN AUDIO R L VIDEO DVI D IN PC IN DIGITAL AUDIO OUT OPTICAL ANT IN HDMI IN SERVICE AV IN AUDIO R L VIDEO DVI D IN DIGITAL AUDIO OUT OPTICAL TV Rear Panel PC 2 Stereo Cable Not supplied 1 HDMI DVI Cable Not supplied Using the HDMI Cable ANT IN HDMI IN SERVICE HDMI PC DVI D A...

Page 13: ...enna signals In Cable mode you can select the correct signal source among N N STD HRC and IRC by pressing the or button then press the E button If you have Digital cable select the cable system signal source for both Analog and Digital Contact your local cable company to identify the type of cable system that exists in your particular area 6 Press the E button to select Start The TV will begin mem...

Page 14: ...ed After all the available channels are stored it starts to remove scrambled channels Clearing N N Scrambled Channels The Auto program menu then reappears If you want to stop Auto Programming press the N N E button The Stop Auto Program message will be displayed Select Yes by pressing the or button then press the E button Clearing Scrambled Channels digital channels only This function is used to f...

Page 15: ...Auto Program menus The Options menus may differ depending on the situation Channel Status Display Icons N N A channel set as a Favorite c A channel selected by pressing the yellow button A Program currently being broadcast mark A reserved program Channel List Option Menu in All Channels Added Channels Favorite Press the TOOLS button to use the option menu Option menu items may differ depending on ...

Page 16: ...log channels only Channels can labeled so that their call letters appear whenever the channel is selected The names of digital broadcasting channels are automatically assigned and cannot be labeled N N Select All Deselect All Select All You can select all the channels in the channel list Deselect All You can deselect all the selected channels You can only select N N Deselect All when there is a se...

Page 17: ... level of Backlight is reduced N N and that this will reduce the overall running cost Picture Options In PC mode you can only make changes to the N N Color Tone and Size from among the items in Picture Options Color Tone Cool Normal Warm1 Warm2 Size Occasionally you may want to change the size of the image on your screen Your TV comes with six screen size options each designed to work best with sp...

Page 18: ... Wide Fit Screen Fit PC 16 9 4 3 Digital NR Off Low Medium High Auto If the broadcast signal received by your TV is weak you can activate the Digital Noise Reduction feature to help reduce any static and ghosting that may appear on the screen When the signal is weak select one of the other options until the best picture is displayed N N HDMI Black Level Normal Low You can select the black level on...

Page 19: ...just click OK and exit the dialog box Display Modes If the signal from the system equals the standard signal mode the screen is adjusted automatically If the signal from the system doesn t equal the standard signal mode adjust the mode by referring to your videocard user guide otherwise there may be no video For the display modes listed below the screen image has been optimized during manufacturin...

Page 20: ...The purpose of the picture quality adjustment is to remove or reduce picture noise If the noise is not removed by fine tuning alone then make the vertical frequency adjustments on your PC and fine tune again After the noise has been reduced re adjust the picture so that it is aligned on the center of the screen Coarse Fine The purpose of picture quality adjustment is to remove or reduce picture no...

Page 21: ...ontrol repeatedly to change the picture size 16 9 Sets the picture to 16 9 wide mode N N 4 3 Sets the picture to 4 3 normal mode N N Reset Reset Picture Mode Cancel Resets all picture settings to the default values Reset Picture Mode Current picture values return to default settings N N ...

Page 22: ... in a language other than the O O Preferred Language by pressing the MTS button on the remote control N N Preferred Language is available only in Digital TV mode You can only select the language from among the actual languages being broadcast N N Multi Track Sound MTS only analog channel Press the O O MTS button on the remote control repeatedly to select Mono Stereo or SAP Mono Choose for channels...

Page 23: ... Menu Language You can set the menu language Time Clock Setting the clock is necessary in order to use the various timer features of the TV The current time will appear every time you press the O O INFO button If you disconnect the power cord you have to set the clock again N N Clock Mode You can set up the current time manually or automatically Auto Set the current time automatically using the ti...

Page 24: ...electing Channel Antenna N N Channel Select the desired channel Repeat Select Once Everyday Mon Fri Mon Sat Sat Sun or Manual When N N Manual is selected press the button to select the desired day of the week Press the E button over the desired day and the c mark will appear You can set the hour minute and channel by pressing the number buttons on the remote control N N Auto Power Off N N When you...

Page 25: ...be blocked TV G TV PG TV 14 and TV MA The sub ratings D L S V work together similarly The V chip will automatically block certain categories that are More restrictive For example if N N you block L sub rating in TV PG then the L sub ratings in TV 14 and TV MA will automatically be blocked MPAA Rating You can block movies depending on their MPAA rating The Motion Picture Association of America MPAA...

Page 26: ...nformation is downloaded from the broadcasting station However depending on the information from the broadcasting station it may not be available for use Parental restriction levels differ depending on the broadcasting station The default menu name N N and Downloadable US rating changes depending on the downloaded information Even if you set the On screen display to your desired language the N N D...

Page 27: ...on the broadcast N N Digital Caption Options digital channels only Size This option consists of Default Small Standard and Large The default is Standard Font Style This option consists of Default Style0 Style 7 You can change the font you want The default is Style 0 Foreground Color This option consists of Default White Black Red Green Blue Yellow Magenta and Cyan You can change the color of the l...

Page 28: ...nput Support Configuring the Input Menu Source List Use to select TV or other external input sources such as DVD Blu Ray players Satellite receivers Set Top Box connected to the TV Use to select the input source of your choice Press the O O SOURCE button on the remote control to view an external signal source PC TV DVI AV Component HDMI You can choose only those external devices that are N N conne...

Page 29: ...ct reception quality or you will not receive them at all So unlike analog channels you cannot fine tune a digital channel You can however adjust your antenna to improve the reception of available digital channels If the signal strength meter indicates that the signal is weak physically adjust your antenna to N N increase the signal strength Continue to adjust the antenna until you find the best po...

Page 30: ...ynet is a function that enables you to control all connected Samsung devices that support Anynet with your Samsung TV s remote The Anynet system can be used only with Samsung devices that have the Anynet feature To be sure your Samsung device has this feature check if there is an Anynet logo on it To connect to a TV TV AV IN AUDIO R L VIDEO HDMI IN HDMI IN DVI D IN PC IN ANT IN ANT IN COMPONENT IN...

Page 31: ...heater When following the connection above the Optical jack only outputs 2 channel audio You will N N only hear sound from the Home Theater s Front Left and Right speakers and the subwoofer If you want to hear 5 1 channel audio connect the DIGITAL AUDIO OUT OPTICAL jack on the DVD Satellite Box ie Anynet Device 1 or 2 directly to the Amplifier or Home Theater not the TV Connect only one Home Theat...

Page 32: ... devices 3 Press the or button to select a particular device and press the E button It is switched to the selected device Only when you set N N Anynet HDMI CEC to On in the Application menu the Device List menu appears Switching to the selected devices may take up to 2 minutes You cannot cancel the operation N N during the switching operation The time required to scan for devices is determined by ...

Page 33: ...order will appear device_name Operation Shows the play menu of the connected device E g If a DVD recorder is connected the play menu of the DVD recorder will appear Record recorder Starts recording immediately using the recorder This is only available for devices that support the recording function Stop Recording recorder Stops recording Receiver Sound is played through the receiver If more than o...

Page 34: ...nu Press the SOURCE button on the TV remote control and select a device other than Anynet devices Press z CH LIST PRE CH and FAV CH to change the TV mode Note that the channel button operates only when a tuner embedded Anynet device is not connected The message Connecting to Anynet device appears on the screen You cannot use the remote control when you are configuring Anynet or switching to a view...

Page 35: ...eries Clean the upper edge of the remote control transmission window Check the battery terminals Check signal cable message Ensure that the signal cable is firmly connected to the PC and DVI source Not Supported Mode message Check the maximum resolution and connected device s Video frequency Compare these values with the data in the Display Modes Digital broadcasting screen problem Please check th...

Page 36: ...l frequency Hz 56 75 P2370HD 48 75 P2570HD PC Maximum refresh rate at 60 Hz 1920 x 1080 Image is not centered on the screen Adjust the horizontal and vertical position The screen position must be adjusted on the output source i e STB with a digital signal The picture appears distorted in the corner of the screen If Just Scan is selected with some external devices the picture may appear distorted i...

Page 37: ...liable for these kinds of accidents Samsung is not liable for product damage or personal injury when a non VESA or non specified N N wall mount is used or the consumer fails to follow the product installation instructions Do not install your Wall Mount Kit while your TV is turned on It may result in personal injury due to electric shock Using the Anti Theft Kensington Lock The Kensington Lock is a...

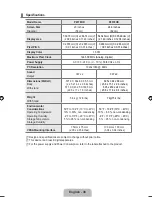
Page 38: ... 6 inches 571 0 X 432 5 X 189 5 mm 22 5 x 17 x 7 5 inches 605 x 384 x 66 mm 23 8 x 15 1 x 2 6 inches 605 x 453 x 240 mm 23 8 x 17 8 x 9 4 inches Weight With Stand 5 8 kg 12 8 lbs 7 kg 15 4 lbs Environmental Considerations Operating Temperature Operating Humidity Storage Temperature Storage Humidity 50 F to 104 F 10 C to 40 C 10 to 80 non condensing 4 F to 113 F 20 C to 45 C 5 to 95 non condensing ...

Page 39: ...This page is intentionally left blank ...

Page 40: ...estáticos ni barras oscuras En modelos de LCD que ofrezcan opciones para el tamaño de la imagen utilice estos controles para ver los distintos formatos como imagen a toda pantalla Tenga cuidado en la selección y duración de los formatos de televisión utilizados para la visualización La garantía limitada de Samsung no cubre el envejecimiento desigual de la LCD como resultado de la selección y uso d...

Page 41: ... opciones de la lista de canales en Todos los canales Canales agregados Favoritos 13 Menús de opciones de la lista de canales en Grabación con temporizador 14 Control de la imagen Control de la imagen TV AV Componente HDMI 15 Uso del televisor como una pantalla de ordenador PC 17 Ajuste del televisor con el ordenador 18 Control de Sonido Configuración del menú de sonido 20 Configuración Configurac...

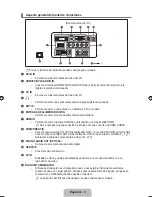
Page 42: ... N característica del producto Aspecto general del panel de control El color y la forma del producto pueden variar según el modelo N N 1 Cambia entre todas las fuentes de entrada disponibles En el menú de la pantalla utilice este botón del mismo modo que el botón E del mando a distancia 2 MENU Pulse para ver en pantalla un menú con las características del TV 3 4 Se mueve de un elemento de menú a o...

Page 43: ... conexión de HDMI a HDMI N N 8 COMPONENT IN Conecte el puerto del DVD VCR decodificador DVD al puerto R AUDIO L del monitor Conecte el puerto VIDEO OUT del decodificador DVD a los puertos de entrada PR PB Y mediante un cable de componente de vídeo PR PB Y 9 DIGITAL AUDIO OUT OPTICAL Se conecta al componente de audio digital 0 SERVICE Conector sólo para servicio AV IN Entradas de vídeo y audio para...

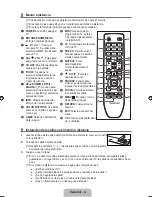
Page 44: ...l que se ha estado viendo anteriormente MUTE M Pulse para desactivar momentáneamente el sonido CH Permiten cambiar de canal SOURCE Púlselo para mostrar y seleccionar las fuentes de vídeo disponibles FAV CH Permite cambiar a los canales favoritos MENU Muestra el menú de pantalla principal RETURN Vuelve al menú anterior EXIT Púlselo para salir del menú a CC Controla el decodificador de subtítulos In...

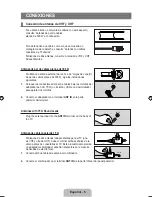
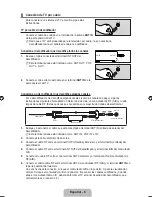
Page 45: ...es del par de cables bajo los tornillos del adaptador de 300 75 Ω no incluido Utilice un destornillador para apretar los tornillos 2 Conecte el adaptador en el terminal ANT IN en la parte posterior del televisor Antennas with 75 Ω Round Leads Plug the antenna lead into the ANT IN terminal on the back of the TV Antenas de cable coaxial de 75 Ω Si dispone de dos antenas independientes para el TV una...

Page 46: ... en la mayoría de tiendas de electrónica Antena del Televisor ANT IN Divisor Servicio de Cable Cable entrante RF A B Conmutador 1 Busque y desconecte el cable que está conectado al terminal ANT IN entrada de antena del decodificador Este terminal puede estar indicado como ANT IN VHF IN o IN N N 2 Conecte este cable al divisor de dos vías 3 Conecte el cable RF entre un terminal OUTPUT salida del di...

Page 47: ...MI es más pequeño y tiene instalada la función de codificación HDCP protección alta de la copia digital del ancho de banda Cada reproductor de DVD o receptor de televisión por cable satélite decodificador tiene una N N configuración diferente del panel posterior Puede que el televisor no proporcione salida de sonido y muestre imágenes con colores anómalos si hay conectados reproductores de DVD o r...

Page 48: ...sdecomponentes Las tomas del panel posterior del televisor facilitan la conexión de un reproductor de DVD o un receptor de televisión por cable satélite decodificador al TV ANT IN HDMI IN SERVICE HDMI PC DVI D AUDIO IN AV IN AUDIO R L VIDEO DVI D IN PC IN DIGITAL AUDIO OUT OPTICAL ANT IN HDMI IN SERVICE HDMI PC DVI D AUDIO IN AV IN AUDIO R L VIDEO DVI D IN PC IN DIGITAL AUDIO OUT OPTICAL Panel pos...

Page 49: ...se puede oír la salida N N de sonido del terminal Optical del televisor Cuando se ve la televisión a través de una señal DTV aérea el televisor envía el sonido de 5 1 canales al receptor del sistema Home Cinema Cuando la fuente es un componente digital como un DVD Blu Ray receptor de satélite decodificador y está conectada al televisor a través de HDMI sólo se oye el sonido de 2 canales del recept...

Page 50: ...ANT IN SERVICE AV IN AUDIO R L VIDEO DVI D IN PC IN DIGITAL AUDIO OUT OPTICAL ANT IN HDMI IN SERVICE HDMI PC DVI D AUDIO IN AV IN AUDIO R L VIDEO DVI D IN PC IN DIGITAL AUDIO OUT OPTICAL ANT IN HDMI IN SERVICE AV IN AUDIO R L VIDEO DVI D IN DIGITAL AUDIO OUT OPTICAL Panel posterior del TV PC 2 Cable estéreo No incluido 1 Cable de HDMI DVI No incluido Uso del cable HDMI ANT IN HDMI IN SERVICE HDMI ...

Page 51: ...le Auto Señales de antena Aire y Cable En el modo de cable puede seleccionar el origen de señal correcto entre STD HRC y IRC con N N los botones o a continuación pulse el botón E Si tiene cable digital seleccione la fuente de la señal del sistema de cable para analógica y para digital Póngase en contacto con su proveedor de cable para saber el tipo de sistema de cable existente en su zona 6 Pulse ...

Page 52: ... codificados Vuelve a mostrarse el menú Prog Auto Si desea detener la programación automática pulse el botón N N E Aparece el mensaje Detener programación automática Seleccione Sí con el botón o y a continuación pulse el botón E Borrar canal encriptado sólo canales digitales Esta función se usa para filtrar los canales codificados después de que Prog Auto se haya completado Puede tardar de 20 a 30...

Page 53: ... Favoritos Visualización con temporizador Edición de nombre Seleccionar todo o Deseleccionar todos y Prog Auto los menús de las opciones pueden cambiar dependiendo de la situación Iconos de la pantalla de estado del canal N N Un canal configurado como favorito c Un canal seleccionado con el botón amarillo Un programa que se está emitiendo Un programa reservado Menús de opciones de la lista de cana...

Page 54: ...canales analógicos Los canales se pueden etiquetar con el propósito de que al seleccionar éstos se pueda ver su nombre Los nombres de los canales digitales se asignan automáticamente y no se pueden etiquetar N N Seleccionar todo Deseleccionar todos Seleccionar todo Puede seleccionar todos los canales de la lista Deseleccionar todos Puede deseleccionar todos los canales seleccionados Sólo podrá sel...

Page 55: ... puede reducir significativamente si se disminuye el N N nivel de la luz de fondo lo que repercutirá en el coste total de funcionamiento Opciones de imagen En el modo PC sólo se pueden hacer cambios en los N N elementos Tono Color y Tamaño del menú de Opciones de imagen Tono Color Frío Normal Tibio1 Tibio2 Tamaño Es posible que alguna vez desee cambiar el tamaño de la imagen en la pantalla El tele...

Page 56: ... DTV 1080i Componente 1080i 1080p HDMI 720p 1080i 1080P 16 9 4 3 Ajuste ancho Ajuste a pantalla PC 16 9 4 3 Digital NR Apagado Bajo Medio Alto Auto Si la señal de emisión que recibe el televisor es débil puede activarse la función Digital Noise Reduction para reducir la estática y las imágenes superpuestas que pueden aparecer en la pantalla Cuando la señal sea débil seleccione alguna de las otras ...

Page 57: ...ción de la pantalla el valor correcto es 60 o 60 Hz Si no haga clic en Aceptar y salga del cuadro de diálogo Modos de pantalla Si la señal del sistema es igual al modo de señal estándar la pantalla se ajusta automáticamente Si la señal del sistema no es igual al modo de señal estándar ajuste el modo consultando la guía del usuario de la tarjeta de vídeo de lo contrario puede no haber señal de víde...

Page 58: ...ito del ajuste de la calidad de imagen es eliminar o reducir el ruido de la imagen Si el ruido no desaparece sólo con la sintonización fina realice los ajustes de frecuencia hasta el máximo y vuelva a realizar la sintonización fina Después de reducir el ruido vuelva a ajustar la imagen para que quede alineada en el centro de la pantalla Grueso Fino El objetivo del ajuste de la calidad de imagen es...

Page 59: ...los ajustes de tamaño de imagen 16 9 Establece la imagen en modo panorámico 16 9 N N 4 3 Establece la imagen en modo normal 4 3 N N Reinicio de la imagen Reinic modo imagen Cancelar Restablece todos los ajustes predeterminados Reinic modo imagen Los valores de la imagen actual regresan a los predeterminados N N ...

Page 60: ...l botón O O MTS del mando a distancia Idioma preferido está disponible sólo en el modo de televisión digital N N Sólo se puede seleccionar uno de los idiomas que ofrece la emisora N N Sonido Multi track MTS sólo canales analógicos Pulse varias veces el botón O O MTS del mando a distancia para seleccionar Mono Estéreo o SAP Mono Elija para canales que emiten en monoaural o si tiene dificultades con...

Page 61: ...sconecta el cable de alimentación debe configurar el reloj de nuevo N N Modo Reloj Se puede configurar la hora actual manual o automáticamente Auto Configure la hora automáticamente mediante la información de la hora de la emisión digital Manual Configure la hora actual manualmente Según la emisora y la señal la hora automática no se puede ajustar correctamente En este N N caso ajuste la hora manu...

Page 62: ...om o Manual Con Manual seleccionado pulse el botón para seleccionar el día de la semana Pulse el N N botón E sobre el día deseado y aparecerá la marcac c Puede ajustar la hora los minutos y el canal pulsando los botones numéricos del mando a N N distancia Apagado automático N N Si activa el temporizador el televisor se apagará si no se pulsa ningún botón durante 3 horas después de que el temporiza...

Page 63: ...TV Y7 De manera similar si bloquea la categoría TV G todas las categorías del grupo adolescente quedarán bloqueadas TV G TV PG TV 14 y TV MA Las subclasificaciones D L S V funcionan de manera similar La opción V chip bloqueará automáticamente ciertas categorías que son More restrictive Por N N ejemplo si bloquea la subclasificación L en TV PG las subclasificaciones L en TV 14 y TV MA se bloquearán...

Page 64: ... U S Descargable está N N disponible después de que la información se haya descargado desde la emisora Sin embargo según el tipo de información de la emisora el menú podría no estar disponible para su uso Los niveles de restricción de bloqueo difieren según la emisora El nombre de menú N N predeterminado y Clasificacion U S Descargable cambian según la información descargada Aunque configure la vi...

Page 65: ...gún el tipo de emisión N N Opciones Subtítulos Dig sólo canales digitales Tamaño Esta opción consta de Programado Pequeño Normal y Grande El valor predeterminado es Normal Estilo fuente Esta opción consta de Programado Estilo0 Estilo7 Puede cambiar el tipo de letra que desee El valor predeterminado es Estilo0 Color de primer plano Esta opción consta de Programado Blanco Negro Rojo Verde Azul Amari...

Page 66: ...o Configuración del menú de entrada Lista de Entradas Úselo para seleccionar TV u otras fuentes de entrada externas como reproductores de DVD o receptores de cable y satélite decodificadores conectados al televisor Permite seleccionar la fuente de entrada que se prefiera Pulse el botón O O SOURCE del mando a distancia para ver una fuente de señal externa PC TV DVI AV Componente HDMI Puede elegir s...

Page 67: ...del usuario del dispositivo externo Intensidad señal sólo canales digitales A diferencia de los canales analógicos cuya calidad de recepción puede variar desde nebuloso a claro los canales digitales HDTV tienen una calidad de recepción perfecta o no se reciben en absoluto Por ello a diferencia de los canales analógicos no se puede realizar una sintonización fina de un canal digital Se puede no obs...

Page 68: ... información cuando el televisor no funcione correctamente o cuando desee actualizar el software Puede ver la información relacionada con el centro de llamadas el producto y el método de descarga del archivo de software Anynet Conexión de dispositivos Anynet Anynet es una función que permite controlar con el mando a distancia del televisor Samsung todos los dispositivos de Samsung conectados que s...

Page 69: ...erior la toma Optical sólo produce la salida de 2 canales de audio N N Sólo oirá sonido de los altavoces frontales izquierdo y derecho y del subwoofer del sistema Home Cinema Para escuchar el canal de audio 5 1 conecte el terminal DIGITAL AUDIO OUT OPTICAL del DVD decodificador de satélite es decir dispositivo Anynet 1 o 2 directamente al amplificador o sistema Home Cinema no al televisor Conecte ...

Page 70: ...vos 3 Pulse el botón o para seleccionar un dispositivo y a continuación pulse el botón E Se cambia al dispositivo seleccionado Sólo cuando se configura N N Anynet HDMI CEC en el menú Aplicaciones aparece el menú Lista Disp El cambio a los dispositivos seleccionados puede tardar unos 2 minutos No se puede cancelar N N la operación de cambio de dispositivo mientras ésta se está efectuando El tiempo ...

Page 71: ...el disco del grabador de DVD nombre_dispositivo Funcionamiento Por ejemplo si se ha conectado un grabador de DVD se muestra el menú del disco del grabador de DVD Grabar grabador Inicia inmediatamente la grabación en el grabador Sólo está disponible en los dispositivos que admiten la función de grabación Detener grabación grabador Detiene la grabación Receptor La reproducción del sonido se efectúa ...

Page 72: ...nynet Pulse el botón SOURCE del mando a distancia del TV y seleccione un dispositivo que no sea Anynet Pulse z CH LIST PRE CH y FAV CH para cambiar al modo TV Tenga en cuenta que el botón de canal sólo funciona cuando no hay ningún dispositivo Anynet con sintonizador incorporado conectado En la pantalla aparece el mensaje Connecting to Anynet device El mando a distancia no se puede utilizar cuando...

Page 73: ...El televisor no se enciende Compruebe que la toma de la pared funciona Anomalías del mando a distancia Remplace las pilas del mando a distancia Limpie el borde superior del mando a distancia ventana de transmisión Compruebe los terminales de las pilas Mensaje Verificar cable señal Compruebe que el cable de señal esté conectado firmemente con las fuentes PC y DVI Mensaje Modo no compatible Comprueb...

Page 74: ...lización multiscan dentro del siguiente rango de frecuencias Frecuencia horizontal KHz 30 81 P2370HD 52 61 82 2 P2570HD Frecuencia vertical Hz 56 75 P2370HD 48 75 P2570HD Índice de barrido máximo 60 Hz 1920 x 1080 La imagen no está centrada en la pantalla Ajuste la posición horizontal y vertical La posición de la pantalla se debe ajustar respecto a la fuente de salida por ejemplo STB con una señal...

Page 75: ...ung no se hace responsable de este tipo de accidentes Samsung no se hace responsable de daños o lesiones personales cuando se usa un montaje N N mural que no cumple las especificaciones VESA o si el cliente no sigue las instrucciones de instalación del producto No instale el equipo de montaje mural mientras el televisor está encendido Se podría producir una descarga eléctrica con riesgo de causar ...

Page 76: ... Sin el soporte con soporte 571 0 x 364 5 x 65 5 mm 571 0 x 423 5 x 189 5 mm 605 x 384 x 66 mm 605 x 453 x 240 mm Peso Con soporte 5 8 kg 7 kg Consideraciones medioambientales Temperatura de funcionamiento Humedad de funcionamiento Temperatura de almacenamiento Humedad de almacenamiento Entre 10 Cy40 C 50 Fa104 F 10 al 80 sin condensación Entre 20 C y 45 C 4 F a 113 F 5 al 95 sin condensación Inte...

Page 77: ...Bu sayfa bilerek boş bırakılmıştır ...

Page 78: ...Bu sayfa bilerek boş bırakılmıştır ...

Page 79: ...Bu sayfa bilerek boş bırakılmıştır ...

Reviews: