background image

39

Using the Smart Auto mode

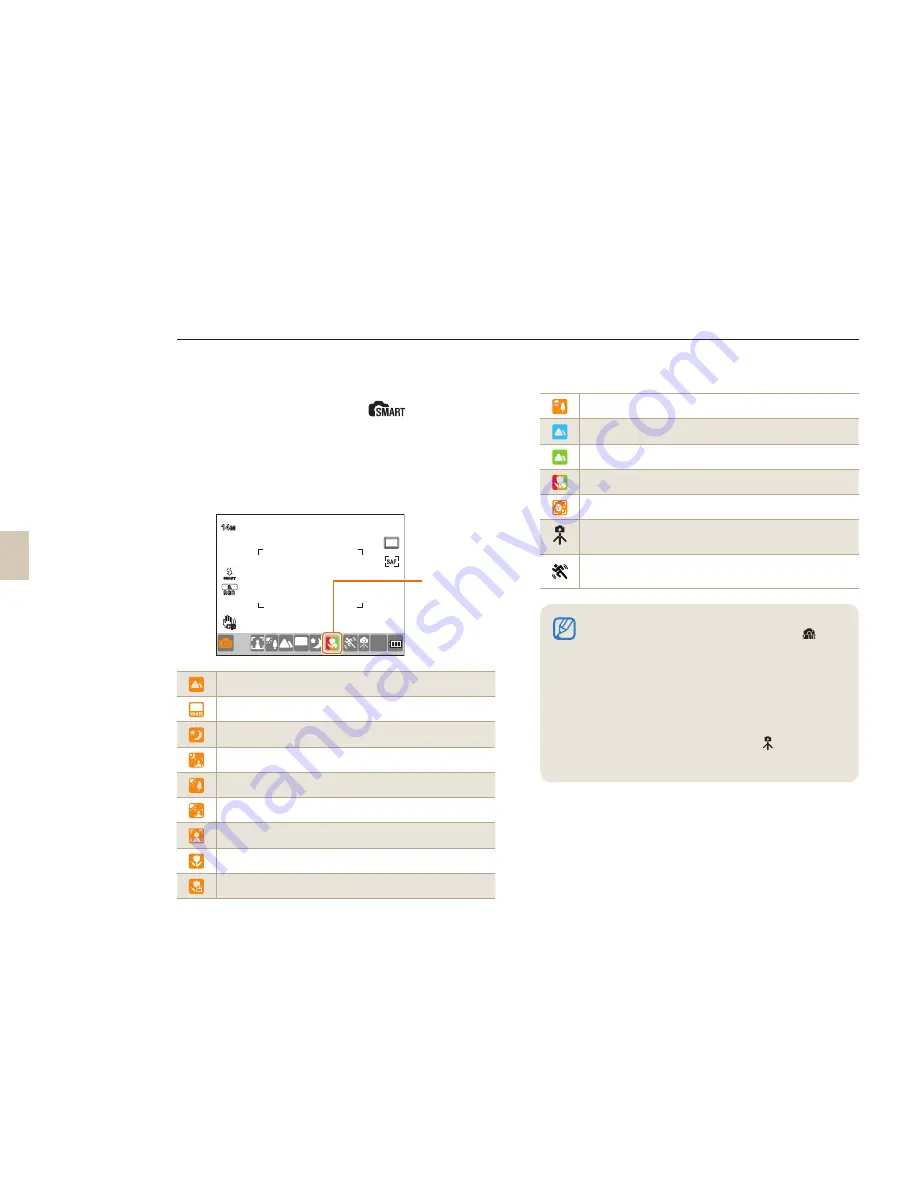
The smart auto mode allows taking pictures under an optimized condition since the camera recognizes various 
photographing conditions automatically. Therefore, even a beginner can use the camera easily.

1

  Rotate the mode dial to 

.

2

  Align your subject in the frame.

•  The camera automatically detects the type 

of scene and displays the corresponding 
scene icon in the display.

Outdoor landscape shot

Highly bright background shot

Night landscape shot

Outdoor portrait shot at night

Backlight landscape shot without a man

Portrait shot under backlight

Portrait shot

Close-up shot

Close-up character shot

Sunset shot

Blue sky shot

Nature shot such as forest and leaves

Close-up shot for the subject with various colors

Close-up portrait shot

With the camera on a tripod, a shot of a subject 
that does not move for a period of time.
Shot of fast moving subject or subject that moves 
frequently.

3

 Half-press 

[Shutter]

 to focus.

4

 Press 

[Shutter]

 to take a photo.

If the camera does not detect a type of scene, it 
takes pictures with the basic settings of the 


mode. .
Even if it detcts a face, the camera may not select 
portrait mode because of the orientation and 
brightness of the face. 
The camera may not recognize a scene because of 
adverse photograph conditions such as bad lighting, 
camera shake, and subject distance. 
The camera may not recognize the   mode, even 
it the camera is on a tripod, depending on the 
movement of the subject.

The camera 
displays the scene 
icon corresponding 
to the scene it 
detects.

14

M

SMART

SMART

RGB

WHITE

14

M

0001

OIS

Summary of Contents for NX5

Page 1: ... usage instructions for your camera Please read this manual thoroughly User Manual NX5 Ä Click a topic Quick reference Contents Basic functions Basic shooting Extended shooting functions Playback Editing Camera settings menu Appendixes ...

Page 2: ...allowed Moving parts and accessories may present physical dangers as well Prevent damage to subjects eyesight Do not use the flash in close proximity closer than 1 m 3 ft to people or animals Using the flash too close to your subject s eyes can cause temporary or permanent damage Handle and dispose of batteries and chargers with care Use only Samsung approved batteries and chargers Incompatible batt...

Page 3: ...very cold or very hot temperatures below 0º C 32º F or above 40º C 104º F Extreme temperatures can reduce the charging capacity of your batteries and can cause memory cards to malfunction Prevent batteries from making contact with metal objects as this can create a connection between the and terminals of your battery and lead to temporary or permanent battery damage Prevent memory cards from makin...

Page 4: ...ower sources when not in use Use batteries only for their intended purpose Exercise caution when using the camera in humid environments When transferring the camera from a cold environment to a warm and humid one condensation can form on the delicate electronic circuitry and memory card In this situation wait for at least 1 hour until all moisture has evaporated before using the camera Check that ...

Page 5: ...k on the camera The diagram below shows the status has been changed to Directional Keys in the User s Manual When explaining the steps needed for navigating the menu the up down left and right directional arrows are shown below Ex Executing the Play mode The user can check saved pictures and movies 1 Press Show most recently saved files 2 Check the following pictures sequentially by using X Adjusti...

Page 6: ... Display when selecting a menu or option within the step Example Select Shooting 1 1 Quality represents select Shooting 1 1 and then Quality Comment explaining symbols Abbreviations used in this manual Abbreviations Explanation AF Auto Focus Auto focus BKT Bracketing Bracketing DPOF Digital Print Order Format Printing order mark EV Exposure Value Exposure value OIS Optical Image Stabilization Opti...

Page 7: ...ife Background the objects around the subject Composition the combination of a subject and background Subject Subject Background Background Composition Composition Exposure Brightness The amount of light that enters your camera determines the exposure You can alter the exposure with shutter speed aperture value and ISO speed By altering the exposure your photos will be darker or lighter Normal exp...

Page 8: ...ing f 115 Taking photos of people mode Beauty Shot f47 Red eye reduction f56 Face Detection AF f64 Taking photos at night or in the dark mode f45 Flash setting options f55 ISO speed setting f59 Taking action photos mode f42 Continuous Burst shooting f73 Taking photos of text insects or flowers mode Close up shot f39 Using the White Balance f68 Adjusting the exposure brightness ISO speed setting f59...

Page 9: ... a clearer photo 32 Holding your camera correctly 32 Image stabilization 32 Half pressing the shutter button 32 Getting your subject in focus 33 Setting the automatic manual focus function 34 Zooming 34 Optical Image Stabilization OIS 35 Using the OIS in the menu option 36 Depth preview 37 Basic shooting 38 Using the Smart Auto mode 39 Using the Program mode 40 Using the Aperture Priority Shutter ...

Page 10: ...justing the ISO sensitivity 59 Focusing methods 60 Changing the Focusing methods 60 AF Priority 60 Using the AF assist light 61 Changing the focus area 61 Setting the focus of the selected area 62 Setting the MF Assist 63 Face detection 64 Normal face detection 64 Self portrait face detection 65 Brightness and color adjustment of picture 66 Adjusting the exposure brightness 66 Exposure adjustment ...

Page 11: ...ows users 93 For Mac users 96 Using Intelli studio 97 Transferring files using Intelli studio 98 Using the Samsung RAW Converter 99 Correcting the exposure 100 Handling the JPEG TIFF files as you edit RAW files 101 Saving the RAW files into JPEG or TIFF format 101 Printing photos with a photo printer PictBridge 102 Camera settings menu 103 Camera settings menu 104 Sound 105 Display 105 Normal setup 1 ...

Page 12: ...tions for shooting Unpacking 13 Title and role of each part 14 Preparations before shooting 18 Turning on the power and initialization 23 Option menu selection method 26 Setting the display and sound 28 Simple picture taking method 31 Tips for getting a clearer photo 32 ...

Page 13: ... shoe cover included USB cable Battery Strap Software installation CD including user s manual Quick Start Manual Charger AC power cable The actual components or optional parts may differ from the illustrations above For information about optional items see Accessories optional items p 123 ...

Page 14: ...e mode button p 73 Diopter adjustment dial p 16 Use the green button The following setup values are initialized if the button is pushed once in the standby state for shooting Program shift Detailed setup of picture wizard Fine tuning of white balance Color Temp setting value Adjusting the colors of screen menu Timer Flash EV When selecting or setting AF shift the changed focus area to the center B...

Page 15: ...attery chamber cover p 19 Playback button p 79 Tripod mount Use of eye sensor This product will automatically convert to EVF when the users try to use the view finder EVF by operating the eye sensor in Auto Select mode and all the information will be shown on the view finder Do not cover the eye sensor with your hands or materials Memory card slot Status lamp p 16 Memory card cover MENU button p 2...

Page 16: ...ar view Eye cup Removal of Eye cup When the camera is shipped the eyecup is attached to the viewfinder Push the Eye cup up as shown in the figure for removal Eyesight adjustment dial Status lamp In the case of saving a picture or shooting a movie this shows the operating status of the camera by blinking the status indicator lamp Blinking When saving photos recording movies being read by a computer...

Page 17: ...mera an lens This information in this user manual is based on the SAMSUNG 18 55mm F3 5 5 6 OIS lens Please refer to the lens user manual for more information about the lens Lens contacts Lens hood mount Zoom ring Lens mount connecting point OIS switch p 35 AF MF switch p 34 Focus ring p 33 Lens SAMSUNG 18 55mm F3 5 5 6 OIS SAMSUNG 30mm F2 Focus ring Lens Lens mount connecting point ...

Page 18: ...ging status Red Charging Green Fully charged Turned off or Yellow Charging error To remove the battery from the charger lift slightly in the direction of the arrow Please use designated charger or batteries for proper use SAMSUNG is not responsible for any accident that may occur from using a product other than designated INSERT 1 2 INSERT AC power code CHARGE INSERT Charging lamp Charger ...

Page 19: ...Installing the battery When taking out the battery pull down slightly on the lock lever You can then remove the battery 2 Lock lever 1 Open by pushing in the direction of the arrow 3 Close by pushing down in the direction of the arrow ...

Page 20: ...y card push the card slightly in the direction of insertion Please do not remove the memory card or battery while the status indicator lamp is blinking It may cause loss of data of product damage 1 3 2 After checking the direction of metal terminal you can insert the memory card ...

Page 21: ...unting or dismounting the lens while the camera is powered off is desirable to ensure the stable operation of the lens SAMSUNG is not responsible for any accident damage or trouble caused by using other company s lens The body cap protects the product from scratches or dust when you transport it Change lenses in a clean low dust environment Foreign particles inside the body or lens of the camera c...

Page 22: ...22 Preparations before shooting Connecting the strap Connecting the strap to the camera body so you can carry the camera easily ...

Page 23: ...n press 2 Press S T W X to select a language and then press The screen appears in the language you selected 3 Press S T to select Date and then press 4 Press S T W X to set the date and then press MENU OK 2 Date Time Zone Time Language 2010 1 1 00 00 English Date Time MENU OK 2 Date Time Zone Time Language 2010 1 1 00 00 English Date Time MENU OK 2 Date Time Zone Time Language 2010 1 1 00 00 Engli...

Page 24: ... again to disable 8 Press to save 9 Press T to select Time and then press 10 Set desired time by pressing S T W X and then press 11 Press MENU to finish setting MENU OK 2 Date Time Zone Time Language 2010 1 1 00 00 English Date Time Exit Change MENU 2 Time Zone London GMT 00 00 2010 01 01 01 10 AM DST Back Turning on the power and initialization ...

Page 25: ...t RGB Color space Smart range OIS OIS Voice recording Fader Wind Cut C Shooting option display right Drive mode Timer AF mode White balance White balance adjustment ISO ISO Metering option Picture wizard The display shows the icons for the currently selected option 3 2 2 3 1 1 0 15 F3 5 0001 A C AEL AFL 12 00AM 2010 01 01 14M SF RGB ISO B 3 2 2 3 1 1 0 15 F3 5 0001 A AE AEL EL AF AF F AFL FL 12 00...

Page 26: ...rity mode this allows you to quickly adjust the desired shutter speed Example Using the dial in the S mode 1 Set the Mode dial to S 2 Adjust the shutter speed by turning the dial The camera sets aperture value automatically according to the shutter speed you set Option menu selection method After pressing MENU you can select an option or menu by pressing S T or The user can return to the state of ...

Page 27: ...e body of camera 3 Select Flash using the W X or dial 4 Press S 5 Set the flash menu option using the W X or dial 6 Press S 7 Set the flash intensity using the W X or dial You can adjust the intensity of the flash by 2 levels 8 Align your subject in the frame and half press Shutter to focus 9 Press Shutter to take a photo Option menu selection method Displays the level of flash intensity adjustment Fl...

Page 28: ...pt for shooting mode shutter speed aperture value exposure number of available shots and battery information Playback mode Display the shooting meta information Display the RGB histogram currently selected histogram option and date set Display shutter speed aperture value ISO file in play and total number of files saved Viewing the function descriptions of menu 1 In the Shooting mode press MENU 2 Se...

Page 29: ... information and the graph gets higher if a specific color is distributed more Insufficient exposure Balanced exposure Excessive exposure Setting the sound You can set the sound the camera makes when you press the OK button 1 In Shooting or Playback mode press MENU 2 Select Setting2 2 Sound System Volume an option Off The camera makes no sound when you press Low Medium High The camera makes a signal...

Page 30: ... 3 Select a desired option Auto Select Convert between Main Display and EVF by eye sensor Main Display The screen will be shown only through Main Display EVF The screen will be shown only through EVF MENU OK 3 1 2 1 1 2 Display Select Video Out Anynet HDMI CEC HDMI Size Firmware Update Auto NTSC On Auto 3 Auto Select Main Display EVF Back Set Setting the display and sound ...

Page 31: ... to focus 4 Press Shutter to take a photo Simple picture taking method Using the Smart Auto mode you can take a picture easily with minimum setup Please refer to the Tips for getting a clearer photo p 32 to take a clear picture Press to see the saved images on the screen Green Focus is set Red Focus is not set 14M RGB WHITE 0001 OIS 14M SMART RGB WHITE 0001 OIS ...

Page 32: ...o check in advance whether the focus of composition is set appropriately please use the half shutter function If you press the shutter half way down the focus and exposure will be adjusted automatically Tips for getting a clearer photo Shows the shutter speed and aperture value being set Focus frame If green take the picture by pressing the Shutter If red either change the composition or adjust th...

Page 33: ...us can be adjusted more accurately p 63 Getting your subject in focus Please try to use the focus lock function Adjust the focus by using the half shutter function where the camera can focus easily Then simply press the Shutter button after moving the camera to a desired composition Keep pressing and holding down the half shutter until you actually make a photo shot Under the half shutter state pr...

Page 34: ...sing the zoom ring you can enlarge telephoto angle or reduce wide angle the size of an image by changing the focal length value of the camera lens Adjust the image to the desired size and then take a picture 1 Check the focus and then turn the zoom ring to the left right The focal length of the lens changes and the subject appears enlarged or reduced 2 Half press Shutter to focus 3 Press Shutter t...

Page 35: ...nction when taking pictures to minimize camera shake and improve focus Before applying OIS After applying OIS Using the OIS switch of lens The OIS function can be used only in the case that the lens in use has the OIS function To use this function please set OIS to ON ON OIS OFF ...

Page 36: ...mstance like night shooting When the battery capacity is not sufficient When you are shooting a close up shot When you use a tripod please disable the OIS function since the image can be shaken due to the vibration of OIS function If the camera is struck or dropped while you are taking a picture the display can be impaired If this occurs turn the camera off and then on and the camera should operate...

Page 37: ... you focus on a specific subject there is a range in which objects closer and further away are all in focus This focused range is called the depth of field The wider the wide angle lens the higher the aperture value the greater the depth of field For example the aperture stop f 11 is higher than f 2 8 Current position of the subject Current position of the subject 10 meters 6 meters 4 meters 2 meters...

Page 38: ...lecting a mode and how to record a video Using the Smart Auto mode 39 Using the Program mode 40 Using the Aperture Priority Shutter Priority or Manual mode 41 Using the Night Portrait Landscapee mode 45 Using the Scene mode 46 Recording a Movie 48 ...

Page 39: ...st and leaves Close up shot for the subject with various colors Close up portrait shot With the camera on a tripod a shot of a subject that does not move for a period of time Shot of fast moving subject or subject that moves frequently 3 Half press Shutter to focus 4 Press Shutter to take a photo If the camera does not detect a type of scene it takes pictures with the basic settings of the mode Ev...

Page 40: ...Shutter to take a photo What is the program shift method If this function is used desired shutter speed and aperture value can be selected while maintaining the same brightness The shutter speed and aperture value are changed as in the following rules The available aperture numbers for exposure setting is different depending on the lens model Dial direction Changing the exposure value Left Decreas...

Page 41: ...te the Mode dial to A 2 Rotate the dial to adjust the aperture value 3 Set options For a list of options refer to Extended shooting functions p 50 4 Align your subject in the frame and half press Shutter to focus 5 Press Shutter to take a photo Aperture value The aperture value of a lens can be adjusted to control the amount of light reaching the image sensor When opening the aperture reduce the a...

Page 42: ...er to focus 5 Press Shutter to take a photo Shutter speed Shutter speed is the length of time the shutter is open You can creat many interesting effects by adjusting the shutter speed A low shutter speed blurs motion on the image You can feel the speed in the picture when the low shutter speed is used for a shot A fast shutter speed is essential for capturing the movement A faster shutter speed fr...

Page 43: ...xtended shooting functions p 50 5 Align your subject in the frame and half press Shutter to focus 6 Press Shutter to take a photo Using the Aperture Priority Shutter Priority or Manual mode EV button Dial In the P Program S Shutter Priority or A Aperture Priority modes when a value appears in red it is outside the range of values that produces good pictures P mode Shutter speed and aperture value ...

Page 44: ... Shutter Priority or Manual mode To improve image stability in the Bulb Exposure mode we recommend you use a reliable tripod or shutter release purchased separately With long exposures the time the camera takes to save images gets longer as well This is not a problem with the product and you do not need to replace the battery Before using Bulb Exposure to take long exposures we recommend you fully...

Page 45: ... mode provides the optimal exposure and focus settings for natural landscapes 1 Rotate the mode dial to 2 Align your subject in the frame and half press Shutter to focus 3 Press Shutter to take a photo Using the Night Portrait Landscape mode When you use Night mode we recommended you also use a tripod shutter release or Timer function purchased separately to minimize camera shake In the portrait m...

Page 46: ...he frame and half press Shutter to focus 4 Press Shutter to take a photo If you have the camera set to Standby mode and the Mode dial set to you can directly select a desired scene by pressing Fn Using the Scene mode Since an appropriate option is set in advance by the scene the shot can be taken conveniently by selecting a scene appropriate for the situation MENU OK 1 Beauty Shot Back Set ...

Page 47: ... tone appear lighter 6 Select Shooting3 3 Face Retouch 7 Set options x Select a higher setting to make skin tone appear lighter 8 Align your subject in the frame and half press Shutter to focus 9 Press Shutter to take a photo MENU OK 3 1 2 1 1 2 3 Face Tone Face Retouch OIS Level 1 In the Beauty Shot mode AF area is set to Face Detection AF or Self Portrait AF Using the Scene mode MENU OK 3 1 2 1 ...

Page 48: ...ram The aperture value is adjusted automatically A Aperture Priority Set the aperture value by using the dial before taking the movie To fade out the screen You can make the movie screen darker or brighter gradually in recording by using the fader function 1 In Shooting mode press MENU 2 Select Shooting3 3 Fader Off Fader function not used In Scene gradually fades in when recording starts Out Scen...

Page 49: ...hooting a movie the camera may record the image stabilizer sound When the size of a movie file exceeds 4GB the camera automatically stops recording If this occurs continue the movie by starting a new movie file When formatting a memory card always format using this camera If you format on another camera or a PC you can cause a change in the capacity of the card or make it incompatible with your came...

Page 50: ... can enjoy more customized pictures and movies Setting the resolution and quality 51 Using the timer function 54 Taking a picture in the dark place 55 Focusing methods 60 Face detection 64 Brightness and color adjustment of picture 66 Changing the shooting method 73 Special effect photo retouching 75 Key Mapping 77 ...

Page 51: ...ting photos on A3 size prints 2M 1920 x 1280 3 2 For printing photos on A5 size prints 4592 x 2584 16 9 When outputting to HDTV 16 9 or printing A1 size prints 3872 x 2176 16 9 When outputting to HDTV 16 9 or printing A3 size prints 3008 x 1688 16 9 When outputting to HDTV 16 9 or printing A4 size prints 1920 x 1080 16 9 When outputting to HDTV 16 9 or printing A5 size prints Setting video resolut...

Page 52: ...AL Normal RAW Save normal image and RAW file at the same time Setting the quality of a movie The camera saves movies in normal or high quality 1 In the Shooting mode press MENU 2 Select Shooting1 1 Quality an option Normal Set normal quality HQ Set high quality The camera saves RAW fi le format images without data loss and only in the 14M 4592 x 3056 photo size Although settings for white balance co...

Page 53: ...reduces noise that may occur when you set a high speed ISO 3200 Long Term NR This function reduces noise when you set the camera for a long exposure over 1 seconds It requires additional processing time equal to the shutter speed you used to take the picture Setting the resolution and quality When the Noise reduction function is disabled there might be a noise in the recorded picture ...

Page 54: ...otating the dial or pressing W X You can select the timer setting from 2 30 seconds 5 The shot is taken automatically after the time being set has passed by pressing Shutter Using the timer function The function can be set directly by pressing in the shooting mode To cancel the self timer function press one more time or press Shutter MENU 2 Timer Reset Back ...

Page 55: ...automatically adjusts the brightness of the flash according to the amount of light in the surrounding environment Auto The flash light operates automatically in the dark place Auto Red The flash light operates automatically and prevents the red eye effect Fill in The flash operates whenever you take a picture The brightness of the flash is automatically controlled Fill in Red The flash operates whenever...

Page 56: ... remained clearly since the flash will burst light immediately upon shutter opening Since the flash bursts the light at a later time when having used the 2nd Curtain option the picture expresses the last image of the subject clearly Ball moving direction Ball moving direction S Use of early 1st Curtain option S Use of 2nd Curtain option Taking a picture in a dark place When you set the red eye fix fu...

Page 57: ...ment function is not available in some shooting modes If an external fl ash unit has a flash control function the light control value of the external flash is applied when you connect it to the camera If the distance from the subject is quite close when taking images by using the built in flash part of the images may appear dark as the lens is interfered with the flash light Please check the distance b...

Page 58: ...ht in the surrounding environment 2 Auto The flash operates automatically in dim or dark light 3 Auto Red The flash operates automatically in dim or dark light and prevents the red eye effect 4 Fill in The flash operates whenever you take a picture and its brightness is controlled automatically 5 Fill in Red Always operates the flash light and prevents the red eye effect 6 1st Curtain The flash operate...

Page 59: ...ising the ISO value This reduces the degree of camera shaking with faster shutter speed 1 In the Shooting mode press MENU 2 Select Shooting 1 1 ISO an option Taking a picture in a dark place The higher the ISO speed you select the more visual noise you may get When the noise reduction function is used the noise caused by the high sensitive ISO 3200 can be reduced The available ISO setting options ...

Page 60: ...e camera takes a shot only if the focus is set correctly when you press the shutter button Even if the focus is set correctly when you press the shutter half way the camera will not take the shot if the focus is not set correctly when you press the shutter button fully If your lens has an AF MF switch you can set the lens to MF and adjust the focus manually If there is no AF MF switch on the lens ...

Page 61: ...an option Selection AF Sets the focus appropriately for an area you have selected Multi AF Displays a green rectangle in all the Face places where focus is set correctly Face Detection AF Shows the areas that the focus is correctly set in the display Self Portrait AF When the sound effect is heard at the time of self shot you can check the position of the subject s face The available options may d...

Page 62: ...U to return to the previous mode 4 In the Shooting mode press 5 Press S T W X to move the focus area 6 Adjust the size of focus area by using the dial 7 Align your subject in the frame and half press Shutter to focus 8 Press Shutter to take a photo Focusing methods AF Zoom Move MENU OK 2 1 1 1 2 3 AF Mode AF Area AF Priority MF Assist Drive Flash 3 Back Set Selection AF Multi AF Face Detection AF ...

Page 63: ... Set the focus method to Manual Focus 2 Select Shooting 2 2 MF Assist 3 Select a desired option Off Do not enlarge the subject on screen when it is in Manual focus mode On Enlarge the subject on screen when you adjust the focus in Manual focus mode MENU OK 2 1 1 1 2 3 AF Mode AF Area AF Priority MF Assist Drive Flash 3 On Off On Back Set Focusing methods ...

Page 64: ...t is too bright or dark The subject is not facing the camera When part of the face is hidden by an object like sunglasses Part of the subject s face is hidden by sunglasses or similar objects The subject makes a large facial expression The light or backlight on the subject s face is not uniform Depending on the Picture Wizard option the camera may not recognize the subject s face The options avail...

Page 65: ...F on the camera chirps rapidly when your face is in focus 1 In the Shooting mode press MENU 2 Select Shooting 2 2 AF Area Self Portrait AF 3 Press Shutter if having an info sound of shooting Check the focus of the subject in Shooting mode Face detection ...

Page 66: ...ing mode press MENU 2 Select User setup 1 EV Step an option 1 3 Change the exposure level by 1 3 step 1 2 Change the exposure level by 1 2 step When fixing and using the exposure value being set it may be excessively bright or dark according to the shooting environment Please take a picture by adjusting the exposure value appropriate for the shooting environment When it is difficult to judge an appr...

Page 67: ...trait shot where there is a strong backlight When the subject is not located in the center of the display the subject can appear to be too bright or too dark Center weighted This calculates the amount of light in the center portion of the shot and averages the result over the entire image This is suitable when the area of the subject is large when compared to the overall composition of the picture...

Page 68: ...light For shooting outdoors on a clear day Cloudy For shooting outdoors on a cloudy day Fluorescent White Daylight fluorescent lamp suitable especially for the white fluorescent light with the color temperature of about 4200K Fluorescent NW Daylight fluorescent lamp suitable especially for the daylight fluorescent lighting with the color temperature of about 5 000K Fluorescent Daylight Daylight fluores...

Page 69: ...he shot is taken after setting the composition of white paper filled in full frame an appropriate white balance value is set according to the measured light source 1 In the Shooting mode press MENU 2 Select Shooting 1 1 1 White Balance 3 Select Custom Set and then press Fn 4 After setting the composition to show only the white paper press Shutter Brightness and color adjustment of picture White pap...

Page 70: ... dial or pressing W X 5 Press to save What is color temperature Color temperature refers to the temperature that has expressed the color change of light in the absolute temperature K This can express cold sense with the rising color temperature and warm sense with the falling color temperature Clear sky Fluorescent_H Cloudy Daylight Fluorescent_L Halogen lamp Incandescent bulb Candle light Brightn...

Page 71: ...RGB for regular images sRGB standards for International standard of color space established by the IEC International Electrotechnical Commission This is defined from color space for PC monitors and is also used as the standard color space for Exif Adobe RGB is the color space recommended by Adobe Systems Inc for commercial printing and has wider range of color reproduction than sRGB Adobe RGB cover...

Page 72: ...ting mode press MENU 2 Select Shooting 3 3 Smart Range an option When you turn on Smart Range you cannot select the ISO 100 option The Smart range function is not available in some shooting modes and it may automatically operate while you use the and shooting options You can set the Smart Range function directly by pressing Fn in the Shooting mode Brightness and color adjustment of picture ...

Page 73: ... WB BKT When the shutter is pressed the camera will take 3 consecutive shots the original and 2 more with different white balance settings P Wiz BKT When the shutter is pressed the camera will take 3 consecutive shots all three will have different picture wizard settings The options may differ depending on the Shooting mode The WB BKT and P Wiz BKT functions correct the image after you take the sh...

Page 74: ...osure interval BKT Order Set the shooting orders BKT Area Set the exposure steps WB BKT Set When using the WB BKT function this allows setting the adjusted interval of white balance value Example MG 3 adjusts the Magenta value of 3 steps minus or plus P Wiz BKT Set When using the picture wizard BKT function this allows setting the shot order MENU OK 3 BKT Set AE BKT Set WB BKT Set P Wiz BKT Set AB...

Page 75: ...ssic 1 In the Shooting mode press MENU 2 Select Shooting 1 1 Picture Wizard an option 3 Adjust the detailed items of picture wizard that were selected by using S T W X You can control the color saturation sharpness and contrast 4 Set to a desired value The option can be set directly by pressing the button of camera in the shooting mode MENU Vivid P L R Cool F CA Color 0 0 0 V Saturation Sharpness ...

Page 76: ...ifferent ways 1 In the Shooting mode press MENU 2 Select Shooting 1 1 Picture Wizard Custom an option 3 Adjust the Picture Wizard value by using S T W X You can control the color saturation sharpness and contrast 4 Set to a desired value MENU Custom1 P L F R CA Cool C1 Color 0 0 0 Saturation Sharpness Contrast Exit Move Classic ...

Page 77: ...cutes the Depth of Field Preview function for the current aperture value What is AEL function The auto exposure lock AEL and auto focus lock AFL functions of the camera are the functions that maintain the settings until the shooting is completed by remembering the exposure value and focus when pushing the AEL button of camera Reaction of the half shutter release when the AEL button is set to the f...

Page 78: ...earn how to connect your camera to your computer photo printer TV or HDTV Play picture movie 79 Picture editing 87 Viewing files on a TV or HDTV 91 Transferring files to your computer 93 Using the Samsung RAW Converter 99 Printing photos with a photo printer PictBridge 102 ...

Page 79: ... information screens The display information appears by pressing DISP in the play mode 1 RAW file indicator 2 File that includes development info 3 Protected file indicator 4 File no 5 Meta value of picture 6 Shutter speed info 7 Aperture value 8 ISO setup value info 9 File playing total no of files stored battery information Play picture movie 00004 00009 1 250 F5 1 100 ISO 100 0001 Mode Flash Focal...

Page 80: ...ormation Movie playback information screen 1 Volume control display 2 Protected file 3 File no 4 Meta value of movie 5 Fast forward 6 Total play time of selected file 7 Current play time 8 Rewind Play picture movie OK WWaWW WXaWW 100 0001 1280 X 720 2010 01 01 Video size Date 3 4 1 7 6 5 8 2 00004 00009 1 40 F3 5 100 ISO 0 0 4592 X 3056 2010 01 01 R G B 1 2 3 4 Y 18mm RAW Play Capture ...

Page 81: ...urn to the previous function Converting to the thumbnail view Since several files can be shown on one display files can be searched quickly To have a thumbnail view of 9 images press two times or press three times to have a thumbnail view of 20 images Press to cancel Play picture movie When you start Smart Album or change the filter method the time it takes for the camera to classify and display files...

Page 82: ...ack mode Deleting one picture You can delete only one picture by selecting a desired file 1 After selecting the file to be deleted in the play mode press 2 From the popup window select Yes Deleting selected file 1 After selecting the file to be deleted in the play mode press 2 From the popup window select Multiple Delete 3 After selecting a file to be deleted press To cancel your selection press again ...

Page 83: ...ical frame by rotating them automatically while in playing 1 In Playback mode press MENU 2 Select Playback Auto Rotate On High Light This informs the excessively bright part from the image taken 1 In Playback mode press MENU 2 Select Playback High Light On Play picture movie If the photo shot is taken when the direction of the camera was aimed at the bottom the direction of the image can be differ...

Page 84: ...d option To play without selecting an option go to step 4 Images Select the pictures you want in the slide show All Include all the saved pictures in the slide show Date Include pictures taken on a specific date in the slide show Select Select pictures and see them in the slide show Effect Select the transition effects between pictures In order not to use the changing effect select the off option I...

Page 85: ...W X Pause Play Press the button View a movie While a movie is being played back you are able to select and cut a desired part of the scene 1 After selecting a desired movie in the play mode press 2 Enjoy movie Rewind Press W Pause Play Press Fast rewind Press X Volume control Turn the dial to the left right Stop Press S Play picture movie OK WWaW PLAY WXaWW WXaWW 100 0001 Pause Stop ...

Page 86: ... part of a movie 1 Press in the play mode 2 Select the start point to cut by pressing while playing a movie 3 Select the end point of cutting by pressing 4 From the popup window press Yes Play picture movie The resolution of the captured image is the same as the movie resolution The captured file is saved as a separate file under a new file name The cut file is saved by using a different file name ...

Page 87: ...t Resize 3 Select desired image resolution The edited file is saved by using the different file name Rotating 1 After selecting a desired picture in the play mode press MENU 2 Select Image Edit Rotate 3 Select a desired rotation state The resolution to be changed will be limited according to the resolution of original picture Depending on the size of the picture when you rotate the original the new ...

Page 88: ...le Selecting picture style allows you to express various moods of emotion in your picture 1 After selecting a desired picture in the play mode press MENU 2 Select Playback Image Edit Photo Style Selector 3 Set to a desired option Face retouching 1 After selecting a desired picture in the play mode press MENU 2 Select Playback Image Edit Face Retouch 3 Set to a desired option The level of face reto...

Page 89: ...Printing all Reset Initializing the standard print option 3 When having made the selections press Fn after selecting the picture and number of copies to be printed by using the dial When having selected all press S T to select the number of copies to be printed and then press The print info you enter can only be used for the digital printer or digital picture printing shop that supports the digita...

Page 90: ...n 6 When having selected the select option select the picture to be printed and press Fn after selecting the print size by using the dial When having selected all press S T and select the print size Then select the print size and press Index printing 1 Press MENU Playback DPOF Index in the playback mode 2 From the popup window press Yes Picture editing The designated print size can only be applied...

Page 91: ...onnect the TV and the camera using the A V cable 3 Make sure the TV and camera are turned on and select the video output mode of TV 4 View the videos and pictures using the buttons of camera body On some TVs digital noise may occur or part of an image may not appear Images may not appear centered on the TV screen depending on your TV settings You cannot capture photos or videos while the camera is...

Page 92: ... user can connect the camera to an HDTV using the Anynet CEC method The Anynet CEC functions allows you to control connected devices using the TV remote control In the case that the HDTV supports Anynet CEC the power of the TV is automatically turned on when used in conjunction with the caemra When connected to an HDTV by an HDMI cable the camera can not take a pictures or movies When connected to...

Page 93: ...ter Programs contained on the CD Program Purpose Intelli studio Edit photos and videos Samsung RAW Converter Convert RAW files into the desired file format Using a self assembled PC or a PC and OS that are not supported may void your warranty The programs may not work properly on 64 bit Edition of Windows XP Vista and 7 Intelli studio may not perform correctly on some computers even when the compute...

Page 94: ... instructions 4 Click Exit to complete the installation and then restart your computer Transferring files to your PC When you connect the camera to your PC the PC recognizes the camera as a removable drive 1 Connect your camera to your PC with the USB cable You must plug the end of the cable with the correct connection plug into your camera If the cable is reversed it may damage your files The manuf...

Page 95: ...he USB cable for Windows 2000 and Vista is similar 1 It the status lamp on your camera is blinking it means the data transfer is in progress Please wait until the status lamp stops blinking 2 Click on the tool bar at the bottom right of your PC screen 3 Click the pop up message 4 Remove the USB cable Transferring files to your computer If the Folder Type is set to Date the folder name appears as XX...

Page 96: ...click the removable disk icon 4 Transfer photos or videos to the computer When using the USB cable make sure to match the plugs on the cable to the USB jacks on the camera and computer If the cable is reversed it may damage your files The manufacturer is not responsible for any loss of data Please use only the accessories that SAMSUNG provides The manufacturer takes no responsibility for any loss o...

Page 97: ...ws desktop The Intelli studio allows you to play back and edit files You can also upload files to websites such as Flickr or YouTube For details select Menu Help in the program Transferring files to your computer You cannot edit files directly on the camera Transfer files to a folder on your computer before editing You cannot copy files in your computer to the camera Intelli studio supports the followin...

Page 98: ...in your computer 14 Move to the previous or next folder 15 Print files view files on a map store files in My Folder or register faces Transferring files using Intelli studio Intelli studio will start automatically when you connect the camera to your computer with the USB cable 1 Connect the camera to your computer with the USB cable 2 Turn on the camera The computer recognizes the camera automatically...

Page 99: ...age editing tools Exposure bias Compensates the exposure value White balance Adjusts the white balance value Color Adjusts the color of the image Tone Changes the color tone Sharpness Noise reduction Adjusts the sharpness Development Previewing is available for the final output Highlight controller Adjusts the saturation and highlights of the selected image Histogram Displays the color layers of th...

Page 100: ...no matter which you change first The following images show how you can change the exposure on an image using the Samsung RAW Converter You can adjust the exposure by using the menu option as shown in the picture below You can see the results of the exposure adjustment in the histograms below Original image P Mode Aperture f 8 Shutter Speed 1 15sec ISO 100 Changed image after correcting the exposure...

Page 101: ...ng RAW Converter You can adjust the contrast by using the menu option as shown in the picture Saving the RAW files in JPEG or TIFF format You can save the RAW files in JPEG or TIFF format using the Samsung RAW Converter 1 Choose the image you want to edit and then select File F Development 2 Select the type of file as JPEG or TIFF and then click Save S The selected file is saved as JPEG or TIFF format...

Page 102: ... Configuring print settings MENU Exit Print 2 1 Images Size Layout Type Quality Date One Photo Auto Auto Auto Auto Auto Images Select whether to print the current photo or all photos Size Specify the size of the print Layout Create thumbnail prints Type Select the type of paper Quality Set the printing quality Date Set to print the date File Name Set to print the name of the file Reset Reset the pri...

Page 103: ...Camera settings menu You can set the camera use environment using the setup menu Camera settings menu 104 ...

Page 104: ... return to the previous mode Camera settings menu You can set the camera use environment using the setup menu MENU OK 2 1 2 1 1 3 Quickview Display Adjust Display Save Power Save Date Time Sound 1sec 3min 1min 3 Setup menu items MENU OK 2 Sound System Volume AF Sound Button Sound Medium On On Exit Change Exit Change ...

Page 105: ...ay brightness auto brightness setting or display color Display Brightness You can adjust the display brightness using the S T to one of five brightness levels Auto Brightness Adjust the brightness of screen Display Color Depending on whether the user uses the screen or the viewfinder the display color can be adjusted by using the S T W X Display Save Sets the display off time Off 0 5min 1min 3min 5m...

Page 106: ...image taken by setting Jan 01 sRGB is saved in 0101xxxx jpg File Number This sets the method of designating file number Series Reset The folder name that has taken pictures for the first time becomes 100PHOTO and the filename will be SAM_0001 when the color space is sRGB The filename number is increased by 1 in the range of SAM_0001 SAM_9999 File name numbers are increased by 1 from SAM_0001 to SAM_99...

Page 107: ...er Save may not work if the camera is connected to a computer TV or printer playing a slide show or movie Date Time This sets the date and time Type Date Time Zone Time Imprint Only the date is shown on the lower right side of the picture in play When printing a picture the date may not be printed appropriately from certain manufacturer or printer model Camera settings menu Default value Normal se...

Page 108: ...efault value The date time language and video output values are kept Camera settings menu Default value Normal setup 3 3 Display Select Auto Select Convert between Main Display and EVF by eye sensor Main Display The screen will be shown only through Main Display EVF The screen will be shown only through EVF Video Out Select the video output signal appropriate for your country when connecting the c...

Page 109: ... error messages specifications and maintenance tips Error messages 110 Camera maintenance 111 Before contacting a service center 115 Camera specifications 118 Lens specifications 122 Accessories optional items 123 Index 125 ...

Page 110: ...y or recharge the battery Memory Full Delete unnecessary files or insert a new memory card No Image File Take photos or insert a memory card that has some photos Check the lens Check whether dust or foreign substances between Lens contacts and Lens mount index Remove either dust or foreign substances if dirt or foreign substances are appeared Please be care for avoid getting dirt foreign substances...

Page 111: ...the photo images because the image sensor can be exposed to the external environment This is not a problem of the product and the exposure to dust can occur in everyday use of camera When using the dust blower do not insert the blower through the lens mount the camera may malfunction In that case please contact to the service center Camera body Wipe gently with a soft dry cloth Camera maintenance ...

Page 112: ...oting conditions These capacities are based on a 1GB SD card Size Super Fine Fine Normal RAW RAW SF RAW F RAW N Photos 14M 3 2 142 278 408 35 28 31 32 10M 3 2 197 382 724 32 34 36 6M 3 2 322 615 1128 36 38 39 2M 3 2 738 1334 2238 41 42 43 12M 16 9 168 328 630 30 33 35 8M 16 9 234 454 860 34 36 37 5M 16 9 381 727 1334 38 39 40 2M 16 9 872 1573 2638 42 43 43 Burst 1201 2092 3320 Size HQ Normal Movie...

Page 113: ...ox 150 min Battery life Shooting mode Number of photos Photos Approx 200 min Approx 400 photos Videos Approx 130 min The figures above are measured by Samsung s standards and may differ depending on actual usage The shooting time may change depending on the shooting environment and shot intervals Several videos were recorded in succession to determine the total recording time Camera maintenance ...

Page 114: ...g time Do not leave the product turned on where there is little or no air circulation Do not let accessories like necklaces coins keys watches etc come in contact with the battery chamber Use Advanced Lithium Batteries with a guarantee from the manufacturing company Do not disassemble the battery or perforate the battery with a pin Do not subject the battery or camera to high pressure Do not drop ...

Page 115: ...cket Using the flash or recording videos depletes the battery quickly Recharge if needed The ability of a Lithium battery to hold a charge dimishes over time If your battery looses its charge rapidly on a regular basis purchase a new battery Cannot take photos There is no space on the memory card Delete unnecessary files or insert a new card Format the memory card p 106 The memory card is defective ...

Page 116: ...the shooting condition If the camera is shaken while shooting the photo may be blurry Use a tripod to avoid camera shake Make sure that the lens is clean If not clean the lens p 111 The colors in the photo do not match the actual scene An incorrect white balance can create unrealistic color Select the proper white balance option to suit the light source p 68 The photo is too bright Your photo is o...

Page 117: ...t your memory card contains photos Your computer does not recognize your camera Make sure that the USB cable is connected correctly Make sure that your camera is switched on Make sure that you are using a supported operating system Your computer disconnects the camera while transferring files The fi le transmission may be interrupted by static electricity Disconnect the USB cable and then connect it...

Page 118: ...fication Approx 0 83x APS C 50mm 1m 1 Eyepoint About 17 mm Diopter Adjustment Approx 4 0 1 0m 1 Specification Focusing Type Contrast AF Focusing point Selection 1point Free selection Multi Normal 15points Close Up 35points Face Detection Max 10faces Modes Single AF Continuous AF MF AF assist lamp Yes Green LED Shutter Type Electronically controlled vertical run focal plane shutter Speed Auto 1 400...

Page 119: ...to Auto Red eye reduction Fill in Fill in Red eye reduction 1st Curtain 2nd Curtain OFF Guide Number 11 at ISO 100 Angle of View Coverage 28mm wide angle Equivalent to 35mm Sync Speed Less than 1 180sec Flash Compensation 2 2EV 0 5EV step External Flash Samsung External Flash available SEF42A SEF20A optional Synchro Flash attachment Hot Shoe White Balance Modes Auto Daylight Cloudy Fluorescent W N...

Page 120: ...080 RAW 14M 4592x3056 Quality Super fine Fine Normal RAW Format SRW Color Space sRGB Adobe RGB Specification Movie Format MP4 H 264 Compression Movie H 264 Sound AAC Movie Clip With Audio or without Audio user selectable recording time 25 minutes Image size 1280x720 640x480 320x240 Frame rate 30fps Sound Mono Sound Movie Editing Still Image Capture Time Trimming Image Play Type Single image Thumbnai...

Page 121: ...uality 44min Normal 66min 320x240 High Quality 145min Normal 210min These figures are measured under the Samsung standard Specification Direct Printing PictBridge Interface Digital Output Connector USB 2 0 HI SPEED Video output NTSC PAL user selectable HDMI 1 3 1080i 720P 576P 480P External Release Yes DC power input connector DC 9 0V 1 5A 100 240V Power Source Type Rechargeable battery BP1310 1300m...

Page 122: ... 2 75 9 28 7 31 4 8 0 Aperture F2 Min F22 Number of Blades 7 Circular Aperture Diaphragm F3 5 5 6 Min F22 Number of Blades 7 Circular Aperture Diaphragm F4 5 6 Min F22 Number of Blades 7 Circular Aperture Diaphragm Mount Type Samsung NX Mount Samsung NX Mount Samsung NX Mount Optical Image Stabilizer No Yes Yes Minimum Focus Distance 0 25m Ğ 0 28m Ğ 0 98m Ğ Maximum Magnification Approx 0 16X Approx...

Page 123: ...ecure Digital and SDHC Secure Digital High Capacity may be used A V cable The camera can be connected to an external device by using an A V cable Shutter release This product minimizes the possible shaking of camera when taking pictures by using a tripod or taking pictures at a low shutter speed Adaptor The power needed in the camera can be supplied by connecting to a power socket using this adapt...

Page 124: ...EF20A or SEF42A can be purchased for your various shooting experience HDMI Cable You can view high quality and uncompressed photos or videos on an HDMI High Definition Multimedia Interface using the optional HDMI cable Battery pack Battery pack can be purchased separately The image of components or optional parts can differ from that of actual products Please refer to the user s manual of the optio...

Page 125: ... Direction keys 5 Diopter adjustment dial 16 Display type 28 Depth of field 37 Depth Preview 37 Deleting a file 82 Display 105 Display Select 108 Date Time 107 E Eye sensor 15 Eye cup 16 EV button 43 External flash 58 Error message 110 F Fn 27 Flash popup button 55 Focusing methods 60 Face detection 64 File protection 82 Face retouching 88 Format 106 File name 106 File number 106 Folder type 106 Firm...

Page 126: ...ting mode 5 Subject 7 Status lamp 16 Strap 22 Sound 29 Screen display 30 Smart Auto mode 39 Shutter Priority mode 42 Shutter speed 42 Scene mode 46 Setting the flash option 55 Single AF 60 Selection AF 61 Self portrait face detection 65 Spot metering 67 Smart range 72 Shooting method 73 Smart album 81 Slide show 84 Samsung Raw Converter 99 System volume 105 T Title and role of each part 14 Turning ...

Page 127: ...hase contract This product and its electronic accessories should not be mixed with other commercial wastes for disposal Correct disposal of batteries in this product Applicable in the European Union and other European countries with separate battery return systems This marking on the battery manual or packaging indicates that the batteries in this product should not be disposed of with other house...

Page 128: ...Please refer to the warranty that came with your product or visit our website http www samsungimaging com for after sales service or inquiries ...

Reviews: