background image

English  23

C

ooking Smar

t

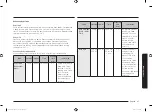
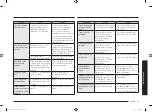
Code

Food

Weight (kg)

Instructions

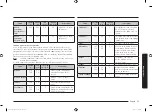
d4

Bread/Cake

0.1-1.0

Put bread on a piece of kitchen paper and 
turn over, as soon as the oven beeps. Place 
cake on ceramic tray and if possible, turn 
over, as soon as the oven beeps. (Oven keeps 
operating and is stopped, when you open the 
door.) This programme is suitable for all kinds 
of bread, sliced or whole, as well as for bread 
rolls and baguettes. Arrange bread rolls in 
a circle. This programme is suitable for all 
kinds of yeast cake, biscuit, cheese cake and 
puff pastry. It is not suitable for short / crust 
pastry, fruit and cream cakes as well as for 
cake with chocolate topping. 
Stand for 10-30 minutes.

d5

Fruit

0.1-0.8

Distribute frozen fruit evenly on ceramic 
tray. This programme is suitable for fruits like 
raspberries, mixed berries, and tropical fruits.
Stand for 5-15 minutes.

NOTE

The Auto Defrost Mode uses microwave energy to heat food.
Therefore guidelines for cookware and other microwave safety precautions must 
be strictly observed when using this mode.

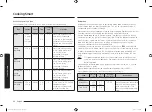
Auto reheat guide

Code

Food

Weight (kg)

Instructions

r1

Drink

0.25-0.5

Pour the liquid into ceramic mugs and reheat 
uncovered. Place one mug in the centre, place 
2 mugs side by side on ceramic tray. Leave 
them to stand in the microwave oven. Stir 
well after 1-2 min standing. Be careful while 
taking the cups out. (see safety instruction for 
reheating liquids.)

r2

Plated meal

0.3-0.4
0.4-0.5

Put on a ceramic plate and cover with 
microwave cling film. This programme is 
suitable for meals consisting of 3 components 
(e.g. meat with sauce, vegetables and a side 
dish like potatoes, rice or pasta). After cooking 
stand for 3 min.

r3

Frozen 
Plated meal

0.3-0.4
0.4-0.5

Take frozen ready meal and check if dish is 
suitable for microwave. Pierce film of ready 
meal. Put the frozen ready meal in the centre. 
This programme is suitable for frozen ready 
meals consisting of 3 components (e.g. meat 
with sauce, vegetables and a side dish like 
potatoes, rice or pasta).After cooking stand for 
3 min.

r4

Soup

0.2-0.3
0.4-0.5

Pour into a deep ceramic plate or bowl and 
cover with plastic lid during heating. Put soup 
in the centre. Stir carefully before and after 
2-3 min standing.

r5

Stew

0.2-0.3
0.4-0.5

Pour into a deep ceramic plate or bowl and 
cover with plastic lid during heating. Put soup 
in the centre. Stir carefully before and after 
2-3 min standing.

NQ50K3130BS_EU_DG68-00523K-00_EN.indd   23

4/15/2016   11:51:49 AM

Summary of Contents for NQ50K3130BM

Page 1: ...50K3130 NQ50K3130BS_EU_DG68 00523K 00_EN indd 1 4 15 2016 11 51 40 AM Questo manuale d istruzione fornito da trovaprezzi it Scopri tutte le offerte per Samsung NQ50K3130BM o cerca il tuo prodotto tra...

Page 2: ...Replacement repair 12 Care against an extended period of disuse 12 Before you start 13 Clock 13 Timer 13 Sound On Off 14 Energy saving 14 About microwave energy 14 Cookware for microwave 15 Operation...

Page 3: ...staff kitchen areas in shops offices and other working environments farm houses by clients in hotels motels and other residential environments bed and breakfast type environments Only use utensils tha...

Page 4: ...upply after installation The disconnection may be achieved by having the plug accessible or by incorporating a switch in the fixed wiring in accordance with the wiring rules Eggs in their shell and wh...

Page 5: ...n scratch the surface which may result in shattering of the glass WARNING The appliance and its accessible parts become hot during use Care should be taken to avoid touching heating elements Children...

Page 6: ...rtly after cooking Do not use the oven for deep fat frying because the oil temperature cannot be controlled This could result in a sudden boil over of hot oils This appliance can be used by children a...

Page 7: ...ut down for 30 minutes for safety purposes We recommend placing a glass of water inside the oven at all times to absorb microwave energy in case the oven is started accidentally Install the oven in co...

Page 8: ...accessories should not be mixed with other commercial wastes for disposal For information on Samsung s environmental commitments and product specific regulatory obligations e g REACH visit samsung com...

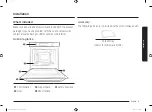
Page 9: ...oven or accessories contact a local Samsung customer centre or the retailer Oven at a glance 01 02 03 04 05 01 Control panel 02 Support Rack 03 Safety door lock 04 Door 05 Door Handle Accessory The fo...

Page 10: ...en is NOT designed for use in a commercial cooking setting It should be used exclusively for cooking food in a home setting The appliance is hot during and after use Exercise caution when young childr...

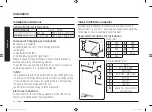
Page 11: ...hold the appliance with 2 side handles and door handle when unpacking the product A B C D E Under sink built in cabinet mm A Min 550 B Min 564 Max 568 C Min 446 Max 450 D 50 E 200 cm2 Mounting the ov...

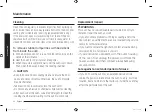
Page 12: ...caution not to spill water into the oven vents Do not use any abrasive or chemical substances for cleaning After each use of the oven use a mild detergent to clean the cooking chamber after waiting f...

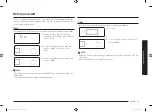
Page 13: ...se the value dial to set the hour and then press OK The minute element blinks 3 Use the value dial to set the minute and then press OK NOTE To change the current time later press and hold for 3 second...

Page 14: ...you must respect the standing time specified in this manual which ensures cooking evenly down to the core Sound On Off You can turn on or off the key tone beep or alarm This setting is available only...

Page 15: ...e unless decorated with a metal trim Disposable polyester cardboard dishes Some frozen foods are packaged in these dishes Fast food packaging Polystyrene cups or containers Overheating may cause these...

Page 16: ...setting 09 Cooking time Press to set the cooking time 10 Stop Press to stop operation This button is also used to cancel the current mode 11 30s Use to add cooking time 30sec 12 Start Press to start...

Page 17: ...dial to set the cooking time Optionally you can delay the end time of your cooking to a desired point After set the cooking time press And then use value dial to set an end point When done press To c...

Page 18: ...the recommended accessory and then close the door 2 Follow steps 1 3 in the Microwave mode on page 17 3 When cooking is complete 0 00 blinks Use oven gloves to take out food Simple start To simply hea...

Page 19: ...are automatically adjusted according to the selected programme Step 1 Step 2 Step 3 Auto Reheat 1 to 9 Weight 1 Put food in suitable cookware then on the recommended accessory and then close the door...

Page 20: ...m The Keep Warm feature keeps food hot until it s served Use this function to keep food warm until ready to serve When cooking is complete 1 Turn the mode dial to select Keep Warm 2 Use the value dial...

Page 21: ...is complete The water inside the oven is very hot and it can cause a burn NOTE Use this feature only when oven has cooled completely to room temperature DO NOT use distilled water DO NOT use high pres...

Page 22: ...e when cooking 0 3 kg rice add 600 ml cold water Use glass pyrex bowl with lid Put bowl in the centre Cook covered Stand 5 minutes and stir after cooking Code Food Weight kg Instructions A6 Pasta 0 25...

Page 23: ...id into ceramic mugs and reheat uncovered Place one mug in the centre place 2 mugs side by side on ceramic tray Leave them to stand in the microwave oven Stir well after 1 2 min standing Be careful wh...

Page 24: ...guide General guidelines Food suitable for microwave cooking Many kinds of food are suitable for microwave cooking including fresh or frozen vegetables fruit pasta rice grains beans fish and meat Sau...

Page 25: ...sized florets Arrange the stems to the center Brussels Sprouts 250 5 6 3 Add 60 75 ml 5 6 tbsp water Carrots 250 5 6 3 Cut carrots into even sized slices Cauliflower 250 500 5 6 7 8 3 Prepare even si...

Page 26: ...ore the centre is piping hot You will have more success reheating smaller pieces Keeping food covered while heating will also help prevent drying Power levels Different power levels can be used for re...

Page 27: ...d times in this table as guide lines for reheating Food Portion Power Time Standing time min Instruction Baby Food Vegetable Meat 190 g 600 W 30 40 sec 2 3 Empty into ceramic deep plate Cook covered S...

Page 28: ...out of any wrapping to allow thawed liquid to drain away Put the frozen food on a dish without a cover Turn over half way drain off any liquid and remove any giblets as soon as possible Check the food...

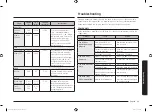
Page 29: ...he oven In that case first check the table below and try the suggestions If a problem persists or if any information code keeps appearing on the display contact a local Samsung service centre Checkpoi...

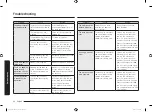
Page 30: ...n Use a cooking container with a flat bottom Problem Cause Action The power turns off during operation The oven has been cooking for an extended period of time After cooking for an extended period of...

Page 31: ...ts to work The door is not properly closed Close the door and check again Problem Cause Action There is electricity coming from the oven The power or power socket is not properly grounded Make sure th...

Page 32: ...cool and then remove the food from the heating elements Food is too close to the grill Put the food a suitable distance away while cooking Food is not properly prepared and or arranged Make sure food...

Page 33: ...ou may see an information code on the display Check the table below and try the suggestions Code Description Action C 20 The temperature sensor is open Unplug the power cord of the oven and contact a...

Page 34: ...el NQ50K3130 Power Source 230 V 50 Hz Power Consumption Microwave Mode 1650 W Output Power 100W 900W IEC 705 240V 900W 230V 850W Operating Frequency 2450 MHz Magnetron OM75P 21 Cooling Method Cooling...

Page 35: ...Memo NQ50K3130BS_EU_DG68 00523K 00_EN indd 35 4 15 2016 11 51 50 AM...

Page 36: ...max 0 60 Anruf www samsung com de support ITALIA 800 SAMSUNG 800 7267864 www samsung com it support CYPRUS 8009 4000 only from landline toll free www samsung com gr support GREECE 80111 SAMSUNG 80111...

Reviews: