background image

28

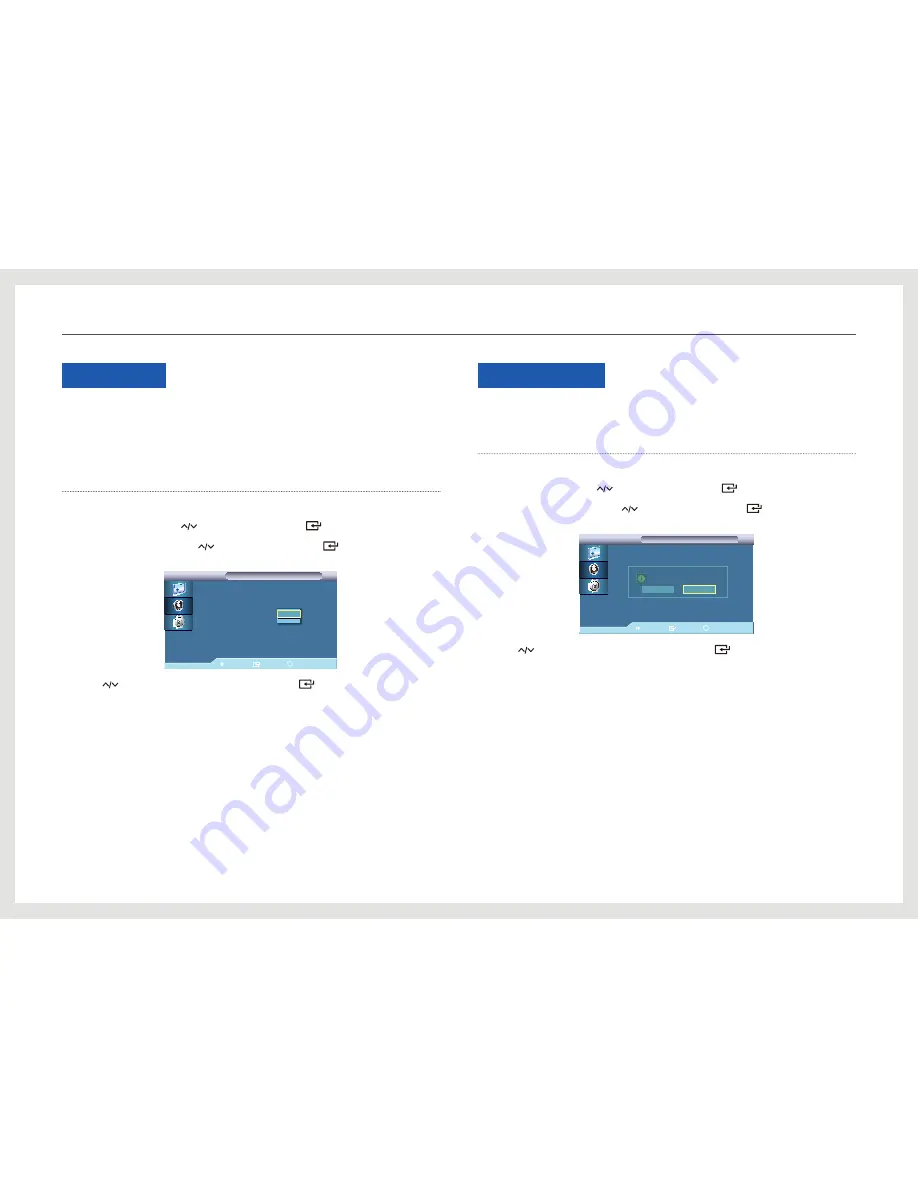
Configuring the Sound Settings

SRS TS XT

SRS TS XT allows you to enjoy the grand and vivid sound quality of 5.1-channel speakers 
using two speakers. TruSurround XT delivers a compelling, virtual surround sound experience 
through any two-speaker playback system, including internal television speakers. It is fully 
compatible with all multichannel formats.

Configuring 

SRS TS XT

1.  Press [

m

] on the product.

2.  Move to 

Sound

 using the [

] buttons. Next, press the [

] button.

3.  Move to 

SRS TS XT

 using the [

] buttons. Next, press the [

] button. 

The following screen will appear.

Move

Enter

Return

Mode   

                  : Custom

Custom 
Auto Volume             

: Off

SRS TS XT


Off 

Sound Reset              

: On 

Sound

Sound

4.  Press [

] to move to the option you want and press [

].

5.  The selected option will be applied.

Sound Reset

Return the sound settings to the default factory settings.

Restoring the default settings (

Sound Reset

)

1.  Press [

m

] on the product.

2.  Move to 

Sound

 using the [

] buttons. Next, press the [

] button.

3.  Move to 

Sound Reset

 using the [

] buttons. Next, press the [

] button. 

The following screen will appear.

Move

Enter

Return

Mode   

                  : Custom

Custom
Auto VolumeVolume             

: Off

SRS TS XT 


: Off

Sound Reset

Sound

Sound

Yes

No

Reset sound settings?

4.  Press [

] to move to the option you want and press [

].

5.  The selected option will be applied.

Summary of Contents for NL22B

Page 1: ...User Manual NL22B The color and the appearance may differ depending on the product and the specifications are subject to change without prior notice to improve the performance BN46 00298A 01 ...

Page 2: ...tents 13 Removing the Packaging 14 Checking the Components 15 Parts 15 External Sensor 16 Rear View 16 Remote Control 18 Product dimensions Chapter 3 CONNECTIONS 19 Using the Product 19 Pre connection Checkpoints 19 LAN Connection 19 Connecting to a USB Device 20 Connecting the Power 20 Changing the Resolution 21 Putting in Devices for Display in the NL22B 22 Playing Image or Video files from USB ...

Page 3: ...6 Configuring Fan Temperature 37 Changing the Auto Power Setting 37 Setting Lamp Schedule 38 Changing the OSD Display Settings 38 Setup Reset 39 Reset All Chapter 7 TROUBLESHOOTING GUIDE 40 Requirements Before Contacting Samsung Customer Service Center 40 Checking the Resolution and Frequency 40 Check the following 41 Q A Chapter 8 SPECIFICATIONS 42 General 43 PowerSaver 44 Preset Timing Modes Cha...

Page 4: ...e Video Electronics Standards Association Ownership of all other trademarks is attributed to their due owner An administration fee may be charged if either a an engineer is called out at your request and there is no defect in the product i e where you have failed to read this user manual b you bring the unit to a repair center and there is no defect in the product i e where you have failed to read...

Page 5: ... an ultrasonic wave humidifier is used nearby Contact your nearest Samsung Customer Service Center if you want to clean the inside of the product Service fee will be charged Safety Precautions Caution Do not open the cover You may suffer an electric shock The components inside this product must not be repaired by home users Contact a technician for repair Symbols Warning A serious or fatal injury ...

Page 6: ...e pins of the power cable or the power outlet using a dry cloth A fire may result Do not bend or pull the power cable with force Also do not place a heavy object on the power cable Damage to the cord may result in a fire or electric shock Do not place the power cable or product near heat sources A fire or electric shock may result Caution Do not disconnect the power cable while the product is bein...

Page 7: ...he product on an unstable or vibrating surface insecure shelf sloped surface etc The product may fall and become damaged and or cause an injury Using the product in an area with excess vibration may damage the product or cause a fire Do not install the product in a vehicle or a place exposed to dust moisture water drips etc oil or smoke A fire or electric shock may result Do not expose the product...

Page 8: ... for reference only Real life situations may differ from what is shown in the images Warning There is a high voltage inside the product Never disassemble repair or modify the product yourself A fire or electric shock may result Contact Samsung Customer Service Center for repairs Before moving the product turn off the power switch and disconnect the power cable and all other connected cables Damage...

Page 9: ... or keep combustible spray or an inflammable substance near the product An explosion or fire may result Ensure the vents are not blocked by tablecloths or curtains An increased internal temperature may cause a fire 100 Do not insert metallic objects chopsticks coins hairpins etc or objects that burn easily paper matches etc into the product via the vent or input output ports etc Be sure to power o...

Page 10: ... doctor immediately When replacing the battery insert it with the right polarity Otherwise the battery may become damaged or it may cause fire personal injury or damage due to leakage of the internal liquid Use only the specified standardized batteries and do not use a new battery and a used battery at the same time Otherwise the batteries may be damaged or cause fire personal injury or damage due...

Page 11: ...duct surface is made of glass The glass is fragile and susceptible to breaking if care is not taken Open or close the product door with caution Body parts may get caught by the door causing injury Objects in the product may get hot due to the built in LED when the product is turned on for a long period of time Take extra caution Note that there is risk of deformation and discoloration to an object...

Page 12: ...the product NOTE Hold the power cable by the plug and do not touch the cable with wet hands Otherwise an electric shock may result 3 Wipe the product screen using a clean soft and dry cloth Do not use detergents that contain alcohol solvent or surface active agents Do not spray water or detergent directly on the product 4 To clean the exterior of the product use a moist soft cloth and wring thorou...

Page 13: ...e the black locking device at the bottom of the box 3 2 1 2 Using the grooves in the box lift and remove the top of the box 2 1 3 4 5 3 Check the components and remove the styrofoam and plastic bag NOTE The appearance of the actual product may differ from the image shown This image is for reference only Preparation Chapter 2 ...

Page 14: ...are missing The appearance of the components and items sold separately may differ from the image shown Components NOTE Components may vary depending on the country Quick setup guide Warranty card Not available in Some locations User manual MagicInfo Software DVD Power cable Remote Control Batteries Not available in Some locations Keys Items sold separately LAN cable USB keyboard USB mouse USB cabl...

Page 15: ...r Aim the remote control towards this spot on the LCD Display NOTE Using other display devices in the same space as the remote control of this product can cause the other display devices to be inadvertently controlled 2 Brightness sensor Automatically detects the intensity of ambient light around a selected display and adjusts the screen brightness 3 Power lamp Turns on in power on mode and blinks...

Page 16: ...o be inadvertently controlled Remote control button functions may differ for different products Power off the product Not available Return to the previous menu Not available Display or hide the onscreen display menu or return to the previous menu Move to the upper lower left or right menu or adjust an option s setting Activates a highlighted menu item Mute the sound Unmuting the sound Press MUTE a...

Page 17: ...a new remote control batteries are not included Remote Control Reception Range Use the remote control within 7 m to 10 m from the sensor on the product at an angle of 30 from the left and right 7m 10m 30 30 NOTE Keep used batteries out of the reach of children while they are waiting to be collected and disposed of Do not use a new and used battery together Replace both batteries at the same time R...

Page 18: ... 0 375 8 61 7 6 1 359 2 417 4 34 8 513 6 444 0 34 8 298 0 476 0 398 7 388 9 NOTE Dimensions are subject to change without notice Refer to the dimensions prior to performing installation of your product Not responsible for typographical or printed errors ...

Page 19: ... 1 Connect the LAN port at the back of the product to a LAN using the LAN cable NOTE Use Cat 5 or 6 STP Type cable for the connection Shielded Twisted Pair Connecting to a USB Device USB3 0 USB2 0 1 Connect a USB device such as a keyboard mouse or speaker to USB at the back NOTE To detect and start a source device faster connect the device to the blue USB 3 0 port on the product Connections Chapte...

Page 20: ... power socket Changing the Resolution NOTE Adjust the resolution and refresh rate in Control Panel on your PC to obtain optimum picture quality The picture quality of TFT LCDs may degrade if the optimum resolution is not selected Go to Control Panel Display Screen Resolution and change the resolution ...

Page 21: ...d screen of the product to be dark The key is only provided to open or close the door It is not intended to prevent theft This applies to all products 1 2 1 Insert the key into the slot and turn the key in the direction of the arrow as shown in the image 2 Open the door at the back of the product in the direction of the arrow 3 4 3 Put in a device or accessories to display in the product 4 Close t...

Page 22: ...nd select Select Later NOTE After a USB memory device is connected the files in the USB memory are copied to the hard disk of the product before playing As a result there may be a slight delay when the files play Save directory D Repository Contents MagicInfoSlide Files on the hard disk are copied over with more up to date files on a connected USB memory each time the USB memory device is connecte...

Page 23: ...ation to the public Advertisement This mode is suitable for displaying video content and indoor outdoor advertisements Custom Customize the screen settings as desired 4 Configure the settings as required using the buttons Custom Customize the displayed colors on the screen as desired NOTE If you adjust screen using Custom function Mode will turn to Custom mode Configuring Custom 1 Press m on the p...

Page 24: ...Green Blue color balance Range 0 100 A higher value will increase the intensity of the color Configuring Color Control 1 Press m on the product 2 Move to Picture using the buttons Next press the button 3 Move to Color Control using the buttons Next press the button The following screen will appear Move Enter Return Red 50 Green 50 Blue 50 Color Control Color Control 4 Adjust the Color Control sett...

Page 25: ... 4 Adjust the Lamp Control setting using the buttons Picture Reset Reset the screen settings Restoring the default settings Picture Reset 1 Press m on the product 2 Move to Picture using the buttons Next press the button 3 Move to Picture Reset using the buttons Next press the button The following screen will appear Move Enter Return Mode Information Custom Color Control Lamp Control Picture Reset...

Page 26: ...will appear Move Enter Return Mode Standard Custom Music Auto Volume Movie SRS TS XT Speech Sound Reset Custom Sound Sound Standard Provides sound suitable for any type of content Music Provides sound close to the original experience Movie Provides a grand sound experience Speech Hear voices clearly Custom Selects Custom if you want to adjust the settings according to your personal preferences 4 C...

Page 27: ... settings using the buttons Bass Emphasizes low frequency audio Treble Emphasizes high frequency audio Balance Allows you to Adjusts the sound balance between the left and right speakers 5 The selected option will be applied Auto Volume The volume of audio input may vary depending on the channel This option automatically equalizes audio input from all channels Configuring Auto Volume 1 Press m on ...

Page 28: ...n The following screen will appear Move Enter Return Mode Custom Custom Auto Volume Off SRS TS XT Off Sound Reset On Sound Sound 4 Press to move to the option you want and press 5 The selected option will be applied Sound Reset Return the sound settings to the default factory settings Restoring the default settings Sound Reset 1 Press m on the product 2 Move to Sound using the buttons Next press t...

Page 29: ...p Setup Deutsch English Español Français Italiano Svenska Русский Português 4 Press to move to the option you want and press 5 The selected option will be applied Time Clock Set Sleep Timer Timer1 Timer2 Timer3 and Holiday Management can be set Changing the Setting for Clock Set 1 Press m on the product 2 Move to Setup using the buttons Next press the button 3 Move to Time using the buttons Next p...

Page 30: ...Next press the button 3 Move to Time using the buttons Next press the button 4 Move to Timer1 using the buttons Next press the button The following screen will appear Move Enter Return Volume Source Holiday Repeat Timer1 Timer1 Sun Mon Tue Wed Thu Fri Sat On Time 12 00 am Inactivated Off Time 12 00 am Inactivated Once 10 MagicInfo Don t Apply On Time Off Time Volume Specify the volume when the pro...

Page 31: ...using the buttons Next press the button 4 Move to Holiday Management using the buttons Next press the button The following screen will appear Move Return Holiday Management Holiday Management 01 01 Add Delete Selected Delete All Add You can specify holidays Delete Selected You can delete selected holidays NOTE Only enabled when registered holidays are selected More than one holiday can be selected...

Page 32: ...n The password will be changed NOTE If you forgot your password press the remote buttons INFO EXIT MUTE to reset the password to 0000 Configuring Lock 1 Press m on the product 2 Move to Setup using the buttons Next press the button 3 Move to Safety Lock using the buttons Next press the button 4 Move to Lock using the buttons Next press the button The following screen will appear Lock On Lock On Re...

Page 33: ...al Sets how many pixels the screen moves vertically Five adjustment levels 0 1 2 3 and 4 Time Set the time interval for performing the horizontal or vertical movement respectively 5 Configure the settings as required using the buttons Configuring Timer 1 Press m on the product 2 Move to Setup using the buttons Next press the button 3 Move to Safety Screen using the buttons Next press the button 4 ...

Page 34: ...s after images on the screen by moving long black and white vertical lines 5 The selected option will be applied Configuring Eraser 1 Press m on the product 2 Move to Setup using the buttons Next press the button 3 Move to Safety Screen using the buttons Next press the button 4 Move to Eraser using the buttons Next press the button The following screen will appear Eraser This function prevents aft...

Page 35: ...s on the screen 5 The selected option will be applied Setting Side Grey 1 Press m on the product 2 Move to Setup using the buttons Next press the button 3 Move to Safety Screen using the buttons Next press the button 4 Move to Side Gray using the buttons Next press the button The following screen will appear Move Enter Return Safety Screen Safety Screen Safety Screen Timer Bar Eraser Pixel Side Gr...

Page 36: ...buttons Next press the button 4 Move to Fan Temperature using the buttons Next press the button The following screen will appear Move Enter Return Fan Control Manual Fan Speed Setting 3 Temperature Control 77 Current Temperature 60 Fan Temperature Fan Temperature Fan Control Selects auto or manual for the fan speed settings Fan Speed Setting Sets the fan speed within a range of 0 and 100 Temperatu...

Page 37: ... power on automatically as soon as it is connected to power 5 Adjust the Auto Power setting using the buttons Setting Lamp Schedule 1 Press m on the product 2 Move to Setup using the buttons Next press the button 3 Move to Advanced Settings using the buttons Next press the button 4 Move to Lamp Schedule using the buttons Next press the button The following screen will appear Enter Return Lamp Sche...

Page 38: ...D Display Displays or hides a menu item on the screen Source OSD Not Optimum Mode OSD No Signal OSD 5 Configure the settings as desired using the buttons Setup Reset This option returns the current settings under Setup to the default factory settings Resetting Setup Setup Reset 1 Press m on the product 2 Move to Setup using the buttons Next press the button 3 Move to Setup Reset using the buttons ...

Page 39: ... product 2 Move to Setup using the buttons Next press the button 3 Move to Reset All using the buttons Next press the button The following screen will appear Move Enter Return Language English Time Safety Lock Power OAdjustment Setup Reset Reset All Setup Setup Reset settings in setup Yes No All Settings return to default settings 4 The selected option will be applied ...

Page 40: ...cy to the recommended level The screen is too bright The screen is too dark Adjust the Brightness setting Troubleshooting Solutions Screen color is inconsistent Adjust the COLOR settings The colors on the screen have a shadow and are distorted Adjust the COLOR settings White does not really look white Adjust the COLOR settings There is no image on the screen and the power LED blinks every 0 5 to 1...

Page 41: ...ay Screen Resolution Advanced settings Monitor and adjust Refresh rate under Monitor settings How can I change the resolution Go to Control Panel Appearance and Personalization Display Adjust Resolution and adjust the resolution How do I set power saving mode To enable power saving mode go to Control Panel Appearance and Personalization Personalization Change screen saver ...

Page 42: ...nsions W x H x D Weight 513 6 x 417 4 x 376 0 mm 14 8 kg 20 22 x 16 43 x 14 80 inches 32 63 Ibs Environmental conditions Operating Temperature 32 F 104 F 0 C 40 C Humidity 10 80 non condensing Storage Temperature 4 F 113 F 20 C 45 C Humidity 5 95 non condensing Panel Dots Pixels Due to the nature of the manufacturing of this product approximately 1 pixel per million 1ppm may be brighter or darker ...

Page 43: ... color of the power LED if the product is not used for a specified period of time The power is not turned off in power saving mode To switch the screen back on press any key on the keyboard or move the mouse PowerSaver Normal operation mode Power saving mode Power turned off Power button Power lamp On Blinking Off Power Consumption 105 W less than 3 watts less than 1 watts The power consumption le...

Page 44: ... x 600 48 077 72 188 50 000 VESA 800 x 600 46 875 75 000 49 500 VESA 1024 x 768 48 363 60 004 65 000 VESA 1024 x 768 56 476 70 069 75 000 VESA 1024 x 768 60 023 75 029 78 750 VESA 1152 x 864 67 500 75 000 108 000 VESA 1280 x 720 45 000 60 000 74 250 VESA 1280 x 800 49 702 59 810 83 500 VESA 1280 x 1024 63 981 60 020 108 000 VESA 1280 x 1024 79 976 75 025 135 000 VESA 1440 x 900 55 935 59 887 106 5...

Page 45: ...ZIL 0800 124 421 4004 0000 http www samsung com CHILE 800 SAMSUNG 726 7864 From mobile 02 482 82 00 http www samsung com COLOMBIA 01 8000112112 http www samsung com COSTA RICA 0 800 507 7267 http www samsung com latin Spanish http www samsung com latin_en English DOMINICA 1 800 751 2676 http www samsung com latin Spanish http www samsung com latin_en English ECUADOR 1 800 10 7267 http www samsung ...

Page 46: ...m BELGIUM 02 201 24 18 http www samsung com be Dutch http www samsung com be_fr French BOSNIA 05 133 1999 http www samsung com BULGARIA 07001 33 11 normal tariff http www samsung com CROATIA 062 SAMSUNG 062 726 7864 http www samsung com CYPRUS 8009 4000 only from landline 30 210 6897691 from mobile and land line http www samsung com CZECH 800 SAMSUNG 800 726786 http www samsung com Samsung Electro...

Page 47: ... 726 7864 http www samsung com SLOVAKIA 0800 SAMSUNG 0800 726 786 http www samsung com SPAIN 902 1 SAMSUNG 902 172 678 http www samsung com SWEDEN 0771 726 7864 SAMSUNG http www samsung com SWITZERLAND 0848 SAMSUNG 7267864 CHF 0 08 min http www samsung com ch German http www samsung com ch_fr French U K 0330 SAMSUNG 7267864 http www samsung com CIS ARMENIA 0 800 05 555 http www samsung com AZERBAI...

Page 48: ...sung com SINGAPORE 1800 SAMSUNG 726 7864 http www samsung com TAIWAN 0800 329 999 0266 026 066 http www samsung com THAILAND 1800 29 3232 02 689 3232 http www samsung com VIETNAM 1 800 588 889 http www samsung com MIDDLE EAST BAHRAIN 8000 4726 http www samsung com ae English http www samsung com ae_ar Arabic EGYPT 08000 726786 http www samsung com IRAN 021 8255 http www samsung com JORDAN 800 2227...

Page 49: ...ng cases Not a product defect Cleaning of the product Adjustment Explanation Re installation and etc If a service technician gives instructions on how to use product or simply adjusts options without disassembling product If a defect is caused by external environmental factors Internet Antenna Wired Signal etc If a product is reinstalled or devices are connected additionally after installing the p...

Page 50: ...nd of their working life To prevent possible harm to the environment or human health from uncontrolled waste disposal please separate these items from other types of waste and recycle them responsibly to promote the sustainable reuse of material resources Household users should contact either the retailer where they purchased this product or their local government office for details of where and h...

Page 51: ...trol Panel on your PC and adjust the resolution and refresh rate as follows The picture quality of TFT LCDs may degrade if the optimum resolution is not selected Resolution 1680 x 1050 Vertical frequency refresh rate 56 85 Hz Due to the nature of the manufacturing of this product approximately 1 pixel per million 1ppm may be brighter or darker on the panel This does not affect product performance ...

Page 52: ... Saver and Power Saving Mode Power off the product for 4 hours after using it for 20 hours Power off the product for 2 hours after using it for 12 hours Go to Display Properties Power Supply on your PC and set the product to power off as required Using a screen saver is recommended It is best to use a single color or moving image screen saver Regular color Change FLIGHT FLIGHT TIME TIME OZ348 UA10...

Page 53: ...splay a moving image along with a logo Interval Display a moving image along with a logo for 60 seconds after using for 4 hours The best way to protect the product from afterimage burn in is switching the power off or setting the PC or system to run a screen saver when not in use Also Warranty service may be limited depending on instruction guide ...

Page 54: ...hat make up an image are transmitted 85000 times per second The horizontal frequency is indicated in 85kHz Vertical Frequency One image is made of numerous horizontal lines The vertical frequency is measured in Hz and represents how many images can be created per second by those horizontal lines A vertical frequency of 60 means that an image is transmitted 60 times per second The vertical frequenc...

Reviews: