


30
Operation
T1. Motor ON/OFF
Press the
T1
button and the hood will be activated at default speed (Default Speed
: Low).
Press again and the hood will return to sleep mode.
T2. Low speed
Press the
T2
button and the hood will be activated at Low speed.
T3. Med Speed
Press the
T3
button and the hood will be activated at Medium speed.
T4. High Speed
Press the
T4
button and the hood will be activated at High speed
T5. Boost speed
Press the
T5
button and the hood will be activated at Maximum speed for 5
minutes.
T6 Auto Speed
The hood will automatically adjust the fan speed based on Gas coming from the
cooktop.
Press the
T6
(Auto) button and the hood will activated at Auto Speed.
About Gas sensor
The hood will automatically calibrate this sensor 5-10minutes for the first operation.
During this time, keep clean and stable air around the hood. Gas Sensor
calibration can be operated by pressing the Auto button for 3seconds at standby-
mode.
Sensor Calibration
Press the
T6
button for 3 seconds at the standby mode and the Hood will start
calibration of Gas sensor for 5-10 minutes.
*Only Standby mode
Cooktop select mode for Sensor
Please set the correct cooktop mode using Cooktop select for Sensor.
Press the
T6
and
T4
button for 3 seconds at the standby mode. The hood will
change the Cooktop mode for Sensor.
GA : Gas cooktop
EL : Electric cooktop (Default)
After set the cooktop mode, The hood will automatically activate the calibration 5-
10minutes.
T7. Timer ON/OFF
Press the T7 (Timer) button to set the working time.
Press the T7 button for 3 seconds and the Timer function will turn off.
T8. Light ON/OFF
Press the T8 button and the light come on at the high setting.
Press the T8 button and the lights turn dimmer
Press the T8 button a third time, the lights turn off.
SOUND ON/OFF
Press the Light button for 3 seconds. The sound will be turned off.
Press the Light button for 3seconds. The sound will be turned on.
COOKTOP AND RANGE HOOD CONNECTIVITY
This appliance has a feature which allows you to pair
compatible Samsung cooktop
s
and your hood via Bluetooth.
After you enable this function and pair your hood and a compatible cooktop, the hood
fan will automatically come on at
Low speed
when you turn on a cooktop element. The
hood fan will also shut off automatically when you turn off the cooktop elements.
In addition, after the hood and compatible cooktop are paired, you can download the
Smart Things
app to a mobile device, and then use the
Smart Things
app to:
•
Monitor and control the On/Off status of the hood.
•
Monitor and control the fan speed.
•
Monitor and control the lights.
•
Set the hood shut-off timer with the "
time-up alarm
".
For more information about downloading the
Smart Things
app to your mobile device
and using it to control your hood, visit:
•
www.samsung.com.
T9. Bluetooth connection (Pairing)
1
. Press the
T9
button on hood for 3 seconds.
The pairing mode will be activated and the
L1
indicator will blink.
2. Press the
Bluetooth
button on cooktop. After the pairing process finishes, the
Bluetooth light will stay lit and ‘bt’ appears in the display.
T9. Bluetooth disconnection (Pairing reset)
1.
Press and hold the
T8+T9
button on the hood for 3 seconds.
2.
The Bluetooth connection disconnects and "
bt rt
"
appears in the display.
NOTE
For a detailed description of the pairing method, see the user manual of a compatible
Samsung cooktop.
Auto Connectivity
The Auto Connectivity function lets you quickly connect the hood via Bluetooth with a
compatible Samsung cooktop after the hood and cooktop have been paired. To turn the
function on, press the
Auto Connectivity
button.
To turn the function off and disconnect the hood and cooktop, press the Auto
Connectivity button again.
While the hood and cooktop are connected, the hood fan and Lamp will automatically
come on at
Low speed
when you turn on a cooktop element.
The hood fan and lamp will also shut off automatically when you turn off the cooktop
elements.
You will also be able to control the hood with the
Smart Things
app as described
above.
T9. Auto Connectivity ON/OFF
1. Press the
T9
button to activate the function.
2. The hood fan and lamp will turn on/off automatically following the cooktop.
3. Press again to deactivate the function.
Automatic Timer when the cooktop turn off
When using the Auto Connectivity function with Auto speed,
Hood automatically sets the 10min timer based on Gas sensor when the cooktop is
turned off.
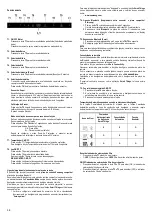
Display Icon
Remote Control
by Smart Things
App
Auto
Connectivity
Hood
Function
X
X
O
O
X
O
O
O
O
Reset filter signals
•
Press the
T1
button until hearing the sound signal.
•
The flashing
LED 1
(grease filter) or
LED 2
(charcoal filter) stops flashing
Charcoal filter signal ON/OFF
•
Press the "
T2
" and "
T3
" Button for 3 seconds and the Charcoal filter signal will
be activate.
•
Press the "
T2
" and "
T3
" Button for 3 seconds, and the charcoal filter signal will
be deactivate.
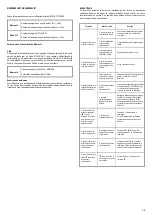
NK36N9804VB*, NK24N9804VB*
Data determined according to Regulation (EC) NO 1275/2008.
Bluetooth
Standby-mode Power Consumption (W) : 1.90W
Period of time for the power management (min.) : 3 min.
Off Mode
Power Consumption (W) : 0.48W
Period of time for the power management (min.) : 3min.
Summary of Contents for NK36N9804VB/UR
Page 1: ...Range Hood Installation Instructions Guide NK36N9804VB UR NK36T9804VD UR NK24N9804VB UR...
Page 3: ......
Page 4: ......
Page 6: ......
Page 7: ......
Page 8: ......
Page 9: ......
Page 10: ......
Page 11: ......
Page 40: ...40 RU 8 2012 19 EC UK SI 2013 No 3113 WEEE...
Page 45: ...45 UK 8 2012 19 EC UK SI 2013 No 3113 WEEE...
Page 65: ...65 BG 8...
Page 69: ...69 MK 8 2012 19 EC UK SI 2013 No 3113 Waste Electrical and Electronic Equipment WEEE...
Page 89: ...89 KK 8...


