background image

28

4. Troubleshooting

4-1 Information Display Codes

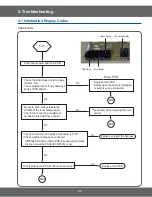
Possible check codes during use can be checked before service.

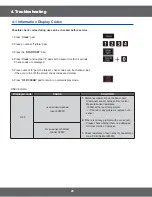
1. Press 

‘Clock’

 pad.

2. Press a number 

µ

 pad.

3. Press the 

‘START/SET’

 pad.

4. Press 

‘Clock’

 and number 

‘1’

 pads at the same time for 3 seconds. 

    Check codes are displayed.

5.  Press number 

‘0’

 pad, the latest 4 check codes can be checked. But, 

if the oven turns off, the stored check codes are deleted.

6. Press 

‘OFF/CLEAR’

 pad to return to normal display mode.

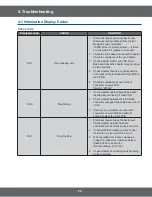
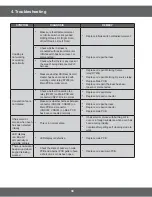
Check code

Displayed code

CAUSE

SOLUTION

C-20

oven sensor opened

RYHUȍ

1. 

Disconnect power. Open the back cover. 

Disconnect sensor harness from control 
Measure sensor resistance   

ȍDWWKHURRPWHPSHUDWXUH

ĺ,IWKHUHDUHDQ\SUREOHPVUHSODFHRYHQ

sensor.

2. 

If there is not any problem with oven sensor, 

Please check whether there is a damaged 
terminal or wire on harness. 

3. 

Check resistance of oven sensor connector on 

PDLQ3&%1RUPDOȍ

Oven sensor shorted.

8QGHUȍ

4. Troubleshooting


Summary of Contents for NE59J7630SS

Page 1: ...FREE STANDING RANGE 1 Precaution 3 Disassembly and Reassembly 4 Troubleshooting 5 PCB Diagrams 6 Wiring Diagrams BASIC NE595R0ABSR MODEL NE59J7630SS MODEL CODE NE59J7630SS AC ...

Page 2: ...ass Cooktop 12 3 4 Removing The Latch Door Switch Door Plunger 14 3 5 Removing Heater Broil 16 3 6 Removing Heater Bake 17 3 7 Removing Convection Element Fan Covnection and Motor Convection 18 3 8 Removing Lamp 19 3 9 Removing Sensor Thermistor 20 3 10 Removing Assy Drawer 21 3 11 Removing and Replacing Oven Door 22 3 12 Removing Handle Door and Glass Inner 23 3 13 Removing Gasket Door 26 3 14 Re...

Page 3: ...erous situations If you need repairs contact an SAMSUNG Service Center or your dealer I WKH SRZHU FRUG LV GHIHFWLYH LW PXVW EH UHSODFHG E D TXDOL HG VHUYLFH DJHQW ZLWK D 8 OLVWHG UDQJH FRUG OHFWULFDO OHDGV DQG FDEOHV VKRXOG QRW EH DOORZHG WR WRXFK WKH RYHQ 5DWLQJ SODWH LV ORFDWHG RQ WKH OHIW VLGH RI ZDUPLQJ GUDZHU 7KH SRZHU VXSSO RI WKH DSSOLDQFH VKRXOG EH WXUQHG RII ZKHQ LW LV EHLQJ UHSDLUHG WARN...

Page 4: ...elements or interior VXUIDFHV RI RYHQ XQWLO WKH KDYH KDG VXI FLHQW time to cool Other surfaces of the appliance may become hot enough to cause burns among these surfaces are oven vent openings and surfaces near these openings oven doors and windows of oven doors CAUTION Do not store items of interest to children in cabinets above a range or on the back guard of a range children climbing on the ran...

Page 5: ...iner protective coating of any kind should be used in or around any part of the oven Clean in the self clean cycle only parts listed in this manual Before self cleaning the oven remove the broiler pan and any utensils from the oven Never keep pet birds in the kitchen the health of birds is extremely sensitive to the fumes released during an oven selfclean cycle Fumes may be harmful or fatal to bir...

Page 6: ...ber Label and Tech Sheet Locations 7KLV 0RGHO 6HULDO 1XPEHU ODEHO DQG 7HFK 6KHHW ORFDWLRQV DUH VKRZQ EHORZ The rating plate is located above the drawer on the oven frame Model Serial Number Location Tech Sheet Location On Low Rear Cover ...

Page 7: ...Heater Bottom Baked Heater Smell No smell Tool to clean Wet cloths Biggest Capacity The biggest capacity in current US market W EHQH WV FRQVXPHUV WR FRRN IRU ODUJH IDPLO IRRG LQ 7KDQNVJLYLQJ KULVWPDV VHDVRQV i e Turkey 25 lbs 4 4 cu ft 20 lbs 3 5 cu ft 6SHFL FDWLRQV Steam Cleaning Casual clean without any smell More frequently Samsung Pyrolitic Steam Clean Competitors Pyrolitic Biggest Capacity Co...

Page 8: ...ng Center 100W Warming Center 100W LF XDO XDO RF XDO 7ULSOH Oven Capacity cu ft 5 9 5 9 Broil element 3 800 watts 4 200 watts Bake element 2 400 watts 3 300 watts Convection System Yes Yes Convection Element HV 9 HV 9 of Racks 2 2 Interior oven light 120V 40 watts 120V 40 watts Cleaning Pyrolytic Steam Pyrolytic Steam Drawer Type Element Warming rack No No Dimensions inch Oven Interior W x H x D E...

Page 9: ...9 6SHFL FDWLRQV 2 3 Accessory Item Description Code No Q ty Rack Flat DG75 01001C 2 ...

Page 10: ...an cut yourself if you are not careful Parts Explanation Photo Explanation Cover Back Main Wire Cover Back Guard Wire and PCB Main Cover Back Guard Wire Cover Back Main Wire 1 Turn off the electrical supply going to the range 2 Pull the range away from the wall so that you can access the rear panel 3 Remove the 8 screws from the Cover Back Main Wire and remove the panel 4 Remove 5 screws from the ...

Page 11: ...y be present and you can cut yourself if you are not careful Parts Explanation Photo Explanation Regulator Energy 1 Turn off the electrical supply going to the range 2 Pull the range away from the wall so that you can access the rear panel 3 Remove Cover Back Guard Wire See step 4 on page 10 4 Remove Regulator Energy connectors 5 Pull out the Knob Dial 2 Screws 6 Remove 2 screws and replace Regula...

Page 12: ...n death or electrical shock Parts Explanation Photo Explanation Surface elements and Ceramic Glass Cooktop 1 Unplug the cord or disconnect power 2 Open oven door and remove the 3 screws located at the front of the cook top then close the door 3 Slightly lift up and pull up the cook top and then unplug the 2 connectors wire at the back by VTXHH LQJ VLGH WDEV DQG XQVFUHZ JURXQG ZLUH 4 Protect the co...

Page 13: ...ement bracket screw shown above for the element you are servicing c Carefully lift the bottom of the EUDFNHW MXVW IDU HQRXJK WR UHPRYH the element d Use sharp tool to remove the heating element REASSEMBLY NOTE When you reinstall the element make sure that the wires are inserted onto the correct terminal then reinstall the bracket screw to secure it to the cooktop Reassembly of All part is the reve...

Page 14: ...tal parts Sharp edges may be present and you can cut yourself if you are not careful Parts Explanation Photo Explanation Latch Door Switch Door Plunger 1 Turn off the electrical supply going to the range 2 Open the oven door 3 Raise the cooktop see page 12 for the procedure 4 To remove the Latch Door a Remove the 2 screws from the front of cavity b Remove two screw from Cover Back Main and remove ...

Page 15: ...move the Switch Door Plunger from the range take out carefully by shaking up and down by using tool Reassembly of All part is the reverse order of disassembly Screw Terminal Block Screw M4 X 18 The others M4 X 12 Removing The Latch Door Switch Door Plunger 3 4 Removing The Latch Door Switch Door Plunger ...

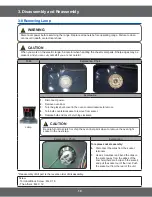
Page 16: ...you can cut yourself if you are not careful Parts Explanation Photo Explanation Broil Heater 1 Turn off the electrical supply going to the range 2 Open the oven door and remove the racks from inside the oven 3 To remove the broil element a Remove the Sensor Thermistor and 4 screws from the front and rear brackets b Remove Cover Back Main Wire and disconnect 2 wires from Heater Broil and a wire fro...

Page 17: ...ar of the unit 3 Remove Cover Back Main Wire See step 3 on page 10 for procedure 4 Remove Terminal Block and Bracket Cover Access with Adiabatic Terminal by unscrew 2 points 5 Unscrew 2 points of Heater Bake 6 Cut the Adiabatic Rear based on the lower side 7 Carefully pull out Heater Bake and replace it Reassembly of All part is the reverse order of disassembly Screw Terminal Block Screw M4 X 18 T...

Page 18: ...g location so that you can access the rear of the unit 3 Remove Cover Back Main Wire from the unit See step 3 on page 10 for procedure 4 Remove oven door See Page 22 on page for procedure 5 Remove Cover casing 6 Unscrew 2 screws and remove Bracket Convection Heater to remove Heater Convection 7 Unscrew nut of Fan Convection Main 8 Unscrew 3 points and disconnect a Motor Convection wire and disconn...

Page 19: ...n the oven counterclockwise to remove 4 Turn bulb counterclockwise to remove from socket 5 Replace bulb and cover by turning clockwise CAUTION Be careful not to scratch or chip the oven liner paint when to remove the oven light socket in the next step Explanation Photo Explanation To replace socket assembly 6 Disconnect the wires from the socket terminals 7 Use a screwdriver and bend the clips on ...

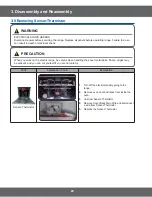
Page 20: ... When you work on the electric range be careful when handling the sheet metal parts Sharp edges may be present and you can cut yourself if you are not careful Parts Explanation Photo Explanation Sensor Thermistor 1 Turn off the electrical supply going to the range 2 Remove oven door and racks from inside the oven 3 Unscrew Sensor Thermistor 4 Remove Cover Back Main Wire and disconnect a wire from ...

Page 21: ...the electric range be careful when handling the sheet metal parts Sharp edges may be present and you can cut yourself if you are not careful Parts Explanation Photo Assy Drawer Explanation To remove Assy Drawer 1 CAUTION Turn power OFF before removing the Warming Drawer 2 Open the drawer to the fully opened position 3 Locate glide lever on each side of drawer push down on the left glide lever and ...

Page 22: ...lose door to the door removal position which is approximately 5 degrees refer to the Fig 2 Lift door up and out until the hinge arm are clear of the slot To replace door 1 Firmly grasp both sides of the door at the top position 2 Fully open the door If the door will not fully open it means that the indentation is not seated correctly in the bottom edge of the slot Push the hinge locks up to the lo...

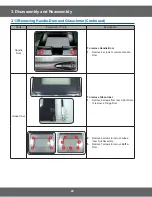
Page 23: ...e electric range be careful when handling the sheet metal parts Sharp edges may be present and you can cut yourself if you are not careful Parts Explanation Photo Explanation Door 1 Remove the oven door from the range see page 22 for the procedure 2 Place the oven door on a padded work surface with the front glass facing down 3 Remove 3 bottom screws from the door 4 Remove 2 Handle screws from the...

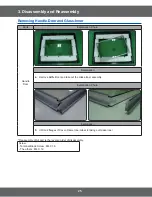
Page 24: ...s Explanation Photo Explanation Handle Door To remove Handle Door 1 Remove 2 screws to remove Handle Door Glass Inner To remove Glass Inner 1 Remove 6screws from rear side of door to remove 2 Hinge Door 2 Remove 4screws to remove Glass Inner Sub Assembly 3 5HPRYH VFUHZV WR UHPRYH DIÀH Door ...

Page 25: ...Photo Handle Door Explanation 4 5HPRYH DIÀH RRU DQG WDNH RXW WKH ODVV QQHU DVVHPEO Explanation Photo Explanation 5 8QIROG ÀDQJHV RI RYHU UDPH QQHU ODVV WR WDNLQJ RXW ODVV QQHU Reassembly of All part is the reverse order of disassembly Screw Terminal Block Screw M4 X 18 The others M4 X 12 ...

Page 26: ...ful Parts Explanation Photo Gasket door Explanation 1 Open the oven door to its fully down position 2 Pull the ends of the gasket out of the liner holes 3 Pull the oven door gasket clips out of the holes until all of the clips are removed REASSEMBLY NOTE When you install the new gasket make sure that all of the clips are seated in their liner holes and that the ends of the gasket are pushed fully ...

Page 27: ...t careful Parts Explanation Photo Explanation Panel Side 1 Turn off the electrical supply 2 Remove the oven door from the range see page 22 for the procedure 3 Pull the range away from the wall so you can access the back of the unit 4 Remove the 6 screws from the rear of Panel Side and remove Cooktop see step 3 4 on page 3 3 5 Remove the 3screws from the top of each Panel Side 6 Pull the back of t...

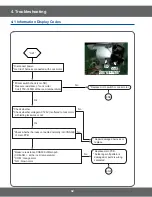
Page 28: ...e stored check codes are deleted 6 Press OFF CLEAR pad to return to normal display mode Check code Displayed code CAUSE SOLUTION C 20 oven sensor opened RYHU ȍ 1 Disconnect power Open the back cover Disconnect sensor harness from control Measure sensor resistance ȍ DW WKH URRP WHPSHUDWXUH ĺ I WKHUH DUH DQ SUREOHPV UHSODFH RYHQ sensor 2 If there is not any problem with oven sensor Please check whet...

Page 29: ...in PCB 5 Check the resistance of oven sensor connector on main PCB 1RUPDO ȍ C d0 Shorted key 1 Check whether cable of keypad has been inserted into connector of main PCB 2 Check whether between main PCB and connector or keypad and cable have a short circuit 3 If there is not a problem occurred with connector on main PCB and cable of keypad replace the main PCB C d1 Door locking 1 Disconnect power ...

Page 30: ...RQQHFWLQJ FRQGLWLRQ RI KDUQHVV 2YHQ VHQVRU DQG 1 RI PDLQ 3 0HDVXUH UHVLVWDQFH RI FRQQHFWRU 16 RI 0DLQ 3 1RPDO 0DNH VXUH WKH SDWWHUQ VROGHULQJ GDPDJHG SDUWV UHODWHG WR RYHQ VHQVRU RI PDLQ 3 DQG UHSDLU WKHP RU UHSODFH PDLQ 3 DFFRUGLQJ WR FDVH 5HSODFH RYHQ VHQVRU oven sensor oven sensor reconnect UHSDLU GDPDJHG KDUQHVV UHSODFH END END 0DLQ 3 0DLQ 3 1 1 ...

Page 31: ...URRP WHPSHUDWXUH Check the connecting condition of harness related with oven sensor Check connector and harness connected to PCB Check whether harness on connector 16 16 RI 0DLQ 3 LV FRQQHFWHG QRUPDOO LQWR WKH FRQQHFWRU 16 16 RU QRW Disconnect power and main PCB Ok Ok Ok No END Reconnect after replacing the oven sensor No Replace or repair the harness With replacing main PCB and make set work No R...

Page 32: ... Check whether Check whether voltage AC 120V is offered to lock motor with letting lock work or not Ok Ok No No Repair damaged harness or replace Check whether harness connected normally into CNS300 of main PCB Measure resistance CNS300 of Main pcb 20 12 DW WKH URRP WHPSHUDWXUH COM orange color NO brown color No Replace main PCB Solder again if pattern is damaged or parts is wrong contacted END EN...

Page 33: ...e a short circuit Make sure whether between keypad have a short circuit Yes Yes No No Repair the area of circuit having short between connector CNP210 pins on main PCB Repair after confirming whether pattern is between micom and connector have a short circuit or get damaged Replace or repair Membrane END END END Main PCB Back Main PCB Back Key Connector CNP210 Control PCB ...

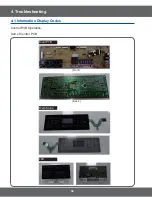
Page 34: ...34 4 Troubleshooting 4 1 Information Display Codes Control PCB Operation Sort of Control PCB Main PCB Membrane LED Front Back ...

Page 35: ...ith AC120V L1 N CNS302 This is consisted of 20 pin and take a role of getting a cable on keypad to connect with membrane CNP210 This is connector which have door lock motor oven lamp and relay of convection fan connected RY200 Circuit is designed to all relay worked after Ry source ralay is being worked For safety RY201 Circuit is designed to have broil relay or worked after DLB relay is being wor...

Page 36: ... Replace or repair main PCB Measure resistance both ends of terminal on thermostat normal 0 ohms Check whether harness is connected terminal on thermostat has been loosen or disconnected Measure voltage regulator IC02 IC03 on main PCB IC02 7812 DC 12V IC03 7805 DC 5V Replace the thermostat Replace or repair harness 5HSODFH RU UHSDLU DIWHU FRQ UPLQJ WKH VWDWH of working of main PCB Oven temperature...

Page 37: ... normal state The self cleaning feature will not operate when warming center is on Keypad is not worked normally in partially or entirely Make sure that keypad cable on main PCB is in normal state 5HSODFH DIWHU FRQ UPLQJ ZKHWKHU LW KDV been loosen or disconnected Make sure connector CNP210 on main PCB or PCB pattern 5HSODFH RU UHSDLU DIWHU FRQ UPLQJ whether keypad cable has been loosen or disconnt...

Page 38: ...or disconnected Convection fan is not rotated Check whether Convection fan relay RY207 on Main PCB and connector CNP210 is in normal Replace or repair Relay Replace or repair connector Make sure whether harness between connector CNS302 CNS303 on Main PCB and connector CNS302 CNS303 on Main PCB has been connected normally Replace or repair harness Replace or repair connector Replace main PCB It has...

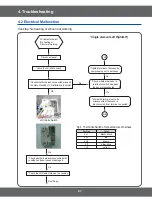
Page 39: ...put 12V 5V Replace the defected PCB Check the terminal block connections Check the circuit breaker Replace or Repair the wiring Troubleshooting Heating Check the relay terminal voltage 240V ΊͶ ΊͶ Ϳ Heating Failure Check the wiring Ϳ Perform the PCB failure process Repair the relay or missing circuit component Replace or Repair the wiring 4 2 Electrical Malfunction ...
Page 40: ...voltage of PCB SMPS Output check point 5V 12V Reset the circuit braker or check main power Repair Faulty wiring or PCB check Check Terminal block voltage 240V Repair the relay or replace PCB Do all relays operate Replace PCB Replace PCB Troubleshooting PCB failure ΊͶ ΊͶ Ϳ Ϳ ΊͶ ΊͶ Ϳ Ϳ 4 2 Electrical Malfunction ...

Page 41: ...k Check whether harness in terminal of switch has been loosen or disconnected Weld with terminal not to be misconnected if harness is disconnected from terminal on switch Tighted terminal of harness by compressing not to be loosen Check whether harness is connected with cooktop has been loosen or damaged Ok END END LR Infinite Switch LR Infinite Switch Single element Left Right LR 4 2 Electrical M...

Page 42: ...cted Weld with terminal not to be misconnected if harness is disconnected from terminal on radiant It is very dangerous when radiant heater is working in case that harness has misconnected Tighted terminal of harness by compressing not to be loosen Continued Ok Check whether harness is connected with LR infinite switch has been damaged or disconnected Fig3 LR radiant element Position ohms 1b 2b 2a...

Page 43: ...nected Weld with terminal not to be misconnected if harness is disconnected from terminal on switch Tighted terminal of harness by compressing not to be loosen Continued Yes Check whether harness is connected with cooktop has been loosen or damaged Check the element of LF Radiant on cooktop Next Page END END Dual element Right Front LF Fig 5 The Infinite Switch of connected wire of harness LF Infi...

Page 44: ...oosen or disconnected Weld with terminal not to be misconnected if harness is disconnected from terminal on Radiant It is very dangerous when radiant heater is working in case that harness has misconnected Tighted terminal of harness by compressing not to be loosen Continued Ok Check whether harness is connected with LF infinite switch has been damaged or disconnected Fig 6 LF radiant element WARN...

Page 45: ...k Check whether harness in terminal on switch has been loosen or disconnected Weld with terminal not to be misconnected if harness is disconnected from terminal on switch Tighted terminal of harness by compressing not to be loosen Ok Check whether harness is connected with cooktop has been damaged or disconnected Check the element of RR Radiant on Cooktop Next Page END END Single element Right Rea...

Page 46: ...has been loosen or disconnected Weld with terminal not to be misconnected if harness is disconnected from terminal on Radiant It is very dangerous when radiant heater is working in case that harness has misconnected Tighted terminal of harness by compressing not to be loosen Continued Ok Check whether harness is connected with RR infinite switch has been damaged or disconnected Fig 9 RR radiant el...

Page 47: ...isconnected Weld with terminal not to be misconnected if harness is disconnected from terminal on switch Tighted terminal of harness by compressing not to be loosen Continued Yes Check whether harness is connected with cooktop has been loosen or damaged Check the element of RF Radiant on cooktop Next Page END END Triple element Right Front RF Fig 5 The radiant heater of connected wire of harness R...

Page 48: ...cted Weld with terminal not to be misconnected if harness is disconnected from terminal on Radiant It is very dangerous when radiant heater is working in case that harness has misconnected Tighted terminal of harness by compressing not to be loosen Continued Yes Check whether harness is connected with RF infinite switch has been damaged or disconnected Fig 6 RF radiant element WARNING END END END ...

Page 49: ...th terminal not to be misconnected if harness is disconnected from terminal on switch It is very dangerous when radiant heater is working in case that harness has misconnected Tighten terminal of harness by compressing not to be loosen Continued Ok Ok Check whether harness is connected with warming zone relay on Main PCB has been damaged or disconnected Fig 14 RC radiant element Position ohms A B ...

Page 50: ...in PCB has been loosen or disconnected No No Ok Ok Ok Check whether PCB pattern have a short circuit or Relay RY206 has been damaged Replace relay or repair PCB pattern Tighten terminal of harness by compressing not to be loosen Ok Check whether harness is connected with cooktop has been damaged or disconnected Ok Check RC Radiant element of cooktop Ok Next page END Warming center relay RY206 CNP2...

Page 51: ...hen 120V voltage is supplied Check whether harness has been damaged or disconnected No Yes Yes Replace Hot Indicator Lamp Having a short circuit might cause fire or damage of infinite switch if harness is misconnected during cooktop is being worked WARNING END B B A A Hot Indicator Lamp END DUQLQJ DYLQJ D VKRUW FLUFXLW RI KDUQHVV RORU WR EH WXUQHG HOORZ KLWH PLJKW FDXVH UH RU GDPDJH RI LQ QLWH VZL...

Page 52: ...eater is supposed to on off cycling work SSUR a at the room temperature Terminal voltage of bake heater AC 240V Replace or repair harness Convection Heater Measure resistance values of heater s terminal after taking off harness from heater Measure YROWDJH RI KHDWHU V WHUPLQDO after having oven worked by pressing convection bake keypad Make sure that voltage has to be measured for more than 1 minut...

Page 53: ...re whether wire housing and terminal is connected with switch has been damaged or not 1RPDO RSHQ 1RPDO FORVH Replace or repair if wire or terminal has been damaged Hot Surface Surface Lamp Back Guard Hot Surface Surface Lamp Back Guard Measure voltage which is supplied with lamp terminal Check whether harness has been loosen or disconnected Approx Lamp voltage 120V UHVLVWDQFH Replace or repair if ...

Page 54: ...er level is right with making RR cooktop work LF Infinite Switch Check whether harness is connected with switch properly P1 red red S1 blue P2 black black S2 black brown 4A brown 4 white 2 gray Measure voltage and resistance between terminals Please refer to schematic diagram Check whether power level is right with making LF cooktop work Approx Resistance between terminals ZKHQ VZLWFK LV RII When ...

Page 55: ... 2a brown 2b yellow yellow Measure voltage and resistance between terminals Approx Terminal resistance E E D a at the room temperature 2a A 240V Replace or repair harness RF Radiant element Check whether harness is connected with terminal of element properly A orange B yellow C blue 1b black 2a brown 2b yellow Measure voltage and resistance between terminals Approx Terminal resistance 1b 2b 2a A 4...

Page 56: ...ree C ohms 0 17 8 932 12 113 45 1170 17 14 10 961 86 122 50 1188 93 23 5 980 95 212 100 1374 93 32 0 1000 00 302 150 1558 01 41 5 1019 02 392 200 1738 06 50 10 1038 02 482 250 1915 39 59 15 1056 99 572 300 2089 69 68 20 1075 92 662 350 2261 07 77 25 1094 83 752 400 2429 52 86 30 1113 71 842 450 2595 05 95 35 1132 56 932 500 2757 65 104 40 1151 38 1000 538 2878 57 ...

Page 57: ...ed by Double line break 12 RY202 Broil Heater Relay Broil relay RY202 Bake relay RY203 will be on off working by micom signal after DLB relay is worked 13 RY203 Bake Heater Relay Broil relay It will not be problem with reversing the order in insering Black and Brown Bake relay It will not be problem with reversing the order in insering Yellow and Gray 14 RY204 Convection Heater Relay This is conne...

Page 58: ...00 10 䆣 1 䆢 9 䆡 1 䆠 9 䆟 DNH 8S 䆞 䆝 17 䆜 5 6 7 䆛 8 57 5 䆚 8 57 7 CNP211 SMW250 05 䆞 䆝 䆜 2SWLRQ 1RQ 䆛 䆚 CNP210 Small Load SMW250 09 䆢 RSWLRQ 1RQ 䆡 䆠 䆟 䆞 0RWRU 䆝 䆜 2 DPS 8 䆛 䆚 DQ 5 CNS303 Cooktop HS SMW250 04 䆞 1 䆝 䆜 䆛 䆚 7RS 6 5 CNP100 PBA Power SMW250 03 䆜 䆛 䆚 1 CNP212 W C CN301 TEMP SMW200 06 䆟 1 3E 1RQ 䆞 3UREH 1RQ 䆝 1 1RQ 䆜 RZHU 6HQVRU 1RQ 䆛 1 䆚 8 6HQVRU CNS300 Door SMW200 09 䆢 1 1 䆡 LYLGHU 6 1RQ ...

Page 59: ...59 6 Wiring Diagrams 6 1 Wiring Diagrams ...

Reviews: