background image

26

  English


Other Information 

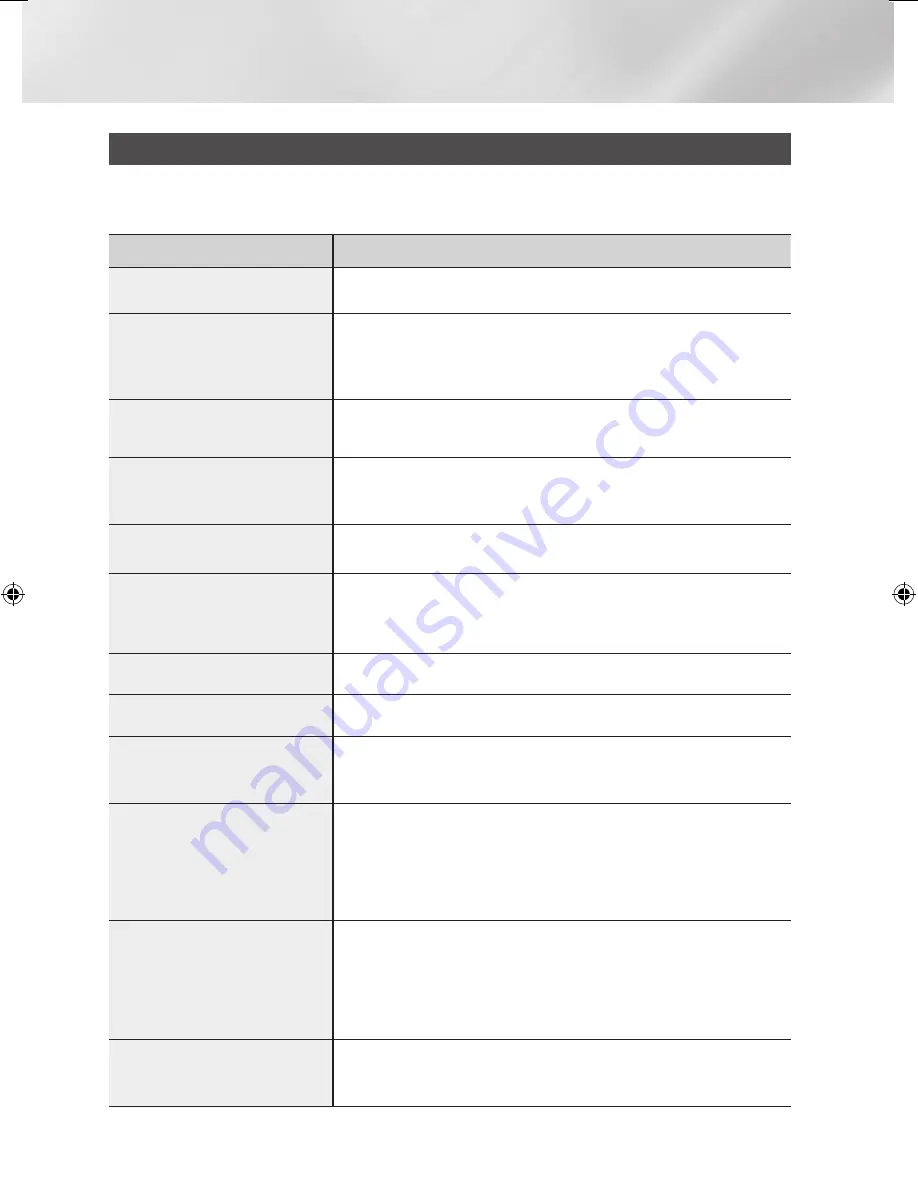
Troubleshooting

Refer to the chart below when this unit does not function properly. If the problem you are experiencing is 
not listed below or if the instruction below does not help, turn off the unit, disconnect the power cord, and 
contact the nearest authorized dealer or Samsung Electronics Service Center.

Symptom

Check/Remedy

I cannot eject the disc.

• Is the power cord plugged securely into the outlet?
• Turn off the power and then turn it back on.

Playback does not start.

•  Check the region number of the DVD.


DVD discs purchased from abroad may not be playable.

•  CD-ROMs and DVD-ROMs cannot be played on this 

product

.

• Make sure that the rating level is correct.

Playback does not start  
immediately when the  
Play/Pause button is pressed.

•  Are you using a deformed disc or a disc with scratches on the surface?
• Wipe the disc clean.

Sound is not produced.

• No sound is heard during fast playback, slow playback, and step motion playback.
•  Are the speakers connected properly? Is the speaker setup correctly customized?
•  Is the disc severely damaged?

The remote control does not work.

•  Is the remote control being operated within its operation range of angle and distance?
• Are the batteries drained?

•  Disc is rotating but no 


picture is produced.

•  Picture quality is poor and 


picture is shaking.

• Is the TV power on?
• Are the video cables connected properly?
• Is the disc dirty or damaged?
• A poorly manufactured disc may not be playable.

Audio language and subtitles do not 

work.

•  Audio language and subtitles will not work if the disc does not contain them.

The menu screen does not appear even 
when the menu function is selected.

•  Are you using a disc that does not contain menus?

Aspect ratio cannot be changed.

•  You can play 16:9 DVDs in 16:9 WIDE mode, 4:3 LETTER BOX mode, or 4:3 PAN SCAN 

mode, but 4:3 DVDs can be seen in 4:3 ratio only. Refer to the DVD disc jacket and then 

select the appropriate function.

•  The product is not working. 


(Example: The power goes out or the 

front panel key doesn't work or a 

strange noise is heard.)

•  The product is not working normally.

•    While “NO DISC” message appears on the display of the product, 

press and hold the 

5


button on the main unit for longer than 


5 seconds with no disc is inserted (reset function).

Using the RESET function will erase all stored settings. 


Do not use this unless necessary.

The rating level password has been 
forgotten.

•  While “NO DISC” message appears on the display of the product, press and hold the 

main unit's 

5

 button for longer than 5 seconds. “

INIT

” appears on the display and all settings will return 

to the default values. 
And then press the 

POWER

 button.

Using the RESET function will erase all stored settings. 


Do not use this unless necessary.

Can't receive radio broadcast.

• Is the antenna connected properly?
•  If the antenna's input signal is weak, install an external FM antenna in an area with good reception.

MX-F630DB-F730DB-ENG-0207.indd   26

2013-3-13   16:06:15

Summary of Contents for MX-F630DB

Page 1: ...he possibilities Thank you for purchasing this Samsung product To receive more complete service please register your product at www samsung com register DVD MINI COMPONENT SYSTEM user manual MX F630DB MX F730DB ...

Page 2: ...ll be placed on the apparatus The Mains plug is used as a disconnect device and shall stay readily operable at any time This apparatus shall always be connected to an AC outlet with a protective grounding connection To disconnect the apparatus from the mains the plug must be pulled out from the mains socket therefore the mains plug shall be readily operable CLASS 1 LASER PRODUCT KLASSE 1 LASER PRO...

Page 3: ... for more information and software tools to convert your files into DivX videos ABOUT DIVX VIDEO ON DEMAND This DivX Certified device must be registered in order to play purchased DivX Video on Demand VOD movies To obtain your registration code locate the DivX VOD section in your device setup menu Go to vod divx com for more information on how to complete your registration DivX Certified to play D...

Page 4: ... 15 Product Information BASIC FUNCTIONS 16 Disc Playback 16 Audio CD CD DA MP3 WMA Playback 16 JPEG File Playback 16 Using the Playback Function 18 Using the Special Remote Control Buttons and the main unit buttons 20 Setting the Clock 20 Timer Function 21 Sleep Timer Function 21 Mute Function 22 Listening to Radio 23 USB Function 23 Recording Function 25 Using Bluetooth OTHER INFORMATION 26 Troub...

Page 5: ...tact the SAMSUNG Customer Care Centre if you have questions or encounter difficulty when playing DVD or CD discs in this product Also refer to rest of this user manual for additional information on playback restrictions Some commercial discs and DVD discs purchased outside your region may not play on this product Supported Formats Video File Support Format Supported Versions AVI DivX3 11 DivX5 1 W...

Page 6: ...al camera device USB card reader is not supported FAT16 and FAT32 file systems are supported Connect directly to the product s USB port Connecting through another cable may raise problems with USB compatibility Inserting more than one memory device to a multi card reader may not operate properly PTP protocol for digital camera is not supported Do not disconnect USB device during a Reading process ...

Page 7: ... button 7 USB BLUETOOTH button 8 DVD CD button 9 TUNER AUX button 10 MIC jack 11 Disc Tray 12 USB jack 13 USB REC button 14 DELETE button 15 OPEN CLOSE button 16 PLAY PAUSE button 17 Search Skip button 18 VOLUME Control 19 LOCAL EQ button 20 FOOTBALL MODE button 21 GIGA SOUND BLAST button 1 2 3 6 5 4 7 9 21 14 15 16 17 18 19 13 8 12 20 11 10 ...

Page 8: ... for testing please don t use it 3 VIDEO OUT JACK Connect your TV s Video Input jack VIDEO IN to the VIDEO OUT jack 4 AUX IN JACK Connect the Audio Out of the external analog component to the AUX IN jack 5 COMPONENT VIDEO OUTPUT JACKS Connect a TV with Component video inputs to these jacks 6 FM ANTENNA JACK Connect the FM antenna 1 2 3 4 5 6 ...

Page 9: ... button above This product is not used the SYNC function printed the 8 button above ENTER button SOUND button DISC MENU button SYNC button VOLUME button POWER button TIMER ON OFF button EQ button TIMER CLOCK button CD REC SPEED button MY KARAOKE button DISPLAY A button MO ST B button CURSOR b button CURSOR TUNING button RETURN button Skip RDS PTY button STOP button TOOLS button PLAY button REPEAT ...

Page 10: ... speakers in front of your listening position facing inwards about 45 toward you Place the speakers so that their tweeters will be at the same height as your ear Align the front face of the front speakers with the front face of the center speaker or place them slightly in front of the center speakers CAUTION Do not let children play with or near the speakers They could get hurt if the speaker fall...

Page 11: ...ideo inputs connect a Component video cable not supplied from the COMPONENT OUT Pr Pb and Y Jacks on the back of the product to the Component Video Input Jacks on your TV METHOD 2 Composite Video GOOD QUALITY Connect the supplied Video cable from the VIDEO OUT jack on the back of the product to the VIDEO IN jack on your TV COMPONENT IN VIDEO INPUT TV METHOD 2 supplied METHOD 1 not supplied ...

Page 12: ...log component Be sure to match connector colors 2 Press the TUNER AUX button to select AUX input You can select AUX by pressing the FUNCTION button on the remote control NOTE When the unit is in AUX mode if none of the buttons on the front panel are pushed for more than 8 hours the power will automatically turn off Audio Cable not supplied If the external analog component has only one Audio Out co...

Page 13: ...t the volume of the microphone 3 During the playback press the KEYCON button then press the b button Each time the button is pressed the key is increased and each time the b button is pressed the key is decreased 4 Press the MY KARAOKE button to suppress the Vocal Each time the button is pressed the selection is changed as follows ON OFF NOTE If you hear strange noises squealing or howling while u...

Page 14: ...ration below Buttons on the Remote Control Used for the Settings Menu 1 HOME Button Press to move to the Home screen 2 RETURN Button Return to the previous menu 3 v Enter DIRECTION Button Press to move the cursor or select an item Press the v button to activate the currently selected item or confirm a setting 4 EXIT Button Press to exit the current menu Display TV Aspect 4 3 Pan Scan Select when y...

Page 15: ...tion will not be reset DivX R Deactivation Select this to get a new registration code Language You can select the language you prefer for on screen menu disc menu etc To select a language that does not appear in the menu select OTHERS in the Disc Menu Audio and Subtitle and enter the language code of your country For more information refer to www samsung com or call to Samsung customer service cen...

Page 16: ...s may not play depending on the recording mode Table of contents of a MP3 CD varies depending on the MP3 WMA track format recorded on the disc WMA DRM files cannot be played If no buttons are pressed on the product or remote control for more than 25 minutes when the product is in Stop mode or no Disc mode the power will automatically turn off JPEG File Playback Insert a JPEG disc _ select Photos s...

Page 17: ...then press the v button DVD Off Title Chapter A B DivX Off Title Folder All CD MP3 Repeat During the CD MP3 playback press the REPEAT button repeatedly to select the repeat mode you want CD Off Track All Random Section A B MP3 Off Track Directory All Random A B Repeat Playback You can repeatedly play back a designated section of a DVD or CD 1 During the DVD disc or CD playback press the REPEAT but...

Page 18: ...rean and Chinese for the file name The subtitle of DivX files are smi sub srt over 148 kbyte is not supported Using the Special Remote Control Buttons and the main unit buttons EQ or Your mini compact system is equipped with a preset equalizer that allows you to choose the most appropriate balance between treble and bass frequencies according to the type of music you are listening to 1 Press the E...

Page 19: ... GIGA SOUND BLAST OFF 2 To cancel this function press the GIGA SOUND BLAST button until OFF is displayed NOTE The GIGA SOUND mode may be different depending on your region FOOTBALL MODE Enjoy the music like on the soccer field with FOOTBALL button 1 Press the FOOTBALL MODE button Each time you press the FOOTBALL MODE button on the product OFF FOOTBALL MODE 1 FOOTBALL MODE 2 2 To cancel this functi...

Page 20: ... button Example You wish to wake up to music every morning 1 Switch the system on by pressing the POWER button 2 Press and hold the TIMER CLOCK button and then press the or buttons until TIME is displayed 3 Press the v button Result ON is displayed for a few seconds you can set the timer switch on time 4 Set the timer switch on time a Press the or button b Press the v button Result The minutes fla...

Page 21: ...ill start automatically as shown by the TIMER indication on the display If you no longer wish to use the timer you can cancel it 1 To cancel the timer press and hold the TIMER ON OFF button once Result is no longer displayed 2 To resume the timer press and hold the TIMER ON OFF button again Result is displayed again NOTE When you select the TIMER OFF mode the TIMER RECORDING and TIME function are ...

Page 22: ...ress the 5 button to select MANUAL and then press the buttons to tune in to a lower or higher frequency Setting Mono Stereo Press the MO ST button Each time the button is pressed the sound switches between STEREO and MONO In a poor reception area select MONO for a clear interference free broadcast NOTE This applies only when listening to an FM station This product does not receive AM broadcasts Pr...

Page 23: ...in unit to select the CD function Press the OPEN CLOSE button to open the disc tray Insert a CD and press the OPEN CLOSE button to close the disc tray Use the CD selection or buttons to select the desired song Tuner Select TUNER by pressing the TUNER AUX button Tune to a station you want to record External Source Connect an External Component MP3 player to your product Press the TUNER AUX button t...

Page 24: ...able during a CD recording If you use the MIC function during a CD recording the voice from the microphone will be recorded You can not record the radio when searching or no available station is found in the Tuner mode Note that setting the input level too loud when recording music from an external device through the AUX or USB channel may cause noise in the recording If this occurs lower the exte...

Page 25: ...on the front display followed by the device name of the connected Bluetooth device 5 Play music on the connected device You can listen to the music playing on the connected Bluetooth device over the Product In Bluetooth mode some model s Play Pause Repeat Stop Next Back functions are not available The product only supports Middle Quality SBC data up to 237kbps 48kHz and does not support High Quali...

Page 26: ...ideo cables connected properly Is the disc dirty or damaged A poorly manufactured disc may not be playable Audio language and subtitles do not work Audio language and subtitles will not work if the disc does not contain them The menu screen does not appear even when the menu function is selected Are you using a disc that does not contain menus Aspect ratio cannot be changed You can play 16 9 DVDs ...

Page 27: ...4 min Video Audio Component Video Y 1 0 Vp p 75 Ω load Pr 0 70 Vp p 75 Ω load Pb 0 70 Vp p 75 Ω load Amplifier MX F630DB 220 Watts MAX Front speaker output 110 W CH 4 Ω 100 Hz MX F730DB 550 Watts MAX Front speaker output 275 W CH 4 Ω 100 Hz Frequency range 20Hz 20KHz S N Ratio 80 dB Channel separation 65 dB Input sensitivity AUX 800 mV Nominal specification Samsung Electronics Co Ltd reserves the ...

Page 28: ...w samsung com Rumania 1 08010 SAMSUNG 72678 doar din reţeaua Romtelecom tarif local 2 021 206 01 10 din orice reţea tarif normal www samsung com Area Contact Centre Web Site Serbia 0700 Samsung 0700 726 7864 www samsung com Slovakia 0800 SAMSUNG 726 7864 www samsung com Spain 902 1 SAMSUNG 902 172 678 www samsung com Sweden 0771 726 7864 SAMSUNG www samsung com Switzerland 0848 SAMSUNG 7267864 CHF...

Reviews: