background image

Setting Cooking Times & Power Levels

Your microwave allows you to set up to three differ-
ent stages of cooking, each with its own time length
and power level. The power level lets you control the
heating intensity from Warm (1) to High (0).

One-stage Cooking 

For simple one-stage cooking, you only need to set
a cooking time. The power level is automatically
set at High. If you want to set the power to any
other level, you must set it using the 

Power Level

button.

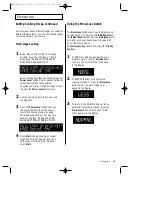
1

Use the number buttons to set a cooking
time. You can set a time from one second
to 99 minutes, 99 seconds.  To set a time
over one minute, enter the seconds too.

For example, to set 20 minutes, enter 2, 0,
0, 0 .

If you want to set the power level to
something other than High, press the

Power Level

button, then use the number

buttons to enter a power level.  

Power Levels:

1 = warm

6 = simmer

2 = low

7 = medium high

3 = defrost

8 = reheat

4 = medium low

9 = sauté

5 = medium

0 = high

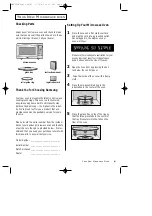
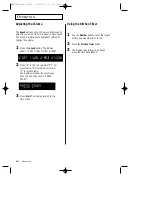
The display shows “PRESS START OR ENTER NEXT
STAGE COOKING TIME”

Press the

Start

button to begin cooking.

If you want to change the power level,
press 

Pause/Cancel 

before you press

Start

, and re-enter all of the instructions. 

O

PERATION

12

O

PERATION

Defrosting Automatically 

To thaw frozen food, set the weight of the food and
the microwave automatically sets the defrosting
time, power level and standing time. 

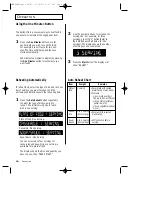
Press the 

Auto Defrost 

button.  The dis-

play shows “0.5 LB.” (0.2Kg if you have
set your oven for metric measure)

2

To set the weight of your food, press the

Auto Defrost

button repeatedly. This

increases the weight by 0.5 lb incre-
ments, up to 6.0 lbs (The Auto Defrost
button will increase the weight by 0.2Kg
if you are using metric measurement). 

You can also use the number buttons to
enter the weight of the food directly.  

The oven calculates the defrosting time
and starts automatically.  Twice during
defrosting, the oven will beep and the
display will read “TURN THE FOOD
OVER.”

3

Press the 

Pause/Cancel

button, open the

oven door, and turn the food over. 

Press the

Start

button to resume defrost-

ing. 

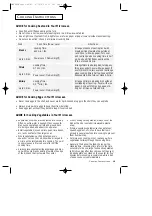
• See page 20 for the Auto Defrosting 

Guide 

MW5592W(mini-SEA)  2/15/00 9:23 PM  Page 12

Summary of Contents for MW440

Page 1: ...Microwave Oven Owner s Manual MW440M CODE NO DE68 00064A MW5592W mini SEA 2 15 00 9 23 PM Page 1 ...

Page 2: ... name of an authorized service center near you IMPORTANT SAFETY INSTRUCTIONS WARNING Some items like whole eggs and food in sealed containers may explode if heated in this oven Use this appliance only for its intended use as described in the manual Do not use corrosive chemicals or vapors in this appliance This type of oven is specifically designed to heat cook or dry food It is not designed for i...

Page 3: ...fore placing bags in oven c If materials inside the oven ignite keep the oven door closed turn the oven off disconnect the power cord or shut off the power at the fuse or circuit breaker panel d Do not use the oven compartment for storage purposes Do not leave paper products cooking utensils or food in the oven when not in use Do not try to preheat oven or operate while empty Do not cook without t...

Page 4: ...ded Use of Extension Cords A short power supply cord is provided to reduce the risk of becoming entangled in or tripping over a longer cord Longer cord sets or extension cords are available and may be used if care is exercised in their use If a long cord or extension cord is used 1 The marked electrical rating of the cord set or extension cord should be at least as great as the electrical rating o...

Page 5: ...y 12 Setting Cooking Times Power Levels 12 One stage Cooking 12 Multi stage Cooking 13 Using the More Less Button 13 Adjusting the Volume 14 Using the Kitchen Timer 14 Setting the Child Protection Lock 15 Demonstration Mode 15 Cooking Instructions 16 Cooking Utensils 16 Testing Utensils 16 Cooking Techniques 17 General Tips 17 Cooking Guides 18 19 Auto Defrosting Guide 20 Recipes 21 Appendix 23 Tr...

Page 6: ...for easy warranty service Model Number _________________________ Serial Number _________________________ Date Purchased _________________________ Dealer _________________________ Setting Up Your Microwave Oven 1 Place the oven on a flat sturdy surface and plug the cord into a grounded outlet Once plugged in the display on your oven will show Make sure there is adequate ventilation for your oven by...

Page 7: ...e of dish to be reheated Number Buttons Sets cooking times or amounts Sound Button p 14 More Less Button p 13 Increases or decreases cooking time Kitchen Timer p 14 Start Press to start cooking Auto Defrost p 12 Sets weight of food to be defrosted Power Level p 12 Sets power to level other than high Clock p 8 Sets current time Pause Cancel p 8 Press to pause oven or correct a mistake Gentle Cook p...

Page 8: ...age and weight sys tem you want to use press the PAUSE CANCEL button to end this procedure or press CLOCK to set the clock Setting the Clock 1 Press the Clock button The display will show 2 Use the number buttons to enter the cur rent time You must press at least three numbers to set the clock If the current time is 5 00 enter 5 0 0 3 Press Clock again A colon will appear indicating that the time ...

Page 9: ... times with fork 3 EA Place on turntable in spoke 4 EA like fashion 5 EA Remove from oven wrap in 6 EA foil and let stand 3 5 min Fresh 1 cup Place the vegetables into a Vegetables 2 cups casserole and add a small 3 cups amount of water 2 4 Tbsp 4 cups Cover during cooking and stir before standing Frozen 7 10 oz Remove package from outer Dinner 10 12 oz wrapping and follow package 12 18 oz instruc...

Page 10: ...select up to four servings for casseroles and soup Only one serving is available for a plate of food The display shows the dish and quantity you have chosen then PRESS START Plate of food One Serving Casserole One Serving Soup Sauce One Serving 2 Use the number buttons to increase the serving size For example for three servings press the 3 button Refer to the Auto Reheat Chart below for the servin...

Page 11: ... Number buttons to enter the amount of cooking time The display will show the amount of time you have set 3 Press Power Level and use the Number buttons to enter the power level The display will show the power level you have set You can set the power level from 0 to 9 1 warm 6 simmer 2 low 7 medium high 3 defrost 8 reheat 4 medium low 9 sauté 5 medium 0 high 4 Press the Custom Cook button again Th...

Page 12: ...NTER NEXT STAGE COOKING TIME 3 Press the Start button to begin cooking If you want to change the power level press Pause Cancel before you press Start and re enter all of the instructions OPERATION 12 OPERATION Defrosting Automatically To thaw frozen food set the weight of the food and the microwave automatically sets the defrosting time power level and standing time 1 Press the Auto Defrost butto...

Page 13: ...ower level you have set and then PRESS START OR ENTER NEXT STAGE COOKING TIME 4 Press Start to begin cooking or repeat steps 2 and 3 to set a power level for a third stage of cooking When finished press Start Using the More Less Button The More Less button allows you to adjust pre set cooking times It only works with Auto Reheat and the Instant Cook buttons Use the More Less button only after you ...

Page 14: ...W 2 MED 3 HIGH 2 Press 0 to turn the volume off 1 for low volume 2 for medium volume or 3 for high volume The display will show the volume you have chosen then shows PRESS START 3 Press Start The display returns to the time of day Using the Kitchen Timer 1 Use the Number buttons to set the length of time you want the timer to run 2 Press the Kitchen Timer button 3 The display counts down and beeps...

Page 15: ...s to the time of day At this point the microwave oven cannot be used until it is unlocked To unlock it repeat steps 1 3 above Demonstration Mode You can use the Demonstration Mode to see how your microwave oven operates without the oven heating 1 Press the 0 button The display shows PRESS 1 DEMO 2 CHILD LOCK 2 Press the 1 button The display shows PRESS START 3 Press the Start button The display sh...

Page 16: ... can damage your oven so be careful Ceramic porcelain and stoneware Use these if they are labeled Microwave Safe If they are not labeled test them to make sure they can be used safely Never use dishes with metallic trim Plastic Use only if labeled Microwave Safe Other plastics can melt Straw wicker and wood Use only for short term heating as they can be flammable Not Recommended Glass jars and bot...

Page 17: ... liquids such as soup or hot choco late should be shaken or stirred when cooking is complete Let liquids stand a moment before serv ing When heating baby food stir well and test the temperature before serving Adding Moisture Microwave energy is attracted to water molecules Food that is uneven in moisture content should be covered or allowed to stand so that the heat dis perses evenly Add a small a...

Page 18: ...ions towards the outside of the dish Cover with wax paper Turn over when the cooking time is half up Cook until juices run clear and meat near the bone is no longer pink Let stand 5 10 min GUIDE for Cooking Poultry in Your Microwave Place poultry on a microwave safe roasting rack in a microwave safe dish Cover poultry with wax paper to prevent spattering Use aluminum foil to shield bone tips thin ...

Page 19: ...ved immediately GUIDE for Cooking Eggs in Your Microwave Never cook eggs in the shell and never warm hard cooked or eggs in the shell they can explode Always pierce whole eggs to keep them from bursting Cook eggs just until set they become tough if overcooked GUIDE for Cooking Vegetables in Your Microwave GUIDE for Cooking Seafood in Your Microwave Cook fish until it flakes easily with a fork Plac...

Page 20: ... lbs After each stage remove any pieces of food that are nearly defrosted Let stand covered with foil for 5 10 minutes Whole Chicken 2 5 6 0 lbs Remove giblets before freezing poultry Start defrosting with the breast side down After the first stage turn the chicken over and shield any warm portions with narrow strips of aluminum foil After the second stage again shield any warm portions with narro...

Page 21: ...Let stand for 10 minutes Remove bay leaf before serving Makes 6 servings Broccoli and Cheese Casserole 1 4 cup butter or margarine 1 4 cup chopped onion 1 1 2 Tbs flour 1 2 tsp salt 1 4 tsp dry mustard 1 8 tsp pepper 1 1 2 cups milk 1 4 cup chopped red pepper 8 oz 2 cups cheddar cheese shredded 1 pkg 9 10 oz frozen chopped broccoli thawed 4 cups cooked spiral shaped pasta 8 oz dry 1 In a 2 quart c...

Page 22: ...stir once 4 Stir in sugar salt flour celery seed and pepper Cook at High until mixture boils 30 40 sec Stir in vinegar and 1 2 cup water Cook at High until liquid boils and thickens slightly 1 2 min stir once Add bacon to dressing Pour dressing over potatoes Stir well Makes 6 servings Black Bean Soup 1 cup chopped onion 1 clove garlic minced 2 cans 15 oz each black beans drained 1 can 14 16 oz ste...

Page 23: ...oller ring are positioned correctly Using your microwave causes TV or radio interference This is similar to the interference caused by other small appliances such as hair dryers Move your microwave further away from other appliances like your TV or radio Care and Cleaning Follow these instructions to clean and care for your oven Keep the inside of the oven clean Food particles and spilled liquids ...

Page 24: ...ponsibility of the customer Exclusions of the Warranty This warranty does not cover damage due to acci dent fire flood and or other Acts of God misuse incorrect line voltage improper installation improper or unauthorized repairs commercial use or damage that occurs during shipping Customer adjustments which are explained in this owner s manual are not covered under the terms of this warranty This ...

Page 25: ... Etapa Utilice los botones numéricos 0 9 para ajustar el tiempo de cocinar Oprima el botón POWER LEVEL y los botones numéricos 0 9 para seleccionar la potencia de cocinar si es diferente a 0 Oprima el botón START para comenzar a cocinar Ajustando el Tiempo de Concinar y Niveles de Potencia Cocinando en Etapas Múltiples Utilice los botones numéricos 0 9 para ajustar el tiempo de cocinar Oprima el b...

Page 26: ...ntánea Selecione el botón Instant cook POP CORN FROZEN DINNER etc apropiado para el tipo de comida que desea cocinar oprima este botón repetidamente para pro gramar el tamaño de la porción Ajustando el Tiempo de Cocinado Si desea ajustar el tiempo de cocinado mientras el horno está en operación opri ma el botón MORE LESS repetidamente hasta llegar al tiempo deseado Usando el Cronómetro Oprima los ...

Page 27: ... a SAMSUNG Authorized Service Center Along with this Statement the Original Limited Warranty Statement and a dated Bill of Sale as Proof of Purchase must be presented to the Service Center Transportation to and from the Service Center is the responsibility of the purchaser Conditions covered are limited only to manufacturing defects in material or workmanship and only those encountered in normal u...

Page 28: ...ns un centre de réparation agréé SAMSUNG En plus de la présente garantie la garantie lim itée originale et une facture datée en tant que preuve d achat doivent être présentées au centre de réparation Le transport de l appareil au et à partir du centre de réparation demeure la responsabilité de l acheteur Les conditions couvertes ne sont limitées qu aux vices de matériaux et de fabrication dans des...

Page 29: ...rompted by oven display press PAUSE CANCEL button and turn food over Press START to resume defrosting cycle 1 Press AUTO REHEAT repeatedly to select type of dish to reheat 2 To increase serving size press the corresponding number button 3 Press START to begin reheating cycle 1 Use number buttons to set cooking time 2 To set power level at other than HIGH press POWER LEVEL and use the number button...

Reviews: