background image

20 

Appendix

Troubleshooting Guide

Before you call a repair person for your oven, check this list of possible 
problems and solutions.

Neither the oven’s display nor the oven operate.

Properly insert the plug into a grounded outlet. 

If the outlet is controlled by a wall switch, make sure the wall switch 
is turned on. 

Remove the plug from the outlet, wait ten seconds, then plug it in 
again. 

Reset the circuit breaker or replace any blown fuse.

Plug another appliance into the outlet; if the other appliance doesn’t 
work, have a qualified electrician repair the outlet. 

Plug the oven into a different outlet.

The oven’s display works, but the power won’t come 
on.

Make sure the door is closed securely.

Check to see if packing material or other material is stuck to the door 
seal. 

Check for door damage.

Press Cancel twice and re-enter all cooking instructions.

The power goes off before the set time has elapsed.

If there has not been a power outage, remove the plug from the 
outlet, wait ten seconds, then plug it in again. If there was a power 
outage, the time indicator will display “ 

 ” . Reset the clock and 

any cooking instructions. 

Reset the circuit breaker or replace any blown fuse. 

The food is cooking too slowly.

Make sure the oven is on its own 20 amp circuit line. Operating 
another appliance on the same circuit can cause a voltage drop. If 
necessary, move the oven to its own circuit.

You see sparks or arcing.

Remove any metallic utensils, cookware, or metal ties. If using foil, 
use only narrow strips and allow at least one inch between the foil 
and interior oven walls.

The turntable makes noises or sticks.

Clean the turntable, roller ring and oven floor. 

Make sure the turntable and roller ring are positioned correctly.

Using your microwave causes TV or radio interference.

This is similar to the interference caused by other small appliances, 
such as hair dryers. Move your microwave further away from other 
appliances, like your TV or radio.

Care and Cleaning

Follow these instructions to clean and care for your oven.

Keep the inside of the oven clean. Food particles and spilled liquids 
can stick to the oven walls, causing the oven to work less efficiently.

Wipe up spills immediately. Use a damp cloth and mild soap. Do not 
use harsh detergents or abrasives. 

To help loosen baked on food particles or liquids, heat two cups of 
water (add the juice of one lemon if you desire to keep the oven 
fresh) in a four-cup measuring glass at High power for five minutes 
or until boiling. Let stand in the oven for one or two minutes. 

Remove the glass tray from the oven when cleaning the oven or tray. 
To prevent the tray from breaking, handle it carefully and do not put it 
in water immediately after cooking. Wash the tray carefully in warm 
sudsy water or in the dishwasher. 

Clean the outside surface of the oven with soap and a damp cloth. 
Dry with a soft cloth. To prevent damage to the operating parts of the 
oven, don’t let water seep into the openings.

Wash the door window with very mild soap and water. Be sure to use 
a soft cloth to avoid scratching.

If steam accumulates inside or outside the oven door, wipe with a 
soft cloth. Steam can accumulate when operating the oven in high 
humidity and in no way indicates microwave leakage.

Never operate the oven without food in it; this can damage the 
magnetron tube or glass tray. You may wish to leave a cup of water 
in the oven when it is not in use to prevent damage if the oven is 
accidentally turned on.

If you have a problem you cannot solve,

please call our service line:

1-800-SAMSUNG

(1-800-726-7864)


Summary of Contents for MW1135WB

Page 1: ...ting Automatically 10 Defrosting Automatically 11 Setting Cooking Times Power Levels 12 One stage Cooking 12 Multi stage Cooking 12 Using the More Less Buttons 12 Using the Kitchen Timer 13 Demonstrat...

Page 2: ...ns should be followed including the following WARNING To reduce risk of burns electric shock fire personal injury or exposure to excessive microwave energy Read all safety instructions before using th...

Page 3: ...rage purposes Do not leave paper products cooking utensils or food in the oven when not in use Do not try to preheat oven or operate while empty Do not cook without the glass tray in place on the oven...

Page 4: ...rds A short power supply cord is provided to reduce the risk of becoming entangled in or tripping over a longer cord Longer cord sets or extension cords are available and may be used if care is exerci...

Page 5: ...________ DATE PURCHASED ____________________ PURCHASED FROM ____________________ Warranty service can only be performed by a Samsung Authorized Service Center If you should require warranty service pr...

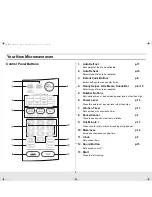
Page 6: ...eated 5 Number Buttons Set cooking times or amounts and power levels other than high 6 Power Level p 12 Press this pad to set a power level other than high 7 Kitchen Timer p 13 Sets kitchen or conveni...

Page 7: ...You must press at least three numbers to set the clock If the current time is 5 00 enter 5 0 0 3 When 5 seconds has elapsed ENTER indicator flash and Cloc will be displayed 4 Press Clock again A colon...

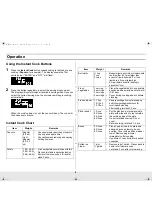
Page 8: ...ight Remarks Boil water cup 1 cup 2 cups Measure liquid pour into microwave safe container that is 2 times larger than amount of liquid Example For 1 cup liquid use a 2 cup or larger dish Stir well be...

Page 9: ...e serving 3 Press Start button to begin cooking Kids Meals Chart Item Code Weight Remarks Melt Chocolate A 1 1 cup chips Place chocolate chips in a microwave safe dish Stir well at half time when the...

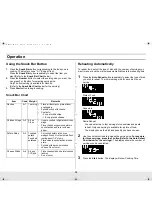
Page 10: ...food The display shows the dish and quantity you have chosen 2 Use the number buttons to increase the serving size For example for three servings press the 3 button Refer to the Auto Reheat Chart bel...

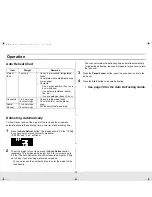
Page 11: ...weight of the food directly The oven calculates the defrosting time and starts automatically Twice during defrosting the oven will beep to let you know to turn the food over 3 Press the Pause Cancel...

Page 12: ...art and re enter all of the instructions Some recipes require different stages of cooking at different temperatures You can set multiple stages of cooking with your microwave Multi stage Cooking 1 Fol...

Page 13: ...microwave oven cannot be used until it is unlocked To unlock it repeat step 1 above Using the One Minute Button This button offers a convenient way to heat food in one minute increments at the High p...

Page 14: ...much foil can damage your oven so be careful Ceramic porcelain and stoneware Use these if they are labeled Microwave Safe If they are not labeled test them to make sure they can be used safely Never u...

Page 15: ...r areas All liquids such as soup or hot chocolate should be shaken or stirred when cooking is complete Let liquids stand a moment before serving When heating baby food stir well and test the temperatu...

Page 16: ...14 min lb for 145 F Well Done Power Level High Hi for first 5 min then Medium 50 Place roast fat side down on roasting rack Cover with wax paper Turn over when cooking time is half up Let stand 10 mi...

Page 17: ...ver the dish with a lid or vented microwavable plastic wrap Whole unpeeled vegetables such as potatoes squash eggplant etc should have their skin pricked in several spots before cooking to prevent the...

Page 18: ...until carrots and beef are tender stirring 2 to 3 times 3 Stir in peas Cover with lid Cook at Medium for 10 minutes Let stand for 10 minutes Remove bay leaf before serving Makes 6 servings Food Standa...

Page 19: ...quart casserole combine potatoes and cup water Cover with lid Cook at High until potatoes are tender 7 10 min stir twice Drain and set aside to cool slightly 2 In a medium bowl cook bacon at High unt...

Page 20: ...le and roller ring are positioned correctly Using your microwave causes TV or radio interference This is similar to the interference caused by other small appliances such as hair dryers Move your micr...

Page 21: ...ume the remaining original warranty or ninety 90 days whichever is longer This limited warranty covers manufacturing defects in materials and workmanship encountered in normal non commercial use of th...

Page 22: ...he above limitations or exclusions may not apply to you This warranty gives you specific legal rights and you may also have other rights which vary from state to state To obtain warranty service pleas...

Page 23: ...ara seleccionar el tama o de la porci n Descongelado Autom tico 1 Presione AUTO DEFROST 2 Ingrese el peso del alimento presionando el bot n de AUTO DEFROST repetidamente o con los botones num ricos 3...

Page 24: ...eeps press PAUSE CANCEL button and turn food over Press START to resume defrosting cycle Set Cooking Time and Power Levels 1 Use number buttons to set cooking time 2 To set power level at other than H...

Reviews: