background image

 · 6 · English  

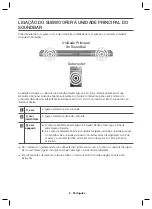
Link indicator

1. 

Plug the power cords of the Soundbar main unit and subwoofer into an AC wall outlet.

2. 

Press the 

ID SET

 button on the rear of the subwoofer with a small, pointed object for 5 seconds.


c

The LINK indicator (Blue LED) on the subwoofer blinks quickly.

3. 

Press the 

 button on your remote control for 5 seconds while the Soundbar main unit is turned OFF.

4. 

The ID SET message appears on the display of the Soundbar main unit for a short period of time, and then 
disappears.

ID SET

5. 

While the subwoofer's indicator is flashing blue, press the 

 button on your remote control or on the right 

side of the Soundbar to turn on the Soundbar main unit.

6. 

The connection is complete if the indicator on the rear of the subwoofer stops flashing and glows 
continuously.


c

If the connection process fails, the blue indicator will flash continuously. Go to Step 2 and start again.

Expand to true wireless surround sound by connecting the Samsung Wireless Rear 
Speaker Kit (SWA-8000S) to your Soundbar. (Sold separately)


c

For further information, refer to the Web Manual.

Summary of Contents for MultiXpress K430 SERIES

Page 1: ...For further information refer to the Web Manual Web manual www Samsung com Support Product name search HW K430 User Manual HW K430 ...

Page 2: ... indicates that the rated voltage marked with the symbol is DC voltage Caution Consult instructions for use This symbol instructs the user to consult the user manual for further safety related information WARNING To reduce the risk of fire or electric shock do not expose this appliance to rain or moisture CAUTION TO PREVENT ELECTRIC SHOCK MATCH WIDE BLADE OF PLUG TO WIDE SLOT FULLY INSERT This app...

Page 3: ...cable from the AC supply if the unit malfunctions Your product is not intended for industrial use It is for personal use only Condensation may occur if your product has been stored in cold temperatures If transporting the unit during the winter wait approximately 2 hours until the unit has reached room temperature before using 5 The batteries used with this product contain chemicals that are harmf...

Page 4: ...he power supply and power consumption refer to the label attached to the product Label Bottom of the Soundbar Main Unit DC 24V Power Jack DC 19V Power Jack Rear of Subwoofer Bottom of the Soundbar Main Unit DC 24V 24 4V V DC 24V 2 Power Cord 1 AC DC Adapter 3 AC DC Adapter Connecting electrical power Connecting electrical power 4 Power Cord c Make sure to rest the AC DC Adapter flat on a table or ...

Page 5: ...tor modes are listed below blue Auto connection is complete blue blinking Auto connection is not complete blue is not lit a Is the power cord plugged into the outlet If not connect the power plug to the outlet b If the power cord is plugged in correctly check the Soundbar main unit If your Soundbar main unit is off in standby mode the subwoofer will also be in standby mode and the blue LED won t b...

Page 6: ...r main unit for a short period of time and then disappears ID SET 5 While the subwoofer s indicator is flashing blue press the button on your remote control or on the right side of the Soundbar to turn on the Soundbar main unit 6 The connection is complete if the indicator on the rear of the subwoofer stops flashing and glows continuously c If the connection process fails the blue indicator will f...

Page 7: ... of the Soundbar main unit Check the OPTICAL OUT port of your TV 1 Connect the DIGITAL AUDIO IN OPTICAL jack on the Soundbar to the OPTICAL OUT jack of the TV with a digital optical cable 2 Press the button on the right side of the Soundbar or the SOURCE button on the remote control to select the D IN mode D IN c If TV sound is not output press the button on the right side of your Soundbar or the ...

Page 8: ...e to ON Then try again c If your Soundbar is connected to your TV through TV SoundConnect you can conveniently control the volume with the Soundbar s remote or the TV s remote You can also have the Soundbar turn on and off automatically when you turn the TV on or off by setting the Bluetooth POWER On function to On See page 15 c The TV SoundConnect Soundshare function is only available in some Sam...

Page 9: ...en connecting a Bluetooth device enter 0000 c In Bluetooth connection mode the Bluetooth connection will be lost if the distance between the Soundbar and the Bluetooth device exceeds 10 meters c The Soundbar automatically turns off after 5 minutes in the Ready state c The Soundbar may not perform Bluetooth search or connection correctly under the following circumstances If there is a strong electr...

Page 10: ...ay music files located on USB storage devices through the Soundbar Display DIGITAL AUDIO IN OPTICAL USB 5V 0 5A AUX IN DC 24V 24 4V V USB 5V 0 5A Micro USB to USB adapter Cable USB port 1 Connect a Micro USB to USB adapter cable with a male USB 2 0 Micro USB plug Type B on one end and a standard female 2 0 USB jack Type A on the other end to the micro USB jack on your Soundbar 2 Connect your USB d...

Page 11: ... on a stable wall that can bear the weight of the Soundbar main unit Check the strength of the wall To install the Soundbar system on a wall that may not bear the Soundbar main unit weight reinforce the wall before installation If this is not possible install the system on another wall one stable enough to bear the weight of the Soundbar main unit Purchase and use the fixing screws or anchors appr...

Page 12: ...f the B TYPE images on each end of the Guide to mark the holes for the supporting screws and then remove the Wall Mount Guide 4 Using an appropriately sized drill bit drill a hole in the wall at each marking c If the markings do not correspond to the positions of studs make sure you insert appropriate anchors or mollies into the holes before you insert the support screws If you use anchors or moll...

Page 13: ...OM THE WALL 1 To separate the Soundbar from the wall push it in the direction of the arrow lift up the left side slightly and then pull it away from the wall as shown c Do not hang onto the installed unit and avoid striking or dropping the unit c Secure the unit firmly to the wall so that it does not fall off If the unit falls off it may cause an injury or damage the product c When the unit is ins...

Page 14: ...n 5 seconds while the Soundbar is turned on 2 ON TV REMOTE appears on the Soundbar s display 3 In the TV s menu set the TV speaker to external speaker c Only the VOL and buttons are available to control the Soundbar c TV menus differ by manufacturer and model Refer to the TV s user manual for further information c This function is not available when the Soundbar is in the TV SoundConnect mode c Ma...

Page 15: ...nd OFF alternates Bluetooth POWER Press to turn the Bluetooth POWER On function on and off When the Bluetooth POWER On function is on ON BLUETOOTH POWER appears in the Soundbar s display SOUND EFFECT You can select from 6 sound modes STANDARD MUSIC CLEAR VOICE SPORTS MOVIE and NIGHT c NIGHT Mode When changing a channel or music source the volume difference between different music input sources is ...

Page 16: ...mware the latest version Update your TV with the latest firmware Does an error occur when connecting Contact the Samsung Call Centre Reset TV SoundConnect and connect again To reset the TV SoundConnect connection press and hold the p button for 5 seconds The blue indicator on the rear of the subwoofer is not lit and the subwoofer is not producing sound Is the Soundbar main unit power on Check the ...

Page 17: ...Main Unit 908 5 x 53 5 x 70 5 mm Subwoofer PS WK430 155 0 x 300 0 x 293 0 mm Operating Temperature Range 5 C to 35 C Operating Humidity Range 10 to 75 AMPLIFIER Rated Output Power Soundbar Main Unit 40W x 4 6 ohm THD 10 Subwoofer PS WK430 60W 3 ohm THD 10 Nominal specification Design and specifications are subject to change without prior notice Samsung Electronics Co Ltd reserves the right to chan...

Page 18: ...tensão nominal é CA Tensão CC Este símbolo indica que a tensão nominal é CC Cuidado consulte as instruções de utilização Este símbolo aconselha o utilizador a consultar o manual do utilizador quanto a informações de segurança AVISO Para reduzir o risco de fogo ou de choque elétrico não exponha este aparelho à chuva ou à humidade CUIDADO PARA EVITAR CHOQUES ELÉCTRICOS INSIRA TOTALMENTE A PARTE LARG...

Page 19: ...o da tomada eléctrica se a unidade não funcionar correctamente O produto não se destina a utilização industrial Utilize este produto apenas para fins pessoais Pode ocorrer condensação se o produto ou o disco tiverem sido arm zenados em temperaturas baixas Se transportar a unidade no Inverno aguarde aproximadamente 2 horas para que a unidade fique à temper tura ambiente antes de utilizar 5 As pilha...

Page 20: ...e o consumo de energia consulte a etiqueta no produto Etiqueta Parte inferior da unidade principal do Soundbar DC 24V Tomada de alimentação DC 19V Tomada de alimentação Parte de trás do Subwoofer Parte inferior da unidade principal do Soundbar DC 24V 24 4V V DC 24V 2 Cabo de alimentação 1 Transformador de CA CC 3 Transformador de CA CC Ligação à corrente eléctrica Ligação à corrente eléctrica 4 Ca...

Page 21: ...ul A ligação automática está concluída azul intermitente A ligação automática não está concluída azul apagado a O cabo de alimentação está ligado à tomada Se não estiver ligue a ficha de alimentação à tomada b Se o cabo de alimentação estiver corretamente ligado verifique a unidade principal do Soundbar Se a unidade principal do Soundbar estiver desligada em modo de espera o subwoofer também estar...

Page 22: ...undbar durante alguns minutos e depois desaparece ID SET 5 Enquanto o indicador do subwoofer estiver a piscar a azul prima o botão no controlo remoto ou no lado direito da unidade principal do Soundbar para ligar a unidade principal do Soundbar 6 A ligação está concluída se o indicador azul na parte posterior do subwoofer deixar de estar intermitente e permanecer aceso c Se o processo de ligação f...

Page 23: ...do Soundbar Verifique a porta OPTICAL OUT do seu televisor 1 Ligue a tomada fêmea DIGITAL AUDIO IN OPTICAL no Soundbar à tomada fêmea de OPTICAL OUT do televisor com um cabo ótico digital 2 Prima o botão no lado direito do Soundbar ou o botão SOURCE no controlo remoto para selecionar o modo D IN D IN c Se o televisor estiver sem som prima o botão no lado direito do Soundbar ou o botão SOURCE no co...

Page 24: ...DO Depois tente novamente c Se o Soundbar estiver ligado ao televisor através do TV SoundConnect pode controlar de forma conveniente o volume com os controlos remotos do Soundbar ou do televisor Também pode fazer com que o Soundbar se ligue ou desligue automaticamente quando liga ou desliga o televisor definindo a função Bluetooth POWER On como Ligada Consulte a página 15 c A função TV SoundConnec...

Page 25: ... ao ligar ao dispositivo Bluetooth introduza 0000 c No modo de ligação Bluetooth a ligação Bluetooth será desactivada se a distância entre o sistema Soundbar e o dispositivo Bluetooth for superior a 10 m c O Soundbar desliga se automaticamente ao fim de 5 no estado Ready c O Soundbar pode não efectuar a procura e ligação de Bluetooth correctamente nas circunstâncias seguintes Se existir um campo e...

Page 26: ...alizados nos dispositivos de armazenamento USB através do Soundbar Visor DIGITAL AUDIO IN OPTICAL USB 5V 0 5A AUX IN DC 24V 24 4V V USB 5V 0 5A Cabo adaptador micro USB para USB Porta USB 1 Ligue um cabo adaptador micro USB para USB com uma ficha macho micro USB 2 0 tipo B numa extremidade e uma tomada fêmea USB 2 0 tipo A noutra extremidade à tomada fêmea micro USB do Soundbar 2 Ligue o dispositi...

Page 27: ...da unidade principal do Soundbar Verifique a solidez da parede Para instalar o sistema do Soundbar numa parede que possa não suportar o peso da unidade principal do Soundbar reforce a parede antes da instalação Se tal não for possível instale o sistema noutra parede que seja estável o suficiente para suportar o peso da unidade principal do Soundbar Pode adquirir e utilizar os parafusos de fixação ...

Page 28: ... das imagens de B TYPE em cada extremidade do Guia para assinalar os orifícios dos parafusos de suporte e remova o Guia de suporte de parede 4 Faça um orifício na parede em cada marca com uma ferramenta de perfuração de dimensão apropriada c Se a parede não tiver qualquer suporte adicional no local das marcas certifique se de que insere as buchas e os parafusos Molly nos orifícios antes de inserir...

Page 29: ...stão fixas firmemente RETIRAR O SOUNDBAR DA PAREDE 1 Para retirar o Soundbar do suporte de parede empurre o na direção da seta e afaste o da parede conforme mostrado c Não exerça pressão sobre a unidade instalada e não sujeite a unidade a impactos ou quedas c Fixe bem a unidade à parede para que não caia Se a unidade cair poderá provocar danos pessoais ou danificar o produto c Se a unidade estiver...

Page 30: ...otão SOUND premido durante mais de 5 segundos enquanto o Soundbar estiver ligado 2 ON TV REMOTE aparece no ecrã do Soundbar 3 No menu do televisor defina o altifalante do televisor para altifalante externo c Nesta função os botões não estão disponíveis exceto VOL e os botões c Os menus do televisor variam consoante o fabricante e o modelo Consulte o manual de utilizador do televisor para obter mai...

Page 31: ...é premido as funções ON e OFF são repetidas alternadamente Bluetooth POWER Prima para ligar e desligar a função Bluetooth POWER On Quando a função Bluetooth POWER On estiver ligada ON BLUETOOTH POWER aparece no ecrã do Soundbar SOUND EFFECT Pode selecionar um de 6 modos de som STANDARD MUSIC CLEAR VOICE SPORTS MOVIE e NIGHT c Modo NIGHT Quando muda de canal ou de origem de música a diferença de vo...

Page 32: ...lize o televisor com a versão mais recente de firmware Ocorre um erro ao ligar È Contacte o centro de contacto da Samsung È Reinicie o TV SoundConnect e ligue novamente Para reiniciar a ligação do TV SoundConnect mantenha o botão premido durante 5 segundos O indicador azul no painel posterior do subwoofer não acende e o subwoofer não emite som A unidade principal do Soundbar está ligada È Verifiqu...

Page 33: ... x 70 5 mm Subwoofer PS WK430 155 0 x 300 0 x 293 0 mm Limites da temperatura de funcionamento 5 C a 35 C Limites de humidade de funcionamento 10 a 75 AMPLIFICADOR Potência nominal de saída Unidade Principal do Soundbar 40W x 4 6 OHM THD 10 Subwoofer PS WK430 60W 3 OHM THD 10 Especificação nominal A conceção e as especificações estão sujeitas a alteração sem aviso prévio A Samsung Electronics Co L...

Page 34: ...bic OMAN 800 SAMSUNG 800 726 7864 KUWAIT 183 CALL 183 2255 BAHRAIN 8000 GSAM 8000 4726 QATAR 800 CALL 800 2255 TURKEY 444 77 11 www samsung com tr support JORDAN 0800 22273 06 5777444 www samsung com levant SYRIA 962 5777444 LEBANON 961 1484 999 IRAQ 964 77 261 72220 964 75 118 92525 MOROCCO 080 100 22 55 www samsung com n_africa support Country Contact Centre Web Site Africa SOUTH AFRICA 0860 SAM...

Reviews: