


Loading paper in the tray
81
4. Media and tray
8
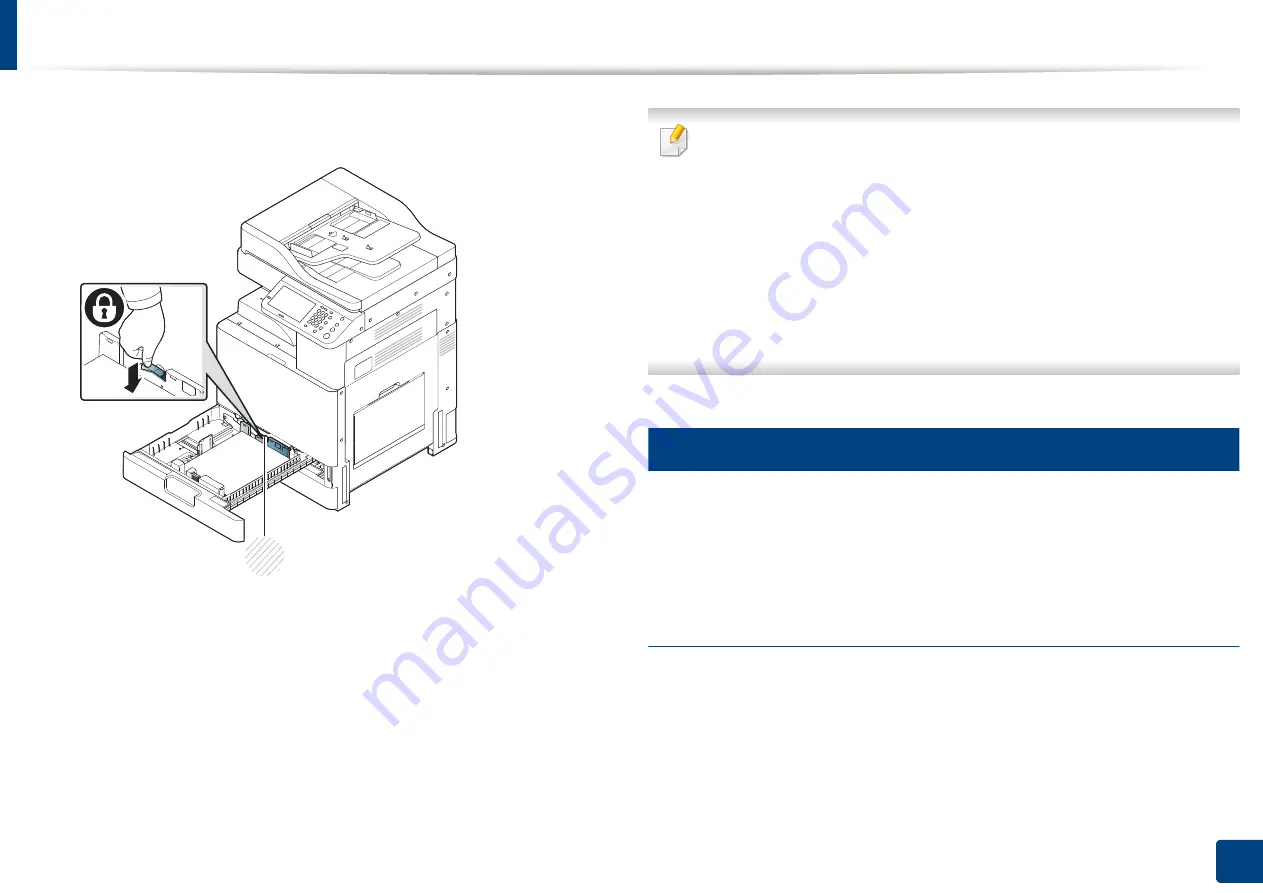
Fix the paper length guide using the locking switch. Release the locking
switch to load a different sized paper.
1
Locking switch
9
Insert the tray back into the machine.
When you print a document, set the paper type and size for the tray.
For information about setting the paper type and size on the control
panel (see "Tray Settings" on page 89).
•
If you experience problems with paper feeding, check whether the paper
meets the media specifications (see "Print media specifications" on page
393
). Then, try placing one sheet at a time in the multi-purpose tray (see
"Multi-purpose tray" on page 81).
•
The standard tray and optional dual cassette feeder can automatically
detect various-sized paper (see "Media sizes automatically detected" on
page 84).
Check if the paper size and type in the tray are detected or not. If you
want to set the paper size and type or if the machine cannot detect them,
you can set the size and type directly in the confirmation window.
6
Multi-purpose tray
The multi-purpose tray can hold special sizes and types of print material, such as
postcards, note cards, and envelopes. It is useful for single page printing on
colored paper.
Tips on using the multi-purpose tray
•
Load only one type, size, and weight of print media at a time in the multi-
purpose tray.
•
To prevent paper jams, do not add paper while printing when there is still
paper in the multi-purpose tray. This also applies to other types of print
media.
1
Summary of Contents for Multifunction MultiXpress K325 Series
Page 295: ...Redistributing toner 295 14 Maintenance 4 X322x X328x series ...
Page 296: ...Redistributing toner 296 14 Maintenance 5 K325x K330x series ...
Page 298: ...Replacing the toner cartridge 298 14 Maintenance 6 X322x X328x series ...
Page 299: ...Replacing the toner cartridge 299 14 Maintenance 7 K325x K330x series ...
Page 301: ...Replacing the imaging unit 301 14 Maintenance 8 X322x X328x series ...
Page 302: ...Replacing the imaging unit 302 14 Maintenance 9 K325x K330x series ...
Page 303: ...Replacing the imaging unit 303 14 Maintenance ...
Page 305: ...Replacing the waste toner container 305 14 Maintenance 10 X322x X328x series ...
Page 306: ...Replacing the waste toner container 306 14 Maintenance 11 K325x K330x series ...
Page 312: ...Cleaning the machine 312 14 Maintenance X322x X328x series ...
Page 313: ...Cleaning the machine 313 14 Maintenance K325x K330x series ...
Page 315: ...Cleaning the machine 315 14 Maintenance X322x X328x series ...
Page 316: ...Cleaning the machine 316 14 Maintenance ...
Page 317: ...Cleaning the machine 317 14 Maintenance K325x K330x series ...
Page 318: ...Cleaning the machine 318 14 Maintenance ...
Page 320: ...Cleaning the machine 320 14 Maintenance K325x K330x series ...
Page 324: ...Cleaning the machine 324 14 Maintenance X322x X328x series ...
Page 325: ...Cleaning the machine 325 14 Maintenance ...
Page 326: ...Cleaning the machine 326 14 Maintenance K325x K330x series ...
Page 327: ...Cleaning the machine 327 14 Maintenance ...
Page 339: ...Clearing paper jams 339 15 Troubleshooting 3 In the multi purpose tray ...
Page 341: ...Clearing paper jams 341 15 Troubleshooting Jam feed 1 Jam feed 2 ...
Page 342: ...Clearing paper jams 342 15 Troubleshooting Jam feed 3 Jam feed 4 Optional device only ...
Page 357: ...Clearing paper jams 357 15 Troubleshooting 8 In the optional finisher area ...


