background image

Installation


Do not place this apparatus near or over a radiator or heat 
register, or where it is exposed to direct sunlight.


Do not place any objects (vases etc.) containing water on this 
apparatus, as this can result in a fire or electric shock.


Do not expose this apparatus to rain or moisture.


Be sure to contact an authorized Samsung service center 
for information if you intend to install your MICRO LED in 
a location with heavy dust, high or low temperatures, high 
humidity, chemical substances, or where it will operate 24 
hours a day such as in an airport, a train station, etc. Failure to 
do so may lead to serious damage to your MICRO LED.


Do not expose this apparatus to dripping or splashing.


This MICRO LED is a consumer product designed for 
installation in a Home Environment only. Any installation 
other than a Home environment, e.g: Private Vessel (Including 
Yacht) or Private Plane or outdoors may invalidate the 
warranty.

Installing as Wall Mount


Please refer to the Installation Guide of the Wall Mount for 
details on attaching the Wall Mount.


You can install a VESA wall mount. However, it is 
recommended to use the wall mount that is provided by 
default.


When installing a VESA wall mount, it is recommended to first 
fasten all four VESA screws.

Mounting the MICRO LED on a wall

If you mount this MICRO LED on a wall, follow the 
instructions exactly as set out by the manufacturer. 
If it is not correctly mounted, the MICRO LED may 
slide or fall and cause serious injury to a child or 
adult and serious damage to the MICRO LED.


Samsung Electronics is not responsible for any damage to the 
product or injury to yourself or others if you choose to install 
the wall mount on your own.


Samsung is not liable for product damage or personal injury 
when a non-VESA or non-specified wall mount is used or 
when the consumer fails to follow the product installation 
instructions.


You can install your wall mount on a solid wall perpendicular 
to the floor. Before attaching the wall mount to surfaces other 
than plaster board, contact your nearest dealer for additional 
information. If you install the MICRO LED on a ceiling or 
slanted wall, it may fall and result in severe personal injury.


When installing a wall mount kit, we recommend you fasten 
all four VESA screws.


Do not install the MICRO LED set with being tilted.

Do not install your wall mount kit while your 
MICRO LED is turned on. This may result in 
personal injury from electric shock.


Do not use screws that are longer than the standard 
dimension or do not comply with the VESA standard screw 
specifications. Screws that are too long may cause damage to 
the inside of the MICRO LED set.


For wall mounts that do not comply with the VESA standard 
screw specifications, the length of the screws may differ 
depending on the wall mount specifications.


Do not fasten the screws too firmly. This may damage the 
product or cause the product to fall, leading to personal injury. 
Samsung is not liable for these kinds of accidents.


Always have four people mount the MICRO LED onto a wall.

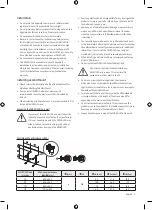
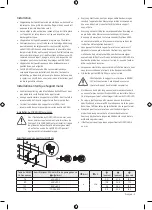
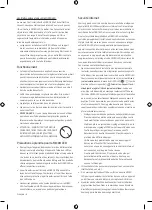
Wall Mount Specifications (VESA)

MICRO LED size 

in inches

VESA screw hole specs

(  x  ) (mm)

 (mm)

 x 4

 (inches)

 (inches)

 (inches)

76

600 x 400

6

M8

3.0

21.4

18.9

89

600 x 400

10.8

26.9

17.2

101

800 x 600

7.6

28.5

18.9

114

1000 x 800

5.9

22.2

18.9

English - 3

Summary of Contents for MNA76MS1BAC

Page 1: ...Thank you for purchasing this Samsung product To receive more complete service please registeryour product at www samsung com Model Serial No USER MANUAL...

Page 2: ...hock Referto the powerspecifications section of the manual orthe powersupplylabel on the product forvoltage and amperage information Power supplycords should be placed so that theyare not likelyto bew...

Page 3: ...Samsung Electronics is not responsible foranydamage to the product orinjurytoyourself orothers ifyou choose to install thewall mount onyourown Samsung is not liable forproduct damage orpersonal injur...

Page 4: ...lectric shock Internet security Samsung takes a numberof steps to protect its Internet compatible MICRO LEDs against unauthorized incursions and hacking Forexample certain sensitive communications bet...

Page 5: ...h This Screen Usingthe IR Cable When using the MultiView function HDMI 1 to 4 ports can be operatedvia IR cable connected to each IR Check the e Manual left directional button Settings Support Open e...

Page 6: ...ED Controller button at the bottom of the MICRO LED and then use the Control menu The Control menu appearswhen the MICRO LED Controller button is pressedwhile the MICRO LED is On Control menu MICRO LE...

Page 7: ...ICRO LED Power Press to turn the MICRO LED on oroff 1 MIC LED Used as MICwhen usingvoice recognitionwith the remote control When charging the remote controlvia the USB port the LED is lit if charging...

Page 8: ...to the remote control orpersonal injury 05 Troubleshooting and Maintenance Troubleshooting Formore information referto Troubleshooting in the e Manual left directional button Settings Support Open e M...

Page 9: ...th Remote make sure to pairthe remote to the MICRO LED To paira Samsung Smart Remote press the and buttons togetherfor3 seconds Eco Sensorand screen brightness Eco Sensoradjusts the brightness of the...

Page 10: ...dity Storage Temperature Storage Humidity 59 F to 95 F 15 C to 35 C 10 to 80 non condensing 4 F to113 F 20 C to 45 C 5 to 95 non condensing Notes This device is a Class B digital apparatus Forinformat...

Page 11: ...Licenses The terms HDMI HDMI High Definition Multimedia Interface HDMI trade dress and the HDMI Logos are trademarks orregistered trademarks of HDMI LicensingAdministrator Inc English 11...

Page 12: ...This page is intentionally left blank...

Page 13: ...Merci d avoir achet ce produit Samsung Pour recevoir une plus vaste gamme de services enregistrez votre produit au www samsung com Mod le No de s rie GUIDEDEL UTILISATEUR...

Page 14: ...d charges lectriques Reportez vous la section portant surles sp cifications lectriques du manuel ou l tiquette sur l alimentation lectrique du produit pourconna tre les renseignements surla tension le...

Page 15: ...ommag Samsung Electronics n est pas responsable des dommages caus s l appareil ni des blessures possibles occasionn es vous ou des tiers sivous tentez d installerle support vous m me Samsung ne saurai...

Page 16: ...RO LED compatibles avec Internet contre le piratage et les acc s non autoris s Parexemple certaines communications sensibles entre le MICRO LED et les serveurs Internet sont crypt es De plus le syst m...

Page 17: ...ez pas l cran Utilisation du c ble IR Lors de l utilisation de la fonction MultiView les ports HDMI 1 4 peuvent fonctionnerparl interm diaire d un c ble IR connect chaque r cepteurIR Consultez le e Ma...

Page 18: ...nde du MICRO LED situ au bas du MICRO LED et utiliserle Menu de commande Le Menu de commande appara t lorsque l on appuie surle bouton Dispositif de commande du MICRO LED pendant que le MICRO LED est...

Page 19: ...imentation Appuyez surcette touche pourmettre le MICRO LED sous ou hors tension 1 Micro DEL Sert de micro lors de l utilisation de la reconnaissancevocale avec la t l commande Levoyant DELest allum lo...

Page 20: ...u des dommages la t l commande 05 D pannage et entretien D pannage Pourplus d informations reportez vous au chapitre D pannage du e Manual touche directionnellevers la gauche Param tres Supporttech Ou...

Page 21: ...urez vous d apparierla t l commande et le MICRO LED Pourapparierune t l commande T l commande intelligente Samsung appuyez simultan ment surles touches et pendant 3 secondes CapteurEco et luminosit de...

Page 22: ...umidit enfonctionnement Temp rature d entreposage Niveau d humidit en entreposage 59 F 95 F 15 C 35 C 10 80 sans condensation 4 F 113 F 20 C 45 C 5 95 sans condensation Remarque Cet appareil est un ap...

Page 23: ...ences Les termes HDMI HDMI High Definition Multimedia Interface la pr sentation commerciale HDMI et les logos HDMI sont des marques ou des marques d pos es de HDMI LicensingAdministrator Inc Fran ais...

Page 24: ...les produits Samsung veuillez contacter le Centre de service Samsung Visitez le site de votre pays http www samsung com Country Samsung Service Center Website Address CANADA 1 800 SAMSUNG 726 7864 ww...

Reviews: