background image

GB

10

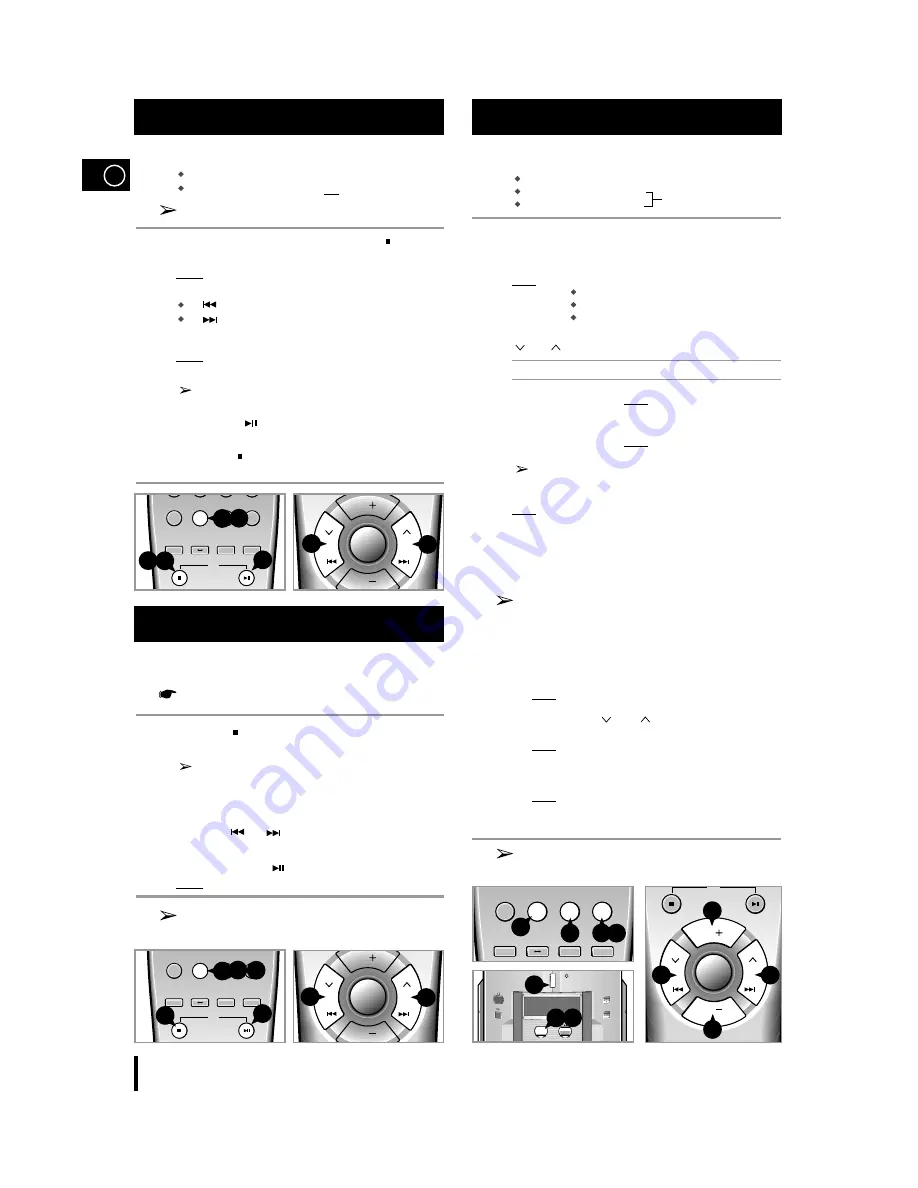
You can decide for yourself:

The order in which you listen to the tracks
The tracks to which you do not wish to listen 

This feature can be combined with the Repeat function.

1

If necessary, stop the player by pressing STOP ( ).

2

Press Program/Set.
Result:

PROGRAM and P - 01-- are displayed.

3

Select the required track by pressing the SKIP buttons:

to move backwards through the tracks
to move forwards through the tracks

4

Press Program/Set.

Result:

P - 02 -- is displayed.

5

To select other tracks, repeat Steps 

3

and 

4

.

You can programme up to 15 tracks.

6

When you have finished selecting the tracks, press
PLAY/PAUSE (

) to start listening to the selection, in the

order in which the tracks were programmed.

7

Press STOP ( ) twice to cancel the selection when the disc is
playing.

You can check and change your selection of tracks at any time.

You must have selected at least one track.

1

Press STOP ( ) once if you have started listening to the selection.

2

Press Program/Set.

Each time you press Program/Set, the next selection
is displayed.

3

Press Program/Set one or more times until the track to be
changed is displayed.

4

Press SKIP

or 

to select the new track.

5

Press Program/Set.

6

Press PLAY/PAUSE (

) to start listening to the selection.

Result:

The first track selected is played.

You can change one or more tracks in your initial
selection.

You can store up to:

15 FM stations
8 MW stations (optional)         
7 LW stations (optional)        

15 AM stations (optional)

1

Switch the system on by pressing On/Standby.

2

Press TUNER to select the radio function

3

Select the required frequency band by pressing Band.
Result:

The appropriate indication is displayed:

FM

Frequency Modulation

MW Medium Wave or AM (Amplitude Modulation)
LW

Long Wave

4

Select the station to be stored by pressing TUNING

and 

to increase or decrease the frequency respectively.

To search for a station

Press the appropriate button...

Manually

One or more times.
Result:

The station changes each time 
you press the button.

Automatically

And hold it down for at least one seconds.
Result:

The next station is found auto-
matically.

The automatic search function may stop on a frequency that
does not correspond to a radio station. If this happens, use the
manual search function.

Result:

TUNED is displayed when a station is received.

5

Adjust the volume by pressing Vol. + and Vol. -.

6

If there is noise interference on an FM  stereo station, press the
Mono/ST button once to select the mono mode. This may improve the
reception. Press the Mono/ST button again to return to the stereo
mode.

If a preset station is displayed when you are searching for a radio
station, press Tuning Mode to select the MANUAL mode and
continue searching.

7

If you do not want to store the radio station found, revert to Step 

3

to

search for another station.
Otherwise:

a

Press Program/Set.
Result:

The programme number and PROG are displayed

for a few seconds. 

b

Press  TUNING

and 

to assign a programme number

between 1 and 20 (for FM). 
Result:

The programme number is displayed. For the FM

frequency band, the over symbol is displayed to
indicate two-digit station numbers.

c

Press Program/Set to store the radio station.
Result:

PROG  is no longer displayed and the station is
stored. 

8

To store any other radio stations required, repeat Steps 

3

to 

7

.

This function can be used to assign a new station to an existing
programme number.

Programming the Order of Playback

Checking and Changing Programmed Tracks

Searching for and Storing the Radio Stations

CD

CD

VOLl.

VOL.

Tuning

Mode

CD

Sleep

Repeat

CD

A

B

+10

CD Repeat

Shuffle

Mono/ST

TUNER

Band

Program

/Set

CD

CD

4

2

6

7

1

CD

CD

VOLl.

VOL.

Tuning

Mode

CD

Sleep

Repeat

CD

A

B

+10

CD Repeat

Shuffle

Mono/ST

TUNER

Band

Program

/Set

CD

CD

3 5

2

6

1

3

3

4

4

CD

CD

CD

VOLl.

VOL.

Tuning

Mode

On/Standby

Volume

CD Repeat

A     B

Band

TUNER

CD

Sleep

Repeat

CD

A

B

+10

CD Repeat

Shuffle

Mono/ST

TUNER

Band

Program

/Set

TUNER

VOL.

VOL.

CD

CD

3

2

3

2

1

6

7

5

5

4

4

PROG

PROG

Summary of Contents for MM-L2

Page 1: ...MICRO COMPONENT SYSTEM CD R RW PLAYBACK MM L2 Instruction Manual ...

Page 2: ...d to BS1362 of the same rating must be used Never use the plug with the fuse cover omitted If the cover is detachable If a replacement fuse cover is required it must be of the same colour as the pin face of the plug Replacement covers are available from your dealer If the fitted plug is not suitable for the power points in your house or the cable is not long enough to reach a power point you shoul...

Page 3: ...nction 9 Programming the Order of Playback 10 Checking and Changing Programmed Tracks 10 TUNER Searching for and Storing the Radio Stations 10 Selecting a Stored Radio Station 11 Improving Radio Reception 11 TAPE DECK Listening to a Cassette 11 Maintaining the Sound Quality 11 Recording a Radio Programme 12 Recording a CD 12 Recommendations for Recording 12 Function to skip through 10 tracks at a ...

Page 4: ...Timer Clock button Mute button Skip Down Up buttons Fast Rewind button Playbak button Record button CD Push Open button CD button Volume button AUX button Equalizer Preset button Super Bass button Fast forward button Stop Eject button Pause button MIC JACK CONNECTOR OPTIONAL HEAD PHONES JACK CONNECTOR AM AERIAL CONNECTOR TERMINALS FM AERIAL COAXIAL CONNECTOR TERMINALS AUX INPUT LOUDSPEAKERS CONNEC...

Page 5: ... Equalizer Mode selection button Sleep button Program Set button CD Repeat button CD Repeat A B button Stop button CD Track or radio station search button Timer Clock Setting button Timer setting Timer on off button Function selection button Sound cut off button Tuner band selection button Mono Stereo button 10 CD button Shuffle button Play and pause button Volume increase button Tuning Mode butto...

Page 6: ...tem Find that the remote control is no longer operating correctly 1 Place your thumb on the position marked on the battery compartment cover rear of the remote control and push the cover in the direction of the arrow 2 Insert two AAA LR03 or equivalent batteries taking care to respect the polarities on the battery against on the remote control on the battery against on the remote control 3 Replace...

Page 7: ...he rear of the system and marked FM 75Ω Spread the T form FM aerial out and attach the ends to a wall in the position providing the best reception How to connect a COAXIAL TYPE areial optional Connect a 75Ω antenna to the FM aerial terminal Plug the connector on the FM aerial supplied into the coaxial socket 75Ω marked FM on the rear of the system Follow the instructions given on Page 8 to tune in...

Page 8: ...c 5 Press the PLAY PAUSE button Result The first track on the disc plays and the track number is displayed 6 To stop playback temporarily press the PLAY PAUSE button Press PLAY PAUSE again to continue playing the disc 7 To start playing Press at the beginning of The next track SKIP SEARCH once The current track SKIP SEARCH once The previous track SKIP SEARCH twice The track of your choice SKIP SEA...

Page 9: ...k on a compact disc All tracks on the compact disc This function is not available in the CD STOP mode 1 Press the Repeat button To repeat the Press Repeat Current track indefinitely Once REPEAT 1 is displayed Disc Twice REPEAT ALL is displayed 2 When you wish to stop the Repeat function press Repeat once more Result REPEAT is no longer displayed When you select CD Repeat A B playback the music pas...

Page 10: ...he appropriate button Manually One or more times Result The station changes each time you press the button Automatically And hold it down for at least one seconds Result The next station is found auto matically The automatic search function may stop on a frequency that does not correspond to a radio station If this happens use the manual search function Result TUNED is displayed when a station is ...

Page 11: ...o stop the playback temporarily press the PAUSE II button Press the PAUSE II button to continue listening to the cassette 7 When you have finished press the STOP EJECT button 8 To Press the Rewind the cassette REW button Fast forward the cassette F FWD button Stop the player STOP EJECT button The rewind or fast forward functions stop automatically when the beginning or end of the cassette is reach...

Page 12: ...ily press the PAUSE II button 6 When you have finished recording press the STOP EJECT button Record on normal bias cassettes only To prevent erasing a cassette that you wish to keep remove the safety tabs on the upper edge of the cassette To re record a cassette where the tabs have been broken simply cover the openings with adhesive tape It is an infringement of copyright laws to copy records and ...

Page 13: ... level and press Program Set Result The source to be selected is displayed 7 Press TUNING and to select the source to be played when the system switches on If you select You must also TAPE cassette Insert a recorded cassette in the decks before setting the system to standby TUNER radio a Select the FM or AM frequency band by pressing TUNING and b Press Program Set c Select a preset station by pres...

Page 14: ...alance suitable for rock music ROCK Result The corresponding indication is displayed Sleep Timer Equalizer Mute Function Bass Amplification System Super Bass EQ Preset S Bass Mute Sleep Repeat CD A B 10 CD Repeat Shuffle Mono ST TUNER Band Program Set Function EQ Preset S Bass Mute Sleep Mono ST TUNER Band Program Set Function On Standby Timer on off EQ Preset S Bass Mute Sleep Repeat 10 CD Repeat...

Page 15: ...he volume and balance as required Volume Equalizer S BASS Example You can watch a film and take advantage of stereo sound as if you were at the cinema provided that the original sound track is in stereo GB 15 Connecting Headphones Connecting to an External Source On Standby Volume CD Repeat A B Band Tuning Mode Up Down Timer Clock Mute EQ S Bass TUNER TAPE AUX CD AUX 3 4 You can connect a set of h...

Page 16: ... distortion 2 LW optional Signal noise ratio 32 dB Usable sensitivity 63 dB Total harmonic distortion 2 COMPACT DISC PLAYER Frequency range 20 Hz 20 KHz 54 dB Signal noise ratio 85 dB at 1 KHz with filter Distortion 0 1 at 1 KHz Channel separation 75 dB Disc sizes Diameter 120 or 80 mm Thickness 1 2 mm TAPE DECK Frequency range 125 Hz 8 KHz Signal noise ratio 45 dB Channel separation 33 dB Erasing...

Page 17: ...MEMO ...

Page 18: ...ELECTRONICS THIS APPLIANCE IS MANUFACTURED BY AH68 00954B ...

Reviews: