


2,3,4
our system is equipped with a clock which allows you to turn
your system on and off automatically.
You should set the clock:
When you first purchase the micro-component system
After a power failure
After unplugging the unit
For each step, you have a few seconds to set the required
options. If you exceed this time, you must start again.
Switch the system on by pressing Standby/On ( )
Press TIMER /CLOCK twice.
Result:
CLOCK
is displayed.
Press PROGRAM /SET.
Result: The hour flashes.
To...
Press...
Decrease the hours ..............................................
Increase the hours ..............................................
When the correct hour is displayed, press PROGRAM /SET.
Result: The minutes flash.
To...
Press...
Decrease the minutes ..........................................
Increase the minutes ...........................................
When the correct time is displayed, press PROGRAM /SET.
Result: The clock starts and is displayed, even when the system is in
standby mode.
You can display the time, even when you are using another
function, by pressing
TIMER /CLOCK
once.
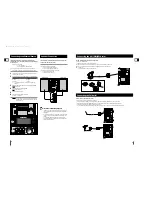
Adjust the volume according to needs with the following procedures.
Press the ,- button or turn the or – knob .
If it is desired to pause while the playback is processing, press the
CD
(
)
button.
Press the
CD
(
) button once again to play back again.
To stop playback, press the Stop (
) button.
GB
11
GB
10
Setting the Clock
1
2
3
4
5
6
7
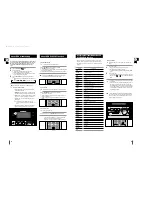
Do not use CDs of irregular shapes like heart or octagon shapes.
The performance of the player may be degraded.
Press the CD(
)button on the main unit and select CD.
Open the CD door by pushing on the top of the main unit marked
PUSH OPEN (
).
Result: The CD door is opened.
Place the CD on the compartment so that the CD label faces upward.
Close the CD door.
Result: Number of tracks and the total playback time are shown on
the display.
Press the CD(
) button to playback.
1
2
3
4
5
7
8
6
Listening to a Compact Disc
You can select the track you wish to listen to, either when the
compact disc player is stopped or when a disc is playing.
To start playback at the beginning of the...
Press...
Next track.....................................................................
once
Current track .................................................................
once
Previous track................................................................
twice
Track of your choice......................................................
or the
appropriate number of
times.
Selecting a Track
When listening to a compact disc, you can quickly search for a
specific music passage on a track.
To search through the tracks...
Press and hold down...
Forwards .........................................................
for at least one second
Backwards.........................................................
for at least one second
It is recommended that you turn the volume down before using
this function.
Searching for a Specific Music
Passage on a CD
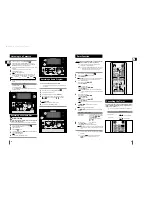
CD Repeat Function
You can repeat:
A specific track on a compact disc
All tracks on the compact disc
Press the REPEAT button.
To repeat the...
Press REPEAT...
Current track indefinitely..................... Once (REPEAT 1 is displayed)
Disc ....................................................Twice (REPEAT ALL is displayed)
When you wish to stop the Repeat function, press REPEAT a third time.
Result:REPEAT is no longer displayed and the function is cancelled.
REPEAT A-B Function
When you select CD(TAPE)
REPEAT
A
B playback, the music
passages to which you were listening are repeated 3 times.
Press CD(
) or TAPE button.
Result:The CD(TAPE) player starts playing.
Press REPEAT A
B button.
Result:The indications appear: START
The flashes appear: A
A Time is memorised.
Press REPEAT A
B button.
Result:The indications appear: END
B Time is memorised.
Your selected passages are repeated 3 times.
When you have finished the Repeat playback,
Press REPEAT A
B.
Programming the Order of Playback
You can decide for yourself:
The order in which you listen to the tracks
The tracks to which you do not wish to listen
This feature can be combined with the CD Repeat function.
If necessary, stop the player by pressing Stop (
).
Press PROGRAM / SET.
Result:
is displayed.
Select the required track by pressing the SKIP buttons:
to move forwards through the tracks
to move backwards through the tracks
Press PROGRAM / SET.
Result:
is displayed.
To select other tracks, repeat Steps 3 and 4.
You can programme up to 24 tracks.
When you have finished selecting the tracks, press CD (
) to start
listening to the selection, in the order in which the tracks were
programmed.
Press Stop (
) twice to cancel the selection when the disc is playing.
CD
TUNER
BAND
MO/ST
TIMER/CLOCK
TIMER ON/OFF
AUX
PROGRAM/SET
REP. A B
SLEEP
EQ/S.BASS
TAPE SPEED
REPEAT
TUNING
MODE
VOLUME
TUNING
MUTE
+10
POWER SOUND
DISPLAY
PTY
RDS
1
2
3
4
1
2
1
2
3
4
5
6
7
Regarding the playback of CD-R/RW
In the case of an original CD-R(Recordable) recorded in
audio CD format, CD-RW(Rewritable) and editing by the
user, playback is processed on the respective
completed status. (The player may not be played back
according to the characteristics of the CD or recorded
status.)
The CD-RW is comparably less reflexive than CD which
causes more time delay to read.
CD
VOLUME
TUNING
TA P E
REPEAT
TUNING
MODE
VOLUME
TUNING
+10
1,5,7
8
CD
VOLUME
TUNING
1,7
3
6
2,4
6
1
1
3
CD
TUNER
BAND
MO/ST
TIMER/CLOCK
TIMER ON/OFF
AUX
PROGRAM/SET
REP. A B
SLEEP
EQ/S.BASS
TAPE SPEED
MUTE
POWER SOUND
DISPLAY
PTY
RDS
CD
TA P E
SLEEP
EQ/S.BASS
TAPE SPEED
REPEAT
TUNING
MODE
VOLUME
TUNING
+10
POWER SOUND
DISPLAY
PTY
RDS
2
1
3,5,7
4,6
4,6
MM-J5-RDS(GB) 9/15/04 19:18 Page 10
Summary of Contents for MM-J5
Page 1: ......


